How to Crochet a Solid Granny Square: Simple Beginner-Friendly Guide!
Have you ever wanted to crochet a granny square that's solid, perfectly square, and looks fantastic on both sides? I'm Christa, and today, I'm going to show you how to create just that! This easy-to-follow tutorial is perfect for beginners. I'll guide you through every step, from changing colors seamlessly to creating an invisible join. You'll love how simple and satisfying it is to create these versatile squares. Plus, this pattern is a fantastic way to use up your yarn stash! So, grab your hook and yarn, and let's get started on this crochet adventure!
Why You'll Love This Solid Granny Square Pattern
This solid granny square pattern is a winner for so many reasons. First, it's incredibly beginner-friendly. If you're just starting your crochet journey, this is a great project to build your skills and confidence. The stitches are simple, and the construction is straightforward.
Second, it's a fantastic stash buster! Got a pile of leftover yarn from other projects? This is the perfect way to use those scraps and turn them into something beautiful. You can use different colors for each round, creating a unique and vibrant design.
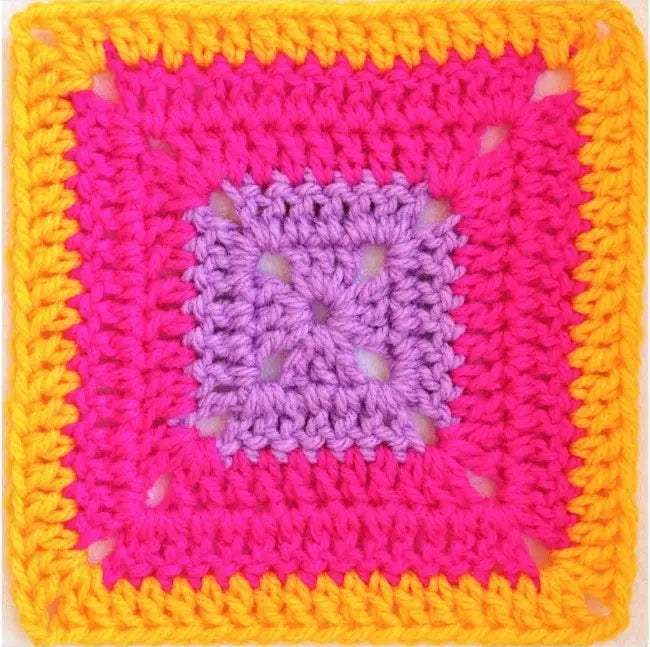
Third, the design is reversible. Both sides of the granny square look equally good. You won't have to worry about which side is "right" or "wrong." This makes it perfect for projects where both sides might be visible.
Finally, and perhaps most importantly, this pattern stays square! Unlike some granny square patterns that tend to get a little wonky as you work, this one is designed to stay perfectly square from start to finish. No more frustrating, lopsided squares!

Materials You'll Need
To make these super-easy solid granny squares, you'll need a few essential supplies:
-
Yarn: You can use any yarn you like for this project! It's a great way to experiment with different weights and fibers. I recommend using different colors for the center and the surrounding rounds to really make your granny square pop. If you're looking for quality options, check out The Secret Yarnery's yarn recommendations.
-
Crochet Hook: The size of your hook will depend on the weight of your yarn. In the video, I'm using a 6mm crochet hook with my yarn. Remember, a bigger hook will create looser stitches, resulting in a softer granny square. You can find a great selection of crochet hooks on Amazon.
-
Scissors: A standard pair of scissors for cutting your yarn.
-
Yarn Needle: You'll need a yarn needle for weaving in the ends of your yarn. I love using my Knitters Pride darning needle. Its large eye makes it super easy to thread the yarn. You can find it here.
-
Stitch Marker: A stitch marker is handy for marking the end of your round. If you don't have a stitch marker, you can use a bobby pin, safety pin, paperclip, or even just a small piece of yarn.

Abbreviations
Here are a few common crochet abbreviations that you'll encounter in this pattern:
- ch - chain
- sl st - slip stitch
- dc - double crochet
Getting Started: Making a Slip Knot
Let's start with the very beginning: making a slip knot. There are many ways to make a slip knot, but here's how I like to do it:
- Hold the tail of the yarn over your hand.
- Push the yarn onto your ring finger, making an "X" around two or three fingers.
- Push the working yarn underneath that ring and pull it down and off your fingers.
That's it! You've made a slip knot. Don't worry about making the tail too long because we're going to work over it and cut it off later.
Creating the Center Ring
Now, let's create the center ring for our granny square:
- Put the loop of the slip knot onto your crochet hook.
- Chain three. To chain, push your hook onto the yarn, turn your hook so the hook part is facing down, and drag it through that loop. Repeat this two more times for a total of three chains.
Now we will join the ring:
- Go into your first chain (the first "V").
- Hold the tail down along the side of the "U" shape.
- Get your finger in the center of that "U" because we want to keep track of it.
- Hold your finger and thumb together to hold that open.
- Grab your yarn and slip stitch to turn it into a ring. To slip stitch, grab that yarn and bring it through both loops on your hook.
Without letting go, chain three! You should now have your center ring.
Round 1: Building the First Square
This is where the magic starts to happen! We'll build the first square by following these steps:
- Chain 3 (Counts as First Double Crochet): Remember, this chain counts as your first double crochet.
- Double Crochet (DC) into the Ring: To double crochet, wrap your yarn around the hook, insert your hook into the center of the ring, grab the yarn and bring it back, wrap your yarn and take off two loops, then wrap your yarn again and take off the remaining two loops.
- Make two more double crochets into the center ring, working over the tail to secure it. The chain 3 plus the two double crochets make three double crochets total.
- Chain 2 (Corner): This creates the first corner of the granny square.
Repeat the pattern to build the sides:
- Make three more double crochets into the center ring.
- Chain 2.
- Repeat this sequence two more times to create the three sides of the granny square.
Before we finish the side, let's adjust the ring: Gently pull the ring open and push the stitches down to create more space. This will make it easier to work into the ring.
Now we will create the final side:
- Make three double crochets into the ring.
- Chain 1.
We've made it to the end of our first round and now we're going to join our hook into the third chain and pull through with a slip stitch.

Seamless Join Technique
To create that seamless join, we're going to use a clever little technique:
- Chain 1
- Single Crochet Join: Single crochet by inserting your hook, yarn over, pull up a loop, yarn over, and pull through both loops
- Chain 1 and single crochet into the top of the initial chain-3 to join.
This creates a seamless join and positions the yarn perfectly for the next round and secures the yarn in the corner.
It's very important to turn your work to prevent twisting and creating a skewed square.
Round 2: Expanding the Square
Now we will continue by expanding the square:
- Chain 3 (Counts as First Double Crochet): Remember, this chain counts as a stitch.
- Double Crochet into the Corner Space: Make one more double crochet into the same corner space.
- Stitch Marker Placement:
- Place a stitch marker in the corner space to mark the end of the round.
- The stitch marker helps prevent confusion and ensures the square grows evenly.
- Double Crochet Across:
- Make one double crochet into each of the three double crochet stitches from the previous round.
- Insert the hook into the "dimple" or top of each stitch, making sure to grab both loops of the "V".
- Corner Stitch:
- Into the corner stitch 2 double crochet, chain 2, and then 2 more double crochet.
- Repeat Around: Repeat the process of double crocheting across and creating corners until you reach the stitch marker.
- Finishing the Round:
- Remove the stitch marker.
- Make two double crochets into the corner space.
- Chain 2
- Joining the Round: Insert hook into the third chain and pull through with a slip stitch.
Changing Colors: A Seamless Transition
Let's switch colors without any messy knots or visible joins! Here's how:
- Fasten Off:
- Chain 1.
- Cut the yarn, leaving a tail for weaving in.
- Pull the yarn through the loop to secure.
- Weaving in the Tail:
- Weaving in ends prevents unraveling.
- Work the tail along the corner stitches (through the back loops).
- Weave the tail back in the opposite direction for extra security.
- Joining the New Color:
- Pick a different corner to join the new yarn.
- Place a loop of the new yarn on the hook and pull through the corner space.
- Slip stitch with both strands to join securely.
- Chain 3 (Counts as First Double Crochet): Chain two more to get the total chain 3.
Round 3 and Beyond: Continuing the Pattern
Now that you've mastered the basics, let's continue growing our granny square!
- Double Crochet into the Corner Space: Make one more double crochet into the same corner space.
- Working Across:
- Continue making one double crochet into each stitch across the side.
- The number of stitches will increase by four on each side for every round (two stitches added in each corner).
- Corners: Remember to make two double crochets, chain 2, and two double crochets in each corner space.
- Joining: Join with a chain 1 and a single crochet.
- Turning: Always turn your work after joining each round.
- Repeat: Repeat the process of working across and creating corners until the granny square reaches the desired size.
Tips for Perfect Corners
Corners are key to a perfect granny square! Here are a few tips to keep in mind:
- Ensure that your chain-2 is loose enough. If it's too tight, the corners will pucker.
- Make sure the hook goes into the correct spot for stitches.
- Adjust the square often to ensure it lays flat.
Weaving in Ends: 3 Methods
Those yarn tails can be a bit annoying, but weaving them in properly is essential for a clean and secure finish. Here are three methods you can use:
- Crochet Over the Ends:
- As demonstrated by Christa, crochet over the yarn tails as you work.
- Hold the tail against the back of the work and crochet over it, encasing it within the stitches.
- Needle Weaving:
- Thread the yarn tail onto a yarn needle.
- Weave the needle through the back of several stitches, following the path of the yarn.
- Weave in both directions for extra security.
- Securing with a Knot:
- This method is less recommended but can be used for slippery yarns.
- Carefully tie a small knot close to the work.
- Weave in the ends as described in Method 2, hiding the knot within the stitches.
Blocking Your Granny Square
Blocking is a fantastic way to give your finished granny square a professional look. It helps to even out the stitches and give the square a crisp, clean shape.
What is Blocking?: Blocking is the process of shaping and setting your finished crochet piece. There are two main methods:
- Wet Blocking:
- Dampen the granny square with water.
- Pin the square to a blocking board or a flat surface, shaping it to the desired dimensions.
- Allow it to dry completely.
- Steam Blocking:
- Use a steam iron to gently steam the granny square, being careful not to touch the iron directly to the yarn.
- Shape the square with your hands as you steam it.
- Allow it to cool and dry.
Ideas for Using Your Solid Granny Squares
Now that you've made a beautiful solid granny square, what can you do with it? The possibilities are endless! Here are just a few ideas to spark your creativity:
- Blankets and Afghans: The most classic use for granny squares! Create a cozy and colorful blanket for yourself or a loved one.
- Pillows: Add a pop of color and texture to your home decor with granny square pillows.
- Bags and Purses: Create unique and stylish accessories using granny squares.
- Garments:
- Sweaters
- Cardigans
- Vests
- Scarves and Shawls: Perfect for adding warmth and style to any outfit.
- Coasters and Placemats: Functional and decorative additions to your dining table.
- Wall Hangings: Create unique art for your home.
- Amigurumi: Use small granny squares to add detail to amigurumi projects.
- Join into Larger Projects: Be creative! Use them in other unexpected ways.
If you're looking for other easy projects, check out this blog post on easy crochet projects for beginners.

Troubleshooting: Common Issues and Solutions
Sometimes, things don't go exactly as planned. Here are a few common issues you might encounter and how to solve them:
- Square Not Staying Square:
- Make sure you're turning your work after each round.
- Check that you're making the correct number of stitches in each round.
- Holes in the Corners:
- Ensure that you're chaining two in each corner space.
- Tighten your tension slightly when working the chain-2.
- Uneven Edges:
- Pay attention to your tension throughout the project.
- Block the finished granny square to even out the edges.
- Yarn Tails Coming Loose:
- Weave in ends securely, going back and forth in both directions.
- Consider using a small amount of fabric glue to secure the ends.
Conclusion
So there you have it: a complete guide to crocheting the perfect solid granny square! This pattern is easy, versatile, and a great way to use up your yarn stash.
Now it's your turn! Grab your hook and yarn, experiment with different colors, and create your own unique granny squares. You can use them to make blankets, pillows, bags, or anything else your heart desires.
Don't forget to share your finished projects and ask questions in the comments below! And be sure to subscribe to The Secret Yarnery for more fun and easy crochet tutorials. Happy crocheting!
FAQs
1. What size hook should I use for this granny square?
The size of your hook depends on the weight of your yarn and the desired appearance of your granny square. For most medium-weight yarns, a 5mm or 6mm hook works well. Always check the yarn label for recommended hook sizes.
2. Can I use a single color instead of changing colors?
Absolutely! You can create a solid-colored granny square, which looks clean and cohesive. Changing colors is optional and adds variety, but single-color squares are just as beautiful.
3. Why are my granny squares not staying perfectly square?
This can happen if your tension is uneven or if you skip turning your work after each round. Blocking your granny square at the end will also help it stay square and flat.
4. How do I prevent my corners from curling?
Ensure you’re chaining enough in each corner (usually 2 chains) and keeping your tension even. If the corners are still curling, try loosening your stitches slightly or adding an extra chain in the corner.
5. Can this pattern be used for blankets?
Yes! These solid granny squares are ideal for blankets and throws. You can make multiple squares and stitch them together or continue adding rounds to create one large square.
6. How do I join multiple granny squares together?
There are many joining methods, including slip stitch join, whip stitch, or join-as-you-go (JAYGO). Each method has a different look, so choose one that fits your project’s aesthetic.
7. What’s the best yarn for granny squares?
Acrylic yarn is a popular choice because it's affordable, durable, and comes in a wide range of colors. Cotton yarn is also great, especially for projects like coasters, placemats, or wearables.
8. Can I use this pattern with thicker or thinner yarn?
Yes! The pattern can be adapted to any yarn thickness, from delicate lace-weight to chunky yarn. Just adjust your hook size accordingly and keep a consistent tension.
9. Do I need to block every granny square?
Blocking isn’t mandatory, but it gives a polished and professional look by shaping the square and evening out stitches. It’s especially useful when joining squares for larger projects.
10. How do I avoid holes in the granny square corners?
Ensure your chain stitches in the corners are not too loose. Maintaining tight, even tension while chaining helps minimize holes in the corners.
![]()
Christa Patel is a passionate crochet enthusiast and the creative mind behind The Secret Yarnery. With years of experience, Christa has become a trusted source of crochet tips, tutorials, and patterns for beginners and seasoned crafters alike.
Her approach to crochet is simple, fun, and inspiring—making even complex techniques accessible to everyone. She specializes in creating beginner-friendly guides and stash-busting projects that help crafters use their leftover yarn in creative ways.
Through her engaging YouTube channel and blog, Christa has built a vibrant community of yarn lovers who come together to share their creations, ask questions, and learn new techniques. When she’s not crocheting, Christa enjoys exploring new yarns and connecting with fellow crocheters around the world.
Follow Christa for more crochet inspiration:
- YouTube: The Secret Yarnery
- Website: Secret Yarnery Blog
- Instagram: @TheSecretYarnery
Join her on this cozy crochet adventure and turn your ideas into beautiful handmade projects!
About the Author
With a passion for crafting easy, beginner-friendly tutorials and patterns, Christa inspires crafters of all skill levels to unleash their creativity worldwide. She encourages yarn lovers to connect, create, and crochet a world filled with beautiful handmade treasures!
How to Crochet a Solid Granny Square: Simple Beginner-Friendly Guide!