Crochet Marble Stack Tote Part 3: Add Handles for a Stylish Finish!
Have you fallen in love with the CROCHET Marble Stack Tote yet? I know I have! If you're following along, you know we're on the final stretch. If this is your first time joining me, welcome! This tote is an easy project and this is the only video you need to complete it. Today, we're tackling the handles, which are not only functional but also a fantastic way to add your personal touch to this stylish bag. A great bag needs great handles, right? We want something sturdy enough to hold all our goodies and comfy enough to carry around all day.
In this blog post, I'm going to walk you through every step of creating those perfect handles. I'll cover everything from initial placement to adding the finishing touches. By the end, you'll have a beautiful, functional bag ready for all your adventures!
Materials You'll Need
Before we dive in, let's gather our supplies. Having everything on hand will make the process smooth and enjoyable. Here's what you'll need:
- Yarn: I used a medium-weight yarn for this project. The color is up to you, so pick something that speaks to your style! You can find a wide variety of yarn options Yarn.
- Crochet Hook: I used the recommended size for my yarn weight. Check your yarn label for the best size, but a good starting point is an H/8 (5.0 mm) hook. If you're looking for new hooks check out this selection Crochet Hooks.
- Stitch Markers: These little helpers are essential for keeping track of your stitches and handle placement. These are lifesavers Stitch Markers.
- Scissors: A sharp pair of scissors will make cutting your yarn a breeze. Here are some scissors for your consideration Scissors.
- Yarn Needle: Also known as a tapestry needle, this will help you weave in those pesky ends for a clean finish. These are useful for weaving in ends Yarn Needle.
Essential Crochet Stitches for Handles
Let's brush up on the stitches we'll be using. Don't worry if you're a beginner; I'll keep it simple and clear!
- Single Crochet (sc): This is a basic stitch. Insert your hook, yarn over, pull through, yarn over, and pull through both loops on the hook.
- Half Double Crochet (hdc): Yarn over, insert your hook, yarn over, pull through, yarn over, and pull through all three loops on the hook.
- Slip Stitch (sl st): Insert your hook, yarn over, and pull through both the stitch and the loop on your hook.
- Chain Stitch (ch): Yarn over and pull through the loop on your hook. This forms the foundation for many projects.
- Decrease (dec): This involves working two stitches together to reduce the stitch count.

Preparing the Bag for Handles
Before attaching the handles, it's important to prep your CROCHET Marble Stack Tote. Remember that last row of half double crochet? We need to make sure it's all joined up nice and tidy.
Slip stitch to join the last row. This creates a seamless finish and sets us up perfectly for the next step. I like to put a stitch marker in my yarn at this point. It helps me keep track of where I am and prevents any confusion down the road.
Laying Out the Bag and Positioning Handles
Now comes the fun part: deciding where to put those handles!
Start by lining up the bottom points of your bag. This ensures that both sides are even. Next, align the sides of the bag to determine where the top edge will be.
If your bag has bobbles or a similar design element, avoid placing the handles directly on top of them. You'll want to leave that space free for the chain loop we'll be adding later.
Even handle placement is key for a symmetrical and balanced look. Take your time with this step!
Using Stitch Markers to Mark Handle Placement
Stitch markers are our best friends for this part! They'll help us visualize exactly where our handles will begin.
Count out stitches (or bobbles, depending on your design) to ensure even spacing between the handles and any design elements. Place a stitch marker in the stitch where you want the handle to start.
Repeat this process on both the front and back sides of the bag. It's crucial to double-check that the stitch markers on the front correspond to those on the back. This will ensure that your handles are aligned correctly. Unlock Your Creativity with Meikeer Stitch Markers, and see how they add a splash of color to your bag.

Customizing Handle Placement: A Personal Choice
Remember, there's no right or wrong answer when it comes to handle placement. It's all about what feels comfortable and looks good to you!
Do you prefer handles that are close together or far apart? Short tote handles or long shoulder straps? The choice is yours!
Consider how you'll be using the bag. Will you be carrying it by hand, over your shoulder, or across your body? This will help you determine the ideal handle length and placement.
Starting the First Handle: Single Crochet to the Stitch Marker
Alright, let's get crocheting! Return your yarn to the hook and begin single crocheting along the side of the bag.
Continue single crocheting until you reach the first stitch marker. Now, here's a decision point: do you want to crochet into the stitch with the marker, or skip it? I'm going to skip it in this tutorial, but feel free to do what feels best to you.
Creating the Chain for the Handle
Time to create the chain that will form our handle! The length of the chain will determine the height of the handle, so think about what style you're going for.
For a small tote, a shorter chain will suffice. If you want a shoulder bag, you'll need a longer chain.
Keep in mind that crochet stretches a bit, so factor that into your chain length decision. I started with 26 stitches, but ultimately added 20 more for a total of 46.
Pro-Tip: It can be helpful to make a gauge swatch of the stitch you are using to determine how much your handle will stretch.
Attaching the Chain to the Bag
Before attaching the chain, make sure it isn't twisted. A twisted chain will result in a wonky handle, and nobody wants that!
Attach the chain to the other side of the bag with a single crochet stitch. If you skipped the stitch marker stitch on the other side, attach the chain to the stitch after the marker.
Continue single crocheting around the bag towards the next stitch marker.
Documenting Your Chain Length
This is super important: Write down the number of chains you created for the first handle. Trust me, you don't want to try and guess later! This will ensure that your second handle is the same size as the first.
Completing the Second Handle
Now, let's repeat the chain-making process for the second handle. Remember to use the same number of chains as the first handle!
Attach the chain to the bag using a single crochet stitch, making sure there are no twists. Continue single crocheting around the bag to the starting point.
Joining the Round and Preparing for Half Double Crochet
We're almost there! Slip stitch to join the round. Then, chain one, wrap your yarn, and begin half double crocheting into the same stitch.
Place a stitch marker in the first half double crochet to mark the beginning of the next round. This will help you keep track of your progress.

Half Double Crochet Round
Work one half double crochet into each stitch around the bag. As you work, remove the stitch markers from the handle areas.
When you reach the chain stitches, work a half double crochet into each one.
Working into the Chain Stitches: Two Options
When working into the chain stitches, you have a couple of options. You can work into the back ridges of the chain stitches for a cleaner look, or you can simply work into the stitches if the back ridges are too fiddly.
Don't worry too much about perfection; a subsequent row will hide any imperfections.
Trying on the Bag for Size
This is a crucial step: Try on the bag after completing this round! Check the handle length and adjust as needed. It's much easier to make changes now than later.
Add or remove chains to get the perfect fit. You want the handles to be comfortable and functional.
Joining the Half Double Crochet Round
Remove the stitch marker and slip stitch to join the round. The next row will be single crochet, so get ready!
Alternating Crochet Rows for Handle Width
I'm planning to alternate rows of half double crochet and single crochet to create a textured effect and add to the handle's sturdiness.
The current row will be single crochet, then half double, then single crochet. This creates a nice, balanced look.
Handle Width: Personal Preference
Again, the handle width is totally customizable! Do you want super fat handles? Super skinny ones? It's all up to you.
Slip Stitch for Stability
A final slip stitch row will make the handles less stretchy and more durable. This will ensure that your handles can withstand the weight of your bag's contents.
Single Crochet Row and Preparing for the Loop
Begin the single crochet row, working around the bag. Move the stitch markers to the current row, indicating where the chain loops will be placed.
These loops will connect to the bobbles (or other design elements) on the front of the bag. They'll help keep your bag closed and secure.
Creating the Chain Loops
Fold in the corners of the bag to determine the desired size. Calculate the length needed for the chain to reach from the back to the front bobble and back.
Aim for a snug fit, not too loose or too tight. I used a chain of 36 for my bag.
Attaching the Chain Loop
Perform a regular single crochet in the stitch where you removed the stitch marker. Follow these steps to slip stitch the chain to form a loop.
Ensure the chain isn't twisted before securing it.
Continuing the Single Crochet Row
Work single crochet stitches around the bag, keeping the chain loop out of the way.
Completing the Second Chain Loop
Repeat the chain-making and attachment process for the second loop. Use the same number of chains as the first loop for consistency.
Double-check that the chain isn't twisted before slip stitching to join.

Joining the Single Crochet Row
Slip stitch to join the final stitch of the single crochet row. Chain one to prepare for the next round (half double crochet).
Half Double Crochet Round with Chain Loops
Work half double crochet stitches around the bag. When reaching the chain loop, push it to the side and crochet into the same stitch as that row.
This secures the loop inside the bag when it's not in use.
Securing the Chain Loops
The chain loops will hang inside the bag when not in use. This keeps them out of sight and prevents them from interfering with the bag's contents.
Finishing the Half Double Crochet Round
Complete the half double crochet round and slip stitch to join.
Adding More Rounds for Handle Thickness
Continue to alternate single crochet and half double crochet rows until the handles are the desired thickness.
Final Single Crochet Row
Work a final row of single crochet stitches around the bag.
Slip Stitch Edging for Durability
Slip stitching around the top edge and handles prevents stretching and adds a finished look. Work one slip stitch into each stitch.
Mark the first slip stitch with a stitch marker, if desired.
Joining the Slip Stitch Round
Slip stitch to join the first slip stitch of the round. Chain one to secure the work. Cut the yarn and pull the loop through to fasten off.
Weaving in the Ends
Use a yarn needle to weave in all loose ends securely. This ensures a clean and professional finish.
Joining Yarn
To start a new row, connect the yarn to the project. To avoid bulkiness, don't do this in the corner. Join two stitches in from the corner to avoid adding stitches to the count.
Creating Decreases in the Corner
When slip stitching the top of the handles it's helpful to work a decrease into the corners. To do this, begin a slip stitch in the first stitch, but don't complete it. Leave the loop on the hook, go into the next stitch, grab yarn, and pull through. Now there should be three loops on hook. Wrap the yarn around the hook again and take off all three loops. This pulls the corner stitches together and keeps your edges neat. Then turn your work to work back down the handle.
Slip Stitching Along the Handle
Work one slip stitch into each stitch along the top of the handle. When reaching the original chain, work into only one loop of the chain. This creates a clean edge and prevents stretching.
Decreasing at the Second Corner
Repeat the decrease process at the second corner of the handle. Follow these steps to work two decreases and create a firm corner. This helps maintain the shape of the handle.
Joining the End and Securing the Yarn
Slip stitch to join the final stitch of the row. Chain one to secure the work. Cut the yarn and pull the loop through to fasten off.
Repeat for the Other Handle
Repeat the entire process for the second handle. This will ensure that both handles are consistent and look great.
Admire Your Work!
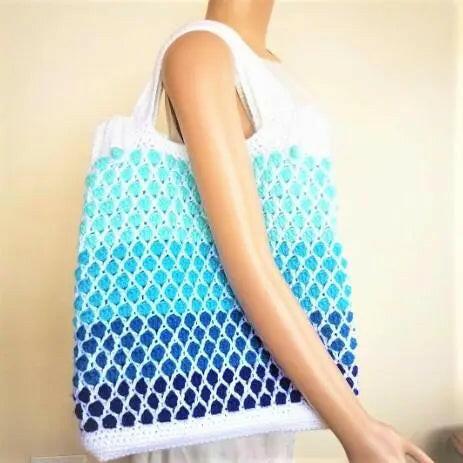
Take a moment to admire your finished CROCHET Marble Stack Tote! Look at that square shape, those neatly tucked-in ends, and those sturdy handles.
Check out the versatility of the bag as a shopping tote with optional chain loops. It’s all coming together, isn’t it?
Conclusion
Thank you so much for following along with this tutorial! I hope you enjoyed making the handles for your CROCHET Marble Stack Tote. Remember, you can find all sorts of great patterns and inspiration at Secret Yarnery.
Don't forget to like, subscribe, and share this blog post with your friends. Stay hooked for more crochet projects in the future!
Final Bag Presentation
Here is the final bag, complete with all the details we covered in this post. I just love how it turned out!
See how easy it is to open and close using the chains and bobbles? The bag looks great open, closed, and from all angles.
Call to Action: Subscribe and Explore More!
Be sure to Subscribe to my channel for more crochet tutorials and inspiration. There are so many great projects waiting for you. Also check out the Marble Stack Tote Bag, and learn how the tote came to life.
Happy crocheting!
FAQs
1. What yarn weight is best for the Marble Stack Tote handles?
A medium-weight yarn works best for creating sturdy yet flexible handles. It's durable and can withstand regular use. Feel free to experiment with different yarns for a unique finish.
2. Can I adjust the length of the handles?
Absolutely! Handle length is entirely customizable. Whether you prefer short tote handles or longer straps for a shoulder bag, you can adjust the number of chains in the tutorial to suit your needs.
3. Do I need to use stitch markers for handle placement?
Yes, using stitch markers is highly recommended. They help you evenly space the handles on both sides of the bag, ensuring a balanced and symmetrical look.
4. What’s the best way to ensure the handles don’t stretch?
You can add a slip stitch row as the final step to reinforce the handles. This extra step will reduce stretching and provide extra durability.
5. Why does the chain length for handles need to account for stretching?
Crochet stretches slightly over time, especially with weight applied to the bag. Factoring in this stretch ensures your handles maintain the desired length when in use.
6. Can I use a different stitch for the handles?
Of course! While the blog uses a combination of single crochet, half double crochet, and slip stitches, you can experiment with other stitches. Just ensure the stitch creates a sturdy and durable handle.
7. How do I keep the chain loop from twisting?
Before attaching the chain loop to the bag, carefully lay it flat and ensure no twists occur. Double-check its orientation before slip stitching for a secure loop.
8. Can I add decorative elements to the handles?
Yes! You can adorn handles with beads, contrasting yarns, or even small appliques to add personality to your bag.
9. What should I do if my handle placements don’t match on both sides?
Double-check your stitch counts and bag alignment before attaching the handles. Use stitch markers to align both sides and ensure even placement.
10. How do I know the correct handle width?
Handle width depends on personal preference and the weight of items you'll carry. Wider handles offer better weight distribution, while thinner ones give a minimalist look.
![]()
Christa Patel is an avid crocheter, designer, and crafting enthusiast with a passion for creating beautiful and functional handmade pieces. Known for her clear, step-by-step tutorials and approachable teaching style, Christa has inspired countless beginners and experts to pick up their hooks and let their creativity shine.
With over 10 years of experience, Christa specializes in designing practical projects—like totes, blankets, and home decor items—that combine style and utility. Her unique patterns often include detailed instructions and customization tips, making each project adaptable to individual tastes.
When she’s not crocheting, Christa enjoys connecting with fellow crafters through her blog, Secret Yarnery, as well as her engaging YouTube tutorials. Her mission is to spread the joy of crochet, one stitch at a time.
From quick beginner projects to all-day creative challenges, she’s here to help you transform yarn into masterpieces. Be sure to explore her website and subscribe to her channel for more inspiration and exclusive new patterns.
Stay hooked and happy crocheting!
About the Author
With a passion for crafting easy, beginner-friendly tutorials and patterns, Christa inspires crafters of all skill levels to unleash their creativity worldwide. She encourages yarn lovers to connect, create, and crochet a world filled with beautiful handmade treasures!
Crochet Marble Stack Tote Part 3: Add Handles for a Stylish Finish!