Crochet a Stylish Yarn-On-The-Arm Bag: Beginner Step-by-Step Guide!
Have you ever wished you could crochet on the go without your yarn getting tangled or dirty? I have the perfect solution for you! The Yarn-On-The-Arm Bag is a stylish and practical way to carry your yarn while you're standing, walking, or just moving around the house. It keeps your yarn clean, easily accessible, and right by your side.
I'm excited to share this easy-to-follow guide, inspired by Krista from The Secret Yarnery! Her YouTube tutorial makes this project a breeze, even for beginners. In this post, I'll walk you through each step, from gathering your materials to adding those final touches. Get ready to crochet your own Yarn-On-The-Arm Bag and experience the freedom of portable crafting!
What is a Yarn-On-The-Arm Bag?
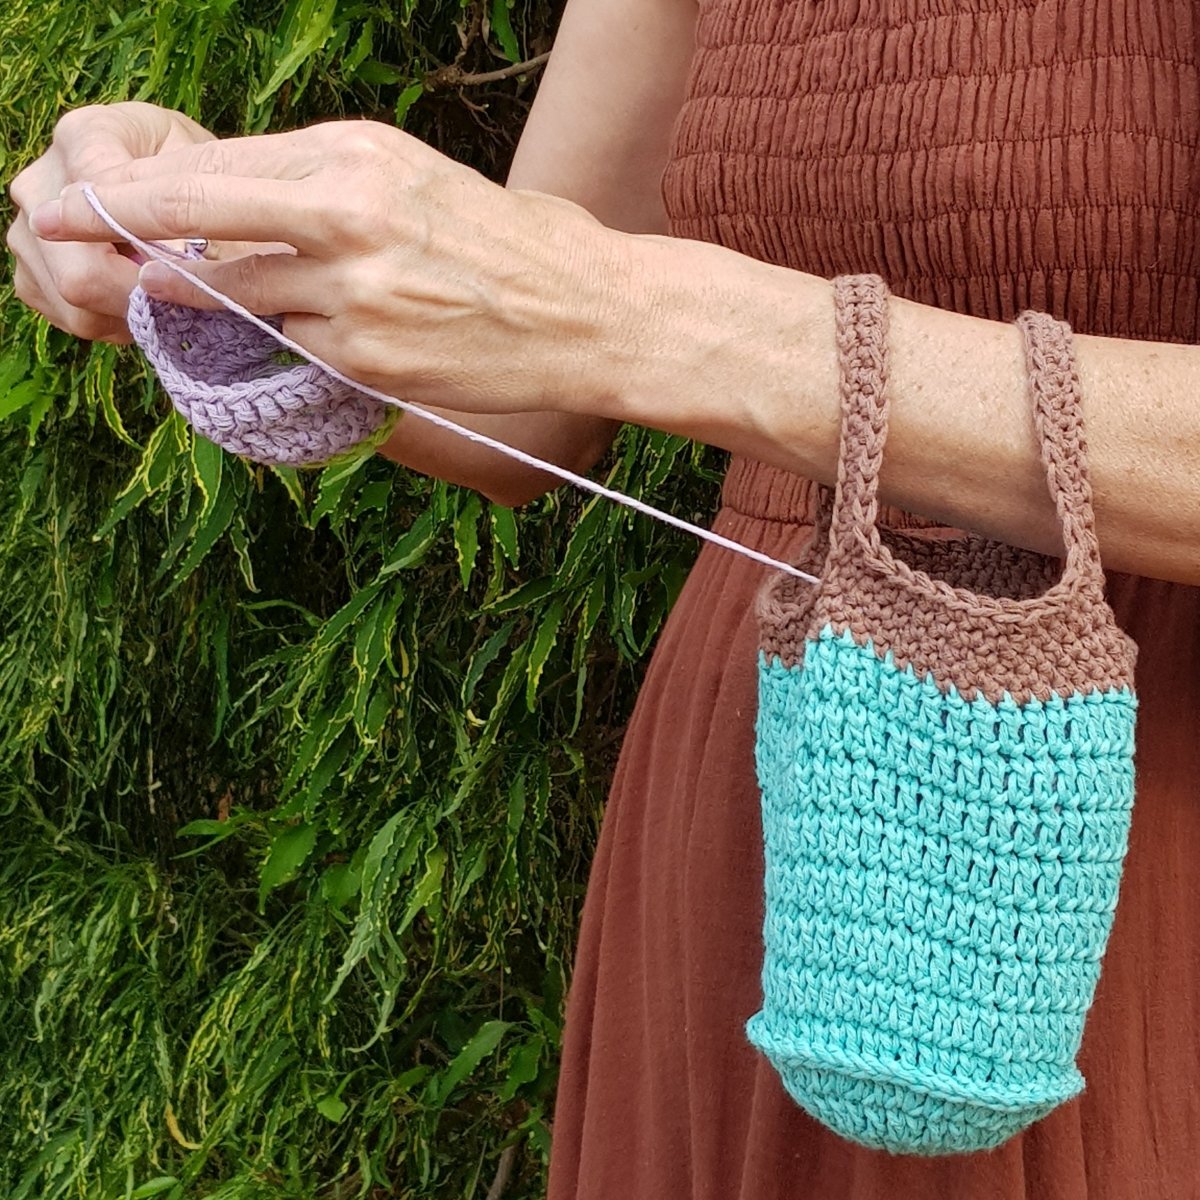
So, what exactly is a Yarn-On-The-Arm Bag? It's a small, sweet little bag designed to hold a single ball of yarn. Think of it as a personal yarn caddy! It's not meant for big projects, but rather for keeping that one skein you're currently working with safe, clean, and readily available. This is especially helpful when you want to crochet while standing, walking, or just moving from room to room. No more chasing runaway yarn balls!
Materials You'll Need
Before we dive in, let's gather our supplies. Here's what you'll need to create your own Yarn-On-The-Arm Bag:
- Yarn: Krista from The Secret Yarnery uses two shades of light, natural cotton yarn, which is a weight #3 yarn. Feel free to use any colors you like!
- Crochet Hook: Krista uses a 5.5 mm crochet hook, even though the yarn label suggests a 4 mm needle. This is because gauge is important.
- Scissors: For cutting your yarn.
- Darning Needle: For weaving in those pesky ends to give your project a professional finish.
You can find a wide variety of yarn and crochet hooks on Amazon, so it's easy to get everything you need in one place.
Note: As an Amazon Associate I earn from qualifying purchases.
Tips for Choosing Colors: Consider using two contrasting colors to make your bag pop. A brighter color for the base and a neutral for the top band and handles can create a stylish look.
Abbreviations
To make this pattern easier to follow, here are some common crochet abbreviations:
- ch - chain
- dc - double crochet
- sl st - slip stitch
- sc - single crochet
- inc - increase
Gauge
Gauge is important because it affects the final size of your project. While Krista doesn't explicitly state her gauge in the video, a typical gauge for a #3 weight yarn with a 5.5mm hook is around 12-17 stitches and 15-20 rows per 4 inches in double crochet. If your gauge is different, you can adjust your hook size to achieve the correct gauge. If you're unsure about what yarn to use be sure to check the Yarn Conversion Chart.

Getting Started: The Magic Ring
Let's start with the foundation of our bag: the magic ring! This technique creates a seamless center for your crochet projects. Here's how to do it:
- Place the tail of your yarn over your non-dominant hand, holding it in place with your ring finger and thumb.
- Wrap the yarn around two fingers, forming an "X," and then around your third finger, leaving a small space. Secure it with your thumb.
- Turn your hand over, revealing a long strand and a short strand (the tail).
- Insert your hook under the short strand, hook side down.
- Grab the long strand with your hook and pull it under and through.
- Point the hook towards yourself, then away from yourself.
- Wrap the long strand around your hook.
- Release the tension and let the yarn come up, creating a loop.
- Pull the yarn through the loop on your hook.
- Release everything and straighten out the tail.
- Chain 2.
For a visual guide, check out Krista's demonstration in The Secret Yarnery YouTube video.
Beginner Tip: If you find the magic ring too fiddly, you can use a chain 2 or chain 3 method instead. Simply chain 2 or 3, slip stitch to form a ring, and then work your stitches into the center of that ring.
Round 1: Building the Base
Now that we have our magic ring, it's time to build the base of the bag:
- Chain 2 (this counts as a double crochet).
- Make 11 double crochets into the magic ring, working over the tail of the yarn to secure it.
In total, you should have 12 stitches in this round (including the chain 2).
Counting Tip: It's easy to lose count, especially in the first round. Use a stitch marker to mark the beginning of the round, or simply count carefully as you go.
Round 2: Increasing the Circle
In this round, we'll increase the size of our circle:
- Chain 2.
- Place two double crochets into each stitch from the previous round.
You should have a total of 24 stitches at the end of this round.
Weaving Tip: To further secure the tail from the magic ring, weave it in as you crochet. Simply hold the tail along the top of your work and crochet over it.

Round 3: Continuing the Increase
Let's continue increasing the base:
- Chain 2.
- Place two double crochets into the next stitch (increase).
- Place one double crochet into the next stitch.
- Alternate between an increase and a single double crochet around the round.
At the end of this round, you should have 36 stitches.
Increase Tip: An increase stitch is simply two double crochets worked into the same stitch.
Round 4: Final Increase Round
This is the final round of increasing the base:
- Chain 2.
- Place one double crochet into each of the next two stitches.
- Place two double crochets into the next stitch (increase).
- Alternate between two single double crochets and an increase around the round.
You should have a total of 48 stitches after this round.
Flat Circle Tip: If your circle starts to ripple or cone, you may be increasing too much or too little. Adjust your tension or the number of increases per round to keep it flat.
Joining the Rounds
To join each round, we'll use a slip stitch:
- Locate the second chain of the initial chain 2.
- Insert your hook, yarn over, and pull through all loops on the hook.
Krista prefers a chain 2 instead of a chain 3 because it creates a tighter, less noticeable join.
Creating the Sides: Back Post Double Crochet Round
Now, let's start building the sides of the bag with a special stitch: the back post double crochet (BPdc). This creates a lovely textured edge at the bottom:
- Chain 3.
- Insert your hook from back to front around the post of the double crochet stitch from the previous round.
- Yarn over and complete the double crochet as usual.
- Repeat this around the entire round.
The BPdc creates a nice, clean, and slightly raised edge at the bottom of the bag, adding a touch of sophistication.
Alternative Stitch: If you find the BPdc too difficult, you can simply use a regular double crochet. The bag will still work, but the edge won't be as defined.

Rounds 6-13: Double Crochet Body
Now, we'll continue building the body of the bag with simple double crochet stitches:
- Chain 1 (this does not count as a stitch).
- Place one double crochet into each stitch around.
- Repeat this for a total of eight rows, including the back post double crochet row.
Seam Tip: To keep the seam straight and less noticeable, Krista chains 1 at the beginning of each round. This helps to bulk up the seam and make it less obvious.
Changing Colors
To create the top band of the bag, we'll need to change colors:
- Finish the last stitch of the current color, but don't pull through the final loop.
- Yarn over with the new color and pull through all loops on the hook.
- Chain 1 and cut the yarn.
- Pull the yarn through to tighten the knot.
Working in the Ends
Before we start crocheting with the new color, let's weave in the end of the old color:
- Thread the end onto your darning needle.
- Weave the needle through the back of several stitches, going in different directions to secure the end.
- Trim any excess yarn.
Joining the New Color
Now, let's join the new color to start the top band:
- Insert the hook into a stitch on the side of the bag.
- Place a loop of yarn on the hook and pull it through.
- Slip stitch to join.
- Work over the tail of the yarn as you crochet.
Krista suggests joining the new color near the seam for a cleaner look, but not directly on top of it to avoid adding too much bulk.
Round 14: Single Crochet Band
Let's create the first round of the single crochet band:
- Single crochet into each stitch around.
- Use a decrease at the join to keep the seam smooth.
Decreasing at the Join
To create a seamless transition at the join, we'll use a decrease stitch:
- Insert the hook into the first stitch and pull up a loop.
- Insert the hook into the next stitch and pull up a loop.
- Yarn over and pull through all three loops on the hook.
This creates a decrease that smooths out the join and makes it less noticeable.
Rounds 15-16: Continuing the Band
Now, let's continue the single crochet band in a spiral:
- Single crochet into each stitch around for three total rows for the band.
- Use a stitch marker to keep track of the beginning of each round, if desired.

Attaching the Handles: Planning and Placement
Now comes the fun part: attaching the handles!
First, decide where you want your handles to be placed. Christa skips nine stitches and then single crochets to make a handle.
Chain for Handle
To start each handle, we'll create a chain:
- Chain 25.
Attaching the First Handle
Now, let's attach the first handle to the bag:
- Skip nine stitches from the end of the chain.
- Single crochet into the tenth stitch.
Single Crochet for first side
Next, single crochet for the first side:
- Make 14 more single crochets for a total of 15 stitches on the end of the bag.
Attaching the Second Handle
Now, let's attach the second handle:
- Skip nine stitches and into the tenth stitch do one single crochet.
Single Crochet for second side
Next, single crochet for the second side:
- Make 14 more single crochets for a total of 15 stitches on the end of the bag.
Decreasing for Handle Support
To help the handles stand up straight, we'll create a decrease where the handle meets the bag:
- Work a decrease over the last stitch of the bag and the first stitch of the chain.
- Insert your hook into the next stitch.
- Start another double crochet but leave it on your hook.
- Insert your hook into the chain stitch.
- There are three loops on your hook.
- Take all three loops off.
Working Along the Chain
Now, let's single crochet along the chain of the handle:
- Work one single crochet into each chain stitch.
- Choose a consistent method for inserting your hook into the chain (e.g., back loops only) to create a uniform look.
Decreasing at the End of the Handle
To create a smooth join at the end of the handle, we'll decrease again:
- Work a decrease over the last stitch of the chain and the first stitch of the bag.
Maintaining consistent tension throughout this process is key to a neat finish.
Completing the Round
Continue single crocheting around the top of the bag until you reach the next handle.

Final Touches: Decreasing for Support
For added support and a professional look, we'll decrease on either side of the handle:
- Decrease two stitches onto the handle and two stitches before the handle.
Finishing the Bag
We're almost there! Let's finish off the bag:
- Slip stitch into the next single crochet.
- Chain 1 and cut the yarn.
- Pull the yarn through to tighten the knot.
Weaving in the Ends
To give your bag a polished finish, it's time to weave in all those loose ends:
- Thread each end onto your darning needle.
- Weave the needle through the back of the stitches, going in different directions to secure the ends.
- Trim any excess yarn.
To prevent ends from coming loose over time, weave them in different directions and make sure they are snug.
Blocking (Optional)
Blocking can help to even out your stitches and give your bag a more professional look. To block your Yarn-On-The-Arm Bag, simply wet it, gently squeeze out any excess water, and lay it flat to dry, shaping it as you go. This is a great way to enhance the finished product.
Customization Ideas
Want to make your Yarn-On-The-Arm Bag truly unique? Here are some ideas:
- Experiment with different yarn colors and textures.
- Add embellishments such as beads, buttons, or appliques.
- Adjust the handle length to suit your preferences.
- Add a lining to the bag for extra durability.
Care Instructions
To keep your Yarn-On-The-Arm Bag looking its best, follow these care instructions:
- Wash the bag gently by hand or in a washing machine with a gentle cycle.
- Lay flat to dry.
Always check the yarn label for specific care instructions.
Why Crochet This Bag?
This bag isn't just cute, it's super practical! It's perfect for:
- Storing yarn
- Using one skein projects
- Looking stylish while you crochet!
More Crochet Projects
Looking for more fun crochet projects? Check out these tutorials from The Secret Yarnery:
- Drunken Granny Blanket: https://youtu.be/mGqpNufvjr4
- The Sober Granny Baby Blanket: https://youtu.be/nKOL0jhQdLI
Where to Find Christa and The Secret Yarnery
Want to see more from Christa and The Secret Yarnery? You can find her here:
- YouTube Channel: https://www.youtube.com/channel/UCfNkcP7KsCSlkcQ8pAkDKRQ/
- Instagram: https://www.instagram.com/secretyarnery/
- Facebook: https://www.facebook.com/secretyarnery
- Facebook Group: https://www.facebook.com/groups/secretyarnerycrochetcommunity/
- Pinterest: https://www.pinterest.com/secretyarnery/_saved/
- Twitter: https://twitter.com/TYarnery
Conclusion
Congratulations, you've crocheted your own Yarn-On-The-Arm Bag! I hope you enjoyed this tutorial and found it helpful. Now you can crochet on the go with ease and style!
Don't forget to share your creations on social media using #YarnOnTheArmBag. I can't wait to see what you make! Thanks for following along, and remember to like, subscribe, and share for more crochet tutorials. You can find more helpful crochet patterns here!
FAQs
1. What type of yarn is best for the Yarn-On-The-Arm Bag?
Light cotton yarn (weight #3) is ideal because it's durable, easy to work with, and has a clean finish. However, you can experiment with other yarn types to suit your preference.
2. Can I adjust the size of the bag?
Yes! To make the bag larger, you can add more rounds to the base by continuing the increase pattern. Similarly, adjust the sides by adding more rows of double crochet.
3. What if I can't do the magic ring technique?
If the magic ring feels too tricky, you can make a simple chain ring instead. Chain 2 or 3, slip stitch to join into a circle, and crochet into the center of it.
4. How do I ensure my stitches are even?
Maintaining consistent tension is important. Take your time, and practice if you're new to crochet. Blocking the bag at the end will also help even out stitches.
5. Can I machine wash my Yarn-On-The-Arm Bag?
Check the care label of your yarn. Many cotton yarns are machine washable on a gentle cycle, but always lay the bag flat to dry to maintain its shape.
6. Do I have to use two colors?
Not at all! You can make the whole bag in one color or mix multiple colors. The choice is entirely up to your style and creativity.
7. How can I make the bag sturdier?
To reinforce the bag, you can add a fabric lining or use thicker yarn. Adjusting the handle tension and adding decreases near the handles can also improve sturdiness.
8. What if I don't have a darning needle?
Use a smaller crochet hook to weave in the ends. While not as precise, this works well in securing the loose ends.
9. Can beginners easily follow this pattern?
Yes! The step-by-step instructions and Krista’s video tutorial make this pattern approachable for all skill levels.
10. What projects are best suited for this bag?
The Yarn-On-The-Arm Bag is perfect for smaller projects like scarves, baby items, or squares for blankets. It’s ideal for single skein tasks.
![]()
Christa Patel is an avid crochet enthusiast, designer, and blogger with a passion for creating beginner-friendly patterns. With years of experience and a commitment to sharing the joy of crafting, she specializes in simplifying complex techniques to inspire crafters of all skill levels.
Christa’s work is rooted in her love for creativity, practical designs, and making crafting accessible to everyone. Whether you're crocheting your first stitch or refining your skills, her step-by-step guides and thoughtful tutorials make crafting enjoyable and stress-free.
When she’s not crocheting, Christa enjoys exploring new yarns, teaching others her favorite crochet tips, and connecting with fellow crafters around the world. Follow her journey and discover more of her designs on her blog, social media channels, and free YouTube videos.
Connect with Christa Patel:
- Website: YourWebsiteHere.com
- Instagram: https://www.instagram.com/YourHandleHere
- Pinterest: https://www.pinterest.com/YourHandleHere/_saved/
- YouTube: https://www.youtube.com/channel/YourChannelHere
About the Author
With a passion for crafting easy, beginner-friendly tutorials and patterns, Christa inspires crafters of all skill levels to unleash their creativity worldwide. She encourages yarn lovers to connect, create, and crochet a world filled with beautiful handmade treasures!
Crochet a Stylish Yarn-On-The-Arm Bag: Beginner Step-by-Step Guide!