EASY Drunken Granny Baby Blanket Border: Add a Whimsical Touch to Your Crochet!
Ever heard of the Drunken Granny stitch? It's got a fun name and even more fun personality! I'm Christa from The Secret Yarnery, and I'm excited to share a super easy way to add a touch of whimsy and charm to your baby blankets with this fabulous Drunken Granny crochet border. This border is perfect for finishing off your treasured projects. The best part? It’s just one row, making it a super quick and satisfying project.
What I love most about this crochet border is how versatile it is. You can use any color you like – match it to your blanket for a seamless look or choose a contrasting color for a pop of fun. Whether you're a seasoned crocheter or just starting out, this simple addition can elevate your work to a whole new level. If you like to read along, I have a written pattern available too: Drunken Granny Border Pattern is written in plain English, just like I was sitting right beside you.
Table of contents
Project Overview
Before we dive in, let’s take a quick look at what you'll need and what to expect. The Drunken Granny Border adds about 2 inches (5 cm) to both the height and width of your blanket. For my baby blanket, which I’ll tell you more about in a moment, I used around 50 grams of Savor yarn from Ice Yarns. You can find similar yarn at this link.
My finished baby blanket measured 32 inches wide by 44 inches tall (81 cm x 112 cm). Keep in mind that this pattern works on anything, it doesn't have to be a baby blanket!
Here’s what you’ll need to get started:
-
A 6.0 mm crochet hook. Something like this 6.0 mm hook will work.
-
Scissors
-
A needle for weaving in those pesky ends – I recommend a blunt tip! These blunt tip needles will prevent you from splitting the yarn.

Getting Started: Preparing Your Blanket
Alright, let’s get our blankets ready! Lay your baby blanket flat with the top row facing you. You want those “pretty stitches,” the little V's, to be visible at the top edge. This is the row where we’ll start our Drunken Granny adventure.
Now, find the corner where you want to begin. Grab your border color yarn and make a loop. Place that loop on your hook, then pull it through to create a slip stitch. This secures your yarn to the corner. Don't worry about the tail just yet; we'll hold it along the side of our work to weave in later.
To start, chain one. This chain counts as our first single crochet.

Working Along the First Side
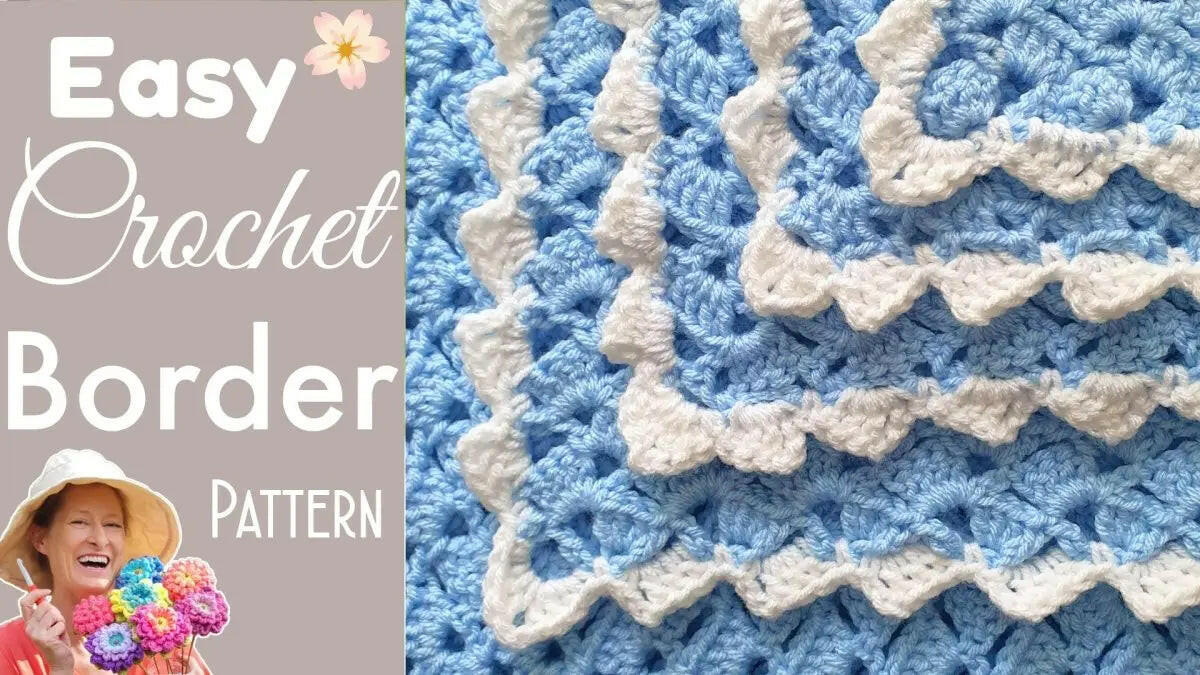
Now for the fun part! The Drunken Granny border pattern works with alternating "big spaces" and "little spaces" along the edge of your blanket. We'll be creating our “big shells” in the big spaces and using single crochets in the little spaces.
For the first "big shell," follow these steps:
- Single crochet into the big space.
- Chain three.
- Work three double crochets into that same big space.
That's it! You've created the first part of your Drunken Granny border.
Next, find the small space right after the shell you just made. Work one single crochet into that little space.
The pattern from here is simple: repeat a "big shell" (single crochet, chain three, three double crochets) in the big space, followed by a single crochet in the little space. Keep going along the edge of your blanket, alternating those shells and single crochets. If you're having trouble spotting those spaces, take a peek at the video – it really helps to see it in action. Don't feel pressured to rush! Pause the video and work along the side at your own speed. Once you do a few repeats, you'll get the hang of it.
Creating the Corner
Time to turn the corner! When you reach the corner space, it's time for a special sequence of stitches that creates a nice, rounded edge. Find the corner space, and work the following stitches all into that same space:
- One single crochet.
- One half double crochet.
- Two double crochets.
- Chain two.
- Two double crochets.
- One half double crochet.
- One single crochet.
See how the stitches after the chain two are worked in reverse order of the stitches before the chain two? That’s what creates our nice, rounded corner. I think it looks really neat!
If you're a visual learner (like me!), take a look at the finished corner in the video for reference.
Working Along the Bottom Edge
Now we're heading down to the bottom of the blanket. Here, the "big spaces" are those chain spaces you see. What about the single crochets? We’re not going to work directly into the stitch, which only has one strand of yarn. Instead, we’re going to work into the space below the stitch. This gives us a stronger and tidier bottom edge.
The Drunken Granny pattern is the same here:
- Single crochet into the space below.
- Single crochet into the big space.
- Chain three.
- Three double crochets into the big space.
See how that single crochet is worked into the space below, "pinching" everything together? It really neatens up the edge.
Pause the video and repeat the pattern along the bottom edge of your blanket. You can do it!
Second Corner
You know what time it is… another corner! When you get to the next corner, simply repeat the same sequence as before: single crochet, half double crochet, two double crochets, chain two, two double crochets, half double crochet, single crochet. Easy peasy!

Working Along the Second Side
We're on the home stretch! Remember our pattern? Big spaces get a "big shell" (single crochet, chain three, three double crochets), and little spaces get a single crochet.
So, if you’re starting with a big shell, begin with a single crochet, chain three, and three double crochets.
Pause the video and repeat this pattern along the side.
Third Corner
Almost there! Yes, you guessed it, repeat the corner sequence: single crochet, half double crochet, two double crochets, chain two, two double crochets, half double crochet, single crochet.
Working Along the Top Edge
And now for the final side! Remember those spaces? Shells go into the small spaces, and single crochets go into the spaces that are easily visible.
To start the pattern in the first space: single crochet, chain three, and three double crochets into the same space. Alternate the shells with single crochets into the next space.
Pause the video and repeat the pattern along the top edge.
Joining the Border: Standard Slip Stitch Method
You've made it all the way around! Woohoo! Now, the corner space is where your final single crochet will go. And remember that chain one we made at the very beginning? That also counts as a single crochet for this last corner.
So, do a half double crochet and two double crochets, chain two, and two double crochets into that same space, and a half double crochet all into the same corner space.
To join, slip stitch into the top of that first stitch to close the border. Chain one, cut the yarn, and pull the hook up to secure the end. And you're done!
Pro Tip: The Invisible Join
Want to take your crochet to the next level? Try an invisible join. It creates a cleaner, more professional finish, especially for delicate items like baby blankets.
Instead of joining regularly, leave your last half double crochet undone. Cut the yarn, leaving a tail long enough to weave in with a needle. Thread the yarn tail onto a needle (a blunt tip needle is best).
Insert the needle under both loops of the first stitch (where your crochet hook would normally go). Then, insert the needle back into the base of the last stitch (where the yarn tail originally emerged).
Now, adjust the tension to make the invisible join blend seamlessly with the surrounding stitches. This is a great time to customize the blanket, so shrink the join down so that it looks like a regular stitch. Weave in the ends securely, and no one will ever know where you joined! This is one of my favorite techniques.
Finishing Touches: Weaving in the Ends
Okay, so this isn't the most exciting part, but it's super important! Weaving in all those yarn ends prevents your beautiful border from unraveling. Use a yarn needle to weave the ends back and forth through several stitches on the wrong side of the blanket. Then, trim any excess yarn close to the blanket surface.
Want to go the extra mile? Blocking can help even out the stitches and give your blanket a more polished look. This is optional, but it makes a difference.
Drunken Granny Border: Design Considerations
This crochet border is so customizable! Let’s talk about some design choices.
Color Choices:
- Matching: Creates a subtle, cohesive look.
- Contrasting: Adds a pop of color and visual interest.
- Variegated/Self-Striping: Introduces a playful, dynamic element.
I suggest using the same yarn weight for the border as the blanket for a consistent texture.
Keep in mind that this tutorial focuses on a single-row border, so don't try to add additional rows.
Drunken Granny Stitch: A Brief History
The Granny stitch has a traditional, vintage appeal. The "Drunken" variation adds a twist to the classic stitch with its irregular, whimsical texture. This variation has been reinterpreted and modernized by contemporary crocheters. It's always fun to put a twist on something traditional!
The Secret Yarnery: More Crochet Resources
Want more crochet goodness? All my written patterns are available on secretyarnery.com. The Patterns page has everything you need. And don't worry, my patterns are written in plain English.
Be sure to subscribe to The Secret Yarnery for more free crochet patterns, tutorials, and inspiration. You can subscribe at this link. I also do weekly podcasts, so you can listen in while you crochet!
Project Modifications and Variations
Want to get even more creative? Here are some ideas!
- Scalloped Edge: Add a row of scallops after the Drunken Granny border for a more decorative edge.
- Picot Edge: A picot edge (small loops) can add a delicate, lacy touch.
- Beads: Incorporate beads into the border for a touch of sparkle.
- Multiple Borders: Try layering multiple rows of different colored borders for a unique effect.
This border can be used on shawls and scarves. It's so versatile!
Choosing the Right Yarn
Let's talk yarn! When choosing yarn for baby blankets, fiber content is key.
- Cotton: Soft, breathable, and machine-washable.
- Acrylic: Affordable, durable, and hypoallergenic.
- Merino Wool: Extra soft and warm but may require special care.
I suggest using a DK weight or worsted weight yarn for the border. When it comes to babies, keep in mind allergies because they will put the blankets in their mouths.
Hook Size Considerations
Using the recommended hook size for your chosen yarn weight is important. It affects the gauge (the number of stitches and rows per inch), which impacts the finished size of the blanket.
Experiment with different hook sizes to achieve the tension and fabric density you want.

Common Crochet Mistakes to Avoid
Here are some common pitfalls to watch out for:
- Tension Issues: Maintain consistent tension to prevent the border from puckering or rippling.
- Skipping Stitches: Pay close attention to the stitch count.
- Incorrect Stitch Placement: Place the stitches in the correct spaces.
- Forgetting Corners: Use the corner stitch pattern described.
- Joining Mistakes: Be careful when joining, and use the invisible join if you mess up.
Benefits of Crochet
Why crochet?
- It's relaxing and meditative.
- It's a creative outlet.
- It promotes mindfulness.
- It connects you to a community.
- You can make useful items for your home, like blankets!
Gift Giving Ideas
A Drunken Granny baby blanket is a thoughtful and personalized gift for:
- Baby showers
- Newborns
- Keepsakes for years to come
Inspiring Confidence
This tutorial empowers crocheters of all skill levels to create beautiful projects and provides a sense of accomplishment. Don’t be afraid to experiment and learn new techniques. The Secret Yarnery community is a supportive and welcoming place.
Connecting with The Secret Yarnery Community
Share your finished projects on social media using the hashtag #SecretYarnery. Ask questions and share your experiences in the comments section. I have weekly live Q&A sessions. You can also join The Secret Yarnery membership for exclusive content and support. Join at this link.
Tools of the Trade: Crochet Essentials
Here are some crochet essentials:
- Hook Sets: A variety of hook sizes. Hyperlink to crochet hooks [https://amzn.to/2p5etkC]
- Yarn Needles: With large eyes for easy threading. Hyperlink to blunt tip needles [https://amzn.to/2MRffKP]
- Sharp Scissors Hyperlink to scissors [https://amzn.to/3EC1CHy]
- Stitch Markers Hyperlink to stitch markers [https://amzn.to/3GdGCYg]
- Measuring Tape Hyperlink to measuring tape [https://amzn.to/3JviyD8]
- Ball Winder Hyperlink to ball winder [https://amzn.to/3Jzd4Y0]
Must Haves
Here are some of my personal must haves!
- Bags: Yarn Ball Storage ➡️ Hyperlink to yarn ball storage [https://amzn.to/36cbr3A]
- Bags: Large UFO Zipper Pouches ➡️ Hyperlink to large zipper pouches [https://amzn.to/3uqgQ0n]
- Bags: Regular UFO Zipper Pouches ➡️ Hyperlink to regular zipper pouches ➡️ [https://amzn.to/3DYxvLB]
- Baskets: WIPS ➡️ Hyperlink to WIPs Baskets [https://amzn.to/3tQK9te]
- Color Wheel: ➡️ Hyperlink to Color Wheel [https://amzn.to/3hJN3IG]
- Foot Warmer: ➡️ Hyperlink to foot warmer [https://amzn.to/3RaMtn0]
- Neck Light: ➡️ Hyperlink to neck light [https://amzn.to/2UYNrW4]
- Needle Threaders: ➡️ Hyperlink to needle threaders [https://amzn.to/3zdCK7S]
- Needles: Sharp Tip ➡️ Hyperlink to sharp tip needles [https://amzn.to/3qEGZWk]
- Tea: Kericho Gold ➡️ Hyperlink to Kericho Gold Tea [https://amzn.to/3zrTcB8]
- Tins: Accessories ➡️ Hyperlink to accessory tins [https://amzn.to/3EN6nxT]
Exploring the World of Crochet Stitches
There's a whole universe of crochet stitches out there! From basic stitches like single crochet, double crochet, and half double crochet, to advanced stitches like shell stitch, puff stitch, and cable stitch, the possibilities are endless.
Stitch dictionaries are a great resource for learning new and interesting stitch patterns. Experiment with different stitch combinations to create your own unique designs. You can even find some beginner crochet patterns here!
Left Handed? Right Handed?
I have tutorials for everyone!
- Right Handed Tutorial: 🍊 Right Handed Tutorial
- Left Handed Tutorial: 🍋 Left Handed Tutorial
- Left Handed Tutorials: 👈🏼 All Left Handed Tutorials
Other Ways To Support The Secret Yarnery
If you like what I do, here are other ways to show your support.
- Sign up for the newsletter! 💌 Newsletter
- Watch behind the scenes! 📺 Behind The Scenes
- Buy me a coffee! ☕ Buy Me a Coffee

Conclusion
I hope you enjoyed learning how to add this easy and fabulous Drunken Granny border to your baby blankets! With just one row, you can add a touch of whimsy and personality to your crochet projects. Now, it's your turn to try it out. Grab your yarn, hook, and get crocheting! Don't forget to share your creations with me. Stay hooked! You can find even more crochet border inspiration on this page.
FAQs
What is the Drunken Granny stitch
The Drunken Granny stitch is a playful variation of the traditional Granny stitch. It combines clusters of stitches in a whimsical way, giving the design a unique, irregular texture that's perfect for adding personality to your crochet projects.
What type of yarn is best for baby blankets
Soft, hypoallergenic yarns like cotton, acrylic, or merino wool are great choices for making baby blankets. These materials are durable and gentle on a baby’s skin. Just make sure the yarn is machine-washable for easy care.
Can I use this border on projects other than baby blankets
Yes! The Drunken Granny border is versatile and can be used on any crochet project, including shawls, scarves, or even larger throws. It's a fun way to add flair to any piece.
How much yarn do I need for the border
Approximately 50 grams of yarn is sufficient for an average-sized baby blanket border, but you can adjust depending on the size of your blanket.
How can I customize the border
You can customize the border by using contrasting colors, variegated yarns, or even adding additional rows of a scalloped or picot edge for more detail. Beads can also be incorporated for a decorative touch.
What is the invisible join, and why should I use it
The invisible join is a finishing technique that creates a seamless and professional look by avoiding a noticeable slip stitch at the end of the row. It’s ideal for projects like baby blankets that deserve a polished appearance.
How do I fix rippling or puckering in my border
Rippling is often caused by inconsistent tension or incorrect stitch counts. Ensure your stitches are even, and double-check the placement of the border stitches. Blocking can also help smooth out minor ripples.
Can I use a different hook size for the border
Yes, but it’s best to use a hook size either equal to or slightly smaller than the one used for the blanket. This ensures the border doesn’t become too loose or tight, maintaining the overall look and feel of the project.
Christa Patel is the creative mind behind the Secret Yarnery, a trusted resource for crochet enthusiasts worldwide. With years of experience, Christa specializes in designing beginner-friendly yet stunning crochet patterns that inspire creativity and confidence in crafters of all skill levels.
As a passionate crocheter, Christa is known for her clear and approachable teaching style, breaking down complex patterns into simple, easy-to-follow steps. Through her engaging video tutorials, written patterns, and helpful tips, she has cultivated a community where crocheters can connect, learn, and share their work.
Christa’s dedication to making crochet fun and accessible shines in every project she creates, from colorful blankets to intricate borders. Whether you’re a seasoned expert or just picking up a hook for the first time, Christa's guidance will help you craft something beautiful.
For more crochet patterns, tips, and inspiration, visit her website at The Secret Yarnery, or check out her YouTube channel filled with step-by-step tutorials.
About the Author
With a passion for crafting easy, beginner-friendly tutorials and patterns, Christa inspires crafters of all skill levels to unleash their creativity worldwide. She encourages yarn lovers to connect, create, and crochet a world filled with beautiful handmade treasures!
Easy Drunken Granny Border for Baby Blankets – Crochet a Perfect Edge!