Easy Plaid Crochet Blanket Pattern - Stylish Gingham Crochet Blanket!
Hooked on crochet and ready for a fun project? In this blog post, we'll explore how to make a beautiful C2C (corner-to-corner) join-as-you-go gingham blanket, guided by Christa from The Secret Yarnery. If you're looking for easy crochet patterns, inspiration, tips, and tricks, then you've come to the right place! This crochet blanket is easier than it looks and the results are stunning.
Check out the video tutorial to guide you:
What Makes This Blanket Special?
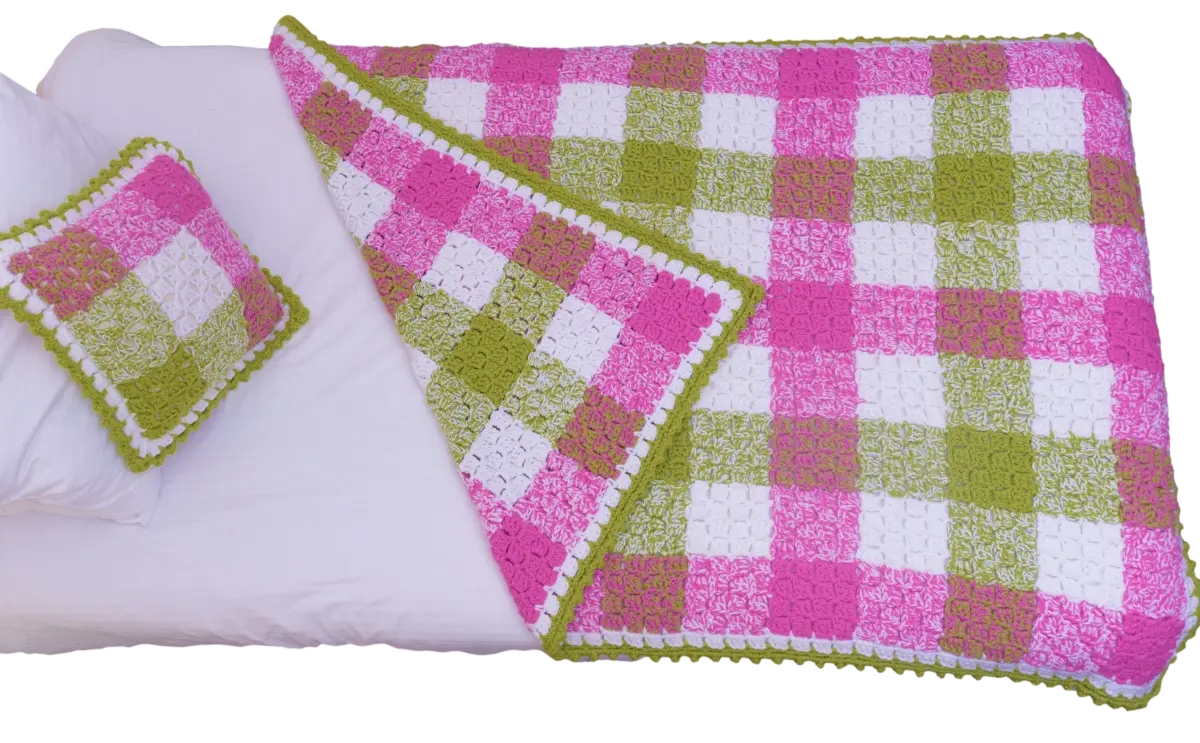
This isn't just any crochet blanket. This gingham crochet blanket is special because it mimics the look of woven gingham fabric, but it's all done with crochet! The secret is in the technique: you'll be working two strands of yarn at a time, building the blanket block by block using a corner-to-corner technique. Even if you're new to C2C, don't worry – it's beginner-friendly. Plus, the border is customizable, so you can adapt the blanket to different styles.

Border Customization
One of the best parts of this pattern is that the cute little border just kind of ties it all together. This border works great on any granny square kind of crochet blanket where there's sets of three stitches or any C2C blanket as well. If you want to jump straight to the border section of the video to add the border to an existing project check out the timestamp in the video description.
Yarn Choices: Stash Buster or Targeted Purchase?
Ready to dive into your yarn stash or planning a trip to the yarn store? Either way, this crochet blanket is a great choice.
- Stash Buster: This project is perfect for using up leftover yarn. Mix and match colors to create a unique and cozy blanket.
- Targeted Yarn Purchase: If you're buying yarn specifically for this blanket, here's what you'll need: You'll need approximately 19 x 100-gram skeins of acrylic yarn. For a planned color scheme, get two packs of each color and four packs of your background color (like white). Or, grab 6 skeins each of your two main colors (like pink and green), and 12 skeins of white.
Need some yarn? Check out these options:
If you're looking for written patterns, check out the different written patterns that can help you learn crochet.
Tools You'll Need
To make this gingham crochet blanket, you'll need a few essential tools:
- 9 mm crochet hook
- Stitch marker
- Darning needle (for weaving in ends)

Planning Your Colors with Graph Paper
Before you start crocheting, take some time to plan your color layout. Graph paper is your best friend for this! It helps you visualize how the colors will look together. Christa recommends using 1cm graph paper, which is included in the written pattern. The written pattern can be found at https://bit.ly/34ZXWni. My blanket uses a graph that is nine squares wide and 13 squares tall. Color-code the squares on the graph to represent your yarn colors. This step ensures you'll love the final result!
Decoding the Color Chart
Now, let's decode that color chart. Each square on the graph represents one block in your blanket. The color (or colors) you marked in the square tells you what yarn colors to use for that block. Remember, you'll always use two strands of yarn together.
Here are a few examples:
- If a square is marked with pink, you'll use two strands of pink yarn for that block.
- If a square is marked with both white and pink, you'll use one strand of white and one strand of pink yarn.
- If a square is empty (representing a white row), you'll use two strands of white yarn.
Here's a row-by-row guide to get you started:
- First row: pink, white/pink, green/pink, and so on.
- Second row: pink/white, white/white, green/white, and so on.
Working with Two Strands of Yarn
Working with two strands of yarn might seem tricky, but it's easier than you think. If you’re looking for beginner crochet patterns be sure to explore our website.
- Use the center pull from two separate skeins. It keeps the yarn from tangling and makes it easy to manage both strands.
- Nearing the end of your blanket and only have one skein left? No problem! Use the outside strand together with the inside strand from that single skein.
Creating Your First Block
Let's make that first C2C block!
- Make a slip knot with both strands of your chosen yarn. Remember to leave a long tail for weaving in later.
- Chain 6.
- Pinch the third chain from the hook, then chain 3 more.
- Double crochet into the fourth chain from the hook (where you pinched).
- Double crochet into the next two chains. This creates a set of 3 double crochets.
- Double crochet into the very last chain.
- You should now have a chain-3 on one side and three double crochets on the other.

Building Block Basics: The Foundation of C2C
This first block is the basic building block for the C2C technique. I know it might feel a little awkward at first, but trust me, it gets easier with practice! Before you know it, you'll master crochet.
Creating the Second Block
Now, let's add another block:
- Chain 6 again (one, two, three, pinch it, one, two, and three).
- Wrap your yarn, double crochet into the fourth chain (where you are pinching).
- Double crochet into each of the next two chains (bottom loops). You will make a set of three double crochets.
- Flip up the first block.
- Look for the chain-3 space at the top of the first block.
- Slip stitch into the chain-3 space to connect the blocks.
- Chain 3 (one, two, and three).
- Make three double crochets into the same chain-3 space.
Connecting the Blocks
The magic of C2C is in the way you connect the blocks. After completing the first few stitches of a new block, you'll slip stitch it into the chain-3 space of the adjacent block. This joins the two blocks together. Next, chain 3 to start the next part of the block.
Completing the Block: Double Crochets
After the slip stitch and chain 3, it's time to finish the block. Make three double crochets into the same chain-3 space. This completes the connection and forms the block.
Growing Your Blanket: The Repeat
Now you've got the hang of it! The process is: Chain, slip stitch, chain 3, and three double crochets. Building a staircase pattern as you work. Let's run through it again:
- Slip stitch into the chain-3 space.
- Chain 3 (one, two, three).
- Three double crochets into that space.
Adjusting the Pace
If you need to slow down or speed up this tutorial, you can adjust the playback speed on the video!

Customizing Your Size
You can make the crochet blanket to be any size you want. If you want to customize your size:
- Any multiple of two rows works (2, 4, 6, etc.).
- Ensure it's a multiple of two.
Turning the Work
Turning the piece the old-fashioned way. Slip stitching along that side to get to your chain-3 space.
We slip stitch along the edges to give you a nice crisp corner.
Building Blocks
Ready to add more blocks? Here's how:
- Rotate your work a little bit and chain 3.
- Build your blocks going all the way along your staircase again.
- Stop when you get right here.
- We're going to build one, two, and three blocks.
- Three double crochets into that first space, slip stitch into the next chain-3 space to join up that block.
- Slip stitch to the next block after each time.
Decreasing: Starting the Diagonal
Once you reach the desired width, it's time to start decreasing to form the diagonal edge.
- Chain 1 and turn your work.
- Slip 4 times, then slip stitch into the chain-3 space.
- Rotate your work a little bit and chain 3.
- Wrap your yarn three double crochets into that space, slip stitch to join up that block.
- Chain 1, turn your work, and now slip stitch into each of these double crochets going all the way up and also into our chain-3 space.
Decreasing
Let's decrease some more! Chain three, three double crochets, and slip stitch to the space to finish the block and chain one to secure your work.
Finishing the Square
Time to finish the square:
- Cut yarn, leaving a long tail for sewing.
- Pull the hook up and yarn through, then snug to secure.
- The first block is complete.
- Refer to your color chart for the next color combination.

Joining the Second Block
Let's join the second block! Here are some tips to help:
- Use a contrasting stitch marker on the top side of the blanket.
- Grab your next two colors and make a slip knot.
- I'm going to join building onto my row.
- Put your hook straight into this chain-3 space, slip stitch to join that yarn.
- We're going to chain six (one, two, three, pinch it, one, two, three).
- One double crochet into the fourth chain and one double crochet into each chain going down.
Joining
Here are some tips for how to properly join the crochet blocks:
- Slip stitch into this space to join, or you can go into the stitch.
- Try to go into that space if you can see right underneath that slip stitch.
- Try to go into there; if it's difficult, you can work into the space.
- Chain three (one, two, and three).
- You're going to slip stitch into the space or into the stitch.
Finishing
Keep going, you are almost done! Here are some tips to help finish this crochet blanket:
- At the end of the blanket, chain six and build a new block.
- Flip up your work all of your work it'll get bigger, but you're always going to just flip it up.
- Slip stitch into that chain-3 space to join up that new block.
- Chain three, one, two, three, and three double crochets into that same space (one, two, and three).
- Join in between your next block, and I'm going to try to go into that stitch, or you can also go into the space if it is tricky for you.
- Push your hook in and slip stitch.
- You want it to be nice and smooth, so I'm going to slip stitch right here into that top chain, just pushing your hook in and slip stitch to pin it down.
Decreasing the Second Block
Let's start decreasing again. For decreasing turn your work. Slip stitch right into that very same stitch just to get a nice crisp corner and one slip stitch into each stitch. That's the same as we have done for all of our blocks. Keep going and decreasing until this block is finished.
Starting the Third Block
Ready to start again? Here is how to get started on the third block:
- Refer to the color chart.
- We've done our pink and pink; we have done our white and pink.
- The next square we're going to be doing is green and pink.
- Slip knot and onto your hook, we're going to be joining into this bottom corner, right into that stitch.
- Slip stitch with both strands of yarn onto your hook and put your hook right into that stitch.
Building the Row
You're just going to keep building your row all the way along until you have finished this entire row. The first block for our second row will be white and pink.
Keeping Track
Don't forget to keep track of that stitch marker!
We would just want to make sure that we're always starting our block with our stitch marker facing up.
Slip Stitch and Join
- Slip stitch and put it on your hook.
- We're going to start building our block right into this nice open space that's waiting for us.
- Working right into the same spot to start our next block.
- Put your hook in, slip stitch, and chain six, one, two, three, pinch one, two, and three.
- You will build our block with one double crochet right where you're pinching into the fourth chain from the hook.
Starting a New Row
You're joining one row up. When finishing off our last block it's our chain three, and we just have to pin it down. Pin it down to anywhere in that corner.
Joining in the Corner
Joining in the corner is going to be awesome! There's no more chain six and building a block on the side and no more working into chains.
If you are working on the bigger one definitely tick off that block and then look what you're going to be doing next, which is white and white, so two strands of white for the next block. Make sure your stitch marker is still facing up and move it to the next block up so I know when I'm starting my next row where I need to start.
More Joining Instructions
- Slip knot and put it on your hook.
- We're going to be joining our next block or starting our next block right in the corner.
- Always going to be starting our blocks in the corner if we have a corner.
- Right into this nice little spot, and you can see it's waiting for you.
- We've already worked into it on both sides; we're going to work into it again.
- Put your hook in and slip stitch to join your new yarn.
Working the Corner
Here's how to work the corner stitch:
- Chain three, one, two, and three.
- Slip stitch right into this space, or into that stitch.
- You can always just go into the space.
- Push your hook straight in, wiggle some of that yarn onto your hook, and slip stitch.
- Chain three, one, two, and three.
- Work into this chain-3 space that we just made and put in three double crochets (one, two, and three).
- Slip stitch on this side either into the big space or into the stitch.

Finishing the Block
Build back up along our staircase the same as we always have. Three double crochets into the space, slip stitch into the space to join. Chain three and three double crochets into the space, slip stitch to join. Make sure that you have four blocks before you start your decrease.
Begin the Border
Time to add the border! Pick a corner and put your hook straight in to this corner here just how we would normally be joining a square if we were starting a new row. Get your hook in and two strands of your white yarn for the border. Join my new yarn into this corner space right here. Put your hook in and take a loop of your yarn, leaving about a six inch tail you want it long enough to sew in easily later.
Slip Stitching the Border
Drop your tail and chain two one and two. Dropping straight into the next space we're going to do a single crochet. Chain two (one, two) into the next space single crochet, and we're going to do this all the way along the edge of the blanket.
Repeating stitches
Single crochet into the space and chain two to get to the next space. The corners get a single crochet chain two and single crochet all into the same corner spot.
Finishing the corner
When you reach your corner just put your hook straight back where you started into the same spot and single crochet chain two.
Final Border Details
Do one more round on our border. So we don't have to do any fancy joining. We can just push our hook straight into the top of that chain three and slip stitch to join.
Border color details
Pick whichever color you want to use for the next round either your green or your pink or whatever colors you are using for yours. Put your hook into that corner space loop of yarn on your hook leaving a long enough tail to be able to sew in and bring it through and ## Joining the stitches
Find your sets of three in the row below, and we're just going to single crochet in between those stitches. Each of them are going to line up.

Finishing and securing your blanket
You want to cut your yarn giving yourself about 6 or 7 inches of yarn and pull that yarn straight up and through that stitch. Thread your needle into this first real stitch here our single crochet and put my needle straight as I would my hook just underneath both strands of that V and pull it through. Keep an eye on where my yarn is coming from so keep pulling it to join it up and keep an eye on that hole where the yarn came from.
End Details
Now you're going to go back down where your yarn came from that spot you were keeping an eye on and just thread your yarn back down through. That gives us a little V that looks just like any of the other stitches.
Sewing your Ends
There are two different kinds of ends, ones that end on the side and ones that end in the corner. Don't panic that it is a lot of work it's actually pretty quick.
Secure your blanket
Thread your needle and work your way back along underneath all of these stitches here under those three double crochets. Go under one of these loops of the same color yarn just to pin it on that one side. Grab a loop of your yarn and say matching colors or same colors and then go back down under those same stitches. Check out Easy Crochet Projects for Beginners for help getting started.
Closing Statement
That is it for your blanket it's complete so I hope you enjoyed this tutorial! If you did don't forget to give the thumbs up down below and share the video with someone else who you think might want to make one of these blankets and thanks so much for watching have a great day and stay hooked! You can learn more about Christa and The Secret Yarnery on their YouTube Channel! The Secret Yarnery has many amazing crochet patterns, tutorials, and inspiration for both beginners and advanced crocheters. This blanket can be a great addition to your collection of crochet blanket patterns.
FAQs
1. What is a C2C blanket?
C2C stands for Corner-to-Corner. It is a crochet technique where you work diagonally from one corner of the blanket to the opposite corner, creating small blocks to form the pattern.
2. Is this gingham crochet blanket beginner-friendly?
Yes! Even though it may seem complicated, the step-by-step instructions and video tutorials make this a great project for beginners who are familiar with basic crochet stitches like chains and double crochets.
3. How long does it take to complete this blanket?
The time it takes depends on your skill level, the size of the blanket, and how much time you dedicate to working on it. For most crocheters, it could take a couple of weeks to complete, working at a moderate pace.
4. Can I use different types of yarn for this project?
Absolutely! While acrylic yarn is suggested for its softness and durability, you can use any yarn type as long as it matches the desired gauge. Just note that the texture and final look may differ.
5. Do I need to use two strands of yarn simultaneously?
Yes, using two strands of yarn together is part of the technique to achieve that gingham look. It helps merge colors and adds depth to the blanket.
6. Can I customize the blanket size?
Definitely! You can make the blanket larger or smaller by adjusting the number of blocks or rows. Ensure your dimensions follow a multiple of 2 for easy construction.
7. What tools do I need for this project?
- 9 mm crochet hook
- Stitch markers
- Darning needle (for weaving in ends)
8. How can I prevent tangling when working with two strands of yarn?
Using the center pull from two separate skeins makes it easier to manage. If using one skein, you can take threads from both the outside and center pull.
9. What if I run out of yarn mid-project?
You can always purchase more yarn in your selected colors. Just ensure the lot numbers match if you need consistent color tones.
10. Where can I access the written patterns?
The written patterns for this blanket are available on The Secret Yarnery's website. Click here to access written patterns.
![]()
Christa Patel is the creative mind behind The Secret Yarnery, a go-to resource for crochet lovers worldwide. Based in Kenya, Christa has grown an incredibly engaged community of crochet enthusiasts through her detailed tutorials, inspiring projects, and contagious passion for crocheting.
With years of experience and a knack for making even the most complex patterns approachable, Christa offers beginner-friendly tips while challenging seasoned crocheters to push their boundaries. Her YouTube channel, blog, and shop are packed with patterns, guides, and tutorials designed to make crochet fun, relaxing, and rewarding.
Known for her unique designs and dedication to helping others, Christa has designed dozens of stunning patterns, including her renowned gingham blanket that blends creativity with simplicity. Through her work, she inspires crafters to explore their potential while creating beautiful, handmade items.
You can explore more of Christa's work on her YouTube Channel or visit her website, The Secret Yarnery, to discover more crochet patterns and projects for all skill levels.
Stay connected with Christa and let her guide you through a delightful crochet journey!
About the Author
With a passion for crafting easy, beginner-friendly tutorials and patterns, Christa inspires crafters of all skill levels to unleash their creativity worldwide. She encourages yarn lovers to connect, create, and crochet a world filled with beautiful handmade treasures!
Easy Plaid Crochet Blanket Pattern - Stylish Gingham Crochet Blanket!