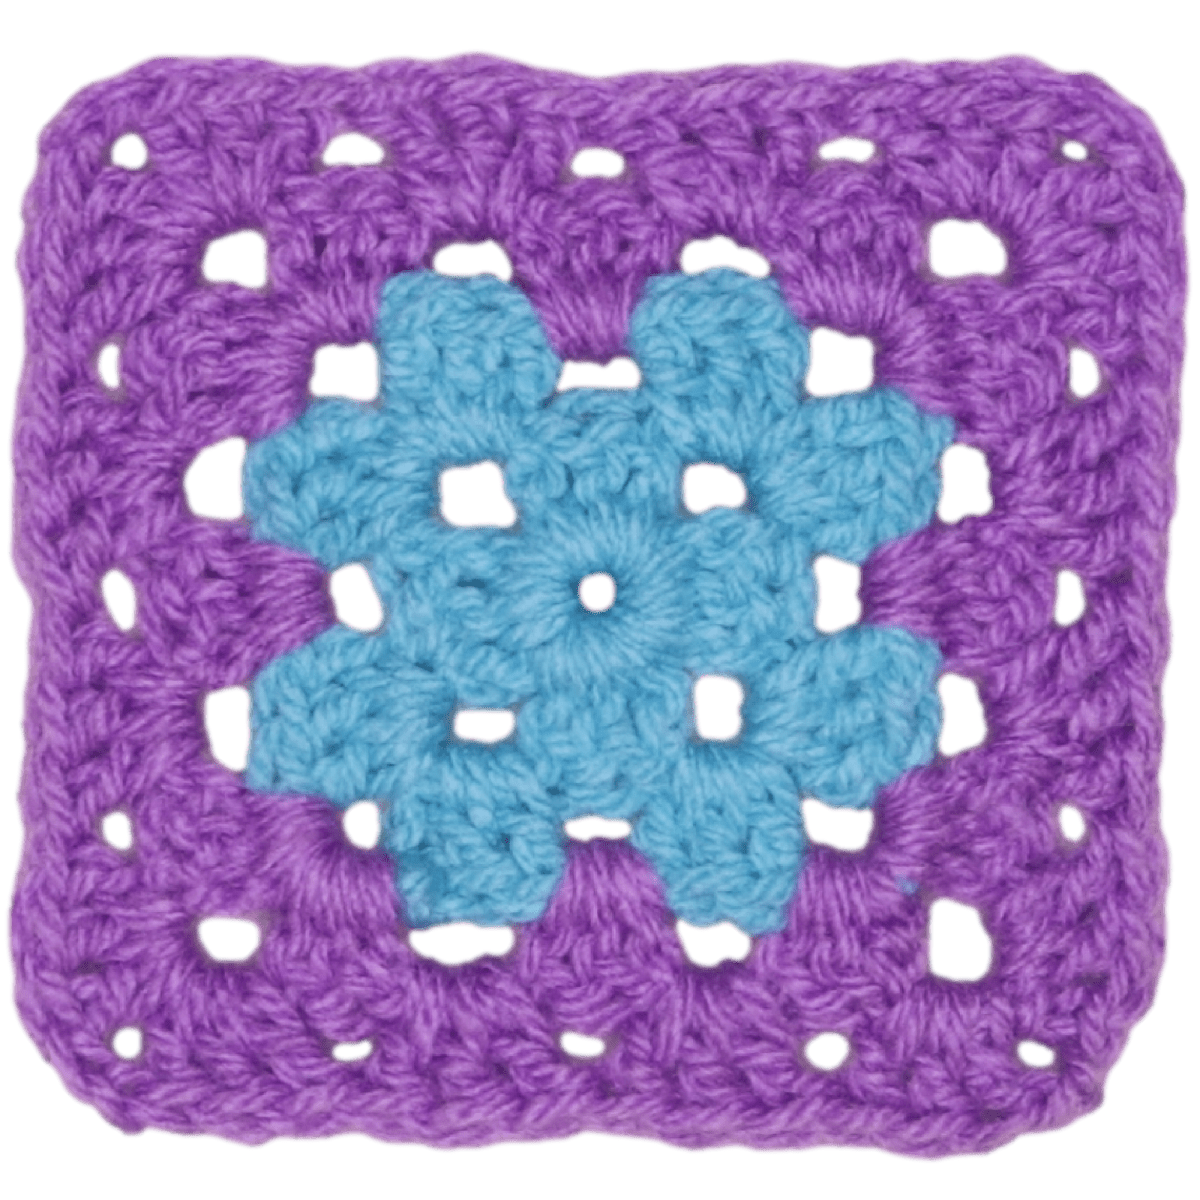
Crochet a Granny Square with No-Seam Color Changes: Beginner's Guide!
Have you ever wanted to learn how to crochet a classic granny square but felt intimidated by the seams, twisting, and color changes? Well, get ready to cast those fears aside! I'm excited to share a super easy method for creating beautiful, seamless, and perfectly square granny squares that even a complete beginner can master. Based on Christa's Secret Yarnery tutorial, this guide will walk you through each step of creating a color-changing granny square that looks fantastic on both sides and stays nice and flat.
Why This Granny Square is Perfect for Beginners
If you're just starting your crochet journey, this granny square is the ideal project. Here's why:
- No Seam: Traditional granny squares often have a visible seam where you join the rounds. This method eliminates that unsightly seam, giving your finished project a cleaner, more professional look.
- No Twist: Have you ever noticed your granny squares starting to twist as you work on them? This technique prevents that annoying twist, ensuring your square stays flat and even.
- Color Changing: Learn how to seamlessly change colors within your project. Adding new colors makes your granny square visually appealing, without any complicated techniques.
- Super Easy: Christa's method is designed with beginners in mind. I will break down simple stitches and clear instructions, so you can start with confidence.
- Versatile: Once you've mastered this basic square, you can adapt it to create all sorts of projects! Think blankets, scarves, bags, and so much more. The possibilities are endless!

Materials You'll Need
To get started on your no-seam, no-twist, color-changing granny square, you'll need a few basic supplies:
- Yarn: Worsted weight acrylic yarn in your choice of colors. This is a great project for using up those yarn scraps you've been hoarding! You can find a wide variety of yarn options online.
- Crochet Hook: A 6mm crochet hook, or the size recommended for your yarn. A good set of crochet hooks can make all the difference.
- Yarn Needle: For weaving in those pesky ends. Blunt tip needles are best!
- Scissors
- Stitch Marker
Before You Start: Essential Crochet Stitches
Before we dive into the pattern, let's quickly review the basic stitches you'll need to know:
- Slip Knot: The foundation of almost every crochet project. It's how you get the yarn onto your hook to begin with.
- Chain Stitch (ch): Used to begin the project and create height. Think of it as the building block of crochet.
- Slip Stitch (sl st): Used to join rounds and finish off. It creates a neat, almost invisible join.
- Single Crochet (sc): Used for a seamless join. This stitch helps keep your granny square looking smooth and even.
- Double Crochet (dc): The main stitch used in the granny square. It creates the classic, open texture of the square.
- Need a refresher? Take a peek at my other crochet content here: Written Patterns Tagged "crochet pattern"

Getting Started: Making the Magic Ring
Instead of the traditional magic ring, I use a slightly different method for creating the center ring. It's easier for beginners and just as effective! You'll chain three and join with a slip stitch to the first chain. This creates a small ring to work into. This method is less fiddly than the magic ring, especially when you're just starting out.
Here's how to do it:
- Chain three.
- Insert your hook into the first chain you made.
- Yarn over and pull through both loops on your hook (slip stitch).
You've now created a small ring to work into!
Round 1: Building the Foundation
Now, let's start building our granny square:
- Chain 3 (this counts as your first double crochet).
- Make two double crochets into the center ring.
- Chain 2.
- Repeat the following sequence three times: three double crochets into the center ring, chain 2.
- Chain 1, single crochet to join to the top of the beginning chain 3. This creates a seamless join!
That chain 3 at the beginning counts as a double crochet. It helps to create the height needed for the first row. Your corners should now be taking shape, with three double crochets and a chain-2 space in each. I keep my yarn tail curled around my work. This allows me to work over it, securing it as I go.
Round 2: Continuing with the First Color
Time to continue building our square with the first color:
- Chain 3 and turn your work.
- Make two double crochets into the corner space.
- Place a stitch marker in the corner space. This is super important! It helps you identify the corner later, especially as the square grows.
- In each corner space, make three double crochets, chain 2, and three double crochets (corner).
- Repeat that corner stitch into each of the next three corner spaces.
- When you reach the corner with the stitch marker, make three double crochets.
- Chain 2 and slip stitch to join to the top of the chain 3.
- Chain 1 to secure, cut the yarn leaving a long tail for weaving in.
- Pull the hook up and yarn through, then snug it down to secure.
Chain 2, Slip Stitch These steps are very important for securing your square.

Understanding the Corner Stitch
Let's clarify that corner stitch: "3 double crochets, chain 2, 3 double crochets all in the same space." This creates the distinct corner shape of the granny square. The chain 2 provides the space needed for the next round. If you keep your stitches nice and flat as you work, you'll have more room for those chain stitches, making it easier to crochet into them in the next round.
Changing Colors: Starting Round 3
Ready to add a pop of color? Here's how to change colors seamlessly:
- Turn your work.
- Locate the corner space before the join from the previous round.
- Attach the new color yarn to your hook.
- Insert hook into the corner space, loop of yarn on your hook, bring it through and slip stitch with both strands to join.
- Drop the yarn tail and hold it along the back of your work.
- Chain 2 (if you joined your yarn in a different way, chain 3). This counts as your first double crochet.
- Make two more double crochets into the same corner space.
- In the space along the side, make three double crochets.
- Continue working the pattern, alternating corners (3dc, ch 2, 3dc) and side spaces (3dc).
The Importance of Working Over Yarn Tails
Here's a handy tip: work over the yarn tails as you crochet. This secures the tails and reduces the number of ends you need to weave in later. It's like magic! Just lay the tail along the edge of your work and crochet over it as you go. Be sure to leave enough slack, so you aren't pulling too tight.
Round 4: Continuing the Pattern
Let's keep building our granny square:
- Chain 3 and turn your work.
- Make two double crochets into the very first corner space.
- Place a stitch marker into that corner space. This helps you identify the corner space and avoid mistaking it for a side space.
- In each space along the side, make three double crochets.
- In each corner space, make three double crochets, chain 2, and three double crochets.
- Repeat all the way around the square.
- When you get back to the stitch marker, make three double crochets in the corner space.
- Chain 2, and slip stitch to join to the top of the chain 3.
- Chain 1 to secure, cut yarn leaving a long tail, pull hook up and yarn through and snug down to secure.
Understanding Side Spaces
What exactly is a "side space" in this granny square pattern? It's the space created between the corner clusters of double crochets. Each side space gets three double crochets, adding to the square's overall size and texture.
Repeating Rounds 3 & 4 for a Larger Square
Here's the best part: you can continue repeating rounds 3 and 4 to make your granny square any size you desire! Want a small coaster? Stop after a few rounds. Dreaming of a giant blanket? Just keep going! Feel free to experiment with different color combinations to create a truly unique piece. You could repeat round 3 for bigger stripes too! Check out other Granny Squares here at Secret Yarnery.

Joining and Continuing with the Same Color Yarn
What if you want to keep going with the same color? Here's how to do it seamlessly:
- At the end of the row, instead of slip stitching, chain one.
- Single crochet to join right to the top of the chain three. This creates a seamless join!
The single crochet join keeps the work seamless and prevents a visible step. It ends you up right in the middle of that corner. Now you can start the next row by chaining three and doing two double crochets in the corner space. Don't forget to place a stitch marker to mark where you started!
Finishing Off and Weaving in Ends
You've crocheted your granny square. Now comes the not-so-fun part: weaving in the ends. But don't worry, it's easier than you think!
- At the end of your last round, chain one and cut the yarn, leaving a tail of at least 6 inches.
- Pull the yarn through the loop to secure.
- Thread the yarn tail onto a yarn needle.
- Weave the yarn tail through the back of your stitches, following the same color yarn whenever possible.
- Trim any excess yarn.
Blocking Your Granny Square
Blocking is a process that helps to even out the stitches and give your square a more professional look. It's like ironing for crochet! There are different blocking methods, like wet blocking and steam blocking.
Troubleshooting Common Granny Square Problems
Sometimes, things don't go exactly as planned. Here are a few common problems and how to fix them:
- Granny Square is Curling: Make sure you're not crocheting too tightly. Try going up a hook size. Blocking can also help flatten a curled square.
- Granny Square is Twisting: Pay attention to your tension. Ensure you're turning your work correctly at the end of each round.
- Visible Seam: Use the single crochet join method described earlier. Make sure your slip stitches aren't too tight.
- Uneven Corners: Double-check that you're working the correct number of stitches in each corner. Use stitch markers to help you identify the corners.

Design Ideas for Your Granny Squares
Now that you know how to make a perfect granny square, what can you do with it? Here are a few ideas:
- Blankets/Afghans
- Scarves
- Bags
- Sweaters
- Pillows
Tips for Choosing Yarn Colors
Choosing the right yarn colors can make all the difference. Here are a few color schemes to consider:
- Complementary Colors: Colors that are opposite each other on the color wheel.
- Analogous Colors: Colors that are next to each other on the color wheel.
- Monochromatic Colors: Different shades of the same color.
- Neutral Colors: Black, white, gray, and beige can be used as a background or to tone down brighter colors.
Christa's Secret Yarnery: More Than Just Granny Squares
I create weekly podcasts and live chats, so come check those out! I encourage you to explore my other crochet tutorials and patterns. If you want more Beginner Crochet Pattern, check this out.
Understanding Crochet Hook Sizes
Different crochet hook sizes are paired with different yarn weights. The 6mm hook is a good starting point for worsted weight yarn. Using a different hook size can affect the gauge of your project.
What is Gauge and Why is it Important
Gauge is the number of stitches and rows per inch or centimeter. Achieving the correct gauge ensures that your finished project will be the size specified in the pattern. To check your gauge, crochet a small swatch using the recommended yarn and hook size, then measure the number of stitches and rows within a specific area. If you have too many stitches per inch, try going up a hook size. If you have too few stitches per inch, try going down a hook size.
Common Crochet Abbreviations
Here's a quick reference for common crochet abbreviations:
- ch = chain
- sl st = slip stitch
- sc = single crochet
- dc = double crochet
- st = stitch
- rep = repeat
Different Ways to Join Granny Squares
Once you have a pile of granny squares, you'll need to join them together. Here are a few methods:
- Single Crochet Join: A simple and popular method.
- Slip Stitch Join: Creates a flatter seam.
- Invisible Join: A more advanced technique for a seamless look.
- Crochet-As-You-Go Method: Joining the squares as you crochet them.
Exploring Different Granny Square Variations
This tutorial focuses on a basic granny square, but there are many variations to explore.
- Solid Granny Square: No spaces between the clusters of stitches.
- Circle to Square Granny Square: Starts with a circle in the center.
- Flower Granny Square: Features a flower motif in the center.
- 3D Granny Square: Incorporates raised stitches for a textured effect.
Understanding Yarn Weights
Understanding yarn weights is also very important.
- Lace Weight: Very fine yarn, often used for delicate projects.
- Fingering Weight: Lightweight yarn, suitable for socks and baby items.
- Sport Weight: Slightly thicker than fingering weight, good for lightweight garments.
- DK Weight: Versatile yarn, ideal for a wide range of projects.
- Worsted Weight: Medium-weight yarn, a popular choice for blankets and sweaters.
- Bulky Weight: Thick yarn, perfect for quick and cozy projects.
- Super Bulky Weight: Very thick yarn, often used for home decor items.

The History of Granny Squares
Granny squares became popular in the Victorian era as a way to use up scraps of yarn. They've experienced a resurgence in popularity in recent years, thanks to their versatility and retro charm. The name "granny square" likely comes from the fact that they were often made by grandmothers.
Caring for Your Crochet Projects
Hand washing is often the best option, especially for delicate items. If machine washing, use a gentle cycle and cold water. Lay flat to dry to prevent stretching.
The Benefits of Crochet
Crochet offers many benefits. The repetitive motion can be very calming and therapeutic. It can help to reduce stress and anxiety. Crochet allows you to express your creativity and make unique items. Completing a crochet project can give you a sense of accomplishment and boost your self-esteem.
Tips for Improving Your Crochet Skills
Practice regularly. Watch tutorials. Join a crochet group. Experiment with different techniques. Be patient. It takes time to develop crochet skills. Don't get discouraged if you make mistakes.
Advanced Techniques to Try After Mastering the Basic Granny Square
Here are some techniques to try after mastering the basic granny square.
- Tapestry Crochet: Changing colors within a row to create intricate designs.
- Intarsia Crochet: Similar to tapestry crochet, but each color area is worked from a separate ball of yarn.
- Filet Crochet: Creating lace-like patterns using chains and double crochets.
- Tunisian Crochet: A technique that creates a dense, woven fabric.
- Bead Crochet: Incorporating beads into your crochet projects.

Resources for Finding Crochet Patterns
Here are a few online resources for finding crochet patterns:
- Ravelry
- Etsy
- LoveCrafts
- Websites and blogs of crochet designers
Join the Secret Yarnery Community!
I hope you've enjoyed this tutorial! Now you are ready to make your very own No-Seam, No-Twist Color Changing Crochet Granny Square.
Join my community for even more fun!
- Subscribe to my YouTube channel.
- Follow me on social media.
- Join my newsletter.
Share Your Granny Square Projects!
Don't forget to share photos of your finished granny squares on social media using #SecretYarneryGrannySquare!
FAQs
1. What size should my granny square be?
The size of your granny square depends on your project. You can stop after a few rounds for small projects like coasters or keep adding rounds for larger items like blankets. The beauty of granny squares is their flexibility!
2. Do I need to block my granny square?
Blocking is optional but recommended. It helps straighten out your square, making it look more even and professional. Blocking is especially helpful if the edges aren't lying flat.
3. Why is my granny square twisting?
Twisting usually happens due to uneven tension or not turning your work consistently. To fix this:
- Check your tension; keep it consistent.
- Make sure you turn your work at the end of each round.
4. How do I know what yarn to use?
Worsted weight acrylic yarn is a great option for beginners. It’s easy to handle and widely available. You can use any yarn so long as you pair it with an appropriate hook size.
5. How do I join granny squares together?
Here are a few methods for joining granny squares:
- Single Crochet Join: Adds texture to the seams.
- Slip Stitch Join: Creates a flatter seam.
- Invisible Join: Provides seamless connections.
- Join-As-You-Go: Connects squares while crocheting the final round.
6. Can I mix yarn types in one granny square?
It’s not recommended, as different yarn types and weights may behave differently. This can lead to uneven textures and sizes in your square.
7. How do I prevent my square from curling?
Curling often indicates that your stitches are too tight. Switch to a larger hook size or adjust your tension. Blocking can also help flatten the square.
8. How can I change colors without leaving gaps or bumps?
Follow the color-changing method described in the tutorial. Be sure to secure new yarn tightly and weave in ends as you work over them for a clean finish.
9. What if I make a mistake in a round?
If you make a mistake, don’t panic! Simply undo the problematic stitches and redo them. Crochet is forgiving and allows you to fix errors without ruining the entire piece.
10. Can I crochet a granny square without turning the work?
Yes, but turning the work helps maintain tension and prevents the square from twisting. For uniform shapes and textures, turning is highly recommended.
![]()
Christa Patel is the creative mind behind The Secret Yarnery, a vibrant and welcoming hub for crochet enthusiasts of all skill levels. With years of experience in crochet design, Christa specializes in creating tutorials and patterns that are simple, accessible, and perfect for beginners. Her passion for crochet shines through her detailed guides, colorful projects, and innovative techniques that make learning crochet enjoyable and frustration-free.
Christa’s welcoming teaching style has helped countless people pick up a crochet hook for the first time, and her fun, engaging YouTube tutorials have gathered a loyal community of crafters worldwide. From granny squares to large-scale blankets, Christa shares all her tips, tricks, and creativity in each of her projects.
When Christa isn’t crocheting or hosting live chats with her community, you’ll find her exploring yarn stores, planning new projects, or connecting with crafters across social media. Her mission is to make crochet an easy and rewarding craft for anyone to learn, no matter their experience level.
Learn more about her work, tutorials, and patterns at The Secret Yarnery, and join her global crochet community!
About the Author
With a passion for crafting easy, beginner-friendly tutorials and patterns, Christa inspires crafters of all skill levels to unleash their creativity worldwide. She encourages yarn lovers to connect, create, and crochet a world filled with beautiful handmade treasures!
Crochet a Granny Square with No-Seam Color Changes: Beginner's Guide!
Comment (1)
THANK YOU so much for taking the time to send me these instructions. I’m going to start today using this pattern.