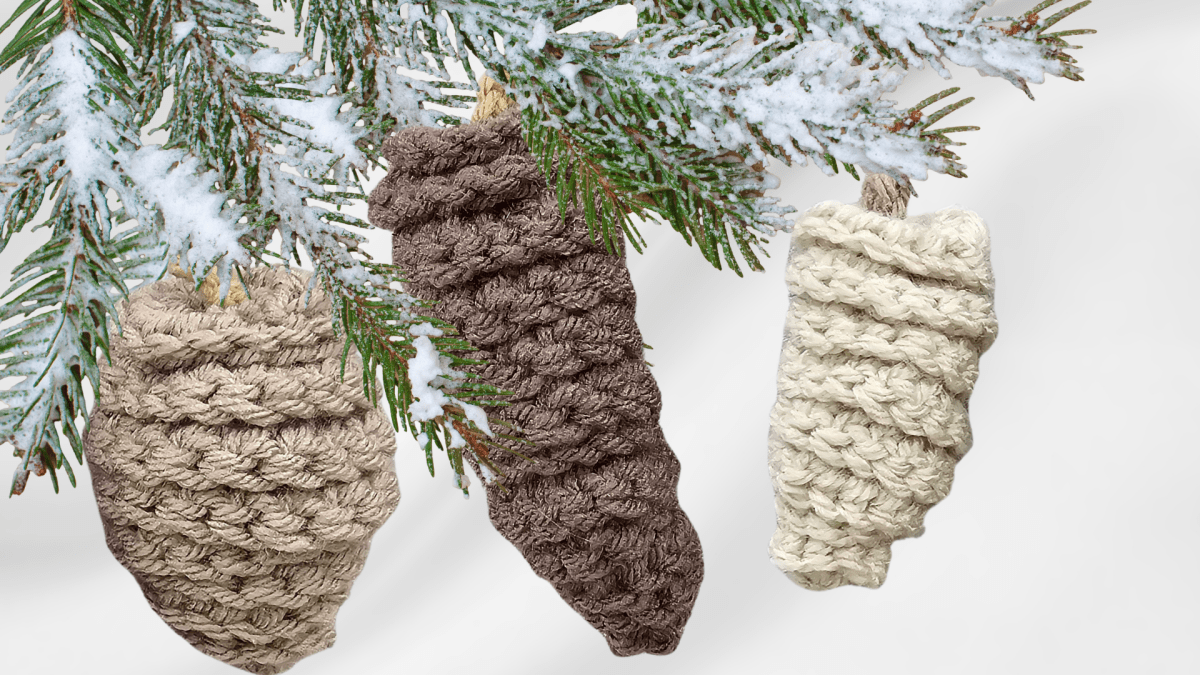
How to Crochet Adorable Pine Cones for Beginners in 3 Unique Shapes and Sizes
If you're looking for a fun, easy way to add a homemade touch to your holiday decor, look no further! Today, I'm sharing how to crochet Adorable Pine Cones in three unique shapes that are perfect for fall decorations, Christmas wreaths, or even woodland-themed craft projects. These crochet pinecones are beginner-friendly, so even if you're new to crochet, you're in the right place.
Below, you'll find step-by-step instructions for crafting small, tall, and fat crochet pine cones. Each style can be customized in three sizes using different hook sizes. Let's get started!
Tools and Materials You’ll Need
Choosing Your Yarn
For these pine cones, I used a size 4 worsted-weight acrylic yarn. Choose one shade for the pine cone and another for the stem. The versatility of acrylic makes it perfect for beginners, and you can use any color palette that fits your home decor.
Hook Sizes
Your crochet hook determines the size of your pine cone. Here's how I broke it down:
- Small Pine Cone: Use a 4 mm hook.
- Medium Pine Cone: Go with a 5 mm hook. (This is demonstrated in the video.)
- Large Pine Cone: Use a 6 mm hook.
Additional Supplies
- Four stitch markers
- A sharp-tip needle for sewing
- Scissors
These supplies are simple and easy to find, making this project approachable for crafters of all levels. If you need inspiration for selecting stitches and projects, check out Easy Fall Crochet Projects for Beginners.

General Crochet Techniques for Pine Cones
How to Customize SizeS
Each shape of pinecone—small, tall, and fat—can be crafted in three sizes by simply using different crochet hook sizes. This flexibility means you can mix and match styles for a varied, realistic look.
The Basic Concept
Each pine cone starts with a chain foundation. You'll work a combination of single crochets, half double crochets, double crochets, and even triple crochets (for the fat one). Placing stitch markers along the chain ensures even spacing, so don't skip that step!

Small Pine Cone Instructions
Step 1: Start the Foundation Chain
To begin, leave about a 4-inch tail and create a slip knot on your hook. Chain 30 to start your foundation.
Step 2: Add Stitch Markers
For even spacing, count five chains from the hook and place a stitch marker. Repeat this step for the next sections, ensuring your markers divide the chain evenly.
Step 3: Work Single Crochets
Skip the first chain and work four single crochets into each chain, including the ones with stitch markers. Single crochets form the base of your pine cone.
Step 4: Transition to Half Double Crochets
Once you reach the next section, work four half double crochets into each chain up to and including the next marker.
Step 5: Add Double Crochets
For the next section, work four double crochets into each chain. Stop just before the last five chains.
Step 6: Finish With Half Double Crochets
To close off the row, work four half double crochets into each of the last five chains.
Step 7: Secure and Arrange
Cut the yarn, leaving a 12-inch tail for assembly. Pull the tail through a final chain to secure your work. Then, arrange the twisted crochet rows by twisting inward to form the pine cone shape. You can make your pine cone thinner or fuller by adjusting the twists.

Tall Pine Cone Instructions
Step 1: Foundation Chain
For the tall pine cone, create a longer chain of 40 stitches.
Step 2: Place Stitch Markers
Divide the chain into sections of five and mark them with stitch markers.
Step 3: Add Single Crochets
Just like the small cone, work four single crochets into each chain up to the first marker.
Step 4: Transition to Half Double Crochets
In the next section, add four half double crochets into each chain.
Step 5: Add Double Crochets
Work four double crochets into each chain until you reach the next marker.
Step 6: Return to Half Doubles
For the final section, finish with four half double crochets into each chain.
Step 7: Secure and Shape
Cut a long tail for sewing, secure your work as before, and twist the rows to create the tall pine cone's distinct narrow silhouette. Adjust the twists to make it as slim or full as you'd like.

Fat Pine Cone Instructions
Step 1: Foundation Chain
This one calls for a chain of 35 stitches. The larger stitch sections make this design unique.
Step 2: Mark Your Sections
Use your stitch markers to divide the chain into five sections, including two middle sections for added width.
Step 3: Start With Single Crochets
Work four single crochets into each chain up to the first marker.
Step 4: Transition to Half Doubles
In the middle sections, work four half double crochets into each chain. This gradual stitch increase builds the pine cone's shape.
Step 5: Add Double Crochets
For the following section, switch to four double crochets into each chain.
Step 6: Include Triple Crochets for Width
The next section is where the fat pine cone takes shape. Work five triple crochets into each chain, creating a fuller middle.
Step 7: Finish With Doubles and Halves
Switch back to four double crochets, followed by four half double crochets as you near the end of the chain.
Step 8: Secure and Final Adjustments
Cut an 18-inch tail, secure your stitches, and arrange the layers by untwisting or tightening them. The wide design is ideal for larger projects or centerpiece displays.

Assembly Tips for All Pine Cones
Threading the Pine Cone
Thread the tail into a needle and secure the pine cone's layers. Start at the top and carefully sew the overlapping layers to the base.
Securing Layers
If you're using acrylic yarn, don't hesitate to snug things tightly—it won't snap. Just be mindful of keeping rows aligned for a realistic shape.
Hiding the Tail
Once you've sewn the cone together, hide the tail by threading it through the center. Trim any excess yarn, and you're done!

Creative Uses for Crochet Pinecones
These little beauties are so versatile! Here are some ideas to try:
- Holiday Wreaths: Combine these pine cones with holly leaves for a festive touch. Check out Festive Free Christmas Crochet Patterns for All for more holiday inspiration.
- Garlands: String them along a length of twine or ribbon for a rustic mantelpiece garland.
- Table Centerpieces: Add them to a bowl of seasonal decor or place them alongside candles.
- Woodland Crafts: Pair them with faux mushrooms or knitted animals for a whimsical vibe.
Ready To Get Hooked?
Whether you're a seasoned crocheter or just starting out, this crochet pinecone tutorial is a delightful project to customize and enjoy. Don't forget to check more beginner-friendly patterns or request the written version on my website! A great place to start is the collection of Beginner Crochet Patterns. Have fun with these pinecones—you'll be amazed at how something so simple can add such charm to your home!
Let me know if you've given these a try. I’d love to hear how you used them in your projects. Stay hooked!
Left Handed?
FAQs
1. Can I use a different type of yarn for this project?
Yes! While size 4 worsted-weight acrylic yarn is recommended for beginners, you can use other types like cotton or wool. Keep in mind that the texture and stiffness of the pine cone may vary depending on the yarn.
2. How long does it take to crochet one pine cone?
It depends on your speed and experience. For beginners, it may take 1–2 hours, but faster crocheters can finish one in 30–45 minutes.
3. How do I make them look more realistic?
Use earthy tones like browns and grays for the pine cones. Adding a little stuffing, like scrap yarn, inside the twists can also give them a fuller look.
4. Can I scale these designs even larger?
Certainly! Use thicker yarn and larger hooks to create oversized pine cones. Adjust the foundation chain length proportionally for the desired size.
5. Can these instructions be used for larger projects like puffs or larger designs?
Yes! You can modify the same technique to create larger, puffier decorations by increasing the chain length and using bulkier stitches.
![]()
Christa Patel is the creative mind behind the Secret Yarnery, a trusted resource for crochet enthusiasts worldwide. With years of experience, Christa specializes in designing beginner-friendly yet stunning crochet patterns that inspire creativity and confidence in crafters of all skill levels.
As a passionate crocheter, Christa is known for her clear and approachable teaching style, breaking down complex patterns into simple, easy-to-follow steps. Through her engaging video tutorials, written patterns, and helpful tips, she has cultivated a community where crocheters can connect, learn, and share their work.
Christa’s dedication to making crochet fun and accessible shines in every project she creates, from colorful blankets to intricate borders. Whether you’re a seasoned expert or just picking up a hook for the first time, Christa's guidance will help you craft something beautiful.
For more crochet patterns, tips, and inspiration, visit her website at The Secret Yarnery, or check out her YouTube channel filled with step-by-step tutorials.
About the Author
With a passion for crafting easy, beginner-friendly tutorials and patterns, Christa inspires crafters of all skill levels to unleash their creativity worldwide. She encourages yarn lovers to connect, create, and crochet a world filled with beautiful handmade treasures!
How to Crochet Pinecones in 3 Fun Shapes for Beginners – Easy Way