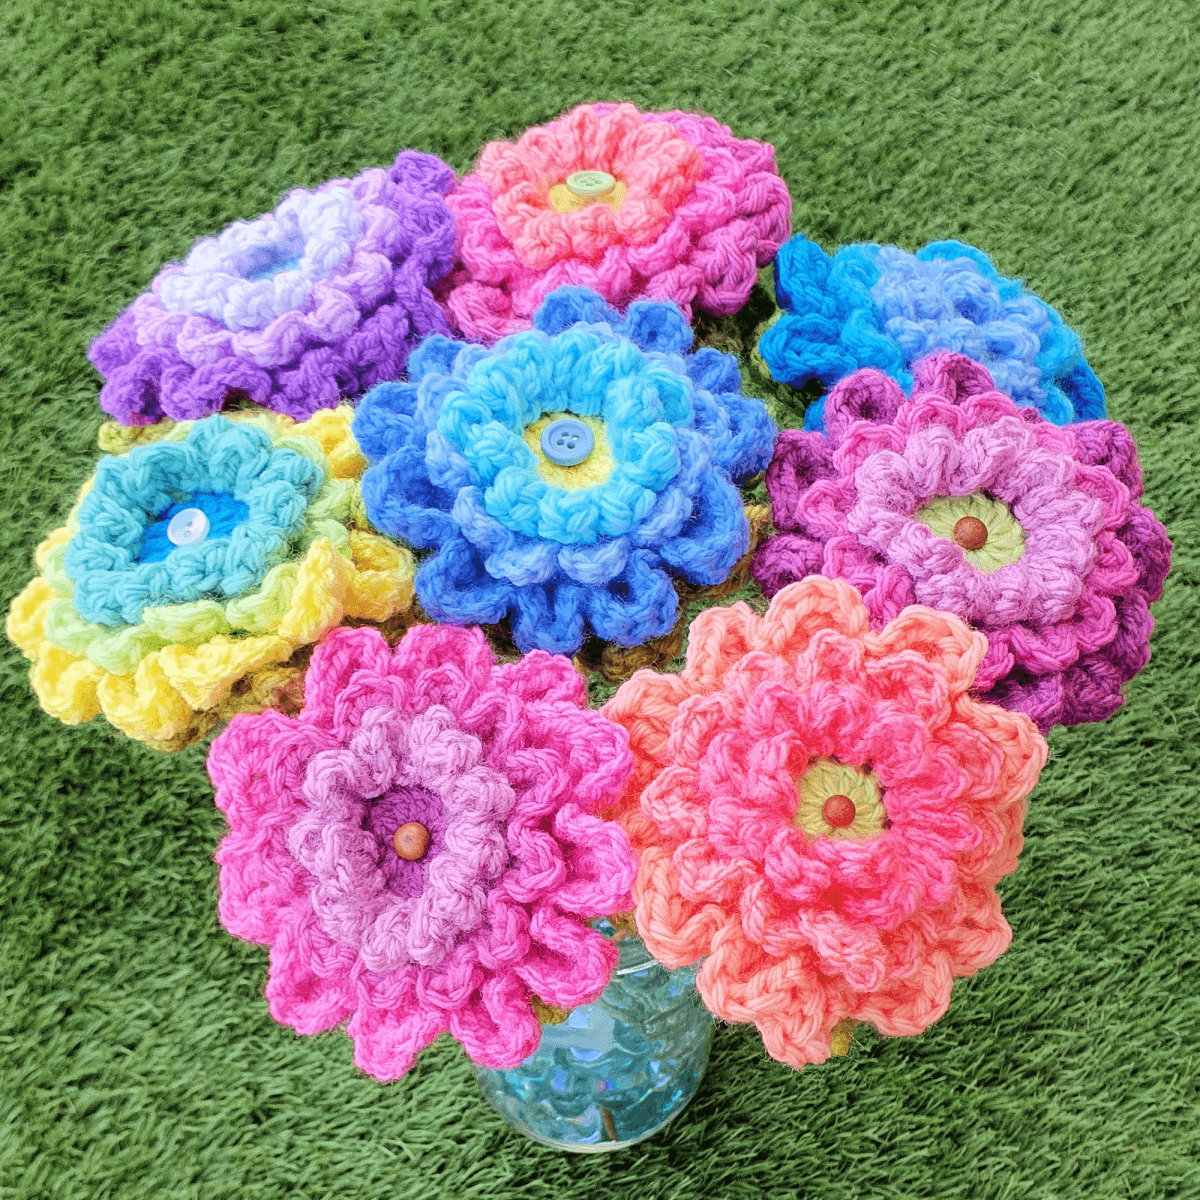
Crochet a Gorgeous Chrysanthemum Bouquet: An Easy Step-by-Step Guide
Have you ever wanted to create a stunning floral display that lasts forever? With this easy crochet flower bouquet tutorial, you can! I'm Christa, from The Secret Yarnery, and I'm excited to guide you through this project. Even if you're a beginner, you'll be amazed at how quickly you can whip up these beautiful blooms using just a few scraps of yarn.
These crochet chrysanthemums are incredibly versatile. Of course, you can arrange them in a vase for a cheerful bouquet, but you can also use them as adorable appliques on bags, blankets, or garments. Feeling ambitious? Transform them into charming granny squares! The possibilities are truly endless. And the best part? You can customize the colors to match your décor or create a vibrant, one-of-a-kind arrangement.
Ready to get started? You can find the free pattern here or the printable PDF pattern here. Let's crochet some happiness!
Gather Your Supplies: What You'll Need
Before we begin, let's gather all the materials you'll need for this project. One of the great things about this crochet flower bouquet is that it's perfect for using up those leftover yarn scraps! It's a budget-friendly way to create something beautiful.
Here's a list of what you'll need:
-
Yarn:
- Four different colors for the flower petals.
- One color for the leaves (I recommend green!). I love using "Favorite" yarn from Ice Yarns.
- Crochet Hook: A 5 mm crochet hook is ideal for this project.
- Yarn Needle: For weaving in those pesky ends!
- Scissors: A good pair of scissors is essential for any crochet project. Check out these great scissors from Amazon.
- Small Elastic Bands: These little bands (like magic loom bands or hair elastics) come in handy for securing the leaves to the stems.
- Knitting Needles or Bamboo Skewers: These will serve as the stems for your flowers. For an extra touch, you can glue cute buttons or beads to the ends of the skewers. Did you know that you can find crochet must haves on amazon?

Getting Started: The Foundation of Your Flower
To begin, we'll create the center of the flower. You have two options for starting: the chain three method or the magic ring method. While both work, I personally recommend the magic ring method, as it creates a tighter, more secure center.
Chain Three Method:
- Make a slip knot and place it on your hook. Leave a long tail of yarn – you'll need this for sewing later.
- Chain three.
- Slip stitch into the very first chain you made to form a ring.
Magic Ring Method:
- Hold the yarn in your hand and wrap the yarn around two fingers, making an X.
- Insert your hook under the first strand of yarn and grab the second strand. Pull it through to create a loop on your hook.
- Chain one to secure the loop.
If you're new to the magic ring, don't worry! It might seem tricky at first, but with a little practice, you'll get the hang of it. There are also plenty of helpful tutorials online, such as this one on youtube.com/secretyarnery.
After Choosing Your Method:
- Chain one.
- Now, into the center of the ring (whether you used the chain three method or the magic ring method), you're going to do 12 double crochets. Ignore the tail for now; we'll deal with it later.
- If you find yourself running out of space as you work your double crochets, simply slide the stitches back along the ring to create more room.
- Once you have 12 double crochets, slip stitch into the top of the first double crochet to join the round.
- Chain one to secure your yarn.
- Cut your yarn, leaving a long enough tail for sewing in later.

Sewing in the Center Tail: Securing Your Work
Securing that center tail is crucial to prevent your flower from unraveling! Whether you started with the chain three method or the magic ring, you'll want to weave in the tail carefully.
Here's how:
- Thread your yarn needle with the center tail.
- Go underneath the loops around the edge of the ring. This will help to close up any gaps in the center.
- Pull the tail gently to tighten the ring.
- Now, sew the tail in the opposite direction, going back the other way, for extra security. This will ensure that the center of your flower stays nice and tight.
This step is essential for both the chain three and magic ring starts. Taking the time to properly secure the center will make a big difference in the finished look of your flower.
Crafting the First Layer of Petals (Color 2)
Now, let's add the first layer of petals using your second color of yarn. This is where your flower will really start to take shape!
- First, locate the join from the previous round. We're going to attach the new yarn color to the front loop, one stitch ahead of the join. This helps to create a seamless transition between colors.
- Place the loop of your new yarn color on your crochet hook. Insert your hook into the front loop, one stitch ahead of the join.
- Bring the yarn through and slip stitch with both strands to join.
- Drop the tail, leaving it where it is for now.
- Chain one.
Now, we'll create the petal:
- Chain two.
- Work two double crochets into the same front loop.
- Chain two.
- Slip stitch into the same front loop to finish the petal.
Repeat this petal pattern around the entire circle, working into each front loop. You should have a total of 12 petals. Be sure that there is only one loop of the petal color on the crochet hook when attaching the yarn.
Once you've completed the round, slip stitch over into the first petal to join it up, creating a nice, continuous circle of petals. Slip stitch and chain one to secure.
Working the Back Loops: Preparing for Layer Two
Before we move on to the next layer of petals, we need to prepare the back loops. This section sets up the next layer of petals and adds dimension to the flower, making it look more realistic.
- Flip your work over to expose the back loops. You'll see a back loop for each petal from the previous round.
- Slip stitch into the back loop of the next petal to get started.
- Chain one.
- Keep the tail of your yarn out of the way as you work.

Adding the Second Layer: Half Double Crochet Magic (Color 2)
Now, let's add the second layer of petals using half double crochets. This will give your flower even more texture and visual interest.
- Two half double crochets into the same back loop.
- Pinch the petals down gently to help you see the back loops more clearly.
- Work two half double crochets into each back loop all the way around the flower.
- Remember, perfect alignment isn't crucial for this project. We're just adding fullness and texture to the flower.
Pause the video and keep working around, placing two half double crochets into each back loop. You should end up with a total of 24 stitches in this round.
When you get back to where you started, slip stitch to the top of the first half double crochet to join the round. Slip stitch to join, and chain one to secure your yarn. Cut your yarn.
Securing the Ends (Color 2): Knotting vs. Sewing
Now it's time to secure those yarn ends! You have two options: sewing in the ends or knotting them. For acrylic yarn, I recommend knotting the ends, as it's a quick and easy way to secure them.
Sewing in the Ends:
If you prefer a more invisible finish, you can sew in the ends using your yarn needle. Simply weave the tail through the stitches on the back of your work, making sure to change direction to prevent it from coming loose.
Knotting the Ends (Recommended for Acrylic Yarn):
- Tie a regular school knot with the two yarn ends. Don't pull it too tight just yet.
- Make a second knot for extra security.
- Now, carefully snug the knots down, making sure they're nice and tight. If the knot slips, simply make one more knot.
I like to hold the tails together at the back while I'm knotting them. Nobody is going to see this, but you do want it wash proof because of course these flowers are removable and washable!
Layer Three: Introducing Color Variety (Color 3)
Let's introduce our third color and add another layer of petals!
- Attaching the new yarn color to the front loop, one stitch ahead of the join. This helps hide any potential mess from stitch count adjustments.
- Slip stitch with both strands to join.
- Drop your tail.
- Chain one.
In this round, we'll be working the same petal pattern as before, but into two front loops instead of one. This will create a slightly larger, more layered effect.
The petal pattern is as follows:
- Chain two.
- One double crochet into the same front loop.
- One double crochet into the next front loop.
- Chain two.
- Slip stitch into the same front loop to finish the petal.

Creating the Third Layer of Petals (Color 3)
Let's walk through the steps for creating the third layer of petals in more detail:
- Slip stitch into the front loop.
- Chain two.
- One double crochet into the same front loop.
- One double crochet into the next front loop.
- Chain two.
- Slip stitch into the same front loop to finish the petal.
Pause the video and keep working along, doing the same petal into two front loops all the way around.
When you get back to where you started, make sure you have 12 petals. Slip stitch into that very first stitch you made just to finish up your round. Slip stitch and chain one.
Back Loops and Half Double Crochets: Adding Depth (Color 3)
Now, we're going to add some depth to this layer by working into the back loops with half double crochets.
- Flip the work over to expose the back loops.
- Slip stitch into the back loop to get started.
- Chain one.
- One half double crochet into the first back loop.
- Two half double crochets into the next back loop.
- Continue alternating one half double crochet and two half double crochets into each back loop all the way around.
Pause the video and keep working around, placing one half double into the first back loop and two half doubles into the next.
Finishing Color Three: Joining and Securing
Let's finish off this color and secure the ends.
- Slip stitch into the top of that first half double crochet to join.
- Chain one.
- Cut your yarn, leaving a bit of a tail.
- Pull your hook up and your yarn through, and snug that down to secure.
- Knot your tails or sew them in, whichever you prefer.
Final Layer of Petals: Adding Flourish (Color 4)
Now, for the final layer of petals! This is where we'll really add some flourish and make our flower stand out.
- Attaching the new yarn color to the front loop, one stitch ahead of the join.
- Slip stitch with both strands.
- Drop your tail.
- Chain one.
For this final layer, we'll be using a slightly different petal pattern that incorporates treble crochets. This will create longer, more dramatic petals.
The petal pattern is as follows:
- Chain two.
- One double crochet into the same front loop.
- Two treble crochets into the next front loop.
- One double crochet into the next front loop.
- Chain two.
- Slip stitch into the same front loop to finish the petal.
This petal spans three stitches or three front loops.
Creating the Treble Crochet Petals (Color 4)
Let's break down the steps for creating these treble crochet petals:
- Slip stitch into the next front loop to start your petal.
- Chain two.
- One double crochet into the same front loop.
- Wrap your yarn twice into the next front loop.
- Two treble crochets into the next front loop.
- Finish your petal into the next front loop with one double crochet.
- Chain two.
- Slip stitch to finish it off.
Pause the video and keep working ahead, creating these beautiful treble crochet petals all the way around.

Final Touches: Completing the Flower
We're almost there! Let's add the final touches to complete our flower.
When you have made your 12 larger petals, slip stitch the same as you did before to finish. Slip stitch to that first petal and chain one to secure your yarn. Cut your yarn, leaving enough tail to give it a knot or to sew it in. Pull your hook up and your yarn through, and snug that down to secure.
Take these two tails and give them a little bit of a pull. We want the knot to be on the back side. Tuck it down to that side loosely. If it's slipping, you need to add one more knot.
Cut your tails or sew them in, whichever you prefer.
Crafting the Leaves: The Green Foundation
Now, let's create the leaves that will complete our bouquet.
- Start with a magic ring.
- Lay the tail over your non-dominant hand.
- Wrap the yarn around two fingers, making an X.
- Wrap it around your whole hand.
- Slide your hook hook side facing down underneath the short strand.
- Grab that long strand and bring it through.
- Point the hook towards yourself.
- Relaxing your thumb a little bit so that yarn can slide.
- Grab that long strand.
- Turn your hook releasing your thumb a little bit turning your hook to bring it through that Loop.
- Chain one.
If you prefer, you can use a chain three ring instead, but remember to leave a long tail for sewing.
Chain one. Work around your ring going over your tail. 12 double crochets into the center of that ring, taking care to go over your tail.
Pause the video and keep working forward 12 double crochets into the center of the ring. Grab your tail and really really get that shut.
Shaping the Leaf: Rounds Two and Three
Let's shape our leaves by working rounds two and three.
Round Two:
- Slip stitch to the top of that first real double crochet (the first one that we did).
- Chain one.
- Two double crochets into that very same stitch.
- Two double crochets into the next stitch.
- Two double crochets into each stitch all the way around our circle.
- 24 stitches around our ring.
Pause the video and keep working around two double crochets into each stitch.
Round Three:
- Slip stitch to the top of that first real double crochet to join.
- Chain three.
- Skip two stitches.
- Single crochet into the third stitch.
- Chain three.
- Skip two stitches.
- Single crochet into the third stitch.
Pause the video and keep working along doing any chain two, skip two, single crochet into the third.
Adding the Leaf Details: Picots and More
Now, let's add some delicate details to our leaves with picots and other embellishments.
- Slip stitch into that very first chain right there to join.
- Turn your work.
- Into that very first space, one half double crochet, one double crochet, and one treble crochet.
- Chain three.
- Picot: roll that chain to the side and look for that third stitch coming down, then slip stitch into the third chain from your hook.
- One treble crochet into that same space, one double crochet, and one half double crochet.
- Slip stitch to start your leaf.
- Into the next space, slip stitch to start, one half double crochet, one double crochet, one treble crochet.
- Picot: chain three and slip stitch to that very first chain you made.
- One treble crochet into the same space, one double crochet, and one half double crochet to finish off our leaf.
- Slip stitch to start half double crochet, double crochet, treble crochet.
- Picot chain three and we're gonna slip stitch into that very first chain we made right there to join.
- Treble crochet into the same space which is working down our Leaf now one double crochet and one half double crochet.
Pause the video and keep working along making that leaf into each of these spaces all the ## Securing the Leaf Center: A Tight Finish
Let's make sure our leaf center is nice and secure.
Snug up the magic ring as much as possible, making it nice and shut and closed. Sew in the tail. Follow the direction that your tail came from. Work it forward about a little more than halfway around your ring. Go back opposite direction all the way around.
Go all the way around backwards forwards again there. Cut that tail off and sew in your last tail.
Assembling Your Bouquet: Bringing It All Together
Now for the fun part – assembling our bouquet!
Gather your barbecue skewer or knitting needle, your flower, and your leaf. Pop that straight down the center of your flower. The macaroni facing up in the center and the pretty side of our leaves also facing up. Poke your barbecue skewer or your knitting needle right down into the center of that magic ring.
If yours is not snug or if you did a chain three ring to start, take two of your little magic Loom elastics. Wrap it around a couple times on your skewer. Slide this up all the way that will stop your leaves or your flour from sliding down on your skewer also.
Displaying Your Project: Showcasing Your Work
Your crochet flower bouquet is complete! Now it's time to show it off. Arrange the flowers in a vase, add some baby's breath or other greenery, and display your beautiful creation for all to admire.
Don't be afraid to get creative with your display! You could also use these flowers to decorate wreaths, embellish gifts, or add a touch of whimsy to any space. I also create a lot of free content on youtube.com/secretyarnery.
Final Thoughts: Enjoy Your Crochet Project!
I hope you enjoyed creating this gorgeous crochet flower bouquet as much as I did! It's such a rewarding project, and the possibilities for customization are endless. Consider trying the easy crochet patterns available to get a head start on your next project.
Remember to share photos of your finished projects with me! I love seeing your unique color combinations and creative variations. And don't forget to subscribe to The Secret Yarnery for more crochet patterns and inspiration. Happy crocheting!
FAQs
1. What skill level is required to make this pattern?
This pattern is beginner-friendly! Even if you're new to crochet, the step-by-step instructions and included tips ensure a smooth crafting experience. Plus, there's room for experienced crafters to add their own flair.
2. What materials do I need for this project?
You’ll need the following supplies:
- Yarn (at least four colors for petals and one for leaves)
- 5 mm crochet hook
- Yarn needle and scissors
- Elastic bands (small hair elastics work great!)
- Skewers or knitting needles (for flower stems)
3. How long does it take to complete?
It depends on your crochet speed, but each flower typically takes around 1-2 hours. They’re quick, fun, and perfect for binge-crochet sessions!
4. Is there a printable pattern available?
Yes! A printable PDF version of the pattern is available for purchase and download, making it easy to refer to as you work.
5. Can I use different yarn weights or colors?
Absolutely! The pattern is flexible, and you can adapt it to suit your yarn stash or desired color scheme. Just keep in mind that different yarn weights may alter the size of the flowers.
6. Are there video tutorials for this pattern?
Yes, you’ll find a detailed video tutorial provided by The Secret Yarnery to guide you through the process. Watch it here.
7. What can I use these crochet flowers for?
These chrysanthemums are versatile! Use them to create bouquets, embellish bags or blankets, decorate wreaths, or craft granny squares for larger projects.
8. Do I need prior experience with the magic ring method?
Not at all! The pattern includes an explanation, and the linked video tutorial demonstrates the magic ring technique for beginners.
9. Can I wash the finished flowers?
Yes! If using acrylic yarn, the flowers are washable. Just ensure all your ends are securely knotted or sewn in for durability.
10. Where can I share my finished project?
We’d love to see your creations! Share your photos on Ravelry or tag @TheSecretYarnery on social media to showcase your beautiful bouquet.
![]()
Christa Patel, the creative mind behind The Secret Yarnery, is a passionate crochet designer dedicated to spreading joy through yarn and creativity. Based in Nairobi, Kenya, Christa has built a vibrant online crochet community where she shares her playful approach to crafting with fiber enthusiasts worldwide.
With years of experience, Christa specializes in creating beginner-friendly patterns that inspire confidence while offering endless customization possibilities. From intricate blankets to charming appliques, her designs showcase her love of bold colors, fun techniques, and practical finishes.
Beyond patterns, Christa hosts a popular YouTube channel where she provides free tutorials, crochet tips, and warm encouragement to new and seasoned crafters alike. Her mission? To make crochet accessible, enjoyable, and an outlet for artistic expression for everyone.
When not crocheting, Christa enjoys family time, exploring local markets for fiber treasures, and dreaming up her next big project to share with her community.
Follow Christa's journey and discover more of her creations via her website or social media platforms:
Let Christa’s vibrant crochet patterns unlock your creative potential and bring beauty to your projects! 🌸
About the Author
With a passion for crafting easy, beginner-friendly tutorials and patterns, Christa inspires crafters of all skill levels to unleash their creativity worldwide. She encourages yarn lovers to connect, create, and crochet a world filled with beautiful handmade treasures!
Make your Home Blooming: Learn to Crochet a Gorgeous Spring Bouquet