Perfect Spiked Granny Square: The Easy Crochet Granny Square with No Big Holes
If you've ever tried making a traditional granny square only to have it turn out crooked, gappy, or less than crisp, you're in for a treat. This spiked granny square is my new favorite easy crochet granny square with firm edges, absolutely no big holes, and a flat, modern look that works wonderfully in everything from throw blankets to bags and more. With just a few tweaks to the classic design and a clever spike stitch for subtle texture, it’s simple to crochet and impossible not to love.
Let's break down all the steps you need to master this easy crochet granny square, from the foundation ring to weaving in those last tails for a clean finish. I'll help you get perfect results—even if you’re brand new to crochet.
Understanding the Spiked Granny Square: A Modern Twist on a Classic
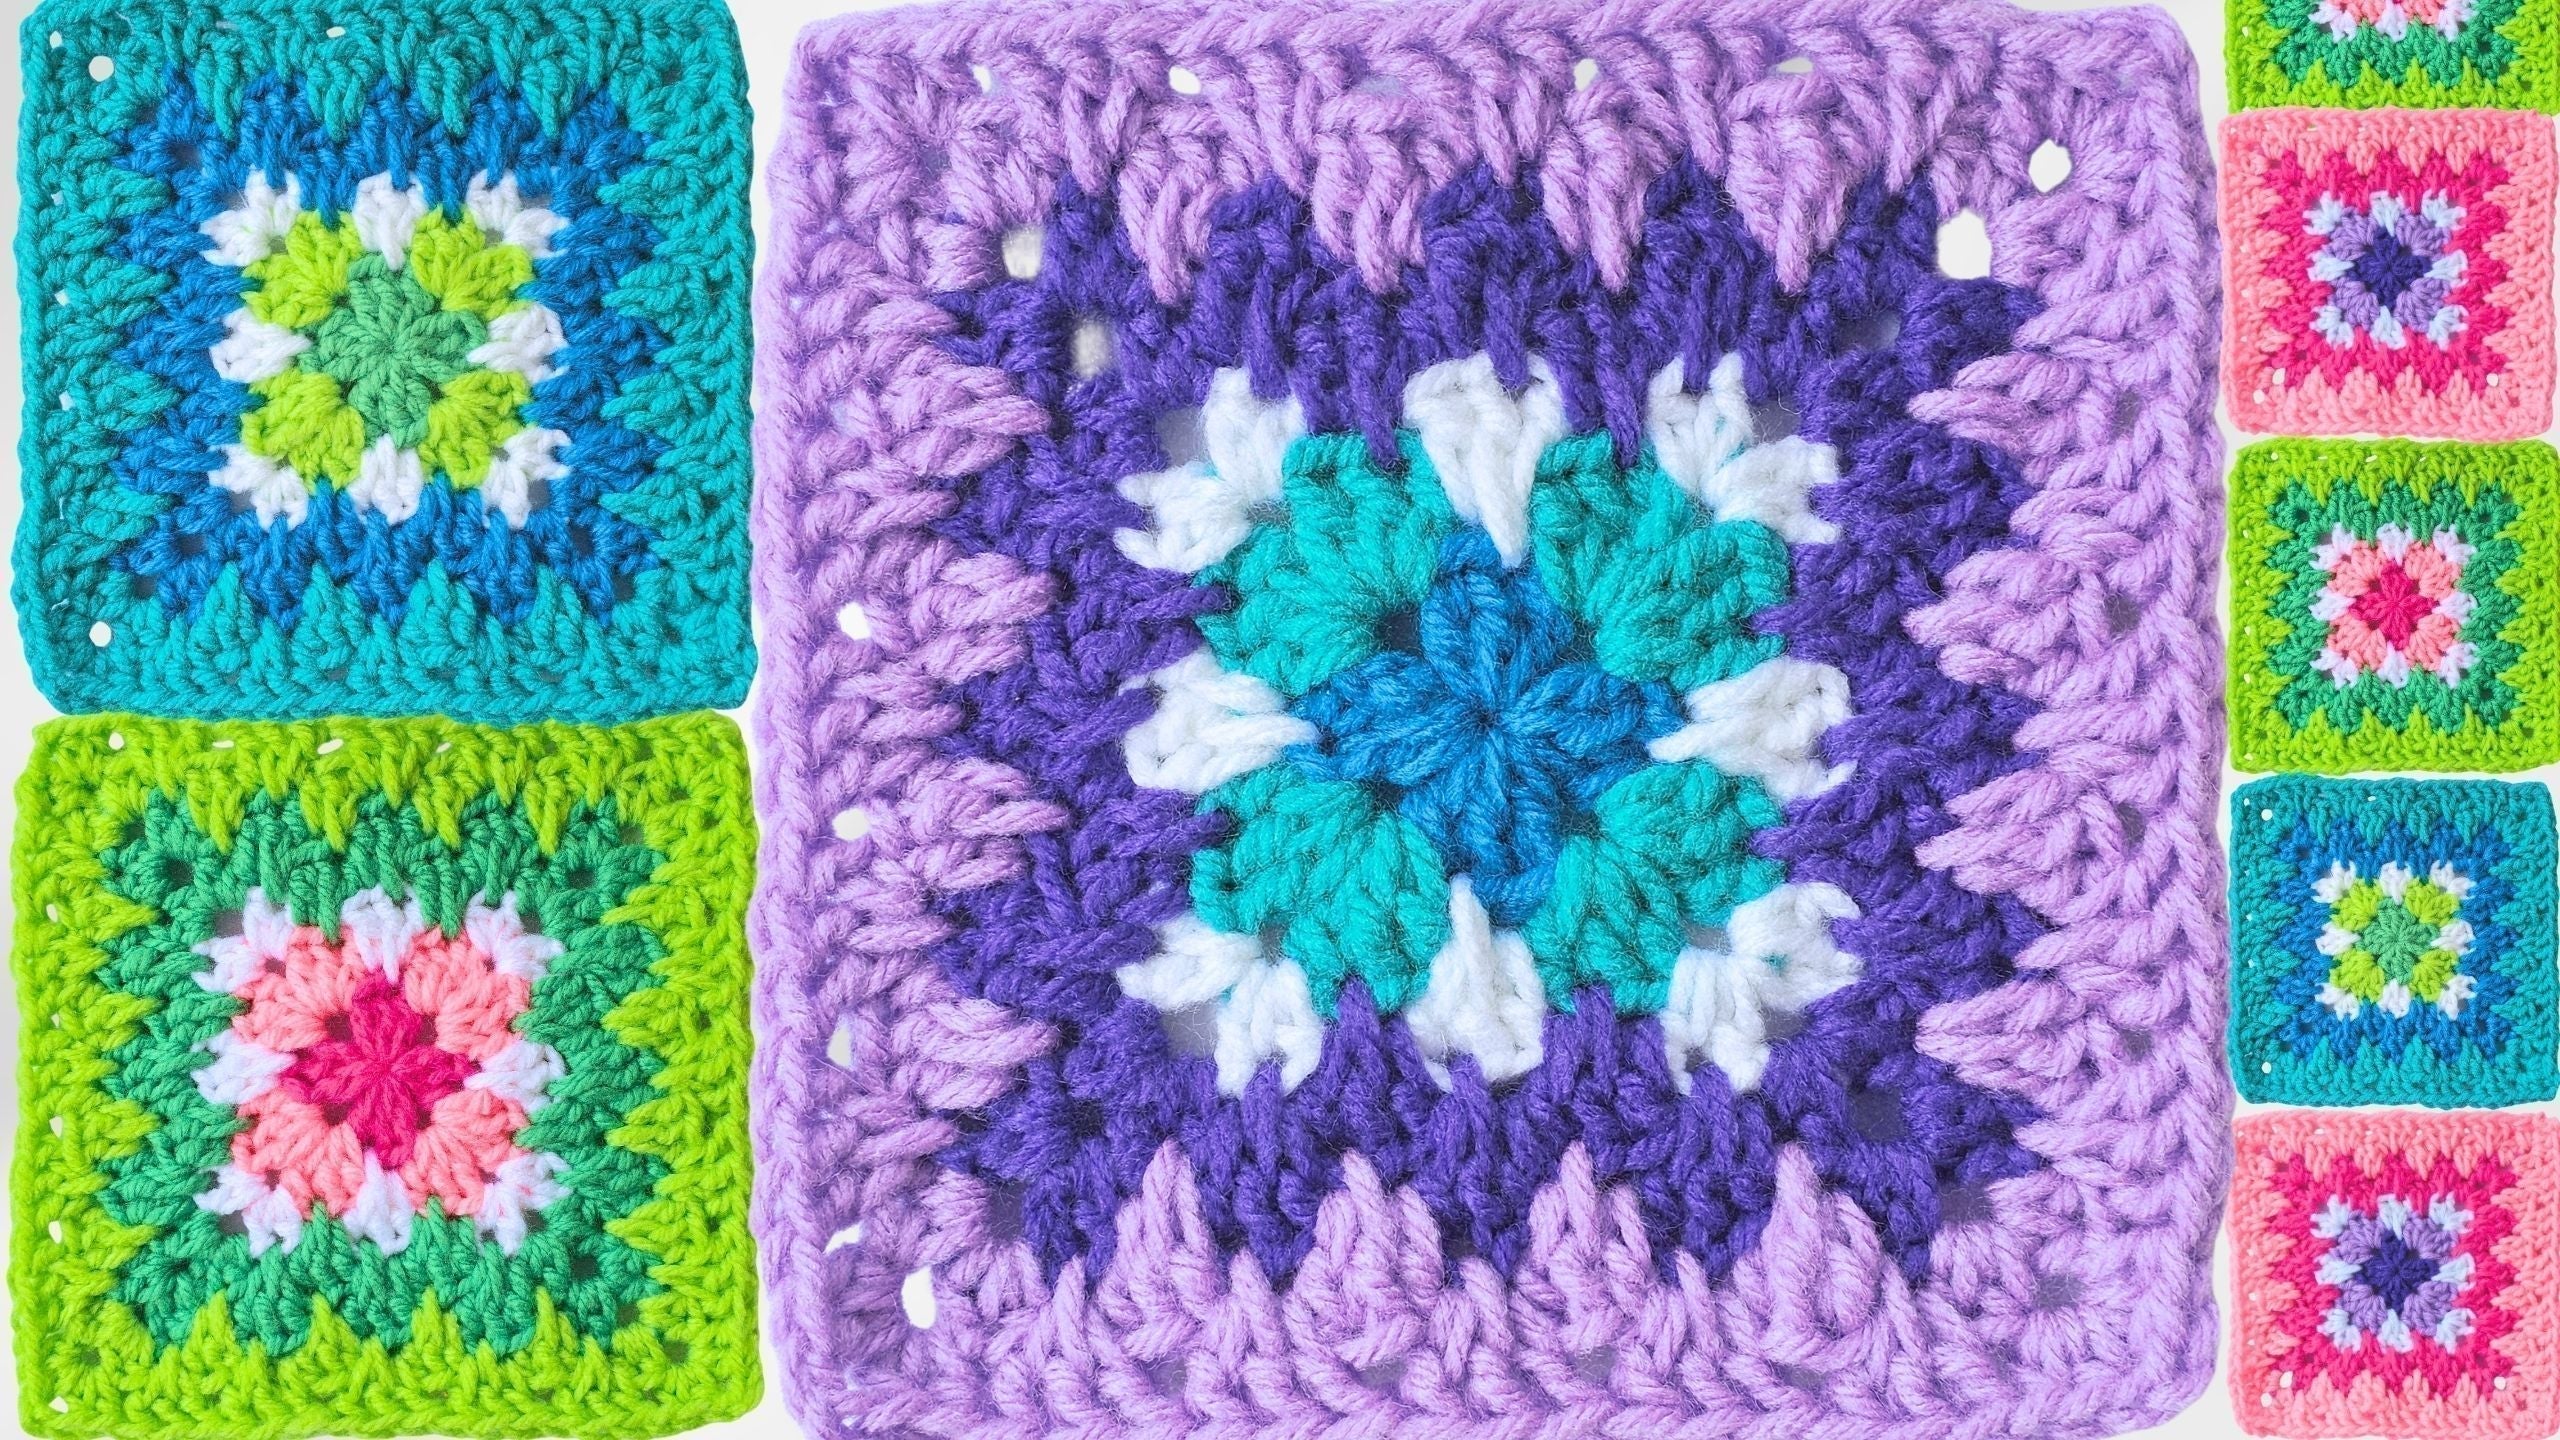
The spiked granny square is exactly what it sounds like: a fresh, modern version of the iconic granny square. What sets this square apart are its super straight edges, flat construction, and the spike stitch that gives a subtle but lovely ridged texture.
- Flat, square shape: No warping or twisting, so your squares stack together perfectly.
- No big holes: The stitches hug tightly, making it a great choice for those who dislike gaps.
- Unique spike texture: The spike stitch adds visual interest and a soft, touchable feel.
This square is perfect if you want a seamless look across your whole project. I love to use it for blankets, tote bags, and modern home décor. You can stop after five rounds for a 4 1/2-inch square (great for mixing with other motifs) or keep going for a full 6 1/4-inch square.

Materials Needed to Create Your Spiked Granny Square
Before starting, make sure you have these tools and materials ready:
- Yarn: Scraps of any color—worsted weight acrylic works best, but any yarn will do.
- Crochet hook: 6 mm size (for worsted yarn).
- Scissors: For snipping ends.
- Yarn needle: For sewing in tails.
- Stitch marker: Optional, but handy for beginners.
Gathering everything first keeps you organized and makes the process a breeze.
How to Start Your Granny Square: Magic Ring vs Chain Three Ring
Every granny square begins at the center, and you have two options—Magic Ring or the classic Chain Three Ring.
Magic Ring:
- Lay your yarn tail across your non-dominant hand, holding it with your thumb and ring finger.
- Wrap the yarn around your first two fingers to create an “X”, bringing the working yarn underneath.
- Turn your hand. With your hook, go under the first (short) strand and grab the second (long) strand.
- Pull the long strand through, turning your hook up onto its fattest part.
- Gently twist your hook toward the long strand and pick up another loop.
- Pull that strand through the loop. This locks the ring.
- Crochet directly into the ring, tightening later.
Chain Three Ring:
- Create a slip knot and chain three.
- Join with a slip stitch into the first chain to form a small ring.
The Magic Ring gives you a tightly closed center, which means no holes in the middle—a must for the perfect spiked granny square.

Creating the First Round: Establishing Your Foundation
The first round sets the foundation for your square:
- Chain 3 (acts as first double crochet)
- 2 double crochets into the center of the ring (work over the tail for easy tightening)
- Chain 1
- Repeat: 3 double crochets, chain 1, three more times (now you’ll have four sets in total)
- Every chain 1 forms a corner space
- Hold on to the tail as you crochet to keep the center snug
Round 1 Stitch List:
- Chain 3 (counts as first stitch)
- 2 double crochets into ring
- Chain 1
- 3 double crochets into ring
- Chain 1
- 3 double crochets into ring
- Chain 1
- 3 double crochets into ring
- Chain 1
Pull the tail gently if needed to keep the center nice and tight. Neat corners and flat fabric here will help the square keep its shape all the way to the last round.
If you’re looking for a good step-by-step foundation, my Beginner's Granny Square Tutorial has clear photos and extra tips.

Joining Your Round 1: Same Color or Color Change Options
When you finish round one, you have two choices for joining:
-
Continuing with same color:
- Work a single crochet into the top of the starting chain 3.
- Hold this stitch open with your fingers, then continue next round from this spot.
-
Changing color:
- Chain 1, then slip stitch into the top of the starting chain.
- Chain 1 again to secure.
- Cut your yarn, leaving a long tail for sewing in later.
To finish the center, use your yarn needle to sew in the magic ring tail securely:
- Thread the needle and weave the tail under several “fat” stitch bars on the back—at least three passes in one direction and two in the opposite.
This keeps the center tight and prevents it from coming loose after washing or pulling.
| Joining Option | Steps | Best For |
|---|---|---|
| Continue with same color | Single crochet join, continue into next round | One-color squares |
| Change color | Chain 1, slip stitch to join, chain 1 to secure, cut yarn, sew in end | Multi-color squares |
If you want tips on truly seamless joins, the No Seam Granny Square Crochet post is a must-read.

Starting Round 2: Joining New Color and First Spike Formation
For a new color, start in the chain space just before your join:
- Insert your hook into the chain space.
- Pull up a loop from your new color and slip stitch to attach (use both strands for security).
- Drop the tail to the back and chain 2 (counts as the first double crochet).
- If you’re using the same color, do a chain 3 instead.
- Into the same space, work 2 more double crochets.
Next, start building your corners:
-
Into each corner chain space:
- 3 double crochets, chain 1, 3 double crochets in the same space
Keep working over your yarn tails if you can—this tidies up your work and saves time weaving in ends.
Take a second to spread your clusters out along the chain space if things look bunched up. Smoothing out your stitches now ensures you’ll have a square that lays flat later.

Working Around Round 2: Side Stitching and Corners
Continue the pattern all the way around the square. After you finish a corner cluster, skip over to the next chain space. For every corner:
- 3 double crochets
- Chain 1
- 3 double crochets (all in the same corner space)
Jump past the side stitches directly into the next chain space each time. Stacking stitches neatly in every round helps your square grow evenly and keeps it from twisting.
Round 2 stitch map:
- 3 double crochets, chain 1, 3 double crochets in each corner
- No side clusters yet, each set goes into the next space
At the end, join to your starting space using:
- A single crochet (if using the same color and continuing)
- Or chain 1 and slip stitch (if you’re changing color)

Beginning Round 3: Introducing the Spike Texture
Now it’s time for the feature that sets this easy crochet granny square apart—the subtle spike texture:
- Join a new color (or continue same) by inserting your hook into a corner space and chaining 1.
- Chain 1 (this is your first half double crochet), then add another half double crochet into that same corner.
- Work a regular double crochet into the space along the side.
- Next is the spike: double crochet into the stitch below, between colors/stitches of previous round.
- Work the last double crochet into the next space along the side.
Corner clusters:
- 2 half double crochets
- Chain 2
- 2 half double crochets (all in the corner space)
Keep repeating this pattern on every side. Don’t worry if your square curls a bit at this stage—later rounds and gentle blocking will flatten it.
Spike stitch breakdown:
- Double crochet into chain space
- Spike double crochet into stitch below (center of last round’s cluster)
- Double crochet into next chain space

Corners and Sides in Round 3: Maintaining Shape and Texture
Working round three, repeat these steps for each side:
- 1 double crochet into the space
- 1 spike double crochet into the stitch below
- 1 double crochet into the next space
When you reach the corner:
- 2 half double crochets
- Chain 2
- 2 half double crochets into the corner
Working over your yarn tails as you go keeps everything tidy. Keeping tension even on spike stitches helps them "pop" without pulling the fabric tight.
Finishing Round 3: Joining and Preparing for Round 4
When you get back to the starting corner, finish the round by working your last two half double crochets into the same corner.
- If you’re using the same yarn color, join with a single crochet and keep going (chain 2 to start next round).
- If you’re changing colors, chain 2, slip stitch to join, then chain 1 and cut your yarn.
This step-by-step join keeps your corners square and prevents tall, noticeable seams.

Starting Round 4: Continuing Spike Texture and Growth
For round 4, join your next color or keep going with the same yarn:
- Insert hook into the space before your join, pull up a loop, and slip stitch with both tails.
- Chain 1 (counts as half double crochet), add one more half double crochet in the same space.
- Work a double crochet in the next chain space along the side.
- Double crochet into the stitch below (spiked into previous round’s center stitch).
- Double crochet into the next chain space.
- When you come to a new side with extra spaces, spread the regular double crochets and spike stitches to match the extra space count.
Corners stay the same:
- 2 half double crochets
- Chain 2
- 2 half double crochets in each corner
With each round, you get one more "space" along every side. That’s how your easy crochet granny square grows square and flat.

Working Round 4: Balancing Spikes and Double Crochets
When you have a side with only two visible stitches below, just spike into the first one you can see—don’t stress if it’s not exact. The most important thing is to keep a steady rhythm: space, spike, space.
Tips to keep things even:
- If your square is curling, give it a gentle pull to relax the stitches.
- Keep those corners generous but not floppy. Chain 2 in each corner is just right.
- Use the stitch that clearly stands out for spike placement, especially when you have fewer visible stitches below.
Finishing Round 4: Joining and Continuing the Square
To finish, either:
- Join with a single crochet and chain 2 if you’re continuing,
- Or chain 2, slip stitch, chain 1, cut your yarn, and weave in your end if you’re done.
Using a stitch marker in your starting corner space makes it easier to spot where to join or begin each round.
Joining Recap:
- Single crochet and chain 2 to continue
- Chain 2, slip stitch, chain 1 and cut to end

Starting Round 5 and Beyond: Repeating and Growing Your Granny Square
From round 5 onward, the process repeats:
- Join with a single crochet into your starting space, chain 2 to begin each round.
- Add half double crochets at each corner with chain 2 in between sets.
- Along the sides, add a double crochet into each space, spike into the visible stitch below, and repeat.
- Every round gives you one more set of “space, stitch, space” along each edge.
Tips for growth:
- Use a stitch marker to keep track of your starting point.
- If you get lost, count spaces along one edge to check progress.
- Always pick the stitch you can see for spiking—don’t stress about absolute symmetry.
Working Sides and Corners in Round 5 and Later
With each round, repeat the core steps:
-
Side pattern:
- Double crochet in space
- Spike double crochet in stitch below
- Double crochet in space
- Repeat as many times as needed
-
Corner:
- 2 half double crochets
- Chain 2
- 2 half double crochets in the same space
Always work over tails for neatness. Smoothing out the edges with your fingers after each round helps the square hold its flat, crisp shape.
Pattern Repeat:
- (Side) [Double, Spike, Double] in each sequence along edge
- (Corner) [2 Half Doubles, Chain 2, 2 Half Doubles] in each corner
Balancing spike placement with regular stitches keeps the square lying flat.

Joining and Finishing Each New Round Until Desired Size
Decide when your spiked granny square is big enough (five rounds = 4 1/2 inches, more rounds = up to 6 1/4 inches or beyond). When finished:
- End with your preferred join
- Secure the yarn tightly with a final chain
- Cut a long tail for sewing in later
Should you keep going or stop early?
- More rounds: Big, bold statement square, perfect for larger projects
- Five rounds: Mixes well with other 4 1/2-inch motifs
Securing and Weaving in Tails: Final Touch for a Clean Finish
Properly weaving in your ends keeps your granny square looking sharp wash after wash.
How to sew in tails:
- Thread your needle and run yarn under several fat bar stitches on the back (about three times in one direction, twice in the other).
- Pull snug but don’t distort the square.
- Trim any excess.
If you want true ease, use a sharp-tipped needle like those found in my favorite Sharp Tip Needles set.
 Tips To Keep Your Granny Square Flat and Square
- Control tension: Don’t pull stitches too tight or too loose.
- Pull tails in the center: Especially with the magic ring, keep that center snug.
- Mind your stitch placement: If you can't see a stitch for the spike, go with the one that's most obvious.
- Block your squares: Gently steam and flatten if they curl.
Careful tension and stitch placement are everything for a flat, easy crochet granny square.
Looking for more tips? See how others approach this topic on Reddit’s Brochet forum’s no-hole granny square discussion.
How to Customize Your Spiked Granny Squares
The best part about this pattern? You can make it your own.
- Color mix: Play with shades for stripes, solids, or unpredictable color changes.
- Size control: Stop at your preferred row for the right dimensions—mix five-round squares with others for patchwork looks.
- Project ideas: Try them in blankets, cozy bags, table runners, or even sweater panels.
For more advanced square ideas, see my fun 3D Chrysanthemum Granny Square Tutorial.
If you want to learn how others create solid, seamless granny squares or how to avoid those annoying gaps, Sarahmaker’s tutorial offers more options and variations to try.
Left Handed?
Conclusion
With this step-by-step process, your next granny square will be perfectly flat, firmly edged, and free of gaps. The spike stitch gives the right amount of drama without fuss, making this an easy crochet granny square you’ll reach for time and time again. Sew in those tails, join as many as needed—the possibilities are endless.
Stay creative and keep those hooks moving! For more patterns, tips, and crochet community fun, check out the Secret Yarnery’s other helpful guides or my Step-by-Step Guide to Making a Granny Square. Happy crocheting!
FAQ: Perfect Spiked Granny Square
1. What is a spiked granny square?
A spiked granny square is a variation of the classic crochet granny square. It uses spike stitches to add texture and remove large gaps, resulting in a flat, modern, and sturdy square.
2. Why are there no big holes in this pattern?
The spike stitches and close-set clusters keep the fabric firm. The center starts tightly with a magic ring, leaving no open holes in the middle or at the corners.
3. What yarn and hook size should I use?
Worsted weight acrylic yarn works best. Use a 6 mm crochet hook for this weight. You can use any yarn and hook you like, but adjust your hook size to match your yarn.
4. Can beginners make this square?
Yes. This pattern is easy and beginner-friendly. If you know how to double crochet and half double crochet, you can do this.
5. What is a spike stitch?
A spike stitch is just a double crochet worked into the stitch or space one row below, instead of the current round. It adds visual interest and keeps the fabric tight.
6. How do I keep my granny square flat?
Crochet with even tension. Don’t pull stitches too tight or too loose. Smooth out your square after each round. Block your finished squares if needed.
7. Do I have to use the magic ring start?
The magic ring gives a closed center. If you prefer, you can use a chain-three ring, but there will be a small hole in the middle.
8. How do I change colors cleanly?
When you finish a round, fasten off. Join your new color in any chain space with a slip stitch, then continue the pattern.
9. How do I weave in yarn tails securely?
Thread tails through several back loops of stitches in both directions. This anchors your ends so they don't come loose.
10. What projects can I make with these squares?
Use them for blankets, tote bags, pillow covers, table runners, or even clothing panels.
11. Can I mix these with other granny square patterns?
Yes. Five-round squares work well with other 4 1/2-inch motifs. Just match the finished size for best results.
12. What if my spikes don’t line up perfectly?
It’s fine—just use the most visible stitch below when making your spike. The texture will even out.
13. How do I join many squares together?
Use any joining method you like—single crochet, whip stitch, or join-as-you-go. Flat, firm squares make joining easy.
![]()
Christa Patel is the founder of Secret Yarnery, a go-to destination for clear, friendly, and practical crochet tutorials. With years of hands-on crochet experience, Christa specializes in breaking down complex patterns into simple, easy-to-follow steps for all skill levels. Her YouTube channel and website reach thousands of crafters each month, helping beginners and experts alike enjoy successful, stress-free crochet projects.
Christa is known for her creative twist on classic crochet motifs, such as her spiked granny square and 3D flower blocks. Her teaching style is approachable, detail-oriented, and focused on results that look great and last.
When she’s not behind the camera or her crochet hook, Christa connects with the global yarn community, sharing tips, troubleshooting common problems, and inspiring creativity through every stitch.