How to Crochet a Gorgeous Striped Granny Square: A Step-by-Step Guide
Ready to make a Striped Granny Square that looks as good as it feels? This tutorial walks through every step of making a bold, colorful granny square—perfect for blankets, cushions, or even as a standalone statement. I’ll cover everything from materials and setup, to color changes and finishing touches. This guide is beginner-friendly, full of details, and keeps things fun.
Crochet is more than just making stitches—it’s about putting personality into every square you create. With just yarn scraps, a hook, and some creativity, you’ll have a granny square you’ll be proud to show off.
Materials and Supplies Needed for Your Striped Granny Square
Let’s gather everything you’ll need before starting. Organized tools and clear materials make crocheting more enjoyable and less stressful.
Yarn:
- Any type or size of yarn works—wool, acrylic, cotton, or blends.
- For this example, I used scraps of size 4 worsted weight acrylic.
- Mixing colors? Dive into your stash and pick any shade you love.
Crochet Hook:
- Use whatever size the yarn label suggests for the weight you’ve picked.
- For size 4 worsted weight, a 6 mm hook is ideal.
Additional Tools:
- Scissors for trimming.
- Yarn needle for sewing in your ends.
Here’s a handy table for a quick supplies check:
| Item | Details | Tips |
|---|---|---|
| Yarn | Any fiber, any color | Mix shades for more stripes |
| Crochet Hook | Size as suggested on yarn | 6 mm works well for size 4 |
| Scissors | Small, sharp if possible | Only for trimming yarn |
| Yarn Needle | Durable, sharp tipped best | Eases weaving in yarn tails |
All patterns are written in plain English and available at the Knitting and Crochet Patterns Collection if you’d like to follow along with a printable version.

Understanding the Basics: What Is a Granny Square?
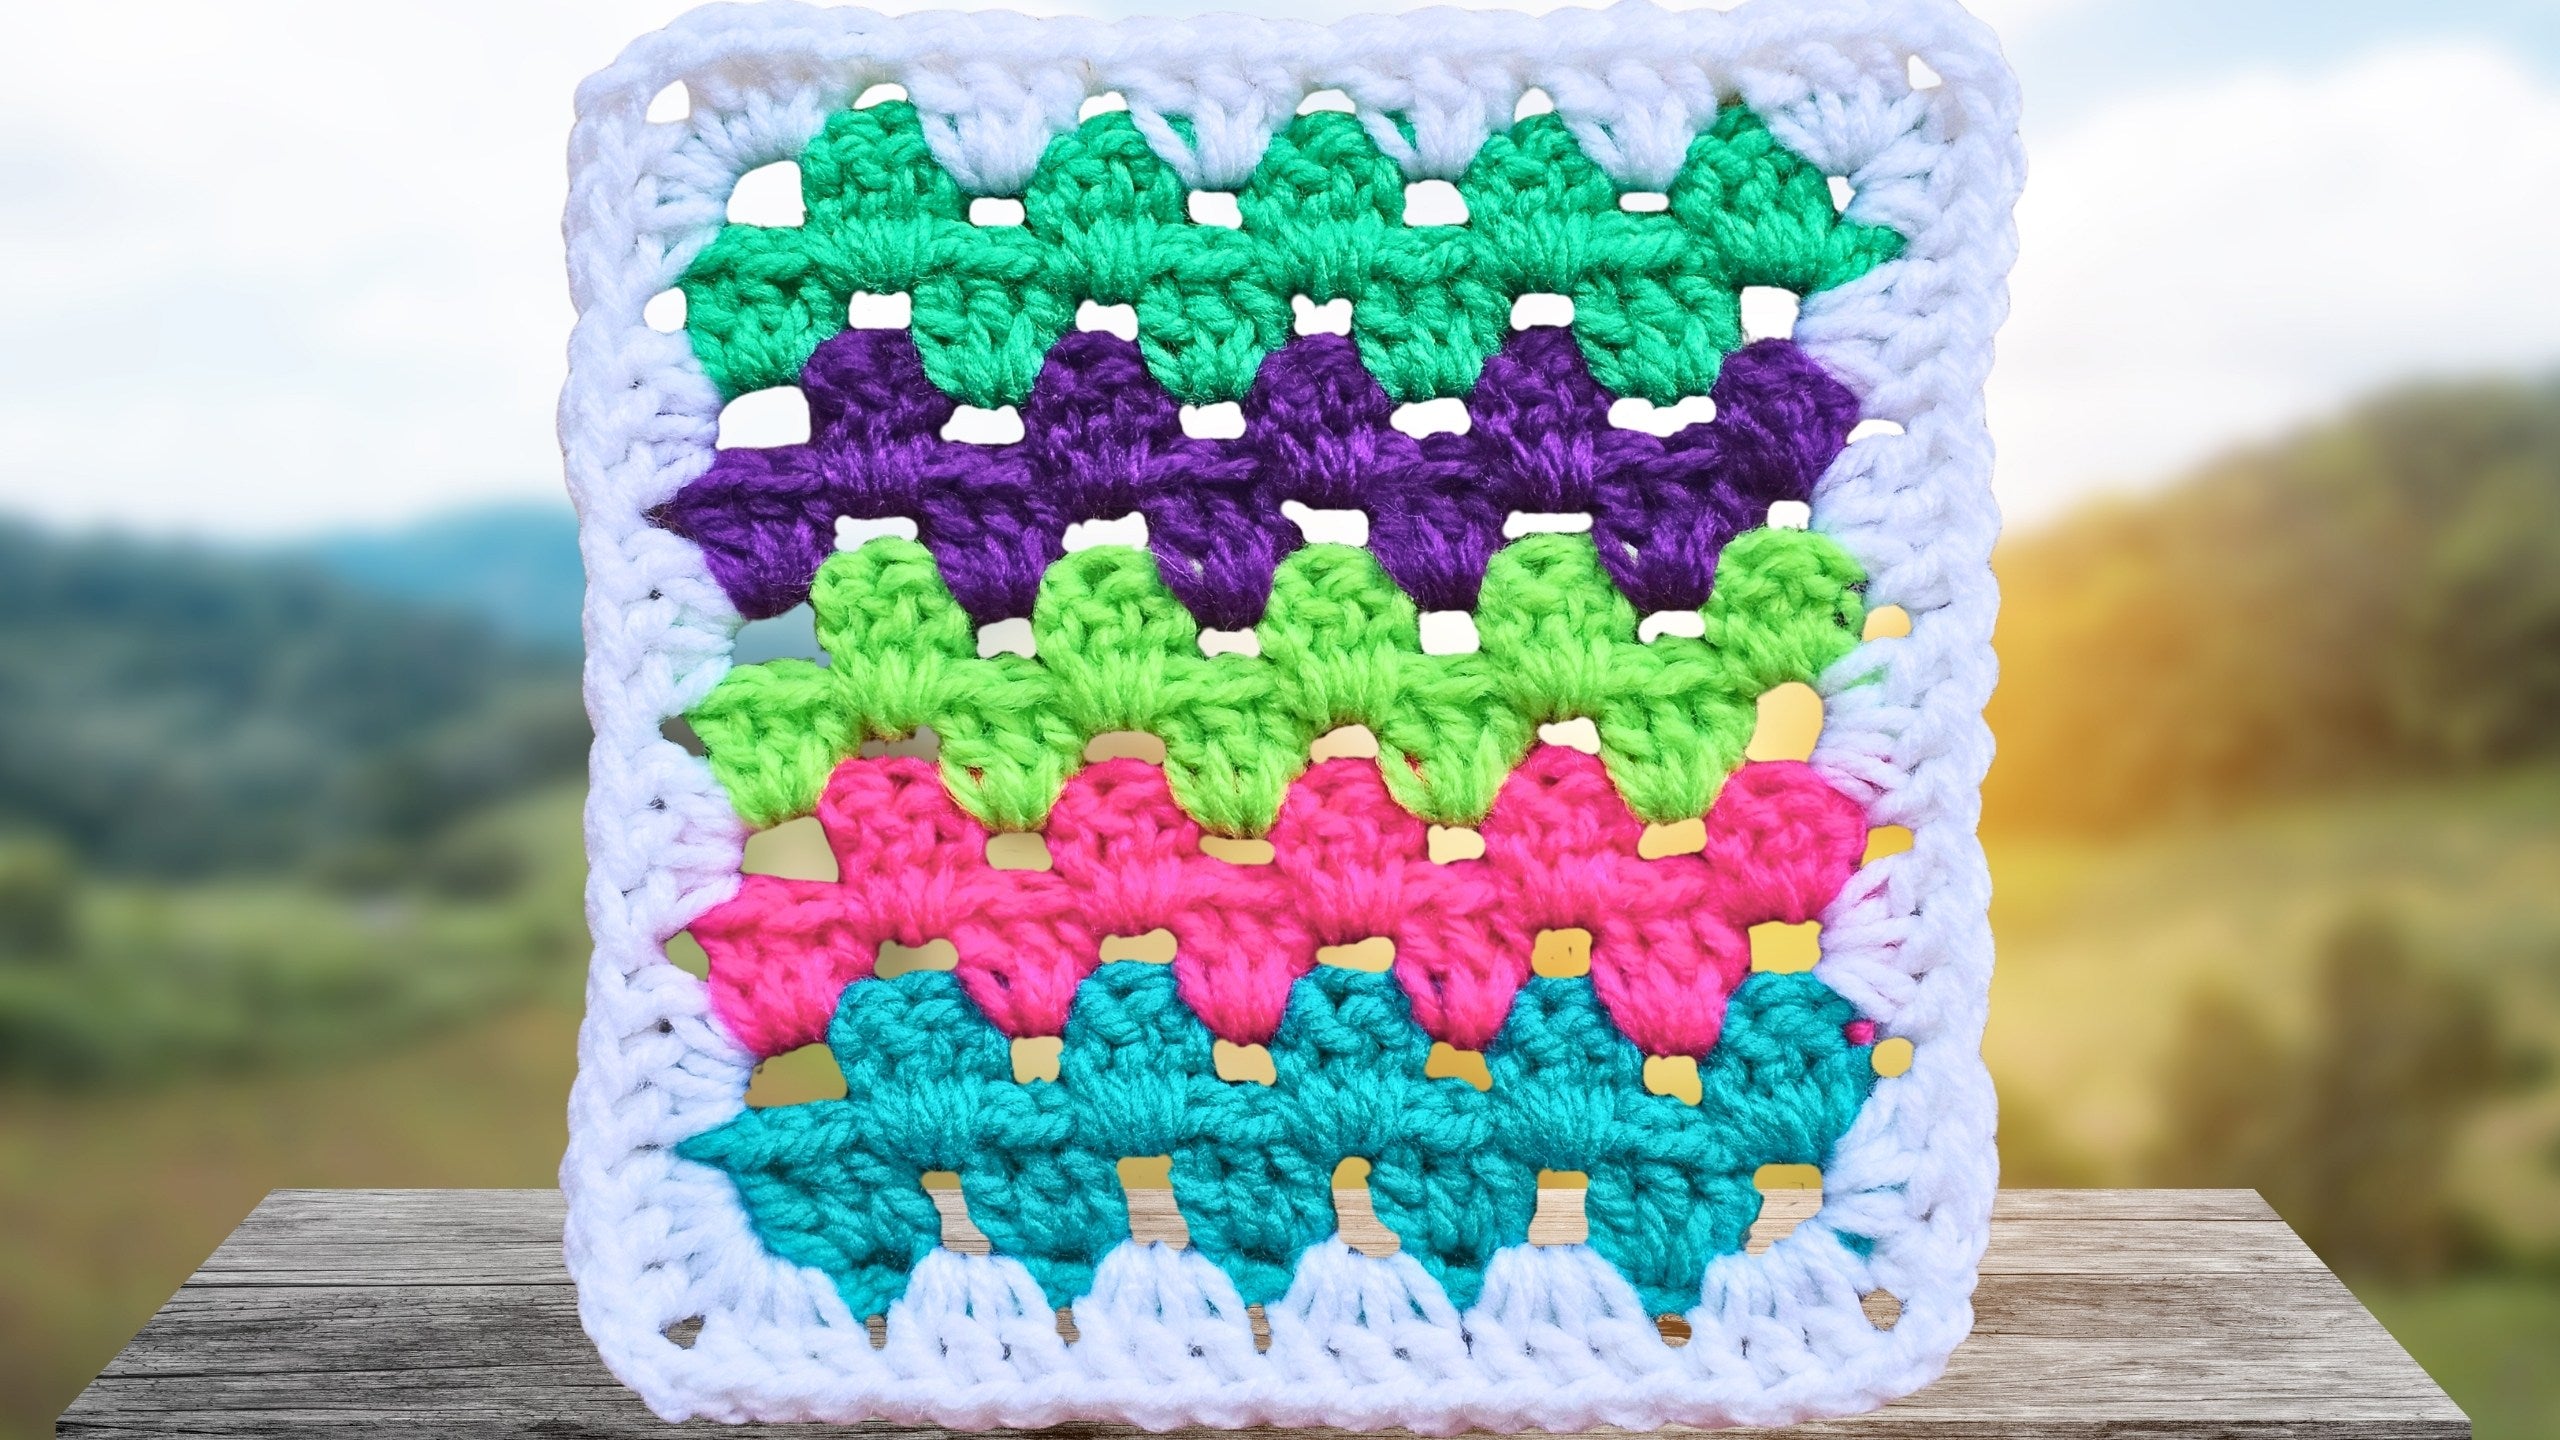
A granny square is a classic crochet block made out of clusters of stitches. It’s loved for its simple rhythm and endless flexibility. The striped granny square adds fresh style by using rows of different yarn colors, giving your project that eye-catching “pop.”
When finished, your square will feature neat rows of bold stripes, with even edges and corners perfect for joining with other squares or adding a border.
For more on basic granny squares, check out the How to Crochet a Granny Square guide for another approach.
Starting Your Granny Square: Making the Foundation Chain
Starting strong makes the rest of your square easier. Here’s how I kick off the project:
- Make a slip knot: Use your usual method and leave a long tail so you can weave it in later.
- Slide the slip knot onto your hook.
-
Chain 18: That’s the magic number for a five-round striped granny square.
- If you want a bigger square, increase the total by adding multiples of three after your first six.
- Check your chain— make sure it’s even and not twisted.
Tip: A longer chain lets you make even bigger squares. Just focus on working in sets of three chains after the sixth chain.

First Row: Creating the Base Clusters
With your foundation chain ready, it’s time to add structure:
-
Three double crochets (dc) in the sixth chain from your hook.
- Bold move: This is your first cluster—call it your “anchor.”
- Skip two chains. In the third chain, crochet three double crochets (another cluster).
- Continue down the chain: Always skip two chains, then work three double crochets into the next (third) chain.
- Repeat this all the way until you have just three chains left.
-
In the very last chain, work four double crochets.
- That extra stitch forms a handy corner at the end of the row.
Why the corner? It helps your square stay flat and makes it easier to add a tidy, even border later on.
Color Changes: Planning Your Striped Granny Square
Big, bold stripes bring granny squares—and your projects—to life. When to switch up your colors is up to you:
- Every two rows: Like I did in my example. This method gives balanced, chunky stripes.
- Every row: For skinny, frequent color changes.
- Choose at least five colors to keep the square eye-catching and even.
- The more often you change colors, the more yarn tails you’ll have—but don’t worry, I’ll show you my trick to keep them tidy.
Think ahead about your color sequence. Alternating bold and neutral shades often works best to define your stripes and add visual interest.

Row Two: Building More Granny Stitch Clusters
Here’s where the pattern starts to take shape and you get that true granny square look.
- Chain two (or three if you find your tension is tight) to bring your new row up to height.
- Turn your work.
- Identify the open “spaces” between your clusters from the previous row.
- Into each space, crochet three double crochets.
- Work your way down the row, filling all the spaces.
- Finish the row by placing three double crochets in the last space—this keeps your edges straight.
- By the end of this row, you should have five shells (clusters) across.
Counting as you go helps avoid missed or extra clusters. If you’re a visual learner, diagrams or photos can really help spot each space.
How to Change Colors Cleanly
Clean color changes keep your square looking sharp—no rogue yarn flecks here. Here’s my way to manage the change at the end of a stripe:
- Chain one.
- Cut your yarn, leaving a tail long enough to weave in with a needle.
- Pull your hook and yarn through the last stitch. Snug it down gently.
- Turn your work to the other side.
- Insert your hook into the very first stitch of the row—the new color always starts there.
- Drape your new yarn color over the hook and pull through.
- Slip stitch with both strands (tail and working yarn) to join.
- Drop the tail along the back of your work and hold in place as you start.
- Chain two to begin the new row.
Tip: Always join at the beginning, not end, of the row—this keeps your color crisp and the top row neat.
For more ideas and techniques on adding new colors to granny squares, see the colorful Granny Squares Step by Step breakdown.

Rows Three and Four: Continuing the Pattern with New Colors
Sticking with your pattern, it’s time to grow your square and add the next stripes.
- Start every new color row with a chain two and a turn.
- Skip the first shell (don’t work into it). Instead, insert your hook into the next space along.
- Crochet three double crochets into every space until you hit the end.
- Finish each row with a cluster in the last space.
- After two rows with the same color, finish off as before (chain one, cut, pull yarn through).
- Join your next color at the start of the following row, using the “clean color change” steps above.
Recap bullet points:
- Start each row with chain two + turn.
- Work clusters only into spaces, not into individual stitches.
- Change color every two rows (or as you wish).
- Weave tails to the same side to help with a clean finish.
Repeating Stripes: Completing Five Color Sets for a Square
Let the rhythm set in and keep repeating until you have the classic 5x5 “chicklet” pattern:
- Choose five different colors and complete two rows for each.
- Each set of two rows forms a single “stripe block” or chicklet.
- You’ll end up with five blocks high and five blocks wide—a perfect square.
- Keep your rows even:
- Check that each row ends and begins in the right place.
- Make sure your clusters line up and that you always have the same number in each row.
- Planning ahead can help you alternate lights and darks, or create a gradient.

If you like plenty of color, you can keep expanding by adding more color sets. This design is ideal for turning into a blanket, throw pillow, or bag panel.
Sample color combos for stripes:
- White, mint, sapphire, pink, grey
- Black, lime, turquoise, coral, soft yellow
- Your favorite team colors
Finishing the Last Color Row and Creating a Corner Space
When you reach the final row in your color sequence, finish it off with a tidy corner:
- In your last row’s end space, place three double crochets.
- Chain two to build the corner space.
- Slip stitch into the same space—this locks in the corner.
- Chain one, cut your yarn (remember a long tail for weaving in), and pull the tail through to secure.
This clear corner makes it easy to line up borders or join to other squares in your next project.
Adding the Border: Preparing to Edge Your Granny Square
A border pulls all your stripes together and makes your square easier to join or use on its own.
- Choose yarn for the border—match a main color or choose a contrasting shade.
- Start by joining your yarn with a slip stitch at one of the corner spaces (the ones you made with chain twos).
- Hold your tail along the top edge as you crochet to help weave it in.
- Chain two right at the start—this counts as your first double crochet in the border.
Quick border prep checklist:
- Select border yarn color.
- Slip stitch and chain two in a corner.
- Hold tail along edge for easy finishing.
This sets up your border row so it’s even and neat.

Crocheting the Border: Shell Stitches Around the Edge
Here’s how to add a clean shell stitch border on your finished square:
- From your corner starting point, crochet three double crochets in the same space (corner = first shell).
- Along each side, place three double crochets in every available space.
- When you reach a corner space, work this sequence:
- Three double crochets, chain two, three double crochets (all in that corner).
- Repeat this sequence for all four sides.
- Work over yarn tails as you go—just lay them along the top edge as you stitch.
Corners are especially important here; if your corners lay flat and sharp, your square will keep its shape when joined or blocked. If you need more room, gently separate the stitches with your fingers as you work—this lets the border remain smooth and even.
By the time you complete the border, your square will have a perfect frame that highlights each color stripe.
Working Over Tails: How to Manage and Secure Yarn Ends
Weaving in yarn tails is essential for a professional finish and a durable square.
Tips for working over tails:
- Lay the yarn tail atop the edge or side where you’re crocheting.
- Work your stitches right over the tail, trapping it in place.
- After a few stitches, let the tail hang—later you’ll weave in the rest with your needle.
It’s not strictly required to work over tails, but it makes later weaving easier and keeps projects feeling smooth.
Sometimes tails are thick or stubborn. In these cases, leave extras to the needlework stage.
Related advice is available in many beginner guides such as How to Make a Granny Square.

Completing the Border and Joining Final Stitches
When you’ve added shells along all edges and corners, here’s how to wrap up the border round:
- Crochet shells in all spaces, corners included.
- End by reaching the original starting corner.
- In that same corner, finish with three double crochets, chain two.
- Slip stitch into the top of the starting chain to join the round.
- Chain one, snip your yarn (leave a tail), and pull yarn through to fasten off.
A tight, clean join on the last stitch helps keep your square’s border nice and even.
Sewing in Yarn Ends: Tools and Techniques
Finishing off with tidy yarn tails takes your square from “homemade” to “handcrafted.”
Recommended tools:
- Sharp-tipped needle, designed for yarn (find these in most craft shops).
Follow these steps:
- Thread the yarn tail onto your needle.
- Pass the needle through a few stitches, picking up fibers within the same color row to keep the weave invisible.
- For a sturdy hold, turn and bring the needle back along another part of the row.
- Pull snug, but not too tight—you want the square to stay fluffy.
- Trim the excess yarn close to the edge.
Benefits:
- Keeps edges neat, even after washing.
- Prevents any contrasting colors from peeking through.
- Strengthens the structure and join between rows.
Take time to sew in all tails, including those from every color change and your border.

Tips for a Professional-Looking Granny Square
Want your granny square to look neat and store-bought? Keep these tips in mind:
- Consistent tension: A gentle, steady pull with every stitch prevents bumpy rows.
- Accurate stitch counts: Double-check chains and clusters for gaps or crowding.
- Careful color changes: Fasten off and join as described—avoid shortcut tie-ons.
- Clean up tails promptly: It’s tempting to leave them until the end, but sewing them in after each section keeps things tidy.
- Blocking: Wet or steam blocking your square flat gives it a crisp, even appearance.
A little extra time spent on these small details makes every square feel more special.
Variations and Customizations
The beauty of granny squares is their adaptability! Here’s how to mix up your striped square:
- Change color every row: Create pinstripes for extra pop.
- Vary yarn weights or textures: Try lightweight cotton or chunky wool for different effects.
- Adjust size: Start with a longer or shorter foundation chain (multiples of three) for bigger or smaller squares.
- Creative borders: Add a scalloped edge, picot, or another specialty stitch for more flair.
- Multiple rounds: Keep going around your square for an afghan or “one giant granny” rug.
- Project ideas: Combine lots of striped squares to make baby blankets, throw pillows, or a statement tote bag.
For patterns and more unique border ideas, visit the Cozy Blankets Collection at Secret Yarnery for inspiration.

Additional Crochet Resources and Support
Want to grow your crochet skills? All my patterns use plain, beginner-friendly language.
See the Knitting and Crochet Patterns Collection for a library of projects and easy-to-read Q&As.
Connect with online groups or social communities, where thousands of crocheters share tips and support new learners. You’ll always find a helpful answer or a friendly cheer.
Conclusion
Every granny square is a small step in a bigger journey. Striped squares let you mix old favorites with modern design and let your personal style shine. Now you know how to crochet a striped granny square from start to finish, switch colors smoothly, add a sturdy border, and finish tails like a pro.
Your first square is just the beginning—combine many into a blanket, personalize a bag, or gift one as a keepsake. Keep learning, share your progress, and enjoy every stitch. Stay hooked—and happy crocheting!
Left Handed?
FAQs
What yarn weight is best for granny squares?
You can use any weight of yarn for granny squares! The tutorial uses worsted weight (#4) acrylic, but you can try cotton, wool, or blends. Adjust your hook size to match the yarn for neat, even stitches.
How do I keep my granny square edges straight and neat?
Count stitches after each row, always cluster into chain spaces (not in the stitches), and don’t skip your turning chain. Blocking your finished square also helps keep everything flat and sharp.
I'm a beginner—are granny squares hard to crochet?
Not at all. Granny squares are beginner-friendly. The same simple stitch repeats across the project, so it’s perfect for learning. The only extra skill is changing colors, which is covered step-by-step above.
How many colors should I use for striped granny squares?
It’s up to you! Five colors create a bold look, but you can use as few or as many as you like. Try alternating light and dark shades for extra contrast.
What if my squares aren't the same size?
Granny squares can vary if your tension changes or your yarn weights differ. Try to keep the same yarn and hook throughout the project. Blocking all your finished squares before joining helps match up the sizes.
How do I join multiple granny squares together?
There are lots of ways: slip stitch, whip stitch, single crochet, or special join-as-you-go techniques. Lay out your finished squares, pin in rows, and join with your preferred method. The Secret Yarnery offers tutorials on multiple joining methods.
What is the easiest way to weave in yarn tails?
Work over the tails with your stitches as you go. For any remaining ends, use a yarn needle to weave them under a few stitches of the matching color back and forth, then trim close for a neat finish.
Can I make a blanket out of striped granny squares?
Absolutely! Make as many squares as you want, then join them together for a throw, baby blanket, or bedspread. Customize your size, color, and border for your perfect project.
My square curls or waves at the edges—how do I fix it?
This usually means your tension changed or your corners need a little more space. Make sure you add the exact corner chains (usually two) and keep stitch counts steady. Wet or steam block your square and reshape it to lie flat.
![]()
I’m Christa Patel, the creator behind The Secret Yarnery. My mission is to make crochet simple, joyful, and accessible—no matter your skill level. I believe crochet should feel relaxing, not overwhelming, and that’s why I use clear, beginner-friendly patterns with step-by-step video tutorials.
After rediscovering crochet as a busy mom, I wanted to help others experience the same sense of accomplishment and creativity that crochet brings. I now share patterns, tip-filled guides, and free lessons with a friendly, supportive online community. You can find me on YouTube, where I post weekly tutorials, live chats, and plenty of inspiration for your next project.
Whether you’re just starting or looking to learn new techniques, I’m here to cheer you on each stitch of the way.
Let’s crochet something beautiful together!
— Christa