Turn a Crochet Flower Bouquet Into a Cute Bag You’ll Love
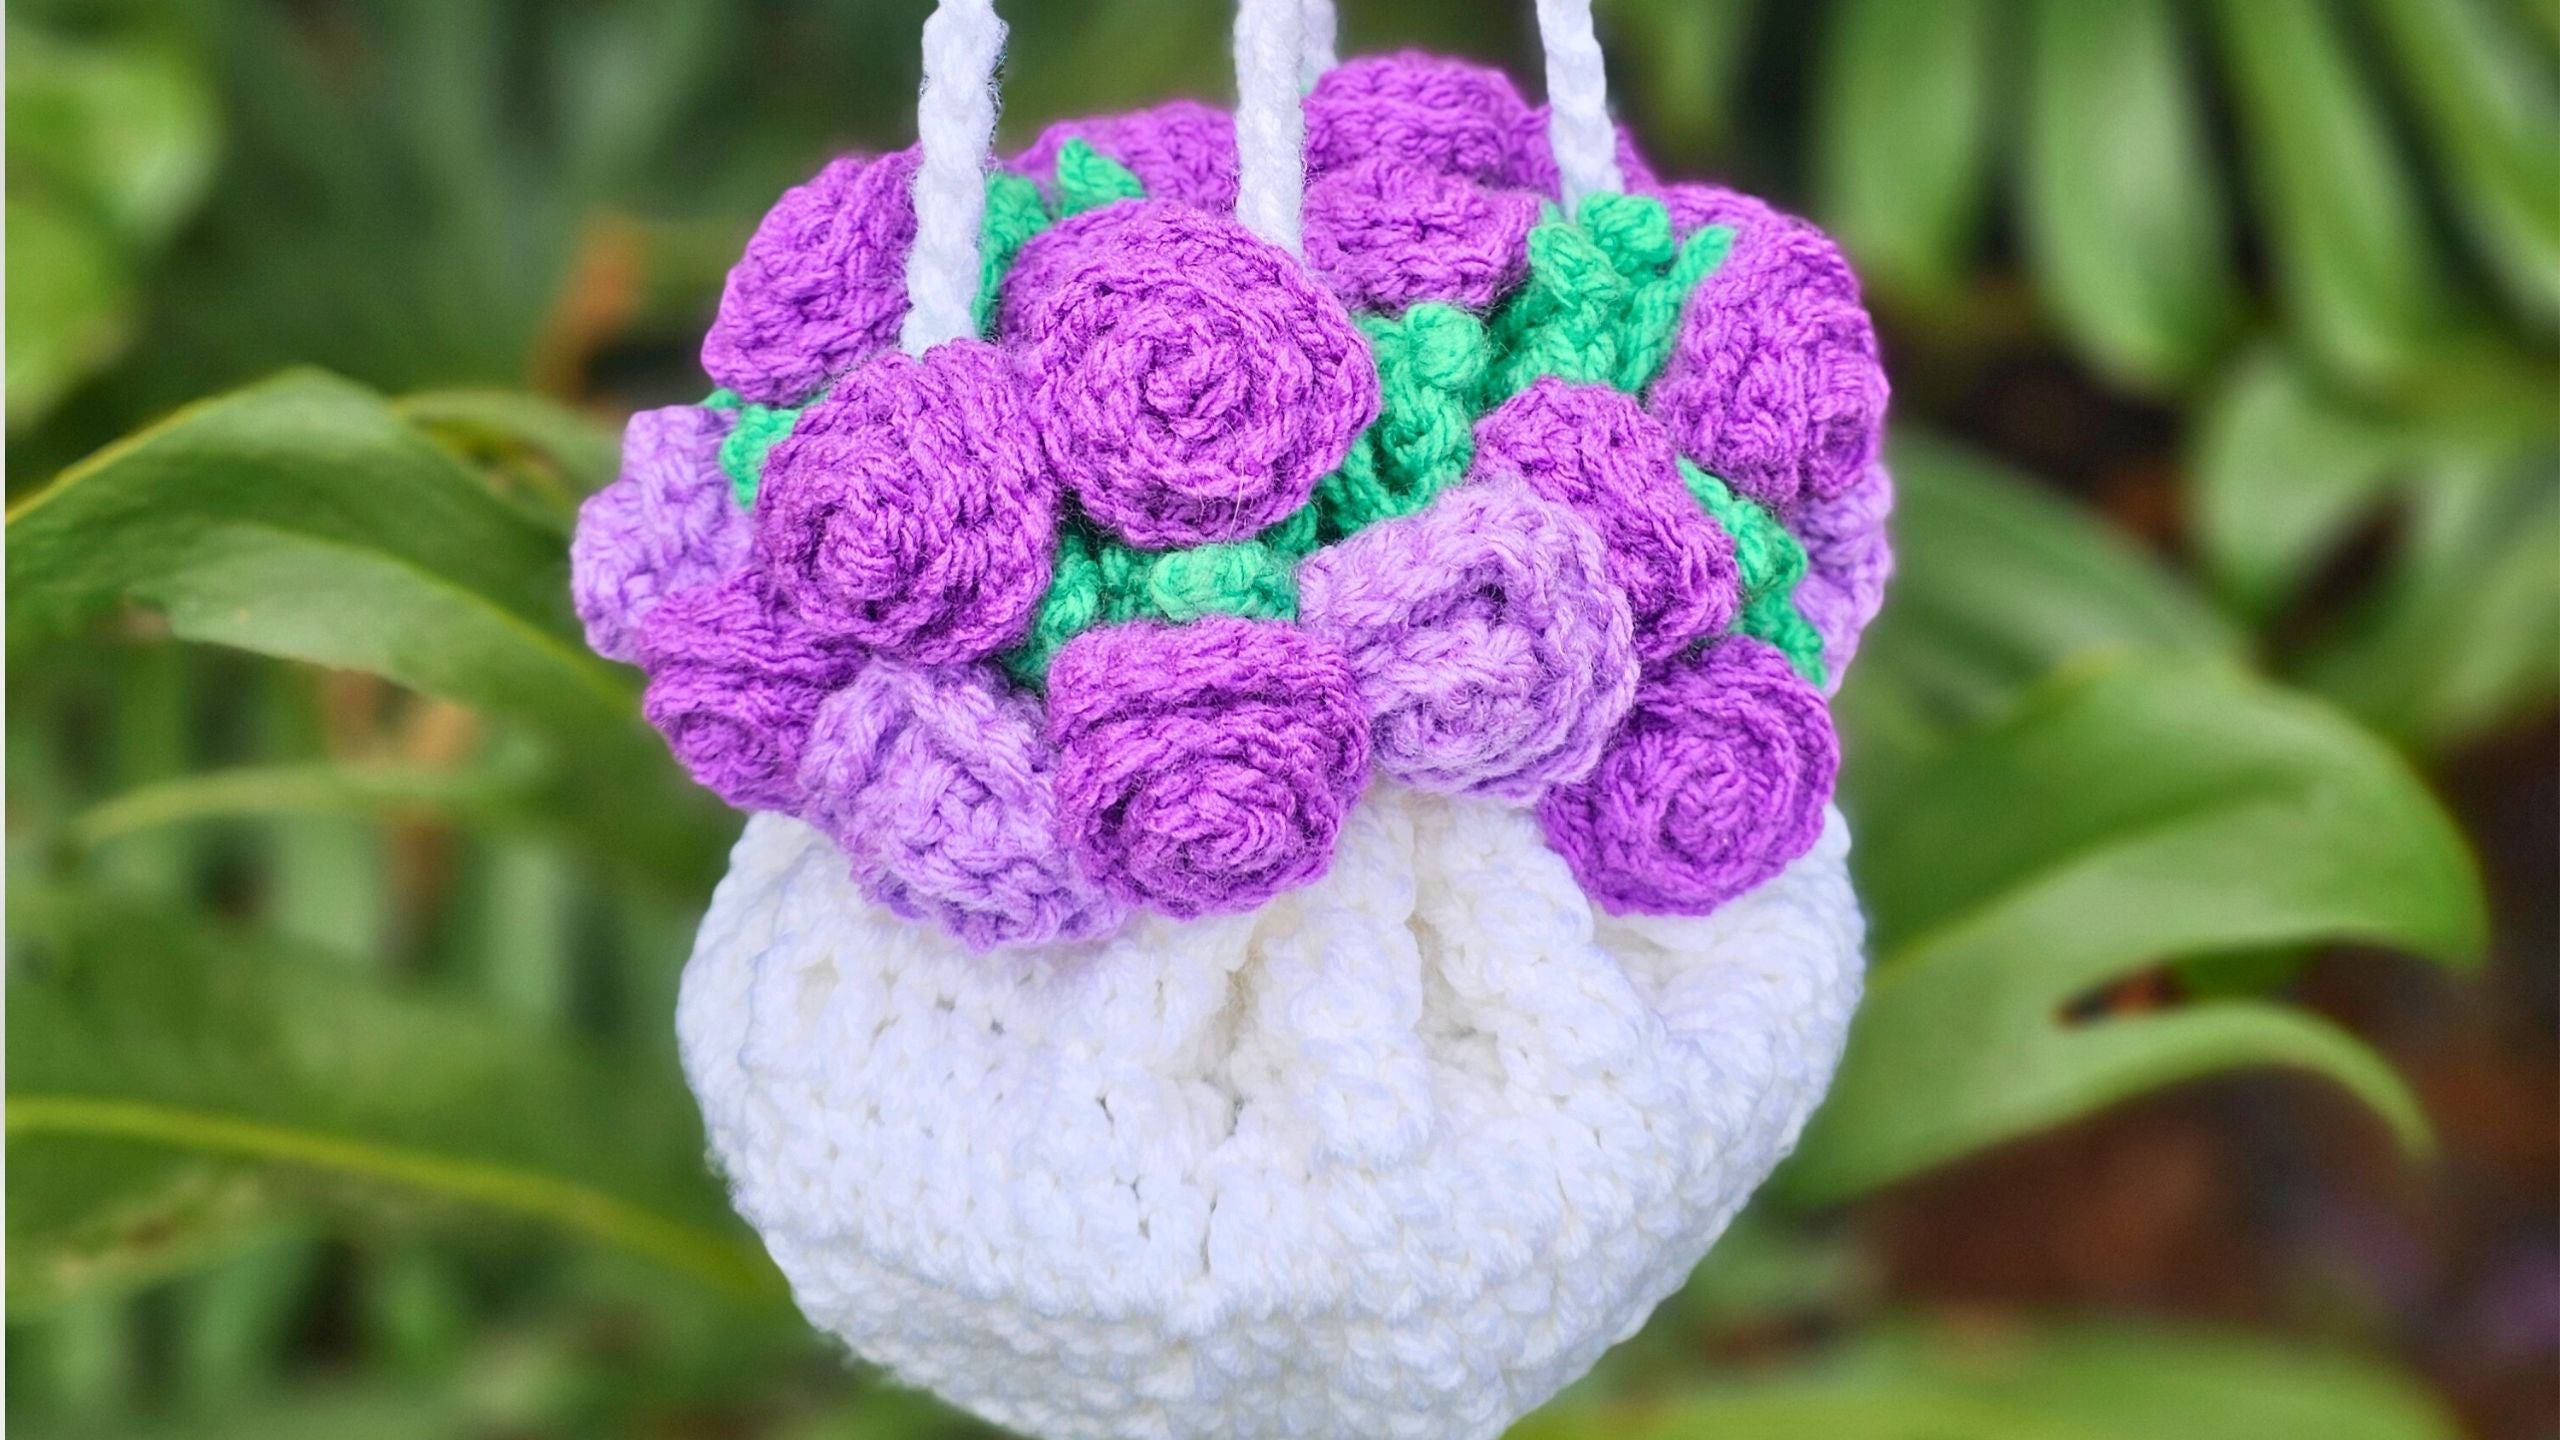
If you’re looking for a fun, beautiful, and practical crochet project, get ready to fall in love with the crochet flower bouquet bag! This cute bag brings a splash of spring wherever you go, turning your flower bouquet into a portable drawstring purse. The design is full of charm and so easy to customize. Whether you want longer straps or a unique shape for the base, this bag fits your style and your needs. I’m Christa from Secret Yarnery, and I’ll help you create this adorable accessory, perfect for gifts, yarn storage, or just adding a little floral joy to your day.
The Crochet Flower Bouquet Bag: Project Overview
The crochet flower bouquet bag combines beauty and function in a single design. With a drawstring closure, you can cinch the opening for a compact look, or leave it loose for a blooming flower effect. The customizable handles let you decide exactly how you'll carry it, and the base can be shaped to your liking using common kitchen items. This bag is as unique as you are and makes a wonderful accessory or gift.
Whether you want a single-color bouquet or a rainbow of flowers, the pattern is flexible. Beginners can follow along step by step, while experienced crocheters will appreciate the creative possibilities.

Materials You’ll Need for a Crochet Flower Bouquet Bag
Gathering the right supplies makes the whole project more enjoyable. Here’s what you’ll need for this cute bag:
-
Yarn: Size 4 worsted weight acrylic yarn in four colors:
- 100g white (main body)
- 50g green (leaves)
- 100g dark shade (flowers)
- 50g light shade (flowers)
- Optional: Use more than two flower shades for variety or stick to a single color for a classic look.
- Crochet hook: 6 mm size recommended.
- Stitch markers: 12 are helpful for beginners, especially when setting up the bag.
- Scissors
- Yarn needle
- Yarn threader (optional, but useful for threading multiple yarn strands)
- Bag base form: Something to keep the shape at the bottom—think a cereal bowl, flat lid, or even the strainer part from your kitchen.
Pro tip: Simple household lids, bowls, or strainers can help your bag hold its shape, and you can swap the base out for different looks as you wish.

Choosing and Preparing the Bag Base
A flexible bag base means your crochet flower bouquet bag can be big or small, flat or rounded. The bottom of the bag holds its shape best when supported. Some ideas for your base:
- Cereal bowl (for a rounded, spacious bottom)
- Flat plastic lid (for a sleek, modern look)
- Strainer insert (for a lightweight, airy bag)
- Try searching your kitchen for the perfect base! Even grocery stores may have cheap lids or small containers that work.
By using an everyday object, you can easily change the final shape of your bag. The support at the bottom not only keeps the bag structured but also helps your bouquet flowers look extra perky and full.
If you like to explore creative options for bag making, check out the variety of bag patterns and tips in the Secret Yarnery Crochet Bags collection.
Getting Started: Creating the Magic Ring
Let’s start building the base of the bag with a strong, flexible foundation known as the magic ring. This technique is ideal for round projects, ensuring that your stitches pull tightly together in the center.

Here’s how you do it:
- Lay the yarn tail over your non-dominant hand and hold it on your ring finger and thumb.
- Wrap the yarn around your first two fingers to form an "X," then bring it around your third finger, holding it with your thumb.
- Flip your hand over so you see two strands—a short and a long one.
- With your crochet hook (hook facing down), go under the short strand and over the long strand.
- Pull the long strand under the short strand, then point the hook toward yourself.
- Gently release your thumb to let the yarn slide slightly.
- Put your hook under the long strand, grab all the yarn under your hook, turn your hook, and pull the yarn through the loop. Tighten for a neat ring.
Alternative: If you prefer, use a chain three ring, joining a small circle to work into.
Once the ring is set, chain two (this will count as your first double crochet). Work 11 double crochets into the center, making sure you stitch over the yarn tail for later tightening. This gives you 12 stitches total if you count the initial chains.
As you crochet, gently tug the yarn tail to keep things firm, but not so tight you can't move your stitches. Once all your stitches are in, pull the tail snug to close the ring and form a solid base.

Joining the Round and Beginning the Spiral
With your first set of double crochets finished, it’s time to join the round. Slip stitch into the top of your beginning chain two, making sure two strands sit on top of your hook. This closes your circle cleanly.
Now, chain one to set up your next round. Into the same space, make one single crochet and one half double crochet to start your spiral. Mark your first single crochet with a stitch marker—this helps you keep track of the starting point as the rounds build.
If you’re visual, drawing a simple diagram or snapping a photo can clarify where stitches go for the spiral start.
Expanding the Circle: First Increase Rounds
Now the fun starts—growing your bag! Increase in each round to keep the circle flat and even.
Checklist for first rounds:
- Two double crochets in each stitch for the next round (check that you have the correct stitch count).
- Pause to count your stitches after each round.
- If your circle starts curving or buckling, loosen your tension just a bit.
If you want to see this written out with plain language instructions and clear step-by-step breakdowns, the full written pattern is available at Secret Yarnery. For even more inspiration, see the Crochet Bag Designs Blog for beginner-friendly projects.
As your circle grows, slip stitch to join each round. If using a stitch marker, be sure to move it up after each round for easy reference.

Building Up with Sets and Chain One Spaces
To give the bag both structure and flexibility, it's time to create sets of stitches separated by chain one spaces. This method grows the diameter of your base while making it easy to spot section changes.
Here’s the basic structure:
- Start with two double crochets into the first stitch of each set, then one double crochet and one chain one into the second stitch.
- Repeat around: two double crochets in the first, one double crochet plus chain one in the next.
- As the bag grows, add more double crochets in each set and always use a chain one to separate the groups.
Stitch markers come in handy here. Pop one into each chain one space so you can easily identify your 12 sections as you go. This is especially useful as the pattern grows and the bag gets bigger.
Why use chain one spaces? They give the circle the flexibility to expand without puckering, and the result looks clean and tidy—a must for a flower bouquet pattern!

Growing the Circle: Rounds 3, 4, and 5
With each new round, the number of stitches per section grows. Keep the pattern going, always starting the set with two double crochets, then work one double crochet into the remaining stitches of the set (the number increases with each round). After each set, chain one before moving to the next section.
- Round 3: Sets expand by one more stitch; chain one spaces always separate sets.
- Round 4: Each slice grows longer, with extra double crochets per set.
- Round 5: Continue the expansion pattern, checking that your chain one spaces and sections align.
The size of your circle is totally your choice—just keep working until it reaches your desired diameter or until you have nearly used a whole skein of yarn. My sample bag measures about 14.5 inches across after 12 rounds, which fits a standard ball of yarn snugly in the bottom.
Use your stitch markers on each chain one space for clarity—this makes tracking the sections much less stressful.

Finalizing the Circle and Starting the Bag Body
As you finish up the last circular round, it's time to taper the stitches:
- With four stitches remaining, work one half double crochet in each of the first two.
- In each of the last two, make a single crochet.
- Slip stitch into the next space to gently transition from the flat circle to the body of the bag.
Chain four to start the new round for the body. Chain one, skip one, then double crochet. Repeat this pattern all the way along. This creates the perfectly spaced openings that act as the drawstring channel later.
Your stitch count might not be identical to mine—just stick with the pattern and the look will stay neat and functional.
Creating the Bag Body and Drawstring Channel
The body of the bag is fast and fun to make. You’ll be repeating a simple pattern that forms the eyelets the handle will go through.
- Chain one, skip one, double crochet into next stitch. Keep repeating all the way around.
- When you return to the start, close with a slip stitch into the second chain from your original chain four, leaving the first chain open.
- Secure your yarn, tighten, and remove all stitch markers.
This round of chain one holes creates an easy way to thread a drawstring or chain handle later, and gives your bag a cute, airy finish at the top. If you feel you want extra holes, add a couple more stitches—more room for a ribbon or thicker handles is always nice.

Making the Leaf Foundation Row
Add a pop of color and depth with a leaf round around your bag opening.
- With green (or leaf color) yarn, slip stitch into any stitch at the top edge.
- Chain two, single crochet into the next stitch, chain two, single crochet into the next stitch—all the way around.
- Slip stitch to join at the end, and your loops are ready for the next row.
Spacing evenly creates nice, even leaf supports. If your spaces look too tight or loose, adjust the number of chains until you’re happy.
Building Larger Leaf Loops
To make bigger, more dramatic leaf loops for your flowers to perch on, start with a chain 5 (this acts as your first single crochet plus a big loop). Then, repeat this pattern:
- Chain four, skip one single crochet, make a single crochet in the next.
- All the way around, keep making chain four loops, skipping one single crochet each time.
If you hit the end of your round and there’s not enough room for a full repeat, chain three and join seamlessly. These larger loops will hold your leaves and support your flower bouquet border.

Crocheting the Leaves
This is where your bag turns truly unique. Each loop becomes a leaf with just a handful of stitches:
- Chain two
- Double crochet in the loop
- Picot (chain three, slip stitch into the first chain)
- Triple (treble) crochet in the loop (yarn over twice before inserting the hook)
- Double crochet again in the same loop
- Chain two to return down
- Slip stitch into the single crochet to finish and secure the leaf
Repeat these steps in each loop around the opening until your bag is wreathed in leaves. The picot gives the leaf a lovely pointed tip while the triple crochet makes it stand tall and showy.
Securing the Leaves and Getting Ready for Flowers
When you finish your last leaf, slip stitch to join and fasten off, leaving a long tail to sew in. Pull the yarn through to secure it tightly.
Your bag now sports a full, leafy edge. This is where your flowers will bloom. Make sure the yarn tails are at least 10 inches long—long enough to weave in securely or use for attaching flowers neatly.
Pro tip: Keep all your yarn tails facing inside the bag for a polished outer finish.

Making the Crochet Flowers
The best part: adding your signature crochet flowers!
- Start with a slip knot and chain 14 (for standard flowers; chain 12 for smaller ones, 16 for larger).
- In the third chain from the hook, double crochet once.
- In the next chain, work two double crochets.
- In each remaining chain down the row, make three double crochets in each (your flower ruffles grow with each set).
- Slip stitch into the last stitch, chain one to secure.
- Leave a tail a foot long for sewing.
The flower forms as you work—your chain and double crochets curl up into a tight spiral that becomes a classic rose.

Rolling and Sewing the Flower
To finish your flower, roll up your double crochet strip, keeping the tops flat and the V shapes visible. This forms a natural spiral with all the petal “waves” on top.
With your yarn needle:
- Secure the tail and weave through the bottom of the rolled flower several times, back and forth, to anchor all the layers together firmly.
- Keep your stitches invisible from the top for the neatest finish.
You can use another color for your flowers if you want a variegated bouquet—just make sure you leave both starting and finishing yarn tails for sewing later.

Attaching Flowers to the Leaves: Placement and Tips
Attach your flowers with a small crochet hook or yarn needle using the yarn tails from the previous step.
- Run each yarn tail through a couple of strands at the base of a leaf (not in the holes).
- Cinch the flower tight and knot three times for a strong hold if the color matches.
- If using different colors, tie in loose bows first to check the arrangement before making knots.
For best effect, alternate the placement: one flower at a leaf base, the next in a valley between leaves, and so on. If you want a fuller bouquet, add more flowers; for a daintier look, skip some spaces.
A balanced, spaced-out look works well when the bag is gathered and carried.
Securing Flower Knots and Managing Tails
Once you’re happy with your flower arrangement, make a triple knot to hold each flower in place. If you have extra tails, thread both strands through a needle and poke them into the inside of the flower. Bring them out the other side and snip off excess yarn.
Keep this process going for all your flowers. It keeps the back tidy and flowers snug on the bag.

Creating and Attaching Handles for Your Drawstring Bag
Handles make your bag portable and practical. Here’s how to make neat drawstring handles just the right length:
- Mark two opposite points on the bag opening with stitch markers, splitting the circle in half.
- With matching yarn, use two strands together for sturdy handles. Leave a 5-inch tail for sewing.
- Make a slip knot, chain 35 for the handle, chain two more, slip stitch into the second chain to make a tidy end, then chain 35 more.
- Cut the yarn, leaving another 5-inch tail. Make a second handle the same way.
- Attach each handle by threading both tails on a needle and weaving under three stitches then over the next three, repeating all around the top opening.
- When you reach the starting point, tie off the ends with a firm knot, weaving the extra tail into the bag for security and neatness.
If you want fun color pops, use contrasting yarn for the handles. Adjust the handle length as needed—short for a wristlet, longer for a shoulder bag!
Finishing Touches and Bag Assembly
Slip in your chosen base (lid, bowl, or strainer) for the final structure. Nestle your handles between the flowers for a perfect bouquet shape as you cinch the drawstring tight.
Shuffle the flower arrangement if needed for symmetry, and make sure the handles slide easily for that classic drawstring effect.
If you love creative bag designs, you'll find even more ideas and step-by-step guides in the Latest on Stylish Crochet Bags.

Want More Crochet Flower Inspiration?
If you enjoy making floral crochet projects, you might like the vibrant patterns in the Flower Crochet Collection. For tutorials on creating full bouquets, arrangements, or as a practice run for your bag flowers, check out how to crochet a gorgeous spring bouquet.

Conclusion: Show Off Your Crochet Flower Bouquet, Cute Bag
That’s it! You’ve taken a crochet flower bouquet and turned it into a cute, functional bag you’ll love using. Your bag is ready to carry your essentials, brighten up any outfit, or be given as a unique handmade gift. The steps are simple, and the end result is always special—no matter what colors or flowers you choose.
If you want to take your technique further, experiment with different yarns or flower types. Share your project photos and see what other crocheters are making too.
Ready for your next project? There are always new patterns and fresh ideas at Secret Yarnery. Surround yourself with crochet inspiration and stay hooked!
Left Handed?
FAQs
1. Can beginners make the crochet flower bouquet bag?
Yes! This project is beginner-friendly. The steps are simple, and there are clear instructions for every stage. Even if you’re just starting to crochet, you can complete this bag by following the directions carefully.
2. What kind of yarn works best for this bag?
Use size 4 worsted weight acrylic yarn for best results. Acrylic holds its shape well and is easy to wash. Mix and match colors for flowers and leaves to create your own look.
3. How do I keep my bag’s shape?
Adding a base (like a plastic lid, bowl, or strainer insert) will help the bag keep its shape. Choose a base that fits your bag’s size and adjust as needed.
4. Can I make the bag larger or smaller?
Absolutely. Just keep increasing the circle base until you reach the size you want. More rounds mean a bigger bag; fewer rounds make a smaller version.
5. Can I use other crochet flower patterns?
Yes! Any small crochet flower can be attached to the leafy edge. Mix different styles for a more textured bouquet.
6. Can the bag hold weight?
It’s designed for lightweight items like yarn, small gifts, or daily essentials. Stronger yarn and double handles help it carry a bit more, but avoid overloading to keep it looking its best.
7. Do I have to use a drawstring handle?
No, you can use any bag handle style you prefer—single strap, chain, ribbon, or even a crossbody strap. Adjust as it suits your needs.
9. How can I customize the bag for gifts?
Change the flower colors to match the season or event, add a personalized tag, or use special yarns for a unique touch. This bag makes a thoughtful gift for birthdays, Mother’s Day, or any special occasion.
![]()
Christa Patel is the creative mind and founder behind Secret Yarnery. With years of crochet experience, Christa shares easy-to-follow patterns, helpful tips, and joyful inspiration for yarn lovers everywhere. Her straightforward teaching style makes even complex projects simple and fun. Christa’s YouTube channel and website offer a welcoming space for beginners and experts to connect, learn, and grow their crochet skills.
She believes crochet should be relaxing, rewarding, and full of color. From playful bags to vibrant bouquets, Christa’s designs help crafters bring handmade beauty into everyday life. When she’s not busy with yarn, Christa enjoys chatting with her global crochet community and finding new ways to spark creativity.
You can find more of her projects, patterns, and helpful videos at Secret Yarnery.
About the Author
With a passion for crafting easy, beginner-friendly tutorials and patterns, Christa inspires crafters of all skill levels to unleash their creativity worldwide. She encourages yarn lovers to connect, create, and crochet a world filled with beautiful handmade treasures!
Turn a Crochet Flower Bouquet Into a Cute Bag You’ll Love