Easy DIY Crochet Toran: Bright Decorations for Diwali 2025
Share
Easy Crochet Toran for Diwali Decorations
Looking for a crochet project that brings in vibrant, festive vibes for Diwali? Let me help you get started with this stunning crochet toran, guaranteed to brighten any celebration! Even if Diwali isn't on your calendar, these colorful crochet decorations can add beauty to any party or special occasion. The best part? You can adapt it to fit any doorway, making it an incredibly versatile piece.
This DIY crafty journey will take you step-by-step through creating flowers, leaves, and even assembling the toran. So let’s dive in!
What You'll Need
Here’s a quick list of everything you’ll need to create your festive crochet toran:
- Yarn: I used three shades for my marigolds, with a worsted weight acrylic yarn. You can mix and match colors for the flowers, leaves, and caps.
- Hook: I went with a 6mm hook.
- Needles: A blunt needle for assembling and a sharp one for sewing in any stubborn ends.
- Key chains: You’ll need three key chains to help with hanging.
- Scissors: Obviously, for trimming all the necessary bits.
Once you’ve got your supplies ready, let’s move on to creating the individual elements of this beautiful garland.
Crochet Marigolds
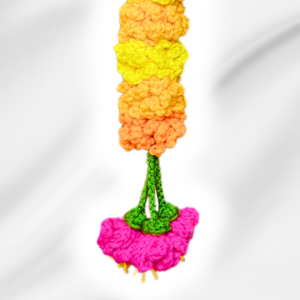
The marigolds are the star of the toran – bright, textured, and a true symbol of festivity. Here’s how you can create your own crochet marigolds:
Stitching the Loops
- Start with a magic ring. Leave a long tail – about 7 inches.
-
Chain 8 after creating the magic ring, then slip stitch into the ring. Repeat this 30 times, so your marigold has the right fullness.
Note: If the tail gets short, just tug it to keep it available – you’ll need it for adjusting later!
- After you’ve done all the loops, start pulling the tail to tighten the ring. Aim for around 28-30 loops, which is perfect for making it full but not too crowded. When you’re happy with the number, tie a secure knot, and your marigold is done!
You can create more or fewer marigolds depending on the size of your doorway or the design you envision.
For more amazing crochet patterns and ideas, check out our collection of easy written patterns.
Mango Leaves
Next up are the mango leaves, which beautifully complement the marigolds. Here’s how to make them:
- Chain 19 to start. You’ll be working into the back loops, which helps create a natural curve.
- In the 6th back loop, place a stitch marker. This will help guide you as you crochet back up.
- Create the leaf by working slip stitches, single crochets, and half double crochets.
- Once you’ve reached the top, flip the leaf and work down the other side by doing the opposite set of stitches (double crochet, half double, and slip stitches).Voila! You’ve got a beautiful set of mango leaves to mix into your garland.

Flower Caps and Hanging Flowers
Let’s create the caps for your hanging flowers, which give your toran that extra flair.
- Create a mini cap using a magic ring and 6 double crochets.
- For each hanging flower, create 10 chains of petals and secure them with a small slip stitch.
- Attach the flower cap snugly to the flower petals. This gives the hanging flowers both structure and style.
Once you have enough hanging flowers, you’ll need to assemble them at the top of your marigolds. Tie off these flower groups and secure them to your toran using a key ring, repeating this step for both ends of your toran.

Assembling Your Toran
Now it's time to bring everything together into one stunning garland!
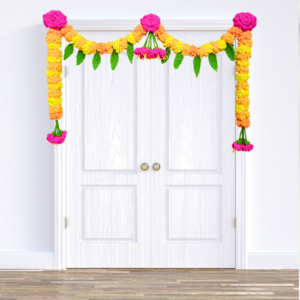
- Marigold Floral Center: At the center of your garland, you'll place the larger marigold flowers. Use your sharp needle to sew them securely to the yarn.
- Mango Leaf Placement: Space out your leaves around the flowers, ensuring that the leaf spine is facing the front for that polished, refined look.
- Attach Your Key Rings: Remember, the key rings help support your garland, so take your time attaching the yarn to them in a secure yet flexible way.
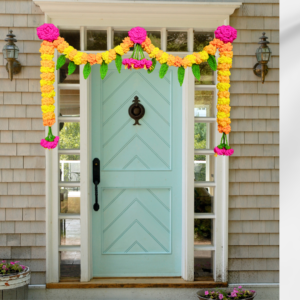
This crochet toran for Diwali decorations makes a beautiful statement, and once everything is tied off, you’re ready to display your handiwork proudly!
For more decorations, you might also enjoy checking out how to create other festive handmade decorations that are perfect for Diwali and beyond.
Follow along with the detailed pattern - written in plain English!
Finishing Touches
After everything is assembled, you're almost ready to hang it up! Secure the side pieces properly so nothing is loose, and leave enough time to arrange it just the way you want.
Before you knot off any remaining threads, I recommend trying it out over the doorway first. Get a feel for how everything hangs. If something is uneven, this is your last chance to adjust.
Left Handed?
Conclusion
This crochet toran might seem intricate at first but trust me — once you get the hang of it, creating each piece becomes almost therapeutic. Plus, the finished result is stunning and sure to be a hit in all your festive gatherings.
If you need additional help or want to follow along with a written pattern, be sure to check out our full selection of crochet patterns. Happy crocheting!
Be sure to try it out for your next event and feel the festive magic every time you walk through that door!
About Me:
Combining her love for yarn with a natural talent for teaching, Christa Patel is the heart behind the Secret Yarnery, a crochet hub that offers tutorials, patterns, and helpful advice for crafters everywhere. Christa’s tutorials simplify even the most complex stitches, making crochet something everyone can enjoy, whether they’re picking up a hook for the first time or are seasoned experts.


