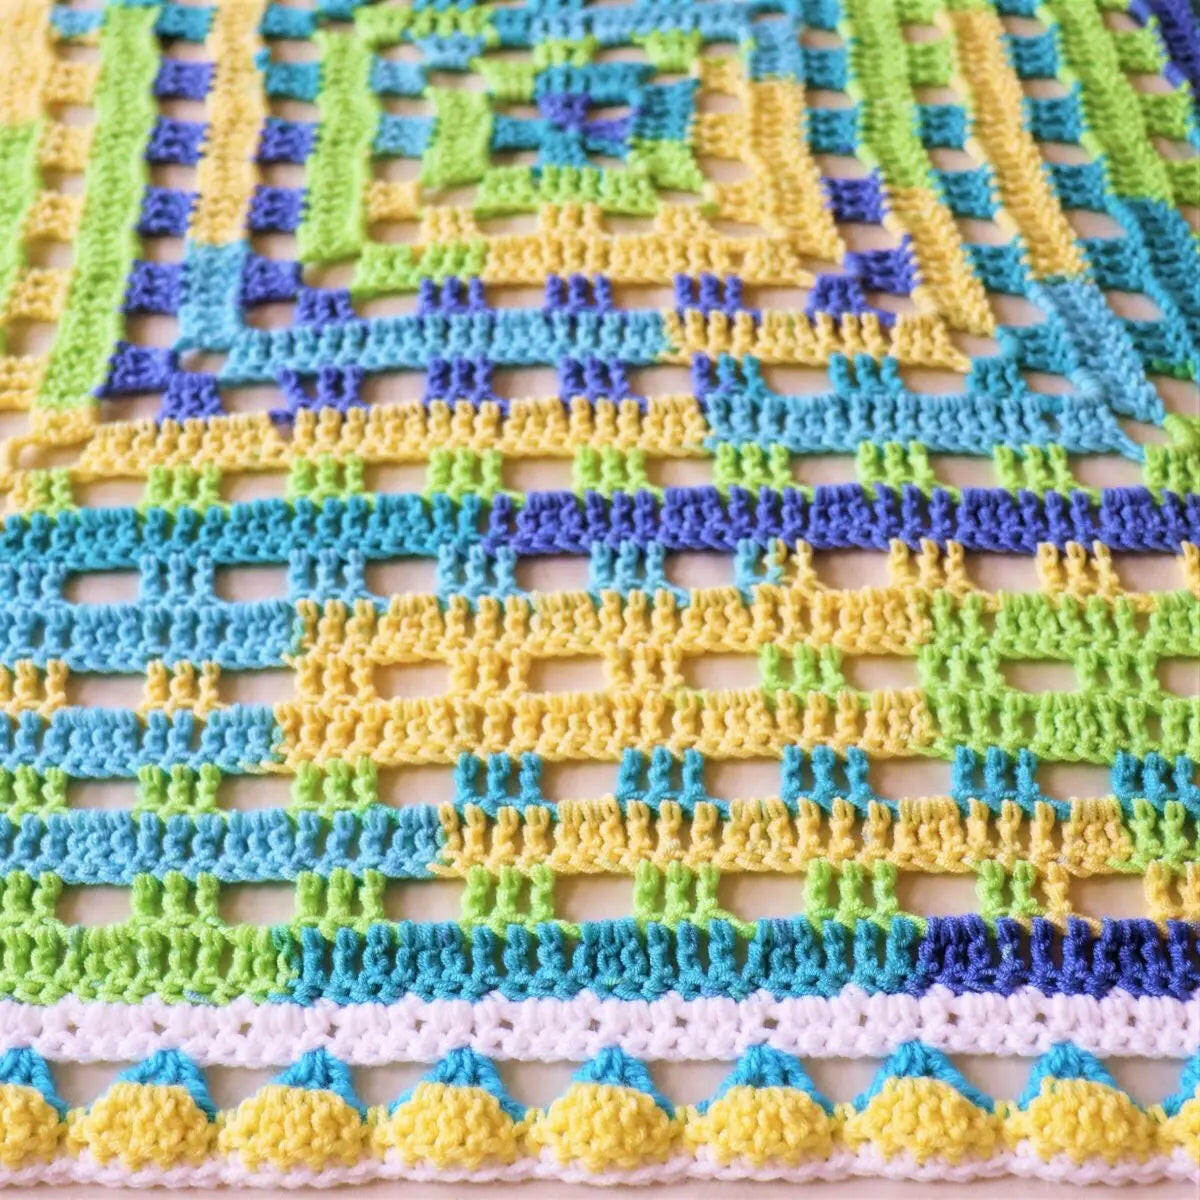
Fast & Easy Crochet Baby Blanket Tutorial – Floor & Windows Pattern!
Crocheting a baby blanket is more than just a hobby; it's an act of love. There's something incredibly special about creating something beautiful and useful with your own two hands. In this guide, I'll show you how to crochet a stunning "Floors & Windows" baby blanket. This design is both easy and fast, making it perfect for crocheters of all skill levels. Even if you're a beginner, you'll be able to create this textured and eye-catching blanket with ease.
Why Choose the Floors & Windows Stitch?
Why should you choose the Floors & Windows stitch for your next project? Let me tell you, it's a winner for several reasons:
- Beginner-Friendly: This stitch uses basic crochet techniques like treble crochet, chains, and single crochet. If you're new to crochet, this is a fantastic pattern to start with. You'll get the hang of it in no time!
- Fast Project: The repetitive nature of the stitch pattern means you can complete this blanket surprisingly quickly. Perfect for those last-minute baby shower gifts!
- Textured Design: The combination of solid rows and open "window" rows creates a unique and eye-catching texture that adds depth and visual interest to the finished blanket.
- Customizable: You can easily adjust the size of the blanket to fit your specific needs. Want a larger throw? Just keep repeating the pattern!
- Great for Color Changes: The stitch pattern beautifully showcases color-changing yarns, creating a stunning gradient effect. It's a fantastic way to use those beautiful yarn cakes you've been eyeing.

Gathering Your Supplies: What You'll Need
Before we dive in, let's make sure you have everything you need. Here's a list of supplies you'll want to gather:
-
Yarn:
- 3 cakes of Ice Yarns Cakes Blues (or any worsted weight yarn). This yarn works up beautifully and gives a lovely color gradient. If you're looking for something similar, you can often find great options online or at your local yarn store.
- Of course, you're welcome to use a solid color or change colors as desired. The beauty of crochet is its versatility!
- Crochet Hook: A 6 mm crochet hook is ideal for working with worsted weight yarn.
- Stitch Marker: This is optional, but it can be helpful to mark your place, especially if you need to put your project down and come back to it later.
- Darning Needle: You'll need this for weaving in the ends of your yarn to give your finished blanket a neat and professional look.
- Scissors: For cutting your yarn, of course!
Tip: I always like to use similar colors for the border as the main yarn to tie the whole project together. It creates a cohesive and polished final product.
Here's a handy bulleted list for easy reference:
- Yarn
- Crochet Hook (6mm)
- Stitch Marker (optional)
- Darning Needle
- Scissors
Understanding Yarn Choices: Acrylic vs. Others
For this project, I recommend using a 100% acrylic yarn. Acrylic is easy to care for, holds its shape well, and is generally very affordable. Worsted weight yarn is a good all-purpose choice, making it perfect for baby blankets. While you can certainly use other types of yarn, acrylic is a great option for its ease of use and durability.

Getting Started: Creating a Slip Knot & Initial Chain
Alright, let's get started! The first step is to create a slip knot and place it on your hook. If you have your own way of making a slip knot that's fine too.
Now, chain four stitches. This will form the foundation for the center of your square.
Tip: Don't count the knot or the loop on your hook when counting chains.
Forming the Center Ring: The First Crucial Step
This is where the magic begins. Insert your hook into the very first chain you made and make a slip stitch to create a ring. Hold the center open with your fingers to make it easier to work into.
Next, chain four. This counts as your first treble crochet.
Now, make two more treble crochets into the center ring. This creates the first side of your square.
Creating the First Corner: Chain 6 Instructions
Now we will chain six. This forms the first corner of your square.
Make three more treble crochets into the center ring.
Tip: Work over your yarn tail to secure it as you go. This saves you from having to weave it in later!
Completing Round One: Building the Foundation
Repeat the chain 6 and three treble crochet sequence to create three sides of your square.
For the last corner, chain six again.
Make three more treble crochets into the center ring to complete the final side.
Finally, slip stitch to the top of the initial chain four to join the round.
Tip: Make sure to get two loops of the stitch on the top of your hook when slip stitching. This creates a cleaner join.
Starting Round Two: Setting Up the Pattern
Chain four. This counts as your first treble crochet for this round.
Make one treble crochet into each of the next two stitches.
Key Point: Treble crochets always get another treble crochet in this pattern.

Working the Corners in Round Two: Building the Shape
Work three treble crochets into the corner chain six space.
Chain six for the corner.
Work three more treble crochets into the same corner space.
Repeat the treble crochet and corner sequence around the square.
Slip stitch to the top of the chain four to join the round.
Round Three: Introducing the "Windows"
Chain four (counts as first treble).
Treble crochet into the next two stitches.
Chain three. This creates the "window" space.
Skip the next three treble crochets.
Treble crochet into the next three stitches (the center three).
Chain three.
Work the corner as usual (three treble crochets, chain 6, three treble crochets).
Repeat the chain three, skip three, and treble crochet sequence around the square.
Slip stitch to the top of the chain four to join the round.
Alternating Rows: The Key to the Pattern
The key to the Floors & Windows stitch is alternating between the solid treble crochet rows (like Round Two) and the "window" rows (like Round Three). The solid rows fill in the spaces, while the window rows create the open, textured look. Think of it as building walls and then adding windows!
Round Four: Creating a Solid Row
Chain four (counts as first treble).
Treble crochet into each stitch across the row.
Work three treble crochets into each chain three space from the previous row.
Work the corners as usual (three treble crochets, chain 6, three treble crochets).
Slip stitch to the top of the chain four to join the round.
Continuing the Pattern: Windows & Walls
Keep alternating between the "window" rows and the solid rows to create the floors and windows pattern. The "window" rows add texture, while the solid rows provide stability. It’s like building a house, one layer at a time! If you would like to explore more free crochet patterns, check out the patterns on my website.

Adjusting Corner Tension: Preventing "Whooping"
Sometimes, your blanket might start to "whoop" or the corners become too pointy. This means you need to adjust the corner tension.
In solid treble crochet rows, work only two treble crochets in each corner instead of three. Chain six, and then two treble crochets.
Window rows remain the same (three treble crochets, chain 6, three treble crochets).
Alternatively, you can skip a treble crochet on each side of the corner in solid rows. This adjustment keeps the corners flat and prevents them from pulling.
Finishing the Main Pattern: Deciding When to Stop
Continue crocheting until your blanket is the desired size, or until you run out of yarn.
End on a solid treble crochet row for a clean finish. It is important to end with a solid row, so the border looks its best.
Tip: You can substitute a similar yarn to finish the last row if needed.
Securing the Last Stitch: The Final Knot
Slip stitch to join the last round.
Chain one.
Cut the yarn and pull the hook up to secure. This knot will keep your hard work from unraveling!
Preparing for the Border: Choosing Colors & Flipping the Blanket
Choose a yarn color for the border that complements the main yarn colors. I used white for a clean, classic look.
Turn your work to the back of the blanket. Work into the back of the stitches to create a neat border.
Start in a different corner than where you finished the main pattern. This helps to distribute the bulk of the joins more evenly.
Attaching the Border Yarn: Creating a Secure Start
Insert your hook into the top of the first treble crochet in the corner.
Attach the border yarn with a slip stitch, leaving a long tail for weaving in later.
Chain two (or three, depending on how you joined the yarn).

First Border Row: Single Crochet & Chain Spaces
Skip two stitches.
Single crochet into the third stitch.
Chain two.
Skip two stitches.
Single crochet into the third stitch.
Repeat the chain two and single crochet sequence along the row.
At the corner, work four single crochets with a chain two in between, all into the corner space.
Evening Out the Edges: Adjustments at the Corners
After the corner, skip three stitches and single crochet into the first double crochet of the next set.
Adjustments may be needed to even out the edges, especially near the corners. Don't worry about perfection – a little variation adds character!
Joining the First Border Row: Completing the Circle
After your last single crochet, slip stitch into the center of the stitch where you joined your yarn.
Pull the yarn tight to create a secure slip stitch.
Second Border Row: Double Crochet & Shells
Chain one, turn your work.
Slip stitch into the next chain two space.
Chain three (counts as first double crochet).
Double crochet into the same space.
Double crochet into the stitch between the chain spaces.
Work two double crochets, chain two, and two double crochets all into the corner space.
Repeat the double crochet and chain space sequence along the row.
When you reach the end, double crochet into the last single crochet and slip stitch to the top of the chain three.
Third Border Row: Treble Crochet Shells
Flip the work.
Attach yarn into a corner with a slip stitch and chain 5.
Skip 4 stitches.
In the 5th stitch, make 3 treble crochets.
Chain 2.
Skip 4 stitches.
In the 5th stitch, make 3 treble crochets.
Repeat across.
In the corner, make 5 treble crochets.
Chain 2.
Make 5 Treble Crochets.
Skip one, and make the next shell of 3 into the second stitch.
Completing the corners with 5 treble crochets
Once you get to a corner, make 5 treble crochets into the center shell. Make sure the sides are mirrored on each side of the corner.
Join to the chain, because it counts as the first treble.

Fourth Border Row: Five Trebles and a Single Crochet
Join yarn into the center treble crochet of a corner shell and chain 3.
Make 2 more treble crochets into that space, to make 3 total.
Single crochet into the chain two space.
In the top of the next treble crochet, make a shell.
Single crochet.
Repeat across.
Final Border Row: A single crochet in each stitch
Work into the back of your shells.
Single crochet into each treble of the shell.
Skip the single crochet, then single crochet into each stitch in the next shell.
Invisible Join: A Seamless Finish
Instead of a slip stitch, cut yarn, pull up the hook, and then use a yarn needle to push the hook straight into the top of the chain made earlier.
Pull yarn through and go back into where it came from. Tighten and sew in the tail.
Weaving in the Ends: Tidying Up Your Project
Use a darning needle to weave in all the yarn ends on the back of the blanket. Secure the ends by weaving them in different directions. This is a crucial step for a polished final product. For more helpful tips and tricks, take a look at the Easy Crochet Projects for Beginners on my blog.
Sharing Your Project: Inspiring Others
I'd love to see a picture of yours! You can tag me on Instagram at @secretyarny or find us on our Facebook group, The Secret Yarnery Crochet Community. Seeing your finished blankets makes my day!
Here are some useful resources:
- Free Pattern: https://bit.ly/4jYvrb4
- Printable Pattern: http://bit.ly/3MtsIYY
- Right Handed Tutorial: https://youtu.be/EOnBZ1pUsnY
- Left Handed Tutorial: https://youtu.be/lB_FwVgGjL0
- Easy Crochet Patterns: https://secretyarnery.com
Make sure you never miss out on any new patterns. Sign up for the email list. Come and join the Secret Yarnery community. Don't forget to subscribe to the YouTube channel
Essential Crochet Tools
Amazon Affiliate Disclaimer: As an Amazon Associate I earn from qualifying purchases.
- Bags - Yarn Ball Storage: https://amzn.to/36cbr3A
- Bags - Large UFO Zipper Pouches: https://amzn.to/3uqgQ0n
- Bags - Regular UFO Zipper Pouches: https://amzn.to/3DYxvLB
- Ball Winder: https://amzn.to/3Jzd4Y0
- Baskets - WIPS: https://amzn.to/3tQK9te
- Color Wheel: https://amzn.to/3hJN3IG
- Crochet Hooks: https://amzn.to/2p5etkC
- Foot Warmer: https://amzn.to/3RaMtn0
- Measuring Tape: https://amzn.to/3JviyD8
- Neck Light: https://amzn.to/2UYNrW4
- Needle Threaders: https://amzn.to/3zdCK7S
- Needles - Blunt Tip: https://amzn.to/2MRffKP
- Needles - Sharp Tip: https://amzn.to/3Rdq2ja
- Scissors: https://amzn.to/3EC1CHy
- Stitch Markers: https://amzn.to/3GdGCYg
- Tea - Kericho Gold: https://amzn.to/3zrTcB8
- Tins - Accessories: https://amzn.to/3EN6nxT
- Yarn: https://bit.ly/39EZwZX
A Cozy Conclusion
Congratulations! You've learned how to crochet a beautiful and fast baby blanket using the Floors & Windows stitch. I hope you enjoyed this tutorial and that you're inspired to create many more crochet projects. Remember, crochet is not just about making things; it's about creating something with love and sharing that love with others. So grab your hook, some yarn, and get crocheting!
FAQs
1. What is the best yarn to use for this blanket?
Worsted weight yarn is ideal, especially 100% acrylic as it is soft, durable, and easy to wash. If you prefer a gradient effect, yarn cakes like Ice Yarns Cakes Blues work beautifully.
2. Can I adjust the size of the blanket?
Yes! The pattern is easily adjustable. To make the blanket larger or smaller, simply continue the rounds until you reach your desired size. You can also start with a bigger or smaller chain foundation as needed.
3. How do I keep my corners flat?
If your blanket begins to "whoop" or the corners become too pointy, you can adjust the tension by working only two treble crochets into each corner for solid rows or skip a treble crochet near the corners.
4. Is this pattern suitable for beginners?
Absolutely! The "Floors & Windows" stitch uses basic crochet techniques such as treble crochet, chain stitches, and single crochet. It's simple enough for beginners yet creates a striking texture.
5. Can I change colors in this pattern?
Yes! This pattern looks stunning with color changes. You can alternate yarn cakes, solid colors, or use a gradient yarn for smooth transitions. Switch yarns at the start of a new row for a clean finish.
6. How much yarn should I buy for this project?
You’ll need approximately 3 cakes of worsted weight yarn (around 1000-1200 yards) for a standard baby blanket size. Adjust accordingly if you plan to make a larger throw or smaller project.
7. Can I use a different stitch for the border?
Of course! While the tutorial includes treble crochet borders, you can opt for simpler borders, like single crochet or double crochet, depending on your preference.
8. What should I do if I run out of yarn mid-project?
Don’t worry! You can either purchase additional yarn of the same type or use a similar-colored yarn. For the last round, a complementary or contrasting shade can make a bold statement.
9. How do I avoid my edges from curling?
Keep your tension consistent and ensure you're not skipping stitches. Adding a border can also help stabilize the edges and prevent them from curling inward.
![]()
Christa Patel is a passionate crochet artist, designer, and the creative force behind The Secret Yarnery. With over a decade of experience in the world of fiber arts, her mission is to inspire crocheters of all skill levels to create beautiful, practical, and heartfelt projects. Christa’s love for crochet began as a simple hobby but quickly grew into a thriving community of enthusiasts who share her passion.
Through her engaging tutorials, detailed guides, and easy-to-follow patterns, Christa has brought countless designs to life, helping beginners gain confidence and encouraging seasoned crocheters to expand their skills. Her "Floors & Windows" baby blanket is just one example of the many imaginative creations she shares with her audience.
Christa lives by the philosophy that crochet is more than crafting—it’s a way to connect, create, and share love with others. When she’s not crocheting, she’s often interacting with her online community, developing new patterns, or drinking a cozy cup of tea surrounded by her yarn stash.
You can follow Christa and her amazing journey on Instagram (@secretyarny) or connect with her warm, welcoming community on Facebook at The Secret Yarnery Crochet Community.
If you love simple, chic, and practical crochet projects, Christa Patel's designs are sure to delight! Visit her blog or subscribe to her YouTube channel for endless crochet inspiration.
About the Author
With a passion for crafting easy, beginner-friendly tutorials and patterns, Christa inspires crafters of all skill levels to unleash their creativity worldwide. She encourages yarn lovers to connect, create, and crochet a world filled with beautiful handmade treasures!
Fast & Easy Crochet Baby Blanket Tutorial – Floor & Windows Pattern!