Crochet Class 13 for Beginners: Magic Loop Made Easy!
Hey there, fellow crochet enthusiasts! I'm Christa from The Secret Yarnery, and I'm thrilled to welcome you to Crochet Class 13! Today, we're tackling a technique that will elevate your crochet projects: the magic ring. Also known as the magic loop or magic circle, this method is a game-changer for creating tight, seamless centers, especially in projects like granny squares and amigurumi. Forget those pesky holes – with the magic ring, you'll achieve a professional, polished look every time. So, grab your hook and yarn, and let's dive into this easy-to-follow tutorial!
Table of contents
What is a Magic Ring?
The Magic ring is a crochet technique used to begin projects that are worked in the round. Unlike starting with a traditional chain and slip stitch, the magic ring allows you to create a center that can be pulled closed, eliminating that annoying hole. This is especially useful when making amigurumi, hats, and other projects where a tight, invisible center is desirable. You might hear it called a magic loop or a magic circle, but they all refer to the same clever trick.
Why Use a Magic Ring?
So, why should you bother learning the magic ring? Well, the benefits are numerous! The most significant advantage is the perfectly closed center it creates. This not only looks more aesthetically pleasing but also provides a more structurally sound foundation for your project. No more gaping holes that let stuffing escape from your amigurumi or create a draft in your hats!
Another great thing about the magic ring is that you can easily adjust the size of the center. If you find that it's not quite tight enough after you've worked a few rounds, simply pull the tail a little more. This flexibility is especially helpful when working with different yarn weights or hook sizes. Think of all the projects you can improve with this technique: hats, doilies, motifs, and so much more.

Tools and Materials You'll Need
Before we get started, let's gather our supplies. Here's what you'll need:
- Yarn: Choose any yarn you like! Different weights will create different effects, so experiment and see what you prefer.
- Crochet hook: Select a hook size that corresponds to your yarn weight.
- Yarn needle: This will be used to weave in the ends and secure your magic ring.
- Scissors: For trimming the yarn.
You can find all these essentials and more at The Secret Yarnery! Check out these links for my favorite tools: Crochet Hooks, Yarn, Scissors, Sharp Tip Needles, and Blunt Tip Needles.
Step-by-Step Guide to Making a Magic Ring
Alright, let's get to the fun part! Follow these steps to create your very own magic ring:
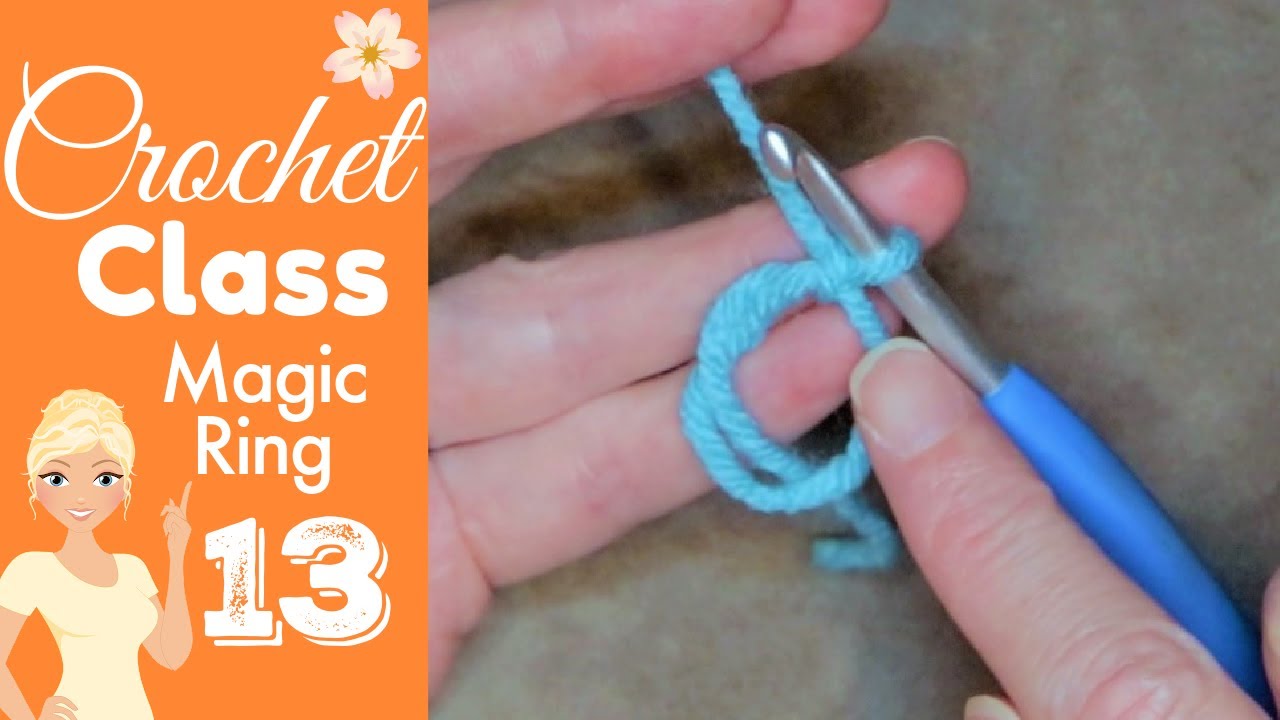
- Step 1: Lay the yarn over your non-dominant hand. Secure it with your ring finger, holding the tail end in place.
- Step 2: Wrap the yarn around your index and middle fingers, creating an "X" shape on the back of your hand. Hold the yarn in place with your thumb.
- Step 3: Insert your crochet hook (hook side down) under the first strand of yarn on your fingers.
- Step 4: Catch the second strand of yarn with your hook and pull it under the first strand, creating a loop on your hook.
- Step 5: Twist your hook toward yourself, then away, to secure the loop and form the basis of your ring.
- Step 6: Yarn over and pull through the loop on your hook to create a chain. This secures the ring and counts as your first chain stitch.
- Step 7: Now, crochet the number of stitches required by your pattern into the center of the ring, working over both the strands of yarn and the tail.
Remember to hold the yarn firmly but not too tightly, and maintain a consistent tension. Don't worry if it takes a few tries to get it right; practice makes perfect!
Working Stitches into the Magic Ring
Once you have your magic ring secured with that initial chain, it's time to start adding stitches. The key here is to work your stitches into the center of the ring, going over both strands of yarn. This will help to secure the ring and prevent it from unraveling later.
Make sure to evenly space your stitches within the ring. This will create a nice, even foundation for your project. Follow your pattern instructions carefully to ensure you're working the correct number of stitches. If your pattern calls for 6 single crochet stitches, make sure you work exactly 6!

Tightening the Magic Ring
After you've completed your initial stitches, it's time to tighten up that center! Gently pull the yarn tail to close the hole in the middle of the ring. You'll see the stitches begin to bunch together, creating a tight, seamless center.
Be careful not to pull the tail too hard, as this could cause the yarn to break. Pull it firmly but gently, until the hole is completely closed. If you're having trouble getting it tight enough, you can try wiggling the stitches around a bit to distribute the tension.
Securing the Magic Ring Tail (Weaving in Ends)
Securing the magic ring tail is absolutely crucial to prevent your project from unraveling. I cannot stress this enough! Here's how to weave in the ends and make sure your magic ring stays put:
- Step 1: Thread the yarn tail onto your yarn needle.
- Step 2: Examine the direction the yarn is coming from in your magic ring.
- Step 3: Weave the yarn tail in the opposite direction through the stitches on the back of your work. This will help to lock the ring in place.
- Step 4: Go back and forth at least three times, weaving in slightly different spots each time. This will provide extra security.
- Step 5: Gently pull the yarn to ensure it lays flat and doesn't create any bumps. Be careful not to over-tighten.
- Step 6: Trim any excess yarn close to the stitches.
Using a sharp-tipped needle can make this process a lot easier. Remember, the more secure your magic ring, the longer your project will last!
Troubleshooting Common Magic Ring Problems
Even with the best instructions, sometimes things don't go as planned. Here are some common problems you might encounter when making a magic ring, along with some helpful solutions:
- The ring keeps coming undone: Make sure your initial chain is secure, and weave in the end properly.
- The center hole is still too big: Pull the yarn tail tighter. If that doesn't work, try adding a few extra stitches in the first round.
- The yarn breaks when tightening: Use a thicker yarn or pull the tail more gently.
- Difficulty inserting the hook: Use a hook size appropriate for your yarn weight and practice the initial steps slowly.
Tips for a Perfect Magic Ring
Want to take your magic ring skills to the next level? Here are a few extra tips for creating a flawless magic ring:
- Use a stitch marker to mark the beginning of each round.
- Maintain consistent tension throughout the process.
- Practice makes perfect – don't be discouraged if your first few attempts aren't perfect.
- Watch the video tutorial multiple times.
- Experiment with different yarn types and hook sizes.
Magic Ring Variations
Once you've mastered the basic magic ring, you might want to explore some variations. Here are a couple to get you started:
- Double Magic Ring: Provides extra security for projects that require a very tight center.
- Magic Ring with a Slip Knot: Offers a slightly different starting method.
Projects That Use the Magic Ring
Now that you know how to make a magic ring, let's talk about some projects that can benefit from this technique. Here are a few ideas to get your creative juices flowing:
- Granny squares
- Hats
- Amigurumi
- Doilies
- Motifs for blankets
Looking for inspiration? Check out the WRITTEN PATTERNS available on The Secret Yarnery website.

Christa's Favorite Magic Ring Project
One of my favorite projects using the magic ring is a set of amigurumi animals I made for my niece. I used a soft, colorful cotton yarn and a small hook to create the tightest possible stitches. The magic ring was essential for creating the seamless heads and bodies of the animals. Knowing that there weren't any holes for the stuffing to escape from made me feel good. Every time I see her playing with them, it reminds me of the power of a well-executed magic ring!
The Importance of Joining the Secret Yarnery Community
If you're looking for more crochet tips, inspiration, and support, I invite you to join The Secret Yarnery community! By becoming a member, you'll gain access to exclusive patterns, tutorials, and a whole lot of fun. We have something for everyone! Plus, you'll be able to connect with other crocheters from around the world, share your projects, and ask questions.
Join the fun: JOIN the FAMILY!. You can also find us on Instagram, Facebook, and our Facebook Group.
Call to Action: Subscribe and Stay Hooked!
Thank you so much for joining me for Crochet Class 13! I hope you found this tutorial helpful and that you're now ready to master the magic ring. Remember to subscribe to The Secret Yarnery's YouTube channel for more crochet tutorials, tips, and inspiration. And don't forget to leave a comment below and share your magic ring projects with me!
Also check out this Crochet Magic Ring Tutorial
The magic ring is an essential crochet technique that opens up new possibilities for your projects. With a bit of practice, you’ll enjoy tighter centers, neater finishes, and fewer frustrations with gaps or unraveling. Whether you're making amigurumi, hats, or decorative motifs, mastering the magic ring will help your crochet work stand out. Remember to secure your ring tightly and enjoy experimenting with different patterns. Keep practicing, stay patient, and soon the magic ring will become second nature.
Stay Hooked!
FAQs
1. What is the magic ring in crochet?
The magic ring is a technique for starting crochet in the round. It lets you create a tightly closed center, so there’s no visible hole.
2. Why does my magic ring keep loosening?
Usually, this happens if the tail isn’t woven in well enough. Always weave it in several times and pull it snug after finishing.
3. Can I use any kind of yarn for a magic ring?
Yes, this technique works with nearly all yarn types and weights. Just match your hook size to your yarn.
4. My center is still open after pulling the ring. What should I do?
Check that you’re pulling the yarn tail, not the working yarn. Gently tug the right end, then adjust the first round of stitches if needed.
5. Does the magic ring replace the classic chain method?
It’s best when you want a tight center—like for amigurumi, hats, and motifs. The chain method still works for other projects.
6. What if I don’t have a yarn needle to weave in ends?
You can use your crochet hook, though a yarn needle makes it easier and cleaner.
7. How do I stop the ring from unraveling over time?
Make sure to weave in the tail in several directions. Some crocheters also add a tiny drop of fabric glue for extra hold.
![]()
Christa Patel is the creative mind behind the Secret Yarnery, a trusted resource for crochet enthusiasts worldwide. With years of experience, Christa specializes in designing beginner-friendly yet stunning crochet patterns that inspire creativity and confidence in crafters of all skill levels.
As a passionate crocheter, Christa is known for her clear and approachable teaching style, breaking down complex patterns into simple, easy-to-follow steps. Through her engaging video tutorials, written patterns, and helpful tips, she has cultivated a community where crocheters can connect, learn, and share their work.
Christa’s dedication to making crochet fun and accessible shines in every project she creates, from colorful blankets to intricate borders. Whether you’re a seasoned expert or just picking up a hook for the first time, Christa's guidance will help you craft something beautiful.
For more crochet patterns, tips, and inspiration, visit her website at The Secret Yarnery, or check out her YouTube channel filled with step-by-step tutorials.
About the Author
With a passion for crafting easy, beginner-friendly tutorials and patterns, Christa inspires crafters of all skill levels to unleash their creativity worldwide. She encourages yarn lovers to connect, create, and crochet a world filled with beautiful handmade treasures!
Crochet Class 13 for Beginners: Magic Loop Made Easy!