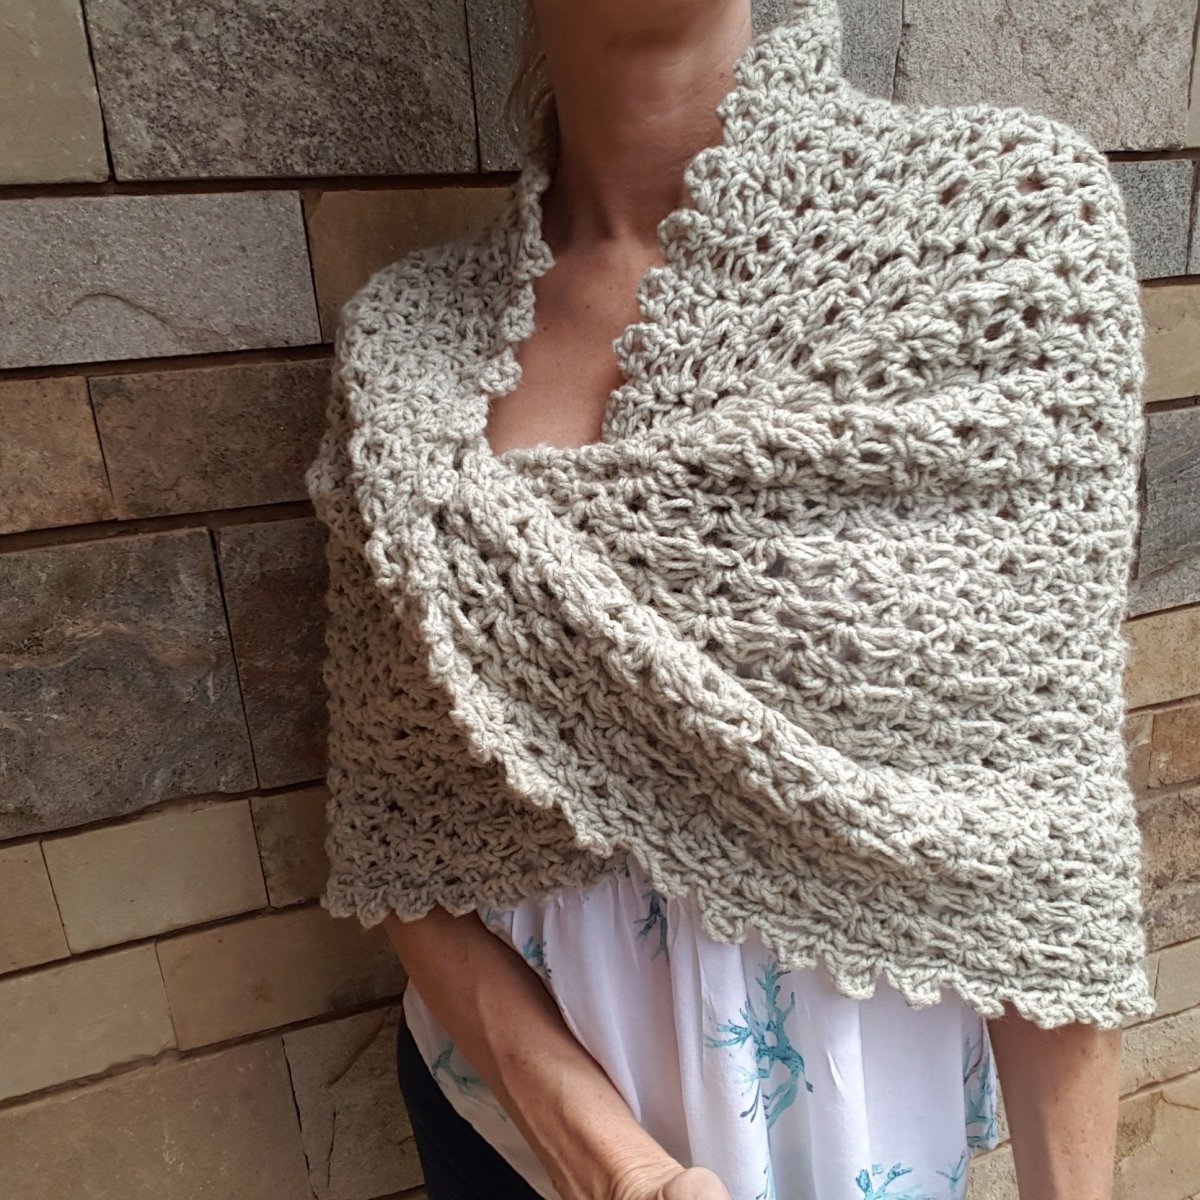
Crochet the Hug Shrug: A Beginner-Friendly Tutorial
Want to crochet something cozy and stylish? The Crochet Hug Shrug is the perfect project! It combines the warmth of a hug with the practicality of a shrug. The versatile design means you can wear it in lots of ways. Plus, it uses simple stitches, making it easy to learn and master, even if you're a beginner. It's a great project to make as a gift, or just to keep for yourself!
Materials You'll Need
Before we get started, here's what you'll need to gather. Getting everything together beforehand will make the process smoother and more enjoyable.
-
Yarn:
- Three 100-gram balls of yarn.
- I used cotton tape yarn for the example.
- A self-striping yarn would give it a unique look. You can find a wide variety of yarn options here.
-
Crochet Hooks:
- 6 mm hook (go up a size from what the yarn label recommends for knitting needles).
- 6.5 mm hook (half a size larger) for the initial chain.
-
Accessories:
- Stitch marker (or a piece of yarn in a different color).
- Scissors.
- Blunt tip needle for weaving in ends.
-
Optional:
- Measuring tape.
- Accessories tin.
- Foot warmer.
- Ball Winder.
Make sure you have everything you need before starting your Crochet Hug Shrug!

Getting Started: Understanding the Basics
Let's cover some basics before we dive into making the Crochet Hug Shrug.
Gauge
Gauge isn't super important for this project. But understanding it helps with sizing. Gauge is the number of stitches and rows per inch or centimeter. It helps ensure your finished project matches the pattern's intended size.
Stitches Used
We'll be using a few basic crochet stitches. If you're new to crochet, don't worry, they're easy to learn! This Easy Crochet pattern uses:
- Chain (ch).
- Single Crochet (sc).
- Double Crochet (dc).
- Slip Stitch (sl st).
Abbreviations
Here are some common crochet abbreviations for easy reference:
- ch - chain
- sc - single crochet
- dc - double crochet
- sl st - slip stitch
"V" Stitch
The "V" stitch is a key element in this project. It's made by doing a (dc, ch 1, dc) all in the same stitch. This forms the main texture of the shrug. It's simple to do but creates a beautiful, textured effect.
Measuring for the Perfect Fit
Getting the right fit is key for your Crochet Hug Shrug to be comfortable and flattering. Let's talk about how to measure correctly.
Torso Measurement
Measure the widest part of your torso. This is usually around your back and chest. The chain you make should be loose, not tight or falling off. You want to have some wiggle room for moving your arms.
Understanding the Twist
The shrug has an infinity twist. This means the top part twists around to the lower elbow area. You need to account for this twist when you measure. It'll take up some extra length.
Trial and Error
It might take a few tries to get the right chain length. Don't be afraid to experiment! Crochet stretches, so keep that in mind as you're measuring.
The Importance of Loose
The chain shouldn't be so loose it falls off completely. But it shouldn't be too tight either. Aim for a comfortable fit that's "almost falling off," but not quite.
Personalize the Fit
Adjust the chain length to suit your personal preference. Do you like a looser or more fitted shrug? The choice is yours!

Creating the Initial Chain
Time to start crocheting! Let's make that initial chain.
Using the Larger Hook
Use the 6.5 mm hook for the initial chain. This helps create a looser foundation.
Leaving a Tail
Leave an 8-10 inch tail for sewing the ends together later. Too short, and it's hard to sew. Too long, and it's wasteful.
Making a Slip Knot
Create a slip knot and place it on the larger hook. This is the first step in any crochet project.
Chaining Technique
Make sets of 20 chains for easy counting. Place a stitch marker every 20 chains. This makes it easier to keep track of your stitch count.
Recording Your Count
Write down the total number of chains. This helps if you want to make another shrug in a different size.
Adjusting the Chain
Drape the chain around your upper body to check the fit. Remove or add chains as needed until you get the right length.
Working the First Row: The Foundation
Now, let's work the first row, which is the foundation for the entire Crochet Hug Shrug.
Switching to the Smaller Hook
Remove the larger hook and use the 6 mm hook. This will be the hook you will use for the main body of this shrug.
Removing Stitch Markers
Take out the stitch markers, except for one to mark the end. You'll need that one to keep track of where you need to end your row.
Creating the First Stitch
In the fourth chain from the hook, make a double crochet (dc). This, along with the initial chains, forms the first "V" stitch. (The three chains count as a double crochet, and the chain one counts as a chain one.)
Alternating Stitches
Skip one stitch, and in the next stitch, make a single crochet (sc). Then, skip one stitch, and in the next stitch, make a "V" stitch (dc, ch 1, dc). Continue alternating these stitches across the entire row.
Double Crochet How-To
If you need a reminder, here's how to double crochet: Wrap the yarn, insert the hook, yarn over, pull through, yarn over, pull through two loops, yarn over, pull through remaining two loops.
Maintaining the Pattern
Ensure the chain isn't twisted as you work. Focus on keeping the "V" stitches aligned.
Ending the Row
Aim to end the row with a "V" stitch. If needed, unpick the last few chains to achieve this.
Dealing with Yarn Breaks
If the yarn breaks, create a loop and sew it in later. Don't let a little snag stop you!

Joining the Ends: Creating the Twist
This is where the magic happens! We'll join the ends and create the signature twist of the Crochet Hug Shrug.
Laying Out the Row
Lay the first row flat in a circle to check for any twists. You want it to be smooth and even.
Adding the Twist
Flip one end over once to create a single twist. This creates the infinity shape of the shrug.
Understanding the Stretch
Note how the twist shrinks the overall size of the piece. It's all part of the design.
Positioning the Tail
The tail will be used to join the ends together later. Keep it out of the way for now.
Securing the End
Place a stitch marker from your slip knot onto the first chain.
Working the Second Row: Alternating Stitches
Now, let's work the second row, building on the foundation we've created.
Crocheting into the "V" Stitch
Work a single crochet (sc) into the top of the first "V" stitch.
Crocheting into the Single Crochet Space
Work a "V" stitch (dc, ch 1, dc) into the space created by the single crochet.
The "Opposite" Rule
Where there was a tall "V" stitch, make a short single crochet. Where there was a short single crochet, make a tall "V" stitch.
Keeping Track
Use the stitch marker to keep track of where the row will join. Make sure the row stays underneath to avoid confusion.
Dealing with Imperfections
Don't worry about small imperfections; they will be less noticeable later. Crochet is forgiving!
Working in the Tail
Work in the broken yarn a little bit so it is more secure.
Continuing the Pattern
Continue alternating single crochets and "V" stitches around the entire row.
Back to the Beginning
Be aware that you've made it back to where you started before.
Joining the Ends
When you get to the end of the row, slip stitch to join. Slip stitch into the third chain of the initial four chains. Chain one to secure the join.
Leaving the Tail
Leave the long tail free for sewing up later.

Row Three: Continued Pattern
Let's keep the pattern going with Row Three.
Turning the Work
Turn your work after joining. This is very important!
Identifying Mountains and Legs
"Mountains" refer to the tops of the "V" stitches. "Legs" refer to the spaces created by the single crochets.
Sl st into the single crochet
Slip stitch into the first single crochet.
Starting 3rd Row
Chain 4. Double Crochet into the same space to create the first V stitch.
Repeating the Pattern
Single crochet into the "mountains" (top of the V-stitch). V-stitch into the "legs" (single crochet space).
The Importance of Turning
Turning the work allows you to see the "legs" clearly. Without turning, it's difficult to find the correct stitch placement.
Moving the Stitch Marker
Move the stitch marker to the current joining point.
Avoiding Spiraling
Be careful not to accidentally crochet in a spiral. This will distort the shape of the shrug. This yarn conversion chart will help you adjust if the yarn is different than the one in the pattern.
Continuing the Body of the Shrug
Now, let's continue working on the body of the Crochet Hug Shrug until it reaches the desired length.
Repeating Rows
Repeat Row 3 until the shrug reaches the desired length.
Judging the Length
Measure from the bottom of your neck to the crease of your elbow. Adjust the length to your personal preference.
Increasing Hook Size for Final Ball of Yarn
Here's a tip!
Avoid Being Too Tight
For the last ball of yarn, it's important to make sure the shrug isn't too tight. Going up a hook size is one way to help avoid that.
Edging: Adding the Finishing Touch
Let's add a decorative edge to our Crochet Hug Shrug with a simple shell pattern.
Last Row
Single crochet into the mountain. Slip stitch to the third chain of the initial four chains to turn that one into a V stitch. Chain one and turn your work. Slip stitch into the first single crochet.
Creating the Shells
Chain 3 (counts as the first double crochet). Make two more double crochets into the same single crochet space (total of 3 dc). This creates half of a shell. Place a stitch marker to mark the joining point.
Shell Pattern
Single crochet into the V-stitch. Five double crochets into the single crochet space. Repeat this pattern around the entire edge.
Border Considerations
The shells create a decorative border. Feel free to use any border you prefer!
Hook Size Adjustment
If the edge seems too loose, go down a hook size for the border.
Casual Shrug Look
Keep the 6 mm hook for a more relaxed, casual look.
Continuing the Shells
Single crochet into the V stitch. Five double crochets into the single crochet space, all the way around.

Joining the Edging
Almost there! Let's join the edging to complete our Crochet Hug Shrug.
Finishing the Shells
Single crochet into the V-stitch. Two double crochets into the next double crochet spot.
Joining to Close
Slip stitch to the top of chain 3 to join. Chain 1 to secure your work.
Weaving in the Ends
Time for the final step: weaving in those loose ends!
Securing the Yarn
Use a blunt needle to weave in all loose ends. This prevents unraveling and gives a clean finish.
Enjoy Your Hug Shrug!
Congratulations on finishing your Crochet Hug Shrug! This is a great project to make to expand your skills, and also make great gifts!
Wear it, gift it, and enjoy the cozy warmth you've created. Experiment with different yarns and colors for unique variations. Want more written patterns? Check out The Secret Yarnery's selection of written patterns.
Video Tutorial Links
Here are the video tutorials for your reference:
- Right-Handed Tutorial: https://youtu.be/RIczqGqiNjw
- Left-Handed Tutorial: https://youtu.be/0F2Lm0D5frs
Written Pattern Link
- Written Pattern: https://bit.ly/48cV3LI
The Secret Yarnery Subscription Link
- Subscribe: https://bit.ly/3UWNmoJ
Free Stuff Link
- Free Stuff: https://bit.ly/3ssa0tn
So there you have it! Your very own Crochet Hug Shrug. This easy crochet sweater is perfect for beginners! Remember to like, subscribe, and share for more fun crochet projects. And most importantly...stay hooked!
Frequently Asked Questions (FAQs) About the Crochet Hug Shrug
1. Can beginners make the Crochet Hug Shrug?
Yes! The Crochet Hug Shrug is beginner-friendly. It uses simple stitches like chain (ch), single crochet (sc), double crochet (dc), and slip stitch (sl st). There’s also a video tutorial for extra guidance.
2. What type of yarn works best for the shrug?
Cotton tape yarn was used in the example, but you can personalize it based on your preference. Self-striping yarn works great for creating unique designs.
3. Do I need to know gauge for this project?
Gauge isn’t crucial for the shrug, but it helps with sizing if you're aiming for precision. Keep in mind that crochet stretches, so the fit can adjust slightly.
4. What does the infinity twist mean?
The infinity twist allows one part of the shrug to twist before joining, which gives it a stylish, draped design.
5. How long does it take to finish this project?
The time depends on your crocheting speed. Most beginners may take a few hours spread over a couple of days.
6. Can I customize the shrug size?
Yes, easily! Adjust the number of foundation chains and the total number of rows to customize the fit.
7. What if I don’t have stitch markers?
You can use a small piece of contrasting yarn or a safety pin as an alternative.
8. Why do I need two crochet hooks of different sizes?
The larger hook is used for the initial chain to make it loose and flexible. The smaller hook is used for the main body to maintain consistency.
9. Can I add embellishments?
Absolutely! Add decorative buttons, tassels, or even fringe to personalize your shrug.
10. What does the shell edging mean?
The shell edging is a decorative finishing touch created by crocheting clusters of double crochets. This creates a scalloped border.
![]()
Christa Patel is a passionate crochet artist and instructor with over a decade of experience in the world of fiber arts. Known for her approachable teaching style, Christa specializes in creating beginner-friendly patterns that inspire creativity and spark joy. Her love for crochet began as a hobby and soon turned into a dedicated craft, where she found a way to merge art with practicality.
Through her blog and YouTube channel, The Secret Yarnery, Christa shares her expertise with crocheters of all skill levels. Her step-by-step tutorials, written patterns, and helpful tips have helped thousands of creators globally to pick up their hooks and make something special.
Christa’s work focuses on keeping crochet accessible and enjoyable, encouraging makers to experiment with colors, textures, and techniques. Based in Nairobi, Kenya, she infuses her patterns with both modern trends and traditional inspiration, offering something unique for crochet enthusiasts everywhere.
When she's not crocheting, Christa enjoys spending time with her family, experimenting with new materials, and connecting with her vibrant crafting community online. Join Christa on her creative journey, and don't forget to explore her growing library of patterns and tutorials—perfect for starting your crochet adventure!
About the Author
With a passion for crafting easy, beginner-friendly tutorials and patterns, Christa inspires crafters of all skill levels to unleash their creativity worldwide. She encourages yarn lovers to connect, create, and crochet a world filled with beautiful handmade treasures!
Design Your Own Custom Crochet Shrug