Speedy Granny Ruth Rainbow Scarf: An EASY Crochet Scarf Pattern for Beginners
Ready for a crochet project that’s as fun as it is fast? The Speedy Granny Ruth Rainbow Scarf is calling your name! This pattern is so simple, it’s perfect whether you’re just starting out or you’re a seasoned pro looking for a relaxing project. Get ready to brighten up your day with a burst of color and texture – and the best part? No complicated stitches are needed! Join Christa from The Secret Yarnery and let's make something beautiful.
Table of contents
Meet Christa from The Secret Yarnery
Christa, the creative mind behind this pattern, is passionate about making crochet accessible and enjoyable for everyone. At The Secret Yarnery, you’ll find a treasure trove of beginner-friendly designs and tutorials. Her YouTube channel is a fantastic resource too! Be sure to check out and subscribe to The Secret Yarnery YouTube Channel for more inspiration and EASY crochet scarf patterns.
Why You'll Love the Speedy Granny Ruth Rainbow Scarf (No Holes!)
This scarf is seriously addictive, and here’s why:
-
It features a super simple one-row repeat, so you can get into a relaxing rhythm.
-
There are no ends to sew in. Yes, you read that right!
-
The tassels add about 12 inches of length, giving you a stylish, finished look without endless crocheting.
-
It's a great stash buster! Use up those leftover yarn scraps and create something amazing.
-
It looks fantastic in any color combination. Get creative and personalize it to your taste.
-
And most importantly for some people, it has no holes! This makes it a wonderfully warm and cozy scarf, perfect for those chilly days. It also makes a thoughtful gift for friends who prefer a solid, hole-free weave.

Get the Pattern: Free and Printable Options
Ready to get started? The complete written pattern for the Speedy Granny Ruth Rainbow Scarf is available on The Secret Yarnery website. You can access the free pattern here or grab the printable PDF pattern for easy, offline access. Don't worry if you're new to reading patterns! All of Christa's patterns are written in plain English, just like she's speaking in the video.
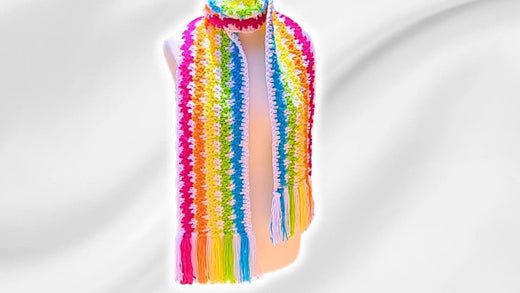
Finished Size and Measurements
Here are the final dimensions of the scarf:
- Length: 62 inches (without tassels)
- Width: 7 inches
- Tassels: Approximately 6 inches long
- Total Length (with tassels): 74 inches (187 cm)
Materials You'll Need to Crochet Your Scarf (Crochet Must-Haves)
Before you begin, gather these materials:
- Yarn: Five different colors of yarn for the rainbow effect.
- Neutral Yarn: A neutral color yarn (like white) for the final row.
- Crochet Hooks: One 8 mm crochet hook for the starting chain and one 7 mm crochet hook for the scarf itself.
- Stitch Markers: Eight stitch markers. These are essential for keeping track of your progress.
- Scissors: A good pair of scissors.
- Yarn Needle: Guess what? You don't need one! This pattern is designed to avoid sewing in ends.
Check out these crochet must-haves, available on Amazon:
- Keep your yarn organized with these Yarn Ball Storage Bags.
- A set of Crochet Hooks is essential.
- Sharp Scissors for trimming yarn.
- Stitch Markers to help you keep your place.
Remember that yarn amounts will vary depending on your yarn weight and tension, but this is a fantastic project for using up your yarn stash!

Let's Get Started: Step-by-Step Instructions (Chain)
- Grab your 8 mm crochet hook.
- Leave a long yarn tail (about 7 inches) – this will be used for your tassels.
- Make a slip knot and place it on your hook.
- Chain 20. That's one, two, three… all the way to 20!
- Notice the pretty little "v" shapes along the top of your chain.
- Gently roll the chain to the side. You'll see bumps along the back – these are your back loops (sometimes called camel bumps).
Adding Stitch Markers (Important!)
Stitch markers are your friends in this project! Place a stitch marker into the back loop directly underneath your working yarn (the loop on your hook). This marks the 20th chain you just made. Chain 20 more, then repeat: gently roll the chain to the side, find the back loop right under your working yarn, and slide in another stitch marker. Keep going, making sets of 20 chains and adding a stitch marker to each set, until you've used all eight stitch markers.
Pro Tip: Want a different length? Just make sure your chain count is a multiple of four!
Switching to the Smaller Hook (7mm) and Starting Row 1
Once you've chained 160 (or your desired multiple of four), switch to your 7 mm crochet hook. Chain three. This chain three counts as your first double crochet. We're still working into those back loops! Make sure the "v's" on your chain are facing up. Gently rest your thumb on the top of those "v's" and turn the chain to the side to reveal the back loops. The first one is hiding right underneath your working yarn.
Row 1: Double Crochet and Chain-One Pattern
Now for the fun part! We're starting the EASY crochet scarf pattern.
- Find the fourth back loop from your hook (the one right where your first stitch marker is).
- Wrap your yarn and insert your hook into that fourth back loop.
- Make one double crochet. You can remove the stitch marker if it's in your way.
- Double crochet into the next back loop (the one right next to it).
- Chain one, then skip one back loop.
- Double crochet into the next three back loops (one double crochet in each loop).
- Repeat this sequence all the way across the row: chain one, skip one, then double crochet into the next three back loops.
So, the pattern for this row is: a set of three double crochets, chain one, skip one.
Finishing Row 1 and Changing Colors
When you reach the end of your chain, you'll have two chains left. Chain one, skip one, and then double crochet into the last chain. But don't finish that last double crochet! Leave the last two loops on your hook. It's time to change colors. Cut a long tail of yarn (as long as you want your tassels to be, or even a bit longer). Grab your next color of yarn and make a loop, leaving a tail that's about the same length as your other tails. Place this loop onto your hook, hold the tails down, and pull the new loop through the two loops on your hook. You've just finished your double crochet with the new color!
Drop your old yarn tail, holding it along the back of your work. Chain three.
Row 2: Drop Stitch Double Crochet
Turn your work. Slide your hand under your working yarn and turn. (You can remove those stitch markers now, too!). Wrap your yarn. We're doing a "drop stitch" double crochet. Instead of going into the stitch up top, we're going into that back loop – the same one we worked into before – way down on the chain below.
- Wrap your yarn.
- Slide that back loop onto your hook, underneath everything.
- Double crochet into that back loop.
- Double crochet into the next stitch (the one right next to the space).
- Chain one, and skip one (skipping the middle double crochet from the row below).
Now, repeat this sequence:
- Wrap your yarn and double crochet into the stitch right before the space.
- Wrap your yarn and insert your hook into that back loop on the chain below the space. Make sure your hook goes all the way through so that all of that yarn will be on the top part of your hook. Double crochet into that chain.
- Double crochet into the stitch right after the space.
Row 2: Repeat Details
So that's chain one, skip one; double crochet into the stitch before the space; drop double crochet into the chain underneath the space; and double crochet into the stitch right after the space.
Finishing Row 2 and Rejoining Color
After your last set of three, you'll have a little circle or "lump" left. Remember, the chains count as double crochets in this pattern, so this is our last set of three. We're going to skip the center double crochet and use the top of the chain three as our third double crochet. At the end of the row, chain one, skip one, and double crochet into the top of our chain three. But wait! Don't finish that stitch completely. Leave the last two loops on your hook.
We're not changing colors here, but we are rejoining the white to get the tassels started.
Cut your yarn, leaving a long tail for the tassels. Make a loop of yarn (again, leaving a tail of the same length), and slip it onto your hook. Finish the stitch with your new yarn, holding everything down at the back of your work. Chain three.
Row 3 (and beyond): The Repeating Pattern
This is it! Row 3 establishes the repeating pattern you'll use for the rest of the scarf. Every row starts with a chain three and a turn. Then, make a drop double crochet into the first stitch. Double crochet into the next stitch. Chain one, skip one (always skipping that drop double crochet in the row below), and then double crochet into the first double crochet before the space. Wrap your yarn, double crochet into the stitch below the space, and do your last double crochet into the first stitch after the space.
Continue this sequence: chain one, skip one; wrap your yarn, double crochet into the second stitch (or the first stitch before the space); wrap your yarn, double crochet into the stitch below the space (that's our drop double crochet); and one double crochet into the next stitch.
I recommend a GIF demonstrating the repeating pattern, it makes it easier to visualize. The GIF should show a few repeats of the drop stitch, double crochet, chain one, skip one sequence.
Color Changes
Remember to change colors every row to create that beautiful rainbow effect. I like to follow this color pattern: one row of white, two rows of a color, one row of white, and so on. And don't forget to cut the yarn and rejoin at the end of each row to prepare for the tassels.
Last Row: A Slight Variation
The very last row is a little different! After you finish the second row of your last color, switch to your neutral color (white) for the final row. Finish that last stitch with your neutral color yarn. Chain three and turn your work. Drop double crochet into the stitch at the bottom of the space. Then, double crochet into each of the next three stitches. Continue alternating drop double crochets and double crochets across the row. The difference? We're not chaining and skipping anything this time. Everything is either a double crochet or a drop double crochet.
A clear photo of the completed last row to show the texture would be great here. Notice how the combination of regular and drop double crochets creates a dense, finished edge.
Tassels: No Sewing Required!
Here's the best part: you don't have to sew in any ends! To get ready for the tassels, take the pairs of yarn tails where you changed colors and tie a simple knot (just a regular overhand knot) to secure them. This keeps the ends secure.
Preparing the Tassel Strands
Now, let's make those tassels! Grab a book (a hardcover works best) that's about the length you want your tassels to be. Wrap the yarn around the book six times per tassel. Use the groove along the top of the hardcover book to slide your scissors under and cut the strands. Repeat this process for each of your five colors.
Alternating Tassel Colors
Remember to alternate your tassel colors in this order: white, color, white, color, white, and so on. Start and end with white tassels on each end of the scarf.
Joining the Tassels: Step-by-Step
- Take six strands of white yarn and hold them open with your thumb.
- Use a smaller crochet hook (a 4.5 mm hook works well) to slide into the first spot on the edge of the scarf.
- Make sure you have two or three strands of the scarf stitch on top of your hook.
- Get the loops of the tassel strands onto your hook.
- Pull them through the stitch.
- Make a large loop (about 1.5 inches).
- Grab the tassel tails and pull them through the loop (like making a big slip stitch).
- Snug it down.
- Give each strand a little pull to make sure there aren't any loose loops.
Joining the Tassels: Color
Now for the next tassel, in the center of the first color stripe. For the one after, white again, and so on.
Continued Tassel Attachment: Color Pattern
Keep adding those tassels! The order should be green, then white, yellow, white, orange, white, pink, and end with white.
Securing the Tassels
It's important to snug down each tassel. After pulling the tassel strands through, snug the loop down nice and tight. Pull each tail individually to make sure there aren't any loose strands. You can use a smaller hook to insert back down into that slip knot, grab the tail, and bring it through.
Trimming the Tassels: Preparation
Almost there! Now we'll prepare for trimming the tassels. This is how to get them all nice and even.
- Use masking tape to line up the shortest tassels.
- Keep the tape parallel to the edge of your scarf.
- Tape the tassels down to hold them in place.
- Add another piece of tape higher up, at the tip of the shortest tassels.
- Use a measuring tape to double-check that all the tassels are about the same length.
Trimming the Tassels: The Cut
- Use sharp scissors to slide in between the tape.
- Cut along the table to remove the extra length.
- Double-check to make sure you've cut all the strands.
Revealing the Finished Tassels
Remove the lower masking tape (with all the little yarn ends attached – so satisfying!). Remove the top tape.
Repeat on the Other Side
Repeat the tassel trimming process on the other side of your scarf.
You're Finished!
Congratulations! You've completed your Speedy Granny Ruth Rainbow Scarf.
Share Your Project!
I would love to see your finished scarf! Share your photos on social media and tag The Secret Yarnery. You can also use the hashtags #SecretYarnery and #SpeedyGrannyRuthScarf.
Subscribe and Stay Connected
For more EASY crochet scarf patterns and tutorials, subscribe to The Secret Yarnery's YouTube channel. And don't forget to hit the bell icon so you don't miss any new videos! You can find even more beginner crochet patterns here.

Left Handed?
FAQs
1. What skill level is required for the Speedy Granny Ruth Rainbow Scarf?
This pattern is beginner-friendly! If you can chain, double crochet, and follow a simple one-row repeat, you're ready to start.
2. Do I need specific yarn for this scarf?
No specific yarn is required! This pattern is great for using up yarn from your stash. Choose five colors for the rainbow effect and one neutral color for added contrast. Adjust yarn weight as desired, but make sure to adjust the hook sizes accordingly.
3. What size crochet hooks should I use?
For this pattern, you'll need an 8 mm crochet hook for the starting chain and a 7 mm crochet hook for the scarf itself.
4. What’s unique about this scarf pattern?
This scarf uses a one-row repeat, features no ends to sew in, incorporates tassels directly from the yarn tails, and has no holes, making it warm and cozy.
5. Can I adjust the scarf size?
Absolutely! Just ensure the starting chain is a multiple of four to maintain the pattern sequence. Add or reduce sets of 20 chains for your preferred length.
6. How do I change colors in this pattern?
To change colors, stop when two loops remain on your hook during the last double crochet. Add the new color, pull it through, and start the next row.
7. Do I need to sew in the yarn ends?
Nope! The ends are used to tie knots and are incorporated into the tassels, saving you time and effort.
8. How are the tassels made?
Tassels are made by wrapping yarn around a hardcover book, trimming to the desired length, and knotting them along the edges of your scarf.
![]()
Christa Patel is the creative mind behind the Secret Yarnery, a trusted resource for crochet enthusiasts worldwide. With years of experience, Christa specializes in designing beginner-friendly yet stunning crochet patterns that inspire creativity and confidence in crafters of all skill levels.
As a passionate crocheter, Christa is known for her clear and approachable teaching style, breaking down complex patterns into simple, easy-to-follow steps. Through her engaging video tutorials, written patterns, and helpful tips, she has cultivated a community where crocheters can connect, learn, and share their work.
Christa’s dedication to making crochet fun and accessible shines in every project she creates, from colorful blankets to intricate borders. Whether you’re a seasoned expert or just picking up a hook for the first time, Christa's guidance will help you craft something beautiful.
For more crochet patterns, tips, and inspiration, visit her website at The Secret Yarnery, or check out her YouTube channel filled with step-by-step tutorials.
About the Author
With a passion for crafting easy, beginner-friendly tutorials and patterns, Christa inspires crafters of all skill levels to unleash their creativity worldwide. She encourages yarn lovers to connect, create, and crochet a world filled with beautiful handmade treasures!
Crochet Speedy Granny Ruth Rainbow Scarf: Quick and Easy Pattern!