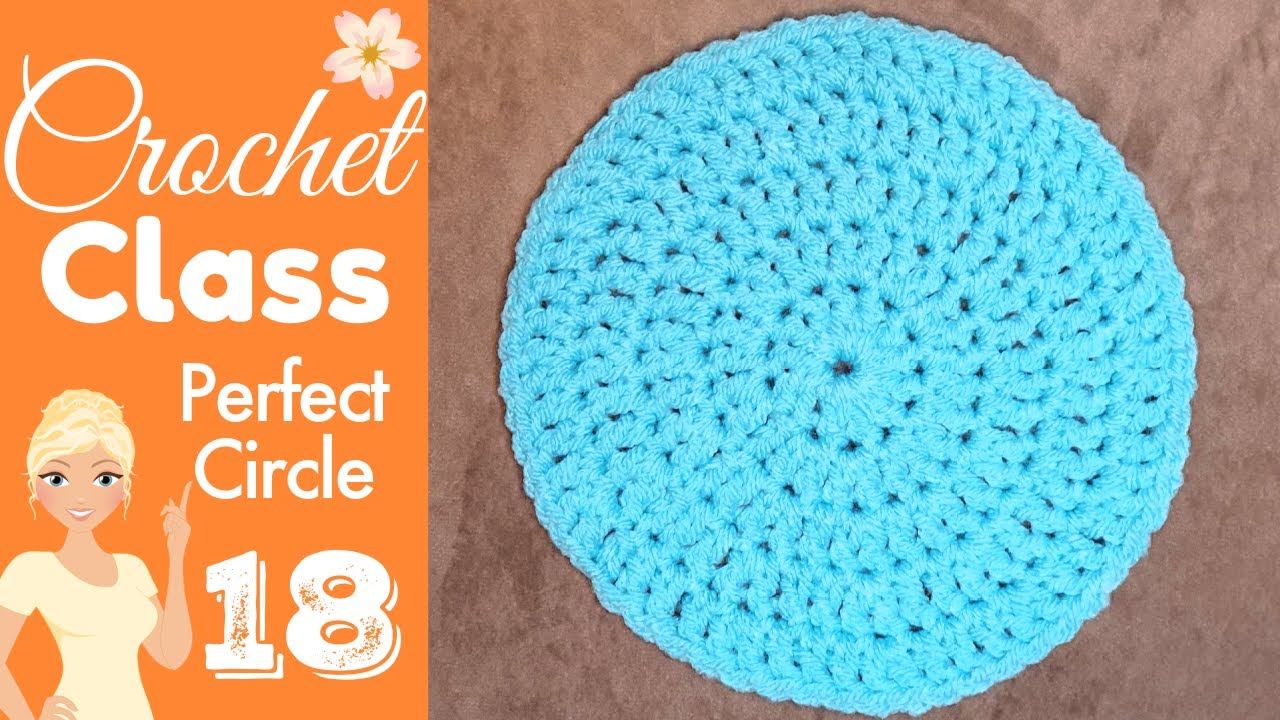
Crochet Class 18: Crochet a Perfect Circle: Easy Step-by-Step Guide
Have you ever wanted to crochet a perfect circle? It's a fundamental skill that opens up a world of possibilities, from creating beautiful appliqués and coasters to crafting stylish hats and cozy blankets. In this guide, I'll walk you through the process step-by-step, ensuring that even if you're new to crochet, you can achieve flawless results. This tutorial is based on Christa's Crochet Class #18 from The Secret Yarnery on YouTube, where she shares easy-to-follow instructions for crocheting a flat, seamless circle in any size.
You'll find a written pattern available on secretyarnery.com. And the best part? Christa's instructions are in plain English, making it super easy to follow along, even if you've never picked up a hook before.
Table of contents
Gathering Your Supplies
Before we dive in, let's gather the necessary materials. For this project, you'll need:
- Worsted weight yarn (Christa uses acrylic)
- A 6 mm crochet hook
- A yarn needle for weaving in those pesky ends
- Scissors
While I'm using specific materials, feel free to adapt this pattern to different yarn weights and hook sizes. Just remember that the thicker the yarn, the bigger your circle will be! You can find a wide variety of Yarn suitable for this project online. I find that having the right Crochet Hooks really makes a difference in my work as well.
Getting Started: The Slip Knot and Chain
Let's start with the foundation: the slip knot. Leave a short tail, about 2 inches, and form a loop. Pull the yarn through to create the knot, then place it on your hook.
Next, we'll chain three. These chains will form the base of our circle, so it's important to count them correctly. Remember, to count your chains, you don't count what is on your hook, or the knot, you just count the "v's".
Now, join the chain by going into the very first chain, right on top of the slip knot. Pull the tail down, so you can work over it, and create a U-shape. Slip stitch through both loops to form a ring. This ring is where we'll work all our stitches for the first round.

Round 1: Building the Foundation
Chain two. This chain doesn't count as a stitch, but it helps to create a smooth edge.
Now, we'll work into the center of the ring. Hold the ring open with your fingers and make one double crochet to secure it. Make sure you're working over the tail to hide it as you go.
Next, create 11 more double crochets into the ring, for a total of 12 double crochets. If you're unsure of your stitches, don't worry! I'll link the playlist for all of the beginning crochet classes , so you can pause the video and catch up.
Sometimes, you might run out of room in the ring before you finish your 12 double crochets. If this happens, just pull the stitches back to create more space.
Once you've completed your 12 double crochets, it's time to count your stitches. Remember, the initial chain two does not count. To make counting easier, separate the stitches with your fingers.
Finally, join the round by slip stitching to the top of the first double crochet
Round 2: Increasing the Size
Chain two (this does not count as a stitch).
In this round, we'll be doing double crochet increases. That means each stitch will receive two double crochets. Start by placing two double crochets into the first stitch, right beside the chain. Then, continue with two double crochets into each stitch around the circle.
By the end of this round, you should have a total of 24 double crochets. It's crucial to keep track of your stitch count to ensure your circle stays flat.
To make counting easier, count the pairs of double crochets. You should have 12 pairs, which equals 24 stitches.
To finish the round, slip stitch to the top of the first double crochet.

Round 3: Introducing a Pattern
Chain two (this does not count as a stitch).
Now, we'll introduce a pattern to create a larger circle. Place one double crochet into the first stitch, and then two double crochets (an increase) into the next stitch. Repeat this pattern around the circle: one double crochet, then an increase.
To help you remember this pattern, I like to use a little mnemonic device: "One, increase." This reminds me to alternate between one double crochet and an increase.
You should end on an increase. It's important to have 36 double crochets in total. Each round adds 12 double crochets to the total.
If you don't end on an increase, don't panic! Just go back and make sure you still have the correct stitch count. As long as you have 36 stitches, a slight variation in the placement of the increases won't make a huge difference.
Join the round by slip stitching to the top of the first double crochet.
Round 4: Continuing the Increase Pattern
Chain two (this does not count as a stitch).
In Round 4, we'll continue the increase pattern. This time, we'll place one double crochet into the first stitch, one double crochet into the second stitch, and then two double crochets (an increase) into the third stitch.
The mnemonic device for this round is: "One, two, increase." Every third stitch gets an increase.
Just like in the previous round, you should end with the increase before the chain. And you'll want to ensure you have 48 double crochets in total for the round.
Slip stitch to the top of the first double crochet to join the round.

Round 5: The Final Round
Chain two (this does not count as a stitch).
For the final round of this tutorial, we'll continue the pattern. Place one double crochet into the first stitch, one double crochet into the second stitch, one double crochet into the third stitch, and then two double crochets (an increase) into the fourth stitch.
The mnemonic device for this round is: "One, two, three, increase." Every fourth stitch gets an increase.
As always, you should end with the increase right before the chain. By the end of this round, you should have 60 double crochets in total, consisting of 12 increases.
Slip stitch to the top of the first double crochet to join the round.
Finishing Off: Securing Your Work
Now that you've completed your circle, it's time to finish off. Chain one to create a knot, then cut the yarn, leaving a long enough tail for sewing in.
Pull the hook up and through to secure the yarn, then snug the knot down.
Weaving in the Ends: A Professional Touch
Weaving in ends is essential for securing your yarn and preventing unraveling. It's the secret to a professional-looking finish.
Thread the yarn tail onto a yarn needle. Then, weave the tail through the back of the stitches, following the same direction as the stitches. For extra security, weave in different directions. Trim any excess yarn.
For best results, use a yarn needle with a blunt tip to avoid splitting the yarn.
Making a Larger Circle: Expanding Your Project
Want to make your circle even bigger? The principle is simple: keep adding 12 stitches per round.
Here's how the pattern continues:
- Round 6: One, two, three, four, increase.
- Round 7: One, two, three, four, five, increase.
- Round 8: One, two, three, four, five, six, increase.
And so on, until you reach your desired size.
A good rule of thumb is that the round you are on is how many double crochets you do, then increase.
- Round 9: One, two, three, four, five, six, seven, increase.
- Round 10: One, two, three, four, five, six, seven, eight, increase.
Adjust the number of rounds to create different sized circles for various projects. Use stitch markers to mark the beginning of each round and the increase stitches to keep track of your progress.

Applications of Crochet Circles: Inspire Creativity
Crochet circles are incredibly versatile. Here are a few ideas to get you started:
- Coasters: Protect your furniture in style.
- Appliqués: Add embellishments to blankets, hats, and bags.
- Hats: Create beanies, berets, and other headwear.
- Blankets: Join multiple circles together for a unique blanket design. Check out these Crochet Blanket Patterns to get inspired!
- Amigurumi: Form the base for stuffed toys and other creations.
- Mandalas: Crochet intricate designs for wall hangings or decorations.
- Bags: Create a circular base for tote bags or purses.
- Scarves: Crochet long strips of circles and join them together.
Here are some more ideas:
- Use the circle as a base to build an amigurumi character.
- Use different yarn colors to add some flair.
- Add other shapes to your circles, triangles, squares, etc.
Troubleshooting Common Issues
Sometimes, things don't go exactly as planned. Here are some common issues and their solutions:
- Circle is not flat: This is usually caused by an incorrect stitch count (too many or too few increases) or tension that is too tight or too loose.
- Visible join: Try a standing double crochet at the beginning of each round instead of a chain two. Also, make sure you work the slip stitch join loosely.
- Wavy edges: This indicates too many increases in each round.
- Pointed edges: Inconsistent tension can cause pointed edges.
Remember, practice makes perfect! Don't be discouraged if your first circle isn't perfect.
Advanced Techniques: Elevate Your Circle
Ready to take your crochet circle skills to the next level? Here are some advanced techniques to try:
- Invisible Join: A technique for creating a seamless join.
- Standing Double Crochet: A method for starting a new round without a chain.
- Color Changes: How to seamlessly change colors within the circle. You can find many Written Patterns to learn how to do this.
- Textured Stitches: Incorporating bobble stitches, popcorn stitches, or other textured stitches for added dimension.
- Lace Edging: Adding a delicate lace border to your circle.
Experiment with different yarn weights, textures, and fibers to create unique effects.

Meet the Maker: Christa from The Secret Yarnery
Christa from The Secret Yarnery is passionate about teaching and committed to making crochet accessible to everyone. Her YouTube channel features a wealth of free crochet classes for both beginners and advanced crocheters.
Explore More Crochet Classes
I encourage you to explore the other crochet classes available on The Secret Yarnery YouTube channel.
Stay Connected with The Secret Yarnery
Don't miss out on new patterns, tutorials, and inspiration. Subscribe to the YouTube channel and explore the many Crochet Patterns available to learn a wealth of new tips and tricks.
Conclusion
Learning to crochet a perfect circle is a rewarding experience that unlocks endless creative possibilities. With this guide and a little practice, you'll be crocheting flawless circles in no time. So grab your hook and yarn, and let your creativity flow! Stay hooked!
FAQs
1. Why is my circle curling or not lying flat?
This happens due to an incorrect stitch count or inconsistent tension. Ensure you are increasing by 12 stitches per round and maintaining even tension throughout the project.
2. How do I adjust the size of the circle?
To make the circle larger, continue adding 12 stitches in each subsequent round. Follow the same "stitch, stitch, increase" pattern (e.g., Round 6: "One, two, three, four, increase").
3. What is the correct way to count stitches?
Don’t count the chain stitches at the beginning of the round. Only count the actual double crochets. Use stitch markers if you find it challenging to keep track.
4. Can I substitute the yarn and hook sizes?
Absolutely! Using different yarns and hooks will result in varying circle sizes. Keep in mind the thicker the yarn and larger the hook, the bigger the circle will be.
5. Why are there gaps between stitches in my circle?
Gaps can occur if your stitches are too loose. Try tightening your tension slightly or using a smaller hook for a closer, more uniform stitch.
6. Can I use single or half-double crochet instead of double crochet?
Yes, but the number of stitches required per round will vary. Adjust the pattern accordingly, and be sure to increase consistently to keep the circle flat.
7. How do I make sure the join is seamless?
Use an invisible join or standing double crochet to start each new round for a cleaner, seamless look.
8. How can I add color changes to my circle?
To change colors seamlessly, finish the last stitch of the round with the new color, and carry on crocheting in the new shade. A yarn needle can help weave in any loose ends cleanly.
9. How do I fix wavy or rippled edges?
Wavy edges mean you’re making too many increases. Reduce the frequency of increases to maintain a flat surface.
10. Can I turn this circle into a hat, bag, or other project?
Yes! For hats, stop increasing when the circle's diameter matches the desired hat size, then continue crocheting without increasing. For bags, use the circle as the base and build sides by crocheting straight up.
![]()
Christa Patel is the creative mind behind the Secret Yarnery, a trusted resource for crochet enthusiasts worldwide. With years of experience, Christa specializes in designing beginner-friendly yet stunning crochet patterns that inspire creativity and confidence in crafters of all skill levels.
As a passionate crocheter, Christa is known for her clear and approachable teaching style, breaking down complex patterns into simple, easy-to-follow steps. Through her engaging video tutorials, written patterns, and helpful tips, she has cultivated a community where crocheters can connect, learn, and share their work.
Christa’s dedication to making crochet fun and accessible shines in every project she creates, from colorful blankets to intricate borders. Whether you’re a seasoned expert or just picking up a hook for the first time, Christa's guidance will help you craft something beautiful.
For more crochet patterns, tips, and inspiration, visit her website at The Secret Yarnery, or check out her YouTube channel filled with step-by-step tutorials.
About the Author
With a passion for crafting easy, beginner-friendly tutorials and patterns, Christa inspires crafters of all skill levels to unleash their creativity worldwide. She encourages yarn lovers to connect, create, and crochet a world filled with beautiful handmade treasures!
Crochet Class 18: Crochet a Perfect Circle: Easy Step-by-Step Guide