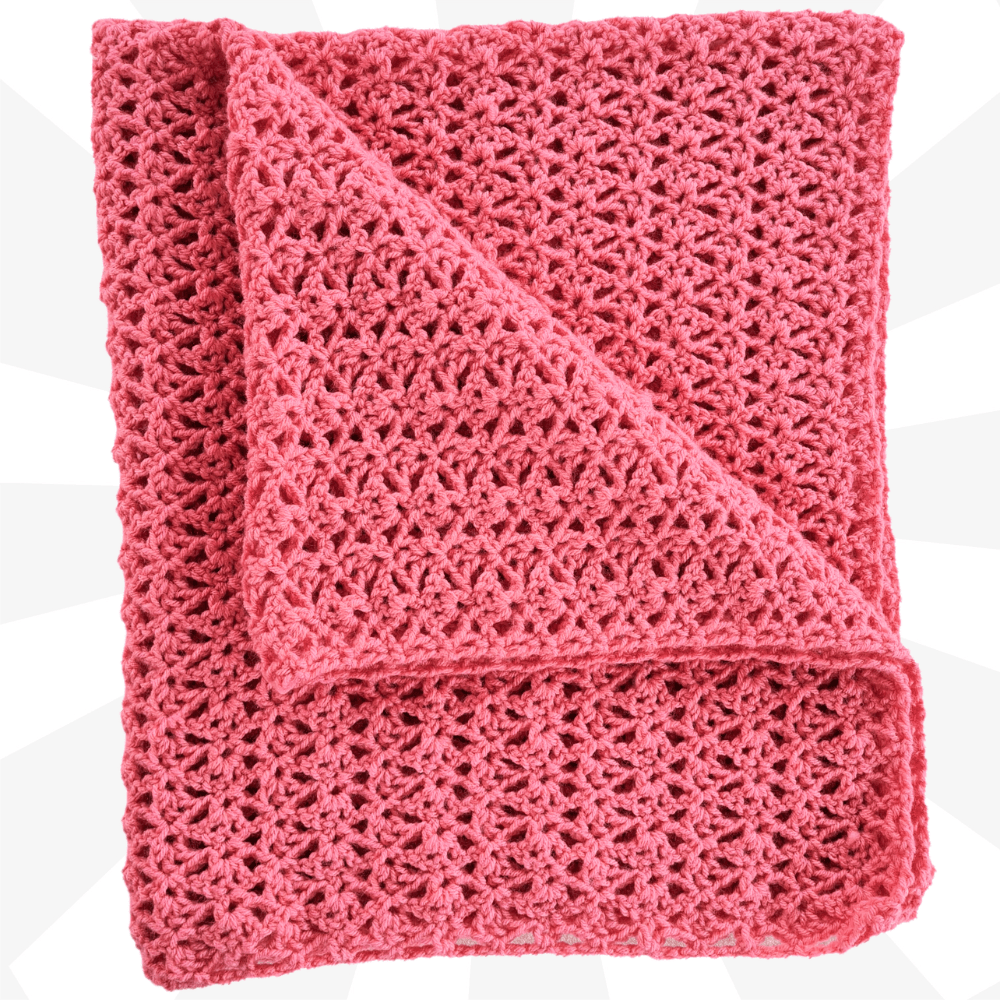
Crochet a Sundae Granny Baby Blanket – Simple Beginner Pattern & Guide
Are you ready to crochet something beautiful and practical? Look no further! This Sundae Granny crochet blanket pattern is so simple, it's perfect even if you're just starting your crochet journey. With its easy one-row repeat, you’ll quickly memorize the pattern and be able to make it any size you like, using any colors that spark joy. Who wouldn’t love to snuggle under a handmade crochet blanket?
Get ready to create your own gorgeous Sundae Granny crochet blanket! If you prefer to follow a written pattern, you can find it on my website at Secret Yarnery. Don't worry if reading patterns seems intimidating; all of my patterns are written in plain English, just like I'm talking to you now! You can also find a right-handed video tutorial here and a left-handed tutorial here
Table of contents
What Makes This Blanket So Great?
What makes this blanket such a winner? Let's break it down:
Beginner-Friendly Design
This pattern is genuinely perfect for beginners. The stitch pattern is simple, and the one-row repeat is easy to memorize. You'll be surprised how quickly you pick it up!
Customizable
Want a different size? No problem! You can easily adjust the dimensions to make anything from a tiny lovey to a full-sized throw. It is adaptable for various projects, such as baby blankets or larger throws.
Versatile Yarn Options
One of the best things about this pattern is its versatility with yarn. Feel free to experiment with different textures and create unique color combinations. Will you choose soft pastels, bright primaries, or something in between?
Open and Lacy Design
The open and lacy design gives the blanket a light, airy feel, making it perfect for warmer months. It's visually attractive and adds an intricate touch without being difficult to create.
Plain English Pattern
No complicated crochet jargon here! The written pattern is easy to understand with clear and concise instructions.
You can find the pattern on my website here.

Materials You'll Need
Ready to gather your supplies? Here's what you'll need to get started:
Yarn
- Type: Worsted weight (size 4) acrylic yarn is recommended.
- Amount: For my sample blanket (34 inches wide by 40 inches tall), I used 500g, which is approximately 825 meters. You might need 600g to be safe!
- Color: If you want to use the same colors, I'll link them in the description box of the video!
Alternative Yarn Suggestions:
- Other worsted weight yarns will work great.
- Cotton yarns will give the blanket a different feel – perhaps for a summer version?
- Remember to adjust your yarn amount for larger blankets.
Crochet Hook
- Size: I used a 6mm hook for this tutorial.
- Recommendation: Always use a hook size that corresponds to your yarn.
Stitch Markers
- Quantity: You'll need about 15 stitch markers.
- Purpose: These help you keep track of your chain, especially when you're first starting.
Scissors
- Purpose: For cutting your yarn.
Yarn Needle
- Purpose: For weaving in those pesky ends.
Optional Tools
Here are a few extra tools that you may find helpful.
- Measuring tape (measuring tape)
- Scissors (scissors)
- Stitch Markers (stitch markers)
- Yarn (yarn)

Getting Started: Making the Initial Chain
Let's get started with the foundation of our blanket – the initial chain!
Slip Knot
First, make a slip knot, leaving a long tail. You’ll use this tail to sew in the ends later with a yarn needle.
Chain Multiple
This pattern is a multiple of 8 + 6. This means you'll chain in sets of eight, then add six more chains at the end. It's important for the pattern to work correctly, so pay close attention!
Chaining
Start chaining in sets of eight. For example: one, two, three, four, five, six, seven, and eight.
Stitch Markers
Now, grab your stitch markers. Place them in every eighth chain. To do this, identify the back loops or camel bumps on the back of the chain. Place a stitch marker in that back loop. This will help you maintain accuracy as you go.
Continuing the Chain
Keep chaining until you reach the desired length. For a baby blanket, around 120 chains is a good starting point.
Adding Extra Chains
Once you've chained 120, add six more chains. These extra chains are essential for setting up the pattern.

Row 1: Creating the Scoops and Cherries
This is where the fun begins! Row 1 is all about creating the "scoops" and "cherries" that give this blanket its name.
First Single Crochet
Make a single crochet in the second back loop from your hook. Then, chain one.
Skipping Chains
Skip three chains. This creates space for the next element.
Making a Scoop
Now, for the "scoop" stitch:
- Work one double crochet into the next chain.
- Chain one.
- Work one double crochet into the same chain.
- Chain one.
- Work one double crochet into the same chain.
Skipping Chains Again
Skip three more chains.
Making a Cherry
Next, we'll make the "cherry" stitch:
- Work one single crochet into the next chain.
- Chain three.
- Work one single crochet into the same chain.
Repeating the Pattern
Repeat the scoop and cherry pattern along the chain. So, it's skip three chains, make a scoop, skip three chains, make a cherry, and so on.
Using Stitch Markers as Guides
Remember those stitch markers? Use them to keep track of your chain and make sure you're placing your stitches in the correct spots.
End of Row 1
At the end of the row, work one double crochet, chain one, and one double crochet into the last stitch. This creates a nice, straight edge.
Understanding the "Scoop" Stitch
The "scoop" stitch is essentially three double crochets, each separated by a chain-one space, all worked into the same stitch. This creates a fan-like shape that adds texture and dimension to the blanket. It's a visually appealing element that makes the blanket stand out.
Understanding the "Cherry" Stitch
The "cherry" stitch consists of a single crochet, a chain of three, and another single crochet, all worked into the same stitch. This creates a small, raised bump that contrasts nicely with the more open "scoop" stitch.
Row 2: Repeating the Pattern
Row 2 is where the magic really starts to happen, as you'll be building upon the foundation you created in Row 1.
Turning the Work
Chain one and turn your work.
First Single Crochet
Make a single crochet into the first stitch, right next to the chain. Then, chain one.
Scoops into Cherries
This is the key to the pattern: you'll make scoops into the center of the cherry stitches from the previous row.
- Work one double crochet, chain one, one double crochet, chain one, and one double crochet all into the center of the cherry.
Cherries into Scoops
Likewise, you'll make cherries into the center of the scoop stitches from the previous row.
- Work one single crochet, chain three, and one single crochet into the center of the scoop.
Repeating the Pattern
Repeat the scoop into cherry and cherry into scoop pattern along the row.
End of Row 2
Finish the row with a double crochet, chain one, and a double crochet into the last stitch.
Tips for Straight Edges
To keep your edges nice and straight, it's crucial to end each row with a double crochet, chain one, and double crochet. This creates a consistent edge that will make your finished blanket look polished.
Row 3 and Beyond: Continuing the Blanket
Guess what? You've already learned the most important parts! Rows 2 and 3 are the same, so just keep repeating them until your blanket reaches the desired height. Remember to periodically check the blanket's size to make sure it meets your needs. Also, keep an eye on your yarn supply to avoid running out mid-project.
Looking for more crochet blanket inspiration? Check out these Crochet Blanket Patterns.
Finishing the Blanket: The Last Row
When your blanket is the size you want it to be, it's time to finish it off! The final row is slightly different from the others.
Final Row
Chain one and turn your work.
Single Crochet Start
Make a single crochet into the first stitch.
Chain Three
Chain three stitches.
Single Crochet into Cherry Center
Make a single crochet into the center of the first cherry.
Chain Three
Chain three stitches.
Single Crochet into Scoop Center
Make a single crochet into the center stitch of the scoop.
Repeating the Pattern
Repeat the single crochet, chain three pattern until the end of the row.
Final Single Crochet
Make one single crochet into the last stitch.
Fastening Off
Secure the yarn with a chain one, cut the yarn, and pull through to create a knot.
Weaving in the Ends
Now comes the part that nobody loves, but it's essential for a professional finish: weaving in the ends! Use a yarn needle to weave in all loose ends along the edges of the blanket. This will hide them securely and prevent them from unraveling.
Blocking (Optional)
Blocking is a process that can help even out your stitches and improve the overall appearance of your blanket. You can wet block or steam block your blanket. Wet blocking involves wetting the blanket and pinning it to a flat surface until it dries. Steam blocking involves using a steam iron to gently steam the blanket.

Care Instructions
To keep your Sundae Granny blanket looking its best, here are a few care tips:
-
Machine wash on a gentle cycle or hand wash.
-
Tumble dry on low or lay flat to dry.
-
Always check the yarn label for specific care instructions.
Tips for Choosing Colors
Choosing the right colors can make all the difference in your crochet blanket. Here are a few tips:
- Color Palette: Choose a cohesive color palette, such as monochromatic, analogous, or complementary color schemes.
- Baby-Friendly Colors: Use soft, pastel colors for a baby blanket.
- Contrasting Colors: Use contrasting colors to make the pattern pop.
- Yarn Scraps: Use up yarn scraps for a colorful, scrappy blanket! A color wheel can help you decide which colors to use (color wheel).
Adjusting the Size of the Blanket
Want to make your blanket bigger or smaller? Here's how:
- Chain Length: Adjust the initial chain length to change the width of the blanket. Remember the multiple of 8 + 6!
- Row Count: Adjust the number of rows to change the height of the blanket.
If you're unsure about the size, create a small sample to check the gauge and appearance of the pattern.
Using Different Yarn Weights
Using different yarn weights will affect the size and drape of your blanket. Adjust the hook size to match the yarn weight. A thicker yarn will result in a larger, warmer blanket.
Adding a Border
Consider adding a border to your blanket for a finished look. There are many types of borders you can use, such as a single crochet border, a picot border, or a shell stitch border. A simple single crochet blanket border is easy to add and gives a neat finish.
Common Mistakes and How to Avoid Them
Everyone makes mistakes, but here are a few common ones to watch out for:
- Incorrect Chain Count: Double-check your chain count before starting row 1.
- Skipping Stitches: Use stitch markers to mark the stitches that need to be skipped.
- Inconsistent Tension: Practice maintaining even tension.
- Forgetting to Chain One: Remember to chain one after each single crochet and between stitch sections.
- Not Weaving in Ends: Always weave in those loose ends!

Tips for Maintaining Consistent Tension
Consistent tension is key to a beautiful finished product. Here are some tips:
- Relax your hands and arms while crocheting.
- Maintain good posture to avoid tension in the shoulders and neck.
- Take frequent breaks to avoid fatigue.
- Use the right hook size for your yarn.
How to Read a Crochet Pattern
If you're new to crochet patterns, here's a quick guide:
- Abbreviations: Learn common crochet abbreviations (e.g., sc, dc, ch).
- Stitch Instructions: Understand how to interpret stitch instructions.
- Repeating Sections: Identify and follow repeating sections in the pattern.
- Parentheses: Parentheses group stitches.
- Brackets: Brackets indicate repeated sequences.
For example, a section of the Sundae Granny pattern might read: "Dc, ch 1 3 times in next st." This means you'll repeat "double crochet, chain 1" three times in the same stitch.

Customizing the Blanket with Different Stitches
Want to get creative? Try replacing the scoop and cherry stitches with other stitch combinations, such as the V-stitch, shell stitch, or puff stitch. Adjust the pattern to accommodate different stitch heights and textures.
Turning This Blanket into Other Projects
The Sundae Granny stitch pattern is so versatile! Here are a few other projects you can make with it:
- Shawl or Wrap: Adapt the pattern to create a cozy shawl or wrap.
- Scarf: Make a narrower version for a stylish scarf.
- Pillow Cover: Create squares to sew together for a pillow cover.
- Table Runner: Adjust the width and length for a charming table runner. You can find other Sweaters & Shawls for Beginners - Sundae + Granny.
Using the Sundae Granny Stitch in Other Projects
The Sundae Granny stitch pattern isn't just for blankets! Here are some other ideas:
-
Scarves: Make a beautiful lacy scarf.
-
Hats: Modify the stitch pattern for hats.
-
Bags: Create bags with a unique texture.
-
Garments: Use the stitch pattern in lightweight summer tops or dresses.
-
Home Decor: Make curtains or light blankets.
The Benefits of Crochet for Mental Health
Crochet is more than just a hobby – it's also great for your mental health!
- Stress Relief: Crochet can be a relaxing and meditative activity.
- Sense of Accomplishment: Completing a project can provide a sense of satisfaction.
- Creativity: Crochet allows for creative expression.
- Community: The online crochet community is incredibly supportive.
Resources for Learning Crochet
If you're new to crochet, here are some helpful resources:
- Online Tutorials: Websites and YouTube channels offer crochet tutorials.
- Books: Crochet books for beginners.
- Local Crochet Groups: Join a local crochet group for in-person learning and support.
- Craft Stores: Craft stores often offer crochet classes.
Why I Love This Sundae Granny Pattern
I personally love this pattern because it's so easy to use, especially for beginners. The possibilities for customization are endless, and there's so much joy in creating something beautiful with your own hands. I've designed this Sundae Granny Crochet Shawl using the same technique.

Call to Action
Now it’s your turn! Try the Sundae Granny pattern and share your finished projects on social media using #SecretYarnerySundaeGranny. Don't forget to subscribe to my YouTube channel and newsletter for more crochet patterns and tutorials! Join the community here.
Where to Find More Free Patterns
Looking for more free patterns? Check out the free patterns section on my website, Secret Yarnery. You can also find more free patterns on my YouTube channel, and by subscribing to my newsletter.
What to Expect in Future Tutorials
Stay tuned for more exciting crochet tutorials! I'll be covering a variety of projects, from blankets to garments to accessories. Whether you're a beginner or an advanced crocheter, there will be something for you!
The Importance of Using Quality Tools
Using quality tools can make a big difference in your crochet experience. Invest in ergonomic crochet hooks (Crochet ➡️), sharp scissors (Scissors ➡️), yarn needles with large eyes (Needles - Blunt Tip ➡️), and stitch markers (Stitch Markers ➡️).
Tips for Ergonomic Crocheting
Take care of your body while you crochet! Use proper lighting (Neck Light ➡️), comfortable seating, and take frequent breaks to stretch and move around.
Why Support Independent Designers
Supporting independent designers helps sustain the crochet community. Independent designers often create unique and innovative patterns and put a lot of care and attention into their work.
How to Share Your Finished Projects
I love to see what you create! Share your finished projects on social media using #SecretYarnery, post them on Ravelry, or email photos to me.
Crochet Abbreviations and Terms Glossary
Here are some common crochet abbreviations and terms:
- Sc: Single crochet
- Dc: Double crochet
- Ch: Chain
- Sl st: Slip stitch
- Inc: Increase
- Dec: Decrease
- St(s): Stitch(es)
- Gauge: The number of stitches and rows per inch or centimeter.
- Blocking: A finishing technique used to even out stitches and improve the shape of a project.
- Fasten off: Securing the yarn at the end of a project.
- Weave in ends: Hiding loose yarn ends within the stitches of a project.
- Yarn over: Wrapping the yarn around the hook.
Troubleshooting Common Crochet Problems
Here are some solutions to common crochet problems:
- Holes in Fabric: Try using a smaller hook or tightening your tension.
- Curling Edges: Add a border or block the project.
- Uneven Stitches: Practice maintaining consistent tension.
- Yarn Splitting: Use a hook with a smoother surface or try a different yarn.
Understanding Yarn Labels
Yarn labels provide important information about the yarn, such as yarn weight, fiber content, and care instructions. Always follow the care instructions on the yarn label.
Advanced Tips for Crochet
Ready to take your crochet skills to the next level? Try learning the invisible join, seamless color changes, and advanced blocking techniques. Learning to read charts can also be very helpful.
The History of Crochet
Crochet has a rich history, dating back to the 19th century. It has evolved over time and has experienced a resurgence in modern craft culture.
The Crochet Community
The crochet community is a supportive and welcoming group of people. You can connect with other crocheters online through forums, social media groups, and local meetups.
How to Sell Your Crochet Projects
If you enjoy crocheting and want to make some extra money, consider selling your projects online through Etsy or other online marketplaces, at craft fairs, or in local shops.
Ethical Considerations in Crochet
When crocheting, it's important to consider ethical issues, such as using ethically sourced yarn and supporting fair labor practices.
Yarn Storage Ideas
Keep your yarn organized with these storage ideas:
- Clear bins (Bags - Yarn Ball Storage ➡️)
- Shelving units
- Yarn swifts and winders (Ball Winder ➡️)
Gifting Your Crochet Projects
Crochet projects make wonderful personalized gifts. Wrap your gifts in a thoughtful and creative way, and include care instructions with the gift.

Sustainable Crochet Practices
Practice sustainable crochet by using recycled yarn, reducing waste, and using reusable shopping bags when buying yarn.
The Benefits of Crochet for Children
Crochet can help children develop fine motor skills, improve concentration, and foster creativity.
Adapting Crochet Patterns for Left-Handed Crocheters
Left-handed crocheters need to mirror the instructions in crochet patterns. Watching left-handed video tutorials (link to left-handed tutorials) can also be very helpful.
Using Crochet to Decorate Your Home
Use crochet blankets and throws to add warmth and texture to your home. You can also create crochet pillow covers and wall hangings for a unique and personal touch.
Creative Ways to Use Leftover Yarn
Don't throw away those yarn scraps! Use them to make scrappy blankets, amigurumi projects, or granny squares.
The Role of Crochet in Fashion
Crochet has played a significant role in fashion throughout history. Crochet garments and accessories are popular in modern fashion.
Conclusion
I hope you've enjoyed this tutorial and are inspired to create your own Sundae Granny baby blanket! With its simple pattern and endless possibilities for customization, it's the perfect project for crocheters of all skill levels. So grab your hook and yarn, and let's get started!
FAQs
1. What skill level is required for this pattern?
This pattern is beginner-friendly! With its easy one-row repeat and clear instructions, it’s perfect for those just starting out.
2. What type of yarn should I use?
Worsted weight (size 4) acrylic yarn is recommended. However, feel free to experiment with other yarns like cotton for a summer version. Just remember to adjust your hook size accordingly.
3. How many chains should I make for different sizes?
The pattern works on a multiple of 8 + 6. For a baby blanket, start with about 120 chains (+6 for the pattern setup). For larger or smaller blankets, adjust the initial chain length based on this formula.
4. Can I use a different hook size?
Yes! Use a hook size that works with your yarn. For a looser stitch, try a larger hook, and for tighter stitches, use a smaller one.
5. How do I keep the edges straight?
Make sure to end each row with a double crochet, chain one, and double crochet. This creates a consistent and straight edge for a polished look.
6. What if I make a mistake in my stitches?
Don’t worry! Use stitch markers to help keep track of skip sections and repeat sequences. If you notice an error, carefully pull back the stitches to the problem area and correct it.
7. How can I customize the colors?
You can use a single color, stripes, gradients, or even a scrappy design from leftover yarn! The open and lacy design works well with a variety of color schemes.
8. How can I block my finished blanket?
Blocking is optional but recommended for a sharper finish. Wet block by soaking the blanket, pinning it to a flat surface, and letting it dry. Alternatively, steam block using a steam iron for a quick fix.
9. How much yarn will I need for this blanket?
For a 34 x 40-inch baby blanket, 500g (approx. 825 meters) of yarn should suffice. Have an extra ball of yarn on hand, especially if you plan to make a larger blanket.
10. Can I add a border to this blanket?
Yes! Adding a border will give the blanket a finished look. Simple borders like a single crochet edge or decorative ones like shells or picots can elevate your project.
![]()
Christa Patel is the crochet designer and creator behind The Secret Yarnery. With over a decade of experience in crochet, Christa is known for her simple, easy-to-follow patterns and friendly teaching style. She specializes in making beginner-friendly projects fun, relaxing, and creative. Christa shares step-by-step tutorials and tips through her popular YouTube channel, website, and online community, helping crafters of all levels find joy in crochet. When she’s not designing new patterns, Christa enjoys connecting with fellow yarn lovers and inspiring makers to explore new techniques and ideas.
About the Author
With a passion for crafting easy, beginner-friendly tutorials and patterns, Christa inspires crafters of all skill levels to unleash their creativity worldwide. She encourages yarn lovers to connect, create, and crochet a world filled with beautiful handmade treasures!
Crochet a Sundae Granny Baby Blanket – Simple Beginner Pattern & Guide