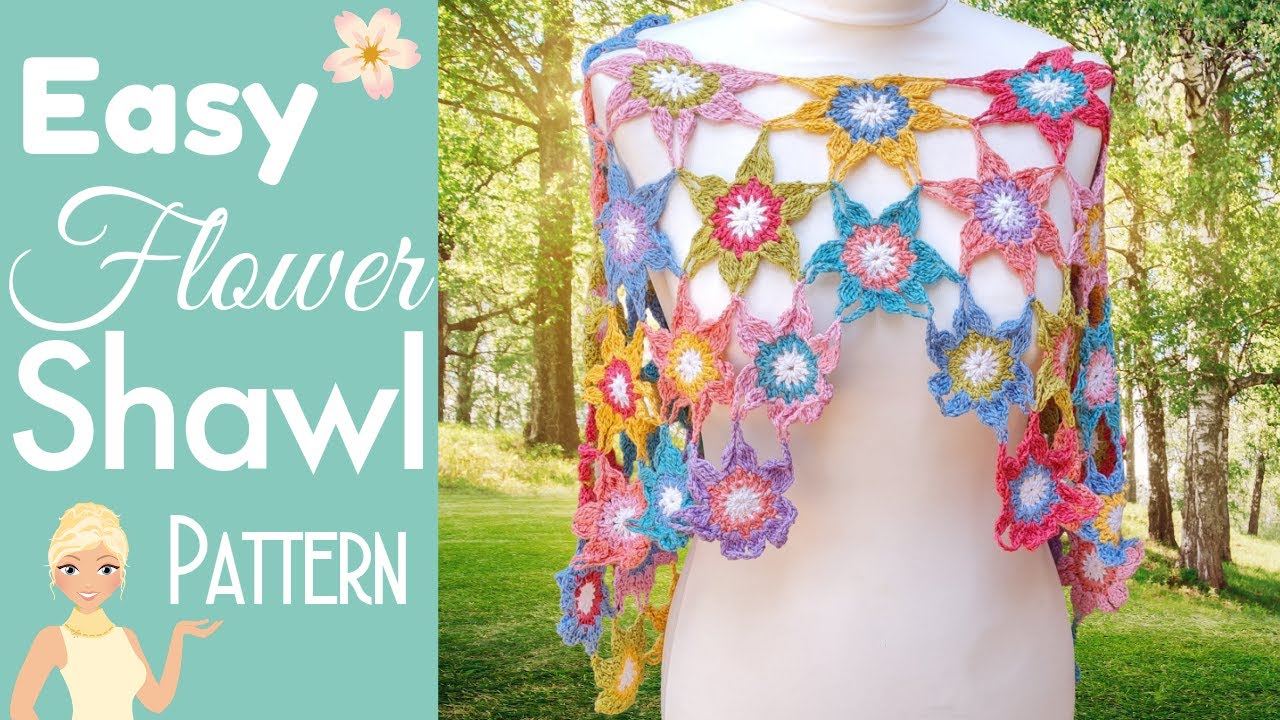
Crochet the Never-Ending Flower Shawl: A Step-by-Step Guide
I'm excited to share with you my journey of creating the Never-Ending Flower Shawl, a beautiful and versatile project that's perfect for spring, summer, and vacations. This easy-to-make shawl can be customized to any size, making it a great project for crocheters of all skill levels. In this tutorial, I'll guide you through the process of creating this stunning shawl, and by the end of it, you'll have a gorgeous piece to wear and enjoy.
Table of contents
Introduction to the Never-Ending Flower Shawl
The Never-Ending Flower Shawl is a fantastic project for those who love to crochet and want to create something unique and personalized. The shawl is made up of beautiful flowers that can be joined together to create a stunning piece of clothing. The best part about this project is that it's never-ending, meaning you can add as many flowers as you like to create the perfect size and shape for your body. Whether you're looking to create a delicate, lacy shawl or a thicker, warmer one, this project is perfect for you.
Gathering Your Supplies
To start this project, you'll need a few basic supplies. These include:
- Yarn: I'm using Natural Garden from I See Yarn, which is a beautiful blend of 40% bamboo, 35% cotton, and 25% linen. You can find the specific colors I'm using on Secret Yarnery's website by navigating to the yarn tab and scrolling down.
- 3.75 mm crochet hook
- Scissors
- Darning needle You can also use any yarn you have at home, just make sure to choose a yarn with a similar thickness to ensure that your shawl lies flat and even. If you're using a different yarn, you may need to adjust the hook size accordingly. For example, if you're using a chunky yarn, you may need to use a larger hook size, such as a 6mm hook.

Understanding Shawl Sizing and Construction
The Never-Ending Flower Shawl can be constructed in two ways: flat (no increase) and increasing (with petal). The flat construction is ideal for the back of the shawl, while the increasing construction is perfect for the front, providing extra space and ease of movement. To decide how many flowers to make for the front and back panels, you'll need to consider your body size and the desired fit of the shawl. For the front panel, you'll want to make sure that the shawl is not too tight, so you may need to add an increase flower on the side if you're extra-chesty.
Creating the Flower Center
To create the flower center, you'll start by making a slipknot. To make a slipknot, simply hold the yarn over your non-dominant hand, wrap it around your top two fingers, and poke it behind. You can then shrink it down and put it on your hook. Next, you'll chain three and count the chains, excluding the knot and the loop on the hook. You'll then work into the first chain, pinch down to create a U-shape, and hold the center open. Bring the yarn through both loops on the hook, chain three again, and make eleven double crochets into the center of the ring. Make sure to hold the tail alongside your work and work over it as you crochet to secure it.

Round Two: Adding More Stitches
In Round Two, you'll loop your yarn back and forth and work on the other side of the flower. You'll join the yarn in a new area between stitches, push the hook between the posts into the large space, and loop the new yarn on the hook. Bring the yarn through, slip stitch to join, and chain two (or three if you joined differently). Make one double crochet into the same space, and two double crochets into each space around. Count the stitches to ensure you have 12 pairs of double crochets.
Joining Flowers: Front Collar (Increasing)
To join the flowers for the front collar, you'll start by picking the flower to join and completing two and a half petals. Chain three to start the third petal, and then hook into one of the petal spaces and slip stitch to join. Chain three and finish the petal, then slip stitch into the center of the next pair to start the next petal. Get halfway down to the next petal and chain three. Make sure the flowers are facing the right way around and join to the next petal, chain three, and finish the flower.

Joining Flowers: Back Collar (Flat/No Increase)
To join the flowers for the back collar, you'll follow a similar process, but without increasing. You'll turn your work up, so the flower you're joining to is above, and join to the first petal. Make sure everything is laying flat and the pretty sides are facing up. Slip stitch to the next petal, chain three, and finish the flower.
Continuing Around
As you continue joining the flowers, remember that every flower is touching its neighbor with two petals, and there are two connections to every flower. Keep going around, joining one underneath and one in the middle, until you've completed the second row.

Trying It On and Planning the Next Steps
Once you've completed the second row, try on the shawl and see how it fits. You can then decide how many more rows you need to add to achieve the desired length. Remember to start on one side and work all the way around, adding one more row until you get back to that side.
Adjusting the Back and Sides
As you add more rows, you may need to adjust the back and sides of the shawl to ensure it lies flat and even. You can do this by adding or removing flowers as needed, and by adjusting the tension of your stitches.

Emphasizing the "Never-Ending" Nature
The best part about this shawl is that it's never-ending, meaning you can add as many flowers as you like to create the perfect size and shape for your body. Whether you're looking to create a delicate, lacy shawl or a thicker, warmer one, this project is perfect for you.
Finishing Touches and Weaving in Ends
Once you've completed the shawl, you'll need to weave in the ends to create a clean and finished look. You can do this by threading the yarn tail through a needle and weaving it in and out of the stitches.

Care Instructions for Your Shawl
To keep your shawl looking its best, you'll need to wash and dry it carefully. The care instructions will depend on the type of yarn you've used, but generally, you'll want to hand-wash the shawl in cold water and lay it flat to dry.
Styling Ideas for Your Never-Ending Flower Shawl
The Never-Ending Flower Shawl is a versatile piece that can be styled in many different ways. You can wear it draped over your shoulders for a classic look, wrapped around your neck as a scarf, or tied in the front for a more casual style. You can also pair it with a summer dress for a bohemian vibe, or with jeans and a t-shirt for a touch of elegance.
Sharing Your Project and Connecting with the Community
If you've enjoyed making the Never-Ending Flower Shawl, I'd love to see your finished project. You can share photos of your shawl on social media using the hashtag #SecretYarneryShawl, or join our Facebook group to connect with other crocheters and share your creations.
More Crochet Resources from The Secret Yarnery
If you're looking for more crochet patterns and tutorials, be sure to check out The Secret Yarnery's website. We have a wide range of patterns and tutorials available, including easy crochet patterns, beginner crochet projects, and floral crochet designs. You can also find printable PDF patterns available for purchase on our website.
Crochet Must-Haves
If you're looking to upgrade your crochet supplies, here are some must-haves to consider:
- Bags - Yarn Ball Storage: https://amzn.to/36cbr3A
- Bags - Large UFO Zipper Pouches: https://amzn.to/3uqgQ0n
- Bags - Regular UFO Zipper Pouches: https://amzn.to/3DYxvLB
- Ball Winder: https://amzn.to/3Jzd4Y0
- Baskets - WIPS: https://amzn.to/3tQK9te
- Color Wheel: https://amzn.to/3hJN3IG
- Crochet Hooks: https://amzn.to/2p5etkC
- Foot Warmer: https://amzn.to/3RaMtn0
- Measuring Tape: https://amzn.to/3JviyD8
- Neck Light: https://amzn.to/2UYNrW4
- Needle Threaders: https://amzn.to/3zdCK7S
- Needles - Blunt Tip: https://amzn.to/2MRffKP
- Needles - Sharp Tip: https://amzn.to/3Rdq2ja
- Scissors: https://amzn.to/3EC1CHy
- Stitch Markers: https://amzn.to/3GdGCYg
- Tea - Kericho Gold: https://amzn.to/3zrTcB8
- Tins - Accessories: https://amzn.to/3EN6nxT
- Yarn: https://bit.ly/39EZwZX
Call to Action: Subscribe and Stay Connected
If you've enjoyed this tutorial and want to stay up-to-date with the latest crochet patterns and tutorials, be sure to subscribe to The Secret Yarnery's YouTube channel. You can also join our Facebook group to connect with other crocheters and share your creations.
Thank You and Final Thoughts
Thank you for joining me on this journey to create the Never-Ending Flower Shawl. I hope you've enjoyed this tutorial and will continue to explore the world of crochet. Remember to always follow your passion and never stop creating. Happy crocheting!
FAQs
What skill level do I need for this project?
This shawl is great for beginners and intermediate crocheters. Basic crochet skills like chaining, double crochet, and slip stitch are all you need. The joining techniques are explained step by step.
Can I use any type of yarn?
Yes! You can use almost any yarn. Lighter yarn makes an airy shawl, while thicker yarn gives more warmth. Just keep your yarn thicknesses consistent throughout for a neater look.
How do I decide on the shawl’s size?
The shawl is fully customizable. You can make as many flowers as you want to fit your body shape and size. Just keep trying it on as you go, and add flowers where needed.
What if my flowers look loose or messy?
Try using a smaller hook, or check your tension as you crochet. Consistent tension helps your flowers stay neat and uniform.
I ran out of a color in the middle. Can I switch colors?
Absolutely! This project looks beautiful with mixed colors. Feel free to use up leftover yarn and mix shades as needed.
What else can I make with this flower motif?
You can make bedspreads, curtains, scarves, table runners, bags, or anything that uses a flat join. Just keep adding flowers to the shape you need.
My shawl is curling at the edges. How can I fix this?
Check your joins to see if you have too many increases or joins in the same area. Relax your tension or block your shawl to help the edges lay flat.
Do I need stitch markers?
They’re optional but helpful, especially for marking the center flower or keeping track of rows and sections as you join.
How do I hide the yarn tails neatly?
Weave them in with a needle along the back of your stitches. Curved scissors can help snip ends close without cutting your work.
![]()
Christa Patel is the creative mind behind Secret Yarnery. She is known for her easy-to-follow crochet tutorials and colorful, inviting designs that inspire crocheters of all skill levels. With a passion for making crochet simple and fun, Christa shares tips, patterns, and encouragement through her blog, YouTube channel, and social media.
She focuses on projects that are customizable, practical, and beautiful, making them perfect for gifts or personal use. Christa’s teaching style is friendly and detailed, helping beginners gain confidence and supporting experienced crocheters in trying new ideas.
To see more of Christa’s work, follow her on YouTube, Instagram, or visit Secret Yarnery for patterns, inspiration, and community support.
About the Author
With a passion for crafting easy, beginner-friendly tutorials and patterns, Christa inspires crafters of all skill levels to unleash their creativity worldwide. She encourages yarn lovers to connect, create, and crochet a world filled with beautiful handmade treasures!
Crochet the Never-Ending Flower Shawl: A Step-by-Step Guide