How to Make a Beautiful Wandering Granny Crochet Blanket Quick & Simple
Tired of complicated crochet patterns that leave you counting rows and deciphering confusing stitch combinations? Say goodbye to all that and hello to the Wandering Granny Crochet Blanket! This project features a super simple, easy-to-remember one-row repeat that creates a stunning textured look. I'm so excited to share this easy crochet blanket pattern with you. I'll guide you through every step, so you can create your own cozy masterpiece.
Discover the Wandering Granny Crochet Blanket
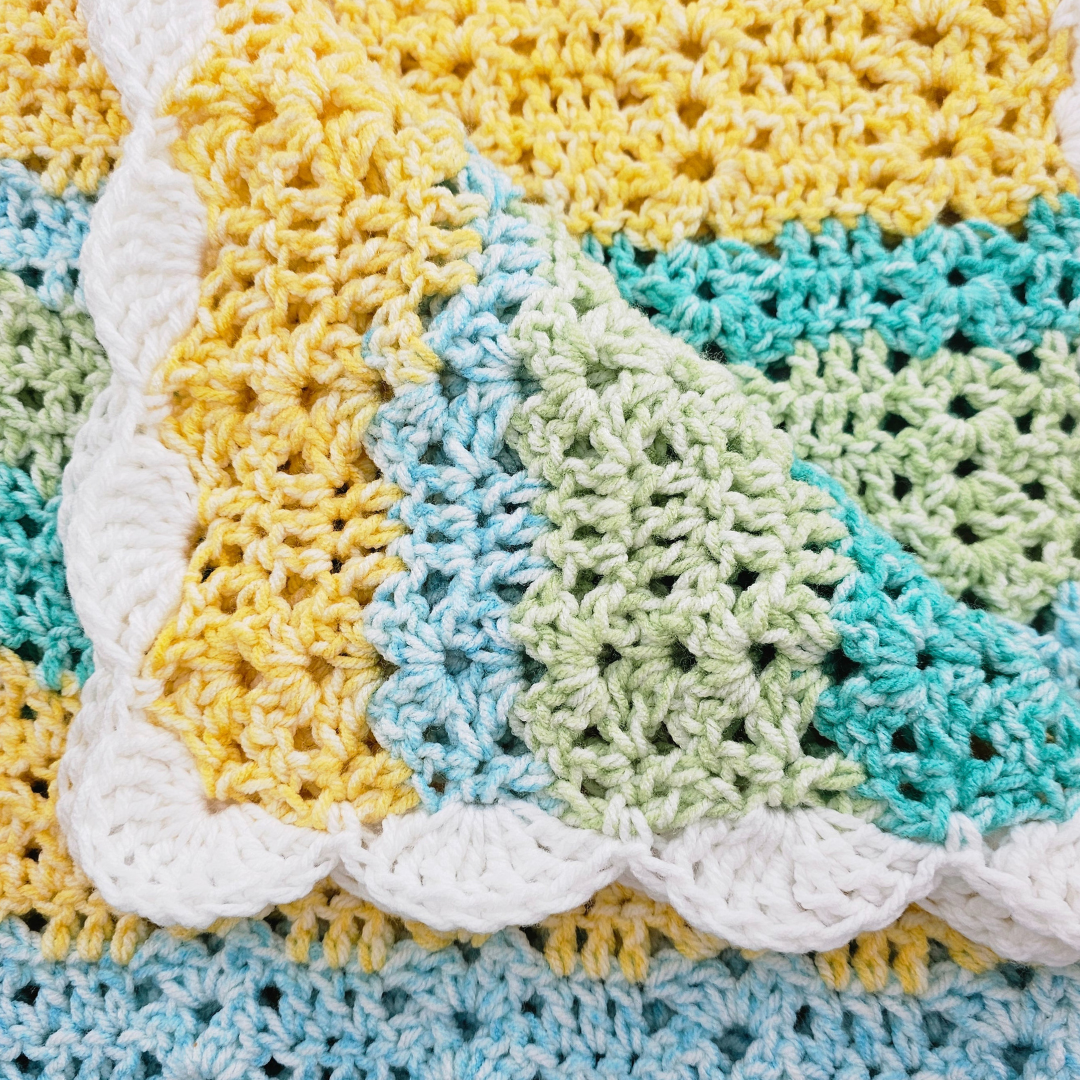
Get ready to create a colorful, cozy, and fun-to-make blanket with a beautiful jumbo shell border! The top and bottom edges of this blanket match perfectly, so you don't have to worry about which way you fold or use it. The border highlights the gorgeous scalloped edge and hides any imperfections. This step-by-step tutorial is perfect for beginners and beyond! If you want to get started right away, check out the video tutorial.
What You'll Need to Make Your Wandering Granny Blanket
Let's gather the supplies! Here's what you'll need to create your own Wandering Granny Baby Blanket:
- Yarn: I used Cakes Splash from Ice Yarns, but you can use any yarn you like! The beauty of this project is how versatile it is with yarn choices. Whether you prefer the self-striping effect of a cake yarn or want to use up some of your stash, the Wandering Granny pattern works well with a variety of fibers and colors. Consider using a soft acrylic, a cozy wool blend, or even a breathable cotton for a lighter blanket. Get your yarn at Ice Yarns or Ice Yarns.
- Hook: Use the hook size suggested on your yarn label, or go up one size. I used a 6.5 mm crochet hook, but a 7 mm would also work. The key here is to find a hook size that creates a fabric with a nice drape – not too tight, and not too loose. If your stitches are too tight, the blanket will be stiff. If they're too loose, it will be too floppy. You can find a wide variety of crochet hooks on Amazon.
- Border Yarn: About 50g of white yarn or your preferred color for the jumbo shell border. Regular worsted weight acrylic yarn works great too! I chose white to really make the scalloped edge pop, but you can use any color that complements your main yarn. Consider a contrasting color for a bold look, or a similar shade for a more subtle effect.
-
Other Essentials:
- Yarn needle for weaving in ends. This is crucial for a neat and professional finish.
- Stitch markers (highly recommended, especially for beginners). These little helpers will keep your stitch count accurate, especially when you're first learning the pattern.
Finished Size: My blanket is 36 inches wide by 42 inches tall.
You can easily adjust the starting chain to customize the blanket size. This pattern is very flexible
Understanding Yarn Choices and Hook Sizes
The beauty of this pattern is its flexibility! You can truly use any yarn you like. If you're using a DK weight yarn, simply choose the hook size that corresponds to it. Remember, you'll just need to adjust the length of your starting chain to achieve your desired blanket width. Don't be afraid to experiment with colors and yarn textures to create a truly unique blanket! The Secret Yarnery has other crochet patterns if you want to try something different.
Customizing Your Blanket Size: The Magic of Multiples
This pattern is based on a multiple of 10 + 3. This means you can easily adjust the width of your blanket by chaining in sets of 10, and then adding 3 chains at the end. Each stitch marker represents about 2.5 inches, so you can use them to estimate the finished width of your blanket. For example, 5 stitch markers equal approximately 1 foot. This makes it super easy to create a blanket in any size you like, from a small baby blanket to a large throw.
Let's Get Started: Creating the Foundation Chain
Ready to start crocheting? Let's begin by making a slip knot, leaving a long enough tail to sew in later with a yarn needle. Place the slip knot onto your hook and grab your stitch markers. Remember, I used 14 stitch markers for my blanket, but you can adjust the number to match your desired width.
The Stitch Marker Trick: Your Guide to Perfect Sizing
Each stitch marker represents approximately 2.5 inches of blanket width. So, if you want your blanket to be 5 feet wide, you'll need around 25 stitch markers. For this tutorial, I'm demonstrating a shorter sample, so I'm only using four stitch markers. Stitch markers are your best friend for keeping track of your place and ensuring consistent sizing!
Chaining in Sets: Mastering the 10 + 3 Formula
Now, start chaining in sets of 10: one, two, three... all the way to ten. Once you've chained ten, place a stitch marker into the back loop (the "camel bump") right underneath your working yarn. Chain ten more, and place another stitch marker. Continue this process until your chain is longer than you want your finished work to be, as it will shrink up a bit when you work into it.
Need a Written Pattern? The Secret Yarnery Has You Covered!
If you prefer to follow a written pattern, all of my patterns are available on my website, The Secret Yarnery. The patterns are written in plain English, just as if I were sitting right beside you, guiding you through each step. You can find many different crochet patterns for all skill levels.
Completing the Foundation Chain: The Final Touches
Once you've used up all your stitch markers, chain three more (1, 2, and 3). Now we're ready to start working into those back loops!
Row 1: Creating the First Row of Your Wandering Granny Blanket
Roll the chain to the side to expose the back loops (the camel bumps). We're going to work into these loops. Make one double crochet right into the same stitch (back loop) as your stitch marker. Now, skip three stitches (back loops). To count your stitches, use your yarn needle to help identify each loop. Skip 1, 2, 3, and go into number four.
Creating the "Hill"
In the fourth back loop, make two double crochets, chain two, and two double crochets all into the same back loop. This creates the "hill" element of the pattern.
Creating the "Valley"
Skip three stitches again (1, 2, 3), and work into the next three stitches (back loops) with one double crochet into each. Your third double crochet should line up with the chain containing a stitch marker.
The Hill and Valley Pattern: Mastering the Repetition
Continue repeating the "hill" and "valley" pattern all the way along your chain. Don't worry if your chain looks a bit weird or shrinks up – that's perfectly normal! Just take your time and focus on accurately counting your stitches. Remember, you're skipping three stitches between each element. This pattern is all about the rhythm and repetition of the "hills" and "valleys". Once you get the hang of it, you'll be able to crochet almost without looking!
Finishing Row 1: Completing the First Side
When you get to the end of your chain, skip three stitches (1, 2, 3) and make one double crochet into the fourth back loop from your work. Then, chain three (1, 2, and 3) and slip stitch into that last back loop. This completes the first row.
Row 2: Working Along the Opposite Side
To start row two, rotate your work (don't turn it). Keep the pretty stitches facing up. We're now going to work into the flat side, so both ends of your blanket are gorgeous. Chain three (1, 2, 3). Now, into the next chain (where your stitches come from), make one double crochet.
Mirror Imaging
For this row, we're going to create a mirror image of all our stitches. Make the same stitches in the same spot.
- The first double crochet goes into the same chain as the double crochet on the other side.
- Jump straight over to where the "hill" was and make another "hill" (two double crochets, chain two, two double crochets).
- Work one double crochet into each of the three stitches in the "valley."
- Continue mirroring the pattern all the way along the side.
Evening Out Your Work: Achieving a Symmetrical Look
As you work along this side, you're essentially working over your chain, incorporating it right into your blanket. It will all start to even out and create a beautiful, symmetrical look. Don't be afraid to adjust your tension slightly to ensure that the stitches are even and consistent.
Completing Row 2: Matching Both Sides
At the end of the row, make sure you have a hill where a hill is and a valley where a valley is. Finish with one double crochet into the same place as your stitch marker (where that double crochet started), and also into the top of your chain (making sure you have two strands on the top of your hook for the last double crochet). This attention to detail will ensure that your blanket has a polished and professional look.
The Repeat: Where the Magic Happens
Now that you've completed the first two rows, you're ready to start the repeat! This is where the pattern becomes incredibly easy to memorize. Chain two (or three if you're a tight chainer) and turn your work. Remember, the chain counts as your first stitch.
Mastering the Repeat: Hills and Valleys
Go into the next stitch and make one double crochet (this counts as your first two double crochets). Now, jump over and make a "hill" into the "hill" from the previous row (two double crochets, chain two, two double crochets).
For the "valley," make one double crochet into each of the three stitches. Then, create another "hill" into the "hill" from the previous row.
Remember, the "hills" are easy because you can just feel for that big space and make your double crochets straight into it. This makes the pattern very relaxing and meditative once you get the hang of it.
Continue working along, remembering that "valleys get valleys" and "hills get hills."
Ending the Repeat Row: Consistent Stitch Count
At the end of each repeat row, make a double crochet into the stitch and a double crochet into the top of your chain. You should always end with two double crochets. This consistency is key to maintaining the correct stitch count and the overall look of the blanket.
Growing Your Blanket: Keep Repeating!
Pause the video and keep working along, growing your blanket until it is the height you want it to be! Don't be afraid to experiment with different color combinations or yarn textures to create a blanket that is truly your own.
Joining New Yarn: Seamless Color Transitions
When you finish a cake of yarn and need to join a new one, try to find a cake that has the same color in the center to maintain a consistent color flow. If your colors don't line up perfectly, you can "color control" your cakes by removing some yarn to match the colors. This is a great way to ensure that your color transitions are smooth and seamless.
Color Control Tip
If you're going to color control your cakes, start that way at the beginning of your blanket as well. This ensures that you have one full color rotation instead of starting in the middle of a cake.
Joining Methods
You can join your yarn using any method you prefer. I use a magic knot for acrylic yarn.
Magic Knot Tutorial
- Lay your tails in opposite directions.
- Loop one over the other and make a simple knot.
- Do the same with the other tail.
- Slide the yarns together and pull the tails to tighten the knots.
- Trim the tails close to the knots.
Finishing the Blanket Body: Ending on an Even Number
When your crochet blanket is the height you want it to be, and you have finished your last row, we can go ahead and finish off! If you want to add the border, make sure you end with an even number of rows.
Securing Your Work: The Final Knot
Chain one and cut your yarn, leaving a long enough tail to sew in with a needle. Pull your hook up and your yarn through, and snug it down to secure. This finishes the blanket part!
Let's Add a Border: The Jumbo Shell Edge
To start the border, slide your work back to the other side. Put your hook into the top of that chain to begin. Attach your border color yarn with a slip stitch. Drop your tail and chain three (1, 2, and 3). This counts as our first treble crochet.
Border Technique: Single Crochet and Treble Clusters
Now, make a single crochet right into the top of our "hill." We're going to work into our center stitch in the "valley." For the top of our blanket, we'll be working into the center stitch of the "valley" and into the top of the "hill."
Into the center stitch in the middle of our "valley," make seven treble crochets (wrap your yarn twice). Single crochet into the top of the "hill" to pin it down. Repeat this pattern all the way along the top edge of your blanket.
Highlighting the Pattern: A Beautiful Finishing Touch
You'll see how this border really highlights the natural pattern of the blanket stitch. The jumbo shell border adds a touch of elegance and sophistication to the finished blanket.
Reaching the Corner: Creating a Smooth Transition
At the end of your row, work into the top of that last double crochet and make ten treble crochets. This will be the corner of our blanket, and we'll do this every time for every corner.
Working Along the Sides: Maintaining a Straight Edge
Now, we're going to start working along the side of our blanket (that nice straight edge). Make a single crochet into the second row (skip a row every time). Find where that yarn is joining on the edge, skip the next row, and go into the second spot (second row).
Now, skipping that next connection (or next row), work into the second row and make seven treble crochets into the same spot. Skip the next connection (or next row) and work into the second one with a single crochet. Repeat this pattern all the way down the edge of our blanket.
Corner Magic: Consistent Stitch Count
At the end of your row, work either into the top of the double crochet or into the top of the chain and make your ten treble crochets.
Completing the Border: A Full Circle
Repeat the border pattern along the bottom edge of the blanket, just like you did on the top. When you reach the starting point, make nine treble crochets into the very same stitch where you joined your yarn (remembering that our chain counted as a treble crochet when we began).
Joining the Border: A Seamless Finish
Slip stitch right into that single crochet to join. Chain one to secure your yarn.
The Invisible Join Option: A Professional Touch
You are also welcome to join with an invisible join if you would like to do that. An invisible join creates a virtually seamless finish, perfect for those who want a polished and professional look.

Weaving in the Ends: The Final Step
Sew in your tail, and you're finished! This is arguably the most important step, as it ensures that your blanket will last for years to come. Take your time and weave in the ends securely, so they don't unravel over time.
Enjoy Your Project!
I hope you enjoyed this tutorial as much as I did! The Wandering Granny Crochet Blanket is a wonderful project for crocheters of all skill levels. With its simple repeat and customizable size, it's a perfect way to create a cozy and beautiful blanket for yourself or a loved one. Happy crocheting!
Left Handed?
FAQs
1. Can beginners crochet the Wandering Granny Blanket?
Yes! The Wandering Granny Blanket is very beginner-friendly. With its simple one-row repeat and detailed instructions, even those new to crochet can confidently create this lovely blanket.
2. What type of yarn is best for this blanket?
You can use any yarn you like! Self-striping cake yarns like Cakes Splash from Ice Yarns work wonderfully, but you can also use acrylic, cotton, or wool blends. The pattern is very versatile, so feel free to experiment.
3. How do I adjust the blanket size?
To customize the size, chain in multiples of 10 and add 3 chains at the end. You can easily make anything from a baby blanket to a full-sized throw.
4. What if my blanket feels stiff or too floppy?
This usually happens if the hook size doesn’t match the yarn. Use the recommended hook size from your yarn label, and go one size up if needed to achieve a soft and draping fabric.
5. Do stitch markers really help?
Yes! Stitch markers are great for keeping track of your place and ensuring your foundation chain is the right size. They’re especially useful for beginners.
6. Can I use leftover yarn from my stash?
Absolutely! This pattern is perfect for using up leftover yarn. Mix and match colors for a unique, colorful look.
7. How do I make seamless color transitions?
If you’re using cake yarns, try to line up the colors from one cake to the next. You can control the colors by cutting and rejoining yarn where needed. For joining, the magic knot method works well for acrylic yarn.
8. What is the purpose of the border?
The border not only adds a decorative touch with its jumbo shell edge but also hides imperfections and ensures the edges look polished and professional.
9. How do I weave in the ends securely?
Use a yarn needle and weave the ends in multiple directions before trimming. This ensures the ends hold firmly and won’t unravel over time.
10. Can I add different edges instead of the jumbo shell border?
Yes, you can personalize your blanket with a border style of your choice. Scallops, picots, or a simple single crochet edge could also look great.
11. How long does it take to complete the blanket?
The time depends on the size of your blanket and your crochet speed. A baby blanket might take just a few days, while a larger throw could take longer.
12. Is there a written pattern for this blanket?
Yes, you can find the written pattern at The Secret Yarnery to download and follow at your own pace.
Christa Patel
Christa Patel is the creative mind behind the Secret Yarnery, a trusted resource for crochet enthusiasts worldwide. With years of experience, Christa specializes in designing beginner-friendly yet stunning crochet patterns that inspire creativity and confidence in crafters of all skill levels.
As a passionate crocheter, Christa is known for her clear and approachable teaching style, breaking down complex patterns into simple, easy-to-follow steps. Through her engaging video tutorials, written patterns, and helpful tips, she has cultivated a community where crocheters can connect, learn, and share their work.
Christa’s dedication to making crochet fun and accessible shines in every project she creates, from colorful blankets to intricate borders. Whether you’re a seasoned expert or just picking up a hook for the first time, Christa's guidance will help you craft something beautiful.
For more crochet patterns, tips, and inspiration, visit her website at The Secret Yarnery, or check out her YouTube channel filled with step-by-step tutorials.
About the Author
With a passion for crafting easy, beginner-friendly tutorials and patterns, Christa inspires crafters of all skill levels to unleash their creativity worldwide. She encourages yarn lovers to connect, create, and crochet a world filled with beautiful handmade treasures!
How to Make a Beautiful Wandering Granny Crochet Blanket Quick & Simple!