Easy Boxing Granny Square Tutorial: Crochet Your Own Shadow Box!
Have you ever wanted to create something that looks intricate but is surprisingly simple to make? I'm excited to share a fantastic project with you: the Easy Boxing Granny Square! This isn't just any granny square; it’s a clever twist that gives a beautiful shadow box effect. By using a gradient of colors, from darkest to lightest, you can create a stunning, dimensional look. I'm going to guide you step-by-step, so grab your hook and yarn, and let’s get started!
Table of contents
What is a Boxing Granny Square?
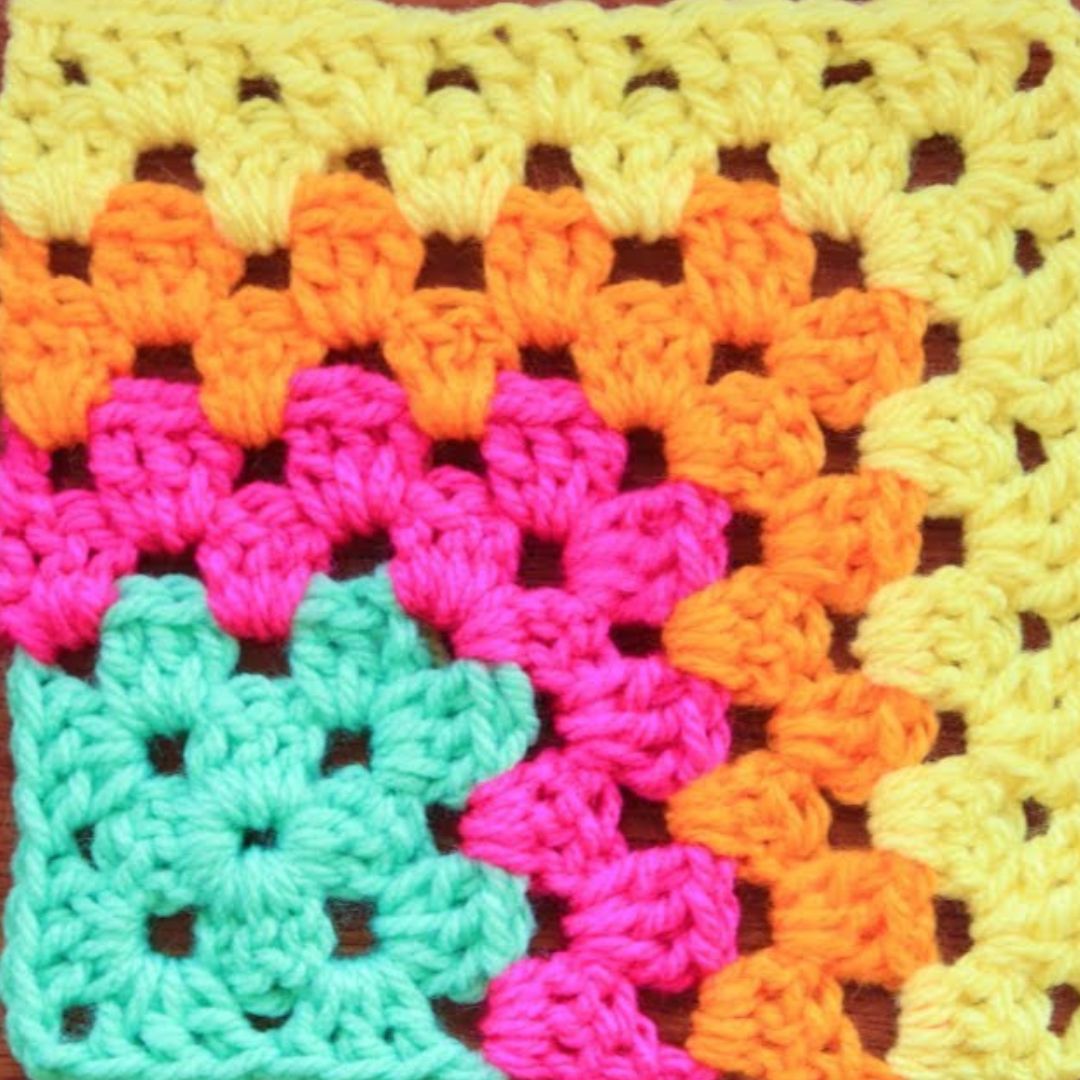
So, what makes a Easy boxing granny square different? It's all about the visual illusion! The "boxing" effect comes from strategically using different shades of yarn. Starting with a dark color in the center and gradually working outwards to lighter shades makes it look like the center square is popping out, like a little shadow box. In this tutorial, I will be using four different colors to achieve this effect. This method is a fun way to add depth and interest to your crochet projects!
Materials You'll Need
To make your own boxing granny squares, you'll need a few essential supplies. Here’s a list to get you started:
- Four colors of worsted weight yarn: Acrylic yarn is recommended, especially for beginners, because it’s affordable and easy to work with.
- Crochet hook: Choose a hook size that's appropriate for your yarn. I’ll be using a 6mm hook in this tutorial.
- Scissors: For cutting your yarn. These scissors with a curved edge are great! As an Amazon Associate, I earn from qualifying purchases.
- Darning needle: Although we'll be working in most of our ends, a darning needle will help weave in the final few tails.
Don't worry if you don't have brand-new skeins of yarn. This project is perfect for using up those yarn scraps! Just make sure you use the same colors in the same order for each square to maintain that consistent shadow box effect.

Choosing Your Colors
The key to a successful boxing granny square is selecting colors that create a beautiful gradient. The contrast between your darkest and lightest shades will really make the design pop! I recommend arranging your colors in order from darkest to lightest before you start. This will give you a clear visual of how the gradient will look. If you need help choosing colors, a color wheel can be a great tool! As an Amazon Associate, I earn from qualifying purchases.
Getting Started: The Slip Knot
Let's get our yarn and hook ready! Start by making a slip knot. There are many ways to make one. The most important part is to not make the tail too long. An inch and a half is all you need because we're going to crochet over it to hide it. This helps minimize the number of ends we need to weave in later!
Round 1: Creating the Center Ring
Now for the fun part! We're going to create the center ring of our granny square. Here’s how:
-
Chain 3.
-
Insert your hook into the very first chain you made. If you count the Vs you'll find your first chain.
-
Hold the yarn tail along the chain. I like to pinch the center open with my finger.
-
Yarn over and pull through, creating your first double crochet. Remember, that initial chain 3 counts as your first double crochet for this pattern.
-
Work 2 more double crochets into the center ring, so you have a total of 3 double crochets together.
-
Chain 2.
-
Work another set of 3 double crochets into the center ring.
-
Chain 2.
-
Work another set of 3 double crochets into the center ring.
-
Chain 2.
-
Work another set of 3 double crochets into the center ring.
It might feel a little fiddly at first, but you'll get the hang of it! Remember, the chain 3 at the beginning counts as a double crochet, so each side of your square will have three double crochets. The little trick of holding the center open makes this easier to work with. Also, we're crocheting over the yarn tail as we go, which helps hide it and saves us work later.
Joining the Round and Continuing with Color 1
To finish off the first round and prepare for the next, we need to join the round. Here’s how to do it:
Chain 1, and then make a single crochet into the third chain of your initial chain 3. The first chain is the little V down at the bottom. Count up to the third chain. You should have two loops on your hook. Yarn over and pull through both loops. Congratulations! You've made a single crochet join.
Now, we want to keep going with our first color into round 2, so we will chain 3. This chain 3 will count as the first double crochet in the next round.
Round 2: Building the Square
In this round, we're going to build on our center ring to start shaping the square. Remember to turn your work after joining to keep the square straight. If you don't, the square will twist. Here are the steps:
- Chain 3 and turn your work.
- Work 2 double crochets into the corner space. Remember, the chain 3 counts as your first double crochet, so this completes your set of three.
- In each of the remaining corner spaces, work a corner: 3 double crochets, chain 2, and 3 double crochets, all into the same space.
- To join, chain 2 and slip stitch to the top of the chain 3 from the beginning of the round.
A "corner" in this pattern is always three double crochets, a chain 2, and three double crochets, all worked into the same corner space. This creates the classic granny square corner. Turning your work ensures that your square stays true and doesn’t start twisting.

Securing and Cutting the Yarn
Now that we've completed the second round with our first color, it's time to secure the yarn and cut it.
Chain 1 to secure the yarn. Then, take your scissors and cut the yarn, leaving a tail. Pull the hook up and pull the yarn through, then snug it down to secure the knot. Those curved scissors I mentioned earlier are great for this! As an Amazon Associate, I earn from qualifying purchases.
Weaving in the Tail (First Tail)
Weaving in the tail might seem like a chore, but it's essential for a neat and durable finish. Plus, I have a trick to make it easier!
With this method, you'll use the back loops of the stitches to weave the tail back along the corner. Go into the back loop of the first stitch. Snag the yarn and bring it through. In the very beginning, gently pull it down a little bit. We want that knot to sink into our work. Continue in the back loops of the next stitch. Then, weave it back the other way twice. This secures it very well.
This method minimizes the need for sewing in the ends later with a needle. Since we've already worked over the initial tail and knotted it at the beginning, we can cut that one off close to the work.
Understanding the Right and Wrong Sides
It's important to know the difference between the right and wrong sides of your work, especially when changing colors. Take a look at your square. One side has neat little "V's". This is the front, or "pretty" side. The other side has a messier texture, almost like a pile of macaroni.
We always want to work into the back, or "macaroni" side. This ensures that the pretty side is always facing up on the front of our work. Flipping every round keeps your square true!
Joining the Second Color (Bougainvillea)
Now, let's switch to our second color and keep building our square!
We don't want to join where we finished off. Instead, we want to join in the corner before. Put your hook into the corner space. Grab a loop of yarn, leaving a tail. Then slip stitch to join with both.
Round 3 & 4: Continuing with Color 2 (Bougainvillea)
In the middle space, you're going to create a shell. That's three double crochets. Into our corner, we're going to do a corner. Corners are always the same: three double crochets, chain two, three double crochets.
The steps for these two rounds are similar. You'll chain 3, turn your work, and then jump over and build a shell into the next space. You'll continue building your corners and working three double crochets into each space.
- Make two sides of the square
- Chain 3
- Turn your work
- Jump over and build a shell into the next space.
- Build your corner
- Jumping across the side three double crochets into each of the spaces
- Double crochet into the top of chain 3
Keep in mind, every space basically gets 3 double crochets except for the corners. These get a full corner of 3 double crochets, chain 2, 3 double crochets. Remember to tug on your yarn to make it snug, and to work over your tails again to hide them. This repetition will help you build the square quickly and efficiently!

Securing and Weaving in the Tail (Second Color)
Time to secure the yarn and weave in the tail for our second color.
First, chain 1 to secure the yarn. Then, cut the yarn, pull the hook up, and snug the yarn down. Now, weave in the tail using the back loops of the stitches, just like we did before. Weave back and forth to secure the tail, and then trim any excess.
Joining the Third Color (Mandarin Orange)
Let's move on to our third color! As always, make sure our "macaroni" side is facing up.
We want to join the third color in the corner before the finish. It's the same slip stitch join with a 5-inch tail. Remember to hold the tail along the work to crochet over it. If you join in a different way, chain 3 instead of 2.
- Chain 2
- 2 Double Crochets in the same corner space
- 3 Double Crochets in the next middle space
Round 5 & 6: Continuing with Color 3 (Mandarin Orange)
The process for rounds 5 and 6 is the same as rounds 3 and 4. Explaining building a shell which is 3 Double Crochets. You'll also be building your corner which is always: 3 Double Crochets, Chain 2, 3 Double Crochets.
- Make two sides of the square
- Chain 3
- Turn your work
- Jump over and build a shell into the next space.
- Build your corner
- Jumping across the side three double crochets into each of the spaces
- Double crochet into the top of chain 3
Each space gets 3 double crochets, except for the corners. Tug on it and make it snug, and work over tails again. These rounds follow a simple pattern, making it easy to create a beautiful and consistent square.
Securing and Weaving in the Tail (Third Color)
Time to secure the yarn and weave in the tail for our third color.
Chain 1 to secure the yarn, then cut the yarn, pull the hook up, and snug the yarn down. Weave in the tail along the corner, using the back loops of the stitches. Remember to weave back and forth for a secure hold, then trim any excess yarn.
Joining the Fourth Color (Yellow)
It's time to add our final color, the lightest shade of yellow, to complete the boxing effect. Just as before, ensure the "macaroni" side is facing up.
We want to join the fourth color in the corner before the finish. Perform the slip stitch join with a 5-inch tail. Be sure to hold the tail along the work to crochet over it. Chain 3 instead of 2, if your normal joining method differs.
- Chain 2
- 2 Double Crochets in the same corner space
- 3 Double Crochets in the next middle space
Round 7 & 8: Continuing with Color 4 (Yellow)
The last two rounds follow the same pattern as before. Remember, each shell consists of 3 double crochets and the corner consists of 3 Double Crochets, Chain 2, 3 Double Crochets.
- Make two sides of the square
- Chain 3
- Turn your work
- Jump over and build a shell into the next space.
- Build your corner
- Jumping across the side three double crochets into each of the spaces
- Double crochet into the top of chain 3
Remember to keep the tension consistent. Don't forget to work over those tails again. This consistency will ensure a neat and professional finish to your granny square.
Securing and Weaving in the Tail (Fourth Color)
Now that we've completed the final color, secure the yarn and weave in the tail to finish off the square.
Chain 1 to secure the yarn, and then cut the yarn. Pull the hook up and snug it down. Weave in the tail using the back loops, making sure to go back and forth to secure it. Once it's secure, trim any excess yarn.

Dealing with Remaining Tails
Even though we've worked in many of our ends as we go, there will still be a few tails left to weave in. Grab your darning needle. Thread the yarn through it. Skip the first loop, and then go back through the rest of them.
Grab a loop on the other side to pin the tail down. This will prevent it from pulling out. Go back in the other direction. This secures the tail in place.
Once you've gone back and forth several times, you can safely trim the tail close to the work.
The Finished Boxing Granny Square
Congratulations! You've now completed your first Easy Boxing Granny Square. Take a moment to admire the shadow box effect created by the gradient of colors. Doesn't it look fantastic? This square is now ready to be used in a variety of projects. Share your finished squares with the hashtag #SecretYarnery – I'd love to see what you create! If you’re looking for more patterns, check out my Yarn Patterns Collection.
Ideas for Using Your Boxing Granny Squares
Now that you have a beautiful stack of boxing granny squares, what can you make with them? The possibilities are endless! Here are a few ideas to get your creative juices flowing:
- Blankets: Join your squares to create a cozy and colorful blanket.
- Pillows: Make a decorative pillow by sewing your squares together and stuffing them.
- Bags: Create a unique tote bag or purse using your granny squares.
- Sweaters: Fashion a stylish sweater or cardigan.
- Scarves: Craft a warm and eye-catching scarf for the winter months.
Don’t be afraid to experiment and personalize your projects!
Joining Your Squares: Coming Soon
If you're wondering how to join your squares together, don't worry! I'll be posting a separate video/blog post soon on how to join these squares into a larger project. This will cover various joining methods and tips for creating a seamless and professional finish. Subscribe to The Secret Yarnery YouTube channel to stay updated!
Troubleshoot
Sometimes, things don't go exactly as planned. Here are some common issues and how to fix them:
- Square is twisting: The most common reason for a twisting square is forgetting to turn the work after each round. Always turn your work to keep the square aligned.
- Holes in the corners: Make sure you're working the correct number of double crochets and chain stitches in the corners. A missed stitch can create a noticeable gap.
- Uneven edges: This usually results from inconsistent tension. Try to maintain a consistent tension throughout the project to ensure even edges.
If you encounter any other problems, don't hesitate to ask questions in the comments section. I'm here to help!
Meet the Creator: Christa from The Secret Yarnery
Hello, I’m Krista! I’m the creator behind The Secret Yarnery. I'm passionate about crochet and dedicated to providing easy-to-follow tutorials that help crocheters of all skill levels create beautiful projects. My goal is to make crochet accessible and enjoyable for everyone. Check out my tutorials for more help!
Stay Connected with The Secret Yarnery
Want to stay up-to-date on new patterns, tutorials, and exclusive content? Subscribe to The Secret Yarnery's newsletter for all the latest updates. Don't forget to subscribe to The Secret Yarnery YouTube channel.
List of Crochet Must-Haves
Here's a handy list of crochet essentials to enhance your crafting experience:
- Bags - Yarn Ball Storage ➡️ https://amzn.to/36cbr3A
- Bags - Large UFO Zipper Pouches ➡️ https://amzn.to/3uqgQ0n
- Bags - Regular UFO Zipper Pouches ➡️ https://amzn.to/3DYxvLB
- Ball Winder ➡️ https://amzn.to/3Jzd4Y0
- Baskets - WIPS ➡️ https://amzn.to/3tQK9te
- Color Wheel ➡️ https://amzn.to/3hJN3IG
- Crochet Hooks ➡️ https://amzn.to/2p5etkC
- Foot Warmer ➡️ https://amzn.to/3RaMtn0
- Measuring Tape ➡️ https://amzn.to/3JviyD8
- Neck Light ➡️ https://amzn.to/2UYNrW4
- Needle Threaders ➡️ https://amzn.to/3zdCK7S
- Needles - Blunt Tip ➡️ https://amzn.to/2MRffKP
- Needles - Sharp Tip ➡️ https://amzn.to/3Rdq2ja
- Scissors ➡️ https://amzn.to/3EC1CHy
- Stitch Markers ➡️ https://amzn.to/3GdGCYg
- Tea - Kericho Gold ➡️ https://amzn.to/3zrTcB8
- Tins - Accessories ➡️ https://amzn.to/3EN6nxT
- Yarn ➡️ https://bit.ly/39EZwZX
As an Amazon Associate, I earn from qualifying purchases.
Video Tutorial Links
If you prefer video tutorials, here are the links to both the right-handed and left-handed versions:
- RIGHT HANDED TUTORIAL 🍊 https://youtu.be/pRHDKXKY-kQ
- LEFT HANDED TUTORIAL 🍋 https://youtu.be/j4TURQzv4V8
Left-handed crocheters, I've got you covered! Check out my playlist of left-handed tutorials.
I hope you enjoyed this tutorial and have fun creating your own Easy Boxing Granny Squares! Happy crocheting!
![]()
Christa Patel is the creative mind behind the Secret Yarnery, a trusted resource for crochet enthusiasts worldwide. With years of experience, Christa specializes in designing beginner-friendly yet stunning crochet patterns that inspire creativity and confidence in crafters of all skill levels.
As a passionate crocheter, Christa is known for her clear and approachable teaching style, breaking down complex patterns into simple, easy-to-follow steps. Through her engaging video tutorials, written patterns, and helpful tips, she has cultivated a community where crocheters can connect, learn, and share their work.
Christa’s dedication to making crochet fun and accessible shines in every project she creates, from colorful blankets to intricate borders. Whether you’re a seasoned expert or just picking up a hook for the first time, Christa's guidance will help you craft something beautiful.
For more crochet patterns, tips, and inspiration, visit her website at The Secret Yarnery, or check out her YouTube channel filled with step-by-step tutorials.
About the Author
With a passion for crafting easy, beginner-friendly tutorials and patterns, Christa inspires crafters of all skill levels to unleash their creativity worldwide. She encourages yarn lovers to connect, create, and crochet a world filled with beautiful handmade treasures!
Easy Boxing Granny Square Tutorial: Crochet Your Own Shadow Box!