Candy Cradle Square Crochet Pattern | Video Tutorial & Tips
Hey there, fellow yarn enthusiasts! I'm so excited to share this fun and engaging crochet project with you. We're diving into the Candy Cradle Square, a delightful pattern that's part of the Secret Stitches Crochet Along (CAL) 2021. Christa from The Secret Yarnery has designed this square, and trust me, it's a treat to make! Get ready to add a touch of sweetness and texture to your crochet creations as we work together on this project. Crochet alongs are the best, aren't they? You get to learn new stitches and techniques, plus you end up with a gorgeous blanket at the end. It's like a year-long adventure in yarn!
Table of contents
What is the Secret Stitches CAL 2021?
If you're new to the world of crochet, you might be wondering, "What's a CAL?" Well, CAL stands for Crochet Along. It's like a virtual crafting party where crocheters work on the same project together, usually following a set schedule. The Secret Stitches CAL 2021 was a year-long event where a new stitch pattern was released every four weeks. Each pattern created a unique rectangular square, and at the end of the year, all the squares were joined together to form a beautiful blanket. Pretty cool, right?
Why Crochet the Candy Cradle Square?
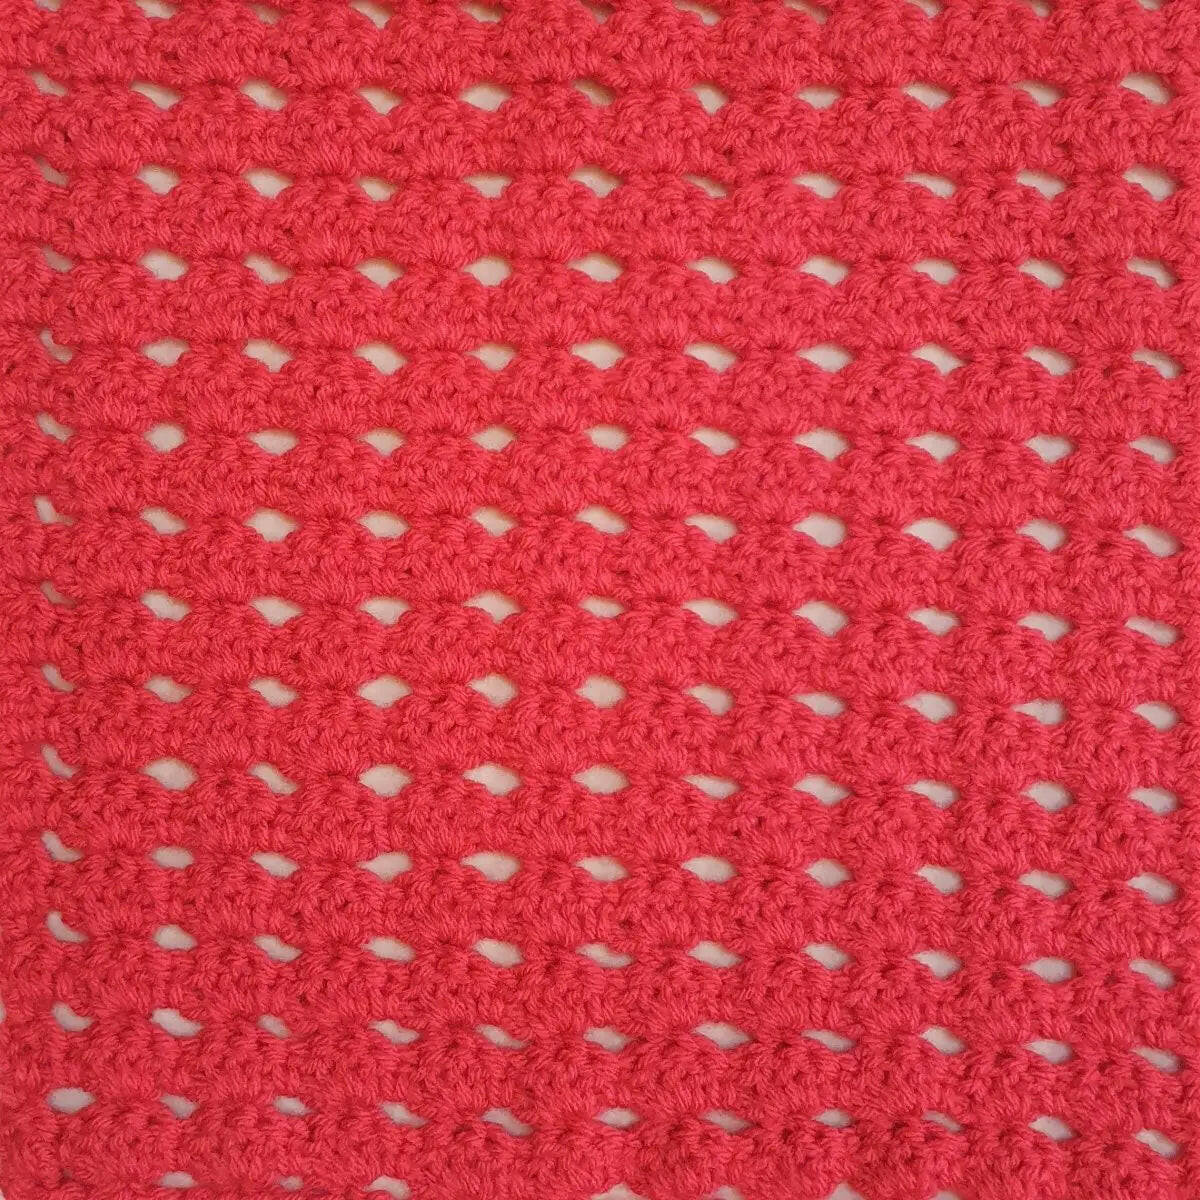
The Candy Cradle Square is special because of its unique texture and design. It's got these adorable "candy" rows alternating with "cradle" rows, creating a sweet and cozy effect. This square is also a great way to use up those leftover bits of yarn in your stash. It's perfect for adventurous beginners who want to try something a little more challenging, as well as intermediate crocheters looking for a fun and quick project. I think this Candy Cradle Square would be fantastic for a baby blanket, don't you?
Materials You'll Need
Alright, let's gather our supplies! Here's what you'll need to crochet the Candy Cradle Square:
-
Worsted weight yarn (make sure it's the same type and thickness for all your squares)
-
6 mm crochet hook
-
Scissors
-
Darning needle
-
Optional: Stitch markers
I love using yarn from my stash for projects like this. It's a great way to be budget-friendly and reduce waste. If you're looking to buy yarn, The Secret Yarnery has some awesome options available at their online shop. You can find the perfect yarn for this project! Candy Cradle Square Product

Choosing Your Yarn
When it comes to choosing yarn for this project, it's important to use the same weight and fiber for all the squares in your blanket. This will ensure that all your squares are uniform in size and texture. Suitable yarn types include acrylic, cotton, and wool blends. Feel free to use different colors for each square to create a vibrant and unique blanket! If you need to substitute yarn, make sure you find something that's the same weight and fiber content as the original yarn.
Gauge and Size
Gauge is super important for making sure your squares are all the same size. The finished size of the Candy Cradle Square should be consistent with the other squares in the CAL. Before you start, I recommend checking your gauge by crocheting a small swatch using the recommended yarn and hook size. If your swatch is too small, try using a larger hook. If it's too big, try using a smaller hook.
Abbreviations
Here are the abbreviations used in this pattern:
-
ch - chain
-
sc - single crochet
-
dc - double crochet
Getting Started: Making a Slip Knot
To start, you'll need to make a slip knot. Wrap the yarn around your fingers, create a loop, and pull the yarn through the loop. Then, place the loop on your crochet hook and tighten it gently. Easy peasy!
Chain 36
Next, chain 36 stitches. Try to keep your tension consistent as you chain. This will help create a nice, even foundation for your square.
Chain 2
After chaining 36, chain 2 more stitches. These chains will help create the height for the next row.
Working into the Back Bumps
Now, here's a slightly trickier part: working into the back bumps. If you flip your chain over, you'll see a series of small bumps on the back. These are the back bumps. We're going to be working into these bumps to create a cleaner edge for our square. To work into a back bump, insert your hook into the bump, yarn over, and pull through a loop. Then, yarn over again and pull through both loops on your hook to complete a single crochet. It sounds complicated, but once you get the hang of it, it's a breeze!
Row 1: The Foundation Row
Okay, let's get started with Row 1! Here's what you need to do:
- Single crochet into the first back bump.
- Chain 3.
- Skip two bumps and single crochet into the third.
- Repeat this pattern across the row.
As you work, try to maintain consistent tension. If your work starts to twist, don't worry! It will straighten out as you add more rows.
Finishing Row 1
When you reach the end of Row 1, make sure your last single crochet is in the very last camel bump. This will ensure that your square has a nice, even edge.

Row 2: The Candy Row
Now we're getting to the fun part – creating the "candy" effect! Here's how to crochet Row 2:
- Chain 3 and turn your work.
- Double crochet into the first stitch.
- Single crochet into the next space.
- 3 double crochets into the next stitch.
- Single crochet into the next space.
- Repeat this pattern across the row.
Remember to place your stitches correctly – double crochets into stitches and single crochets into spaces. This is what creates the "candy" look.
Finishing Row 2
At the end of Row 2, single crochet into the last space and then place two double crochets into the last stitch. Make sure you get two strands of that stitch onto your hook. This completes the candy row!
Row 3: The Cradle Row
Time for the "cradle" effect! Here's how to crochet Row 3:
- Chain 1 and turn your work.
- Single crochet into the first stitch.
- Chain 3.
- Single crochet into the second double crochet (the center) of each "candy".
- Chain 3.
- Repeat this pattern across the row.
The single crochets should go into the center stitch of each candy. This is what creates the "cradle" effect. Don't worry if your work is twisting a bit – it'll all even out as you continue.
Finishing Row 3
To finish Row 3, work the last single crochet into the top of the chain 3. Make sure you have two strands of that chain on your hook. Congrats, you finished the cradle row!
Row 4: Repeating the Candy Row
We're repeating the candy row again! Here's how to crochet Row 4:
- Chain 3 and turn your work.
- Double crochet into the first stitch.
- Single crochet into the next space.
- 3 double crochets into the next stitch.
- Single crochet into the next space.
- Repeat this pattern across the row.
Remember to pay attention to where you're placing your stitches – double crochets into stitches and single crochets into spaces.
Finishing Row 4
To finish Row 4, single crochet into the last space and then place two double crochets into the last stitch, getting two strands of that stitch onto your hook. That completes the candy row!

Rows 5-18: Alternating Rows
Now, here's the pattern: alternate between the Candy Row (Row 2/4) and the Cradle Row (Row 3) until you have completed 15 Candy Rows. Keep going, you're doing great!
Counting Your Candy Rows
Need to double-check how many candy rows you've done? Just count each shell of double crochets. Easy peasy!
Finishing on a Cradle Row
It's important to end on a Cradle Row. Here's how to crochet that final Cradle Row:
- Chain 1 and turn your work.
- Single crochet into the first stitch.
- Chain 3.
- Single crochet into the center stitch of each "candy".
- Chain 3.
- Repeat this pattern across the row.
Make sure you work the last single crochet into the top of the chain 3.
Securing and Finishing Off
Alright, time to finish off your square! Here's what to do:
-
Chain 1.
-
Cut the yarn.
-
Pull the hook up and yarn through.
-
Snug the yarn to secure the stitch.
Weaving in the Ends
Don't forget to weave in those ends! This will make your square look neat and prevent it from unraveling. Thread the yarn onto your darning needle and weave it through the stitches on the back of your work.

Joining Your Squares
Once you've crocheted all your squares, it's time to join them together to create a blanket! There are several different joining methods you can use, such as the single crochet join or the mattress stitch. Check out The Secret Yarnery's Easy Crochet Blanket Ideas for a full tutorial on how to join your squares. Experiment with different methods to find the one you like best!
Crochet Must-Haves
Here are some crochet tools that are very helpful:
- Bags - Yarn Ball Storage ➡️ https://amzn.to/36cbr3A
- Bags - Large UFO Zipper Pouches ➡️ https://amzn.to/3uqgQ0n
- Bags - Regular UFO Zipper Pouches ➡️ https://amzn.to/3DYxvLB
- Ball Winder ➡️ https://amzn.to/3Jzd4Y0
- Baskets - WIPS ➡️ https://amzn.to/3tQK9te
- Color Wheel ➡️ https://amzn.to/3hJN3IG
- Crochet Hooks ➡️ https://amzn.to/2p5etkC
- Foot Warmer ➡️ https://amzn.to/3RaMtn0
- Measuring Tape ➡️ https://amzn.to/3JviyD8
- Neck Light ➡️ https://amzn.to/2UYNrW4
- Needle Threaders ➡️ https://amzn.to/3zdCK7S
- Needles - Blunt Tip ➡️ https://amzn.to/2MRffKP
- Needles - Sharp Tip ➡️ https://amzn.to/3Rdq2ja
- Scissors ➡️ https://amzn.to/3EC1CHy
- Stitch Markers ➡️ https://amzn.to/3GdGCYg
- Tea - Kericho Gold ➡️ https://amzn.to/3zrTcB8
- Tins - Accessories ➡️ https://amzn.to/3EN6nxT
- Yarn ➡️ https://bit.ly/39EZwZX
Why Use These Crochet Must-Haves?
Having the right tools can really make a difference in your crochet experience. Yarn ball storage bags keep your yarn clean and organized. UFO (UnFinished Object) zipper pouches are perfect for keeping your projects safe when you're on the go. A ball winder makes it easy to wind your yarn into neat cakes. Stitch markers help you keep track of important points in your pattern. And a good pair of scissors is essential for clean yarn cuts.
Understanding Crochet Hook Sizes
Crochet hooks come in different sizes, and it's important to use the right size for your project. Crochet hook sizes are typically indicated by a number and a letter (e.g., 6 mm, H/8). The larger the number, the larger the hook. The size of your hook will affect the gauge and overall look of your project.
Choosing the Right Scissors
Sharp scissors are essential for clean yarn cuts. Embroidery scissors or thread snips are great options for crochet.
The Importance of Stitch Markers
Stitch markers are little helpers that mark important places in your crochet. I like to use them to mark the beginning of a row, or to designate a place where I need to increase or decrease stitches.
Why a Darning Needle is Essential
A darning needle (also known as a yarn needle or tapestry needle) is a large needle with a blunt tip and a large eye. It's used for weaving in ends and joining pieces of crochet.
Understanding Yarn Weights
Yarn comes in different weights, from lace weight to bulky weight. Worsted weight yarn is a medium-weight yarn that's perfect for a wide variety of projects. Using the correct yarn weight is essential for achieving the correct gauge and overall look of your project.
Exploring Different Yarn Fibers
Yarn is made from different fibers, such as cotton, wool, acrylic, and blends. Each fiber has its own unique properties. Cotton is soft and breathable. Wool is warm and cozy. Acrylic is durable and easy to care for.
The Benefits of Using a Ball Winder
A ball winder is a tool that winds yarn into neat cakes or balls. This makes it easier to work with your yarn and prevents it from tangling.
Why a Color Wheel is a Helpful Tool
A color wheel is a tool that helps you choose harmonious color combinations. By using a color wheel, you can create visually appealing crochet projects.
Benefits of Crochet
Crochet is not only a fun and creative hobby, but it also has many therapeutic benefits. It can help reduce stress, improve focus, and boost your mood. And, of course, there's the satisfaction of creating something beautiful with your own two hands!
Staying Connected with The Secret Yarnery
For more crochet tutorials and inspiration, be sure to subscribe to The Secret Yarnery's YouTube channel! And don't forget to follow The Secret Yarnery on social media for updates and behind-the-scenes content. youtube.com/secretyarnery
Final Thoughts
I hope you enjoyed this tutorial on how to crochet the Candy Cradle Square! It's a fun and rewarding project that's perfect for adding to the Secret Stitches CAL 2021 blanket. So grab your hook, yarn, and let's get crocheting!
![]()
Christa Patel is the creative mind behind the Secret Yarnery, a trusted resource for crochet enthusiasts worldwide. With years of experience, Christa specializes in designing beginner-friendly yet stunning crochet patterns that inspire creativity and confidence in crafters of all skill levels.
As a passionate crocheter, Christa is known for her clear and approachable teaching style, breaking down complex patterns into simple, easy-to-follow steps. Through her engaging video tutorials, written patterns, and helpful tips, she has cultivated a community where crocheters can connect, learn, and share their work.
Christa’s dedication to making crochet fun and accessible shines in every project she creates, from colorful blankets to intricate borders. Whether you’re a seasoned expert or just picking up a hook for the first time, Christa's guidance will help you craft something beautiful.
For more crochet patterns, tips, and inspiration, visit her website at The Secret Yarnery, or check out her YouTube channel filled with step-by-step tutorials.
About the Author
With a passion for crafting easy, beginner-friendly tutorials and patterns, Christa inspires crafters of all skill levels to unleash their creativity worldwide. She encourages yarn lovers to connect, create, and crochet a world filled with beautiful handmade treasures!
Candy Cradle Square Crochet Pattern | Video Tutorial & Tips