Crochet Class 20: Master the Front Post Double Crochet Stitch
Hi, I'm Christa, and welcome to The Secret Yarnery! Have you ever wanted to add some serious texture to your crochet projects? Then you need to learn the front post double crochet (FPdc) stitch! It's easier than you might think, and it opens up a whole new world of design possibilities. This lesson is Crochet Class 20, and I'm excited to guide you through it. Be sure to check out the other free crochet classes available to expand your skills. Today, our goal is simple: to help beginners like you easily master the FPdc stitch.
Table of contents
What is Front Post Double Crochet?
The front post double crochet is a variation on the standard double crochet. The key difference? Instead of working into the top of the stitch, you work around the post of the stitch from the previous row. This simple change creates a raised, textured effect that can add incredible dimension to your crochet.
Think of it like this: with a regular double crochet, you're building a flat wall. With a front post double crochet, you're adding columns that pop out from the surface. This raised effect is what makes the stitch so versatile and visually appealing. This unique stitch creates a textured, raised effect, setting it apart from its flat counterpart. The key lies in hook placement: the FPdc involves working around the post of the stitch, not into the top of it, as with a regular double crochet.
Why Learn the Front Post Double Crochet?
Why should you spend time learning this stitch? Because it's a fantastic way to add texture and dimension to your projects. Imagine creating cozy blankets with raised stripes, or scarves with beautiful ribbed edges. The FPdc makes it all possible.
The front post double crochet is a common stitch in many crochet patterns. Once you learn it, you'll be able to tackle a wider range of designs. Plus, learning new stitches is a great way to expand your crochet skill set and keep things interesting!
Here are just a few project ideas that use FPdc:
-
Blankets with textured stripes
-
Scarves with ribbed edges
-
Hats with interesting patterns
-
Sweaters with unique detailing
-
Baskets with sturdy construction
Materials You'll Need

Before we get started, let's gather our materials. Here's what you'll need:
-
Yarn: Any yarn will work, but I recommend using a different color than your base fabric for practice, so you can easily see the stitch. You can find a wide selection of Yarn to choose from.
-
Crochet hook: Choose a hook size that's appropriate for your yarn. Check out the variety of Crochet Hooks available at The Secret Yarnery.
-
Scissors: For cutting your yarn. You can find Scissors suitable for yarn projects.
-
Tapestry needle: For weaving in your ends. You can find Blunt Tip Needles for weaving in your ends.
-
Optional: Stitch markers: These can be helpful for keeping track of your stitches. Stitch markers can be found here: Stitch Markers.
-
A piece of practice crochet fabric: You'll need a base row of double crochet stitches to work into.
Getting Started: Creating a Base Row
Before we can start front post double crocheting, we need a foundation to work on. That means creating a base row of double crochet stitches.
Here's a quick refresher on how to do that:
-
Chain a certain number of stitches (for example, chain 20).
-
Double crochet in each stitch across the chain.
This base row is crucial for practicing the FPdc stitch, as it gives you the posts you need to work around. I suggest creating a larger swatch for more practice, this will allow you to practice the stitch multiple times without needing to start over. I won't be showing this in the tutorial, but it is a very important step.

Understanding the Anatomy of a Stitch
Let's talk about the "post" of a double crochet stitch. This is the part of the stitch we'll be working around when we do the front post double crochet.
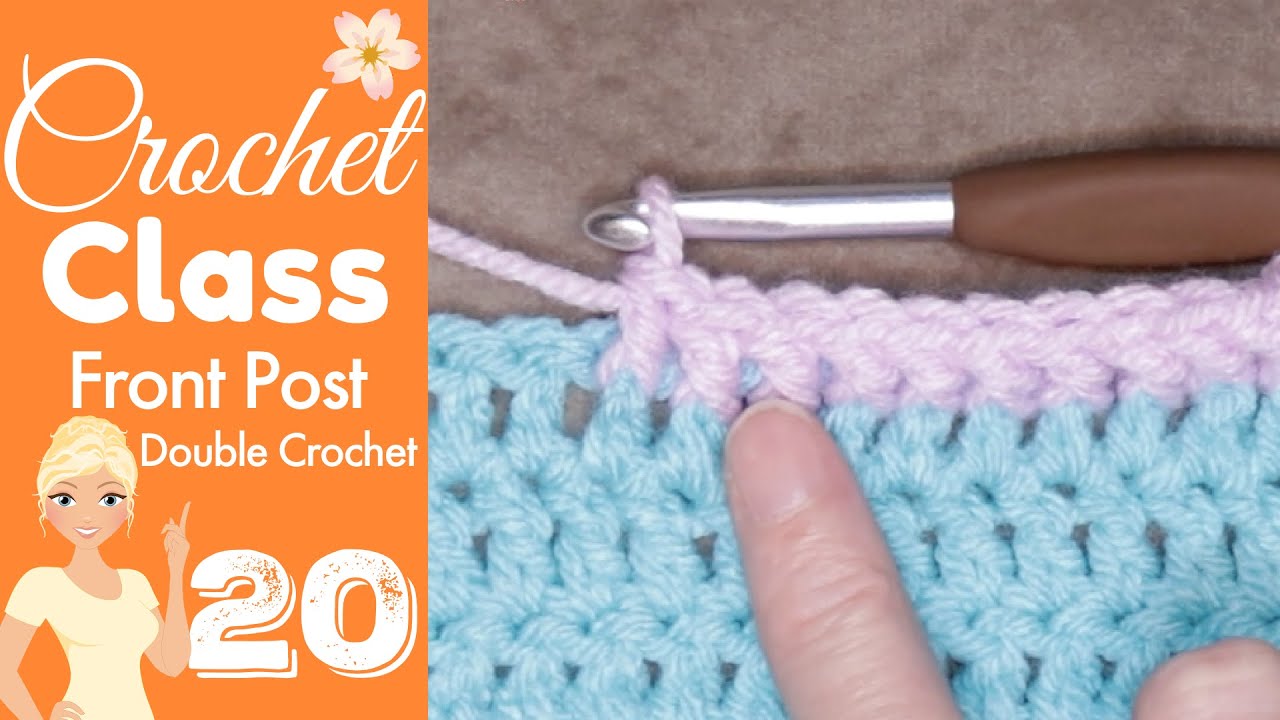
To identify the post, look at the "stick part underneath the stitch." Instead of working into the top of the stitch, we're going to be going around this post. It's a subtle but important difference.
Step-by-Step Guide: Front Post Double Crochet
Okay, let's get to the fun part! Here's a detailed, step-by-step guide on how to create the front post double crochet stitch:
-
Yarn Over: Wrap the yarn around your hook.
-
Insert Hook: Insert your hook from front to back around the post of the stitch.
-
Yarn Over and Pull Through: Yarn over and pull the yarn through the back of the stitch. You should now have three loops on your hook.
-
Yarn Over and Pull Through Two Loops: Yarn over and pull the yarn through the first two loops on your hook. You should have two loops left.
-
Yarn Over and Pull Through Two Loops: Yarn over and pull the yarn through the remaining two loops on your hook.
-
You should now have your first front post double crochet stitch.
Repeat these steps for multiple stitches to see the row developing. Keep practicing, and you'll get the hang of it in no time! Remember to go around the post, not through it.
Front View and Back View
It's interesting to see how the stitch looks on both sides of your work. On the front, the front post double crochet creates a distinct, raised texture. On the back, it looks different! This contrast is part of what makes the stitch so versatile. The FPdc creates texture on the front, while the back has a different appearance.
Slow Motion Demonstration
Sometimes, it helps to see a stitch worked in slow motion. Here's a section of the video where I demonstrate the front post double crochet at a slower pace. Watch it closely, and don't be afraid to pause and rewind as needed. Seeing the individual steps can make all the difference!
Tips for Beginners
Here are some helpful tips to keep in mind as you practice the FPdc stitch:
-
Tension: Maintain even tension to avoid puckering or looseness. Too tight, and your fabric will be stiff. Too loose, and your stitches will be sloppy.
-
Hook Placement: Ensure the hook is correctly placed around the post. This is the most important part of the stitch!
-
Counting Stitches: Double-check your stitch count to maintain consistent rows. It's easy to accidentally skip a stitch or add an extra one.
-
Practice Makes Perfect: Don't be discouraged if it takes time to master. Crochet is a skill, and like any skill, it takes practice.
If you're having trouble, try practicing with a larger hook and yarn. This will make it easier to see what you're doing. And remember, patience and persistence are key!
Common Mistakes to Avoid
Even experienced crocheters make mistakes from time to time. Here are some common errors to watch out for:
-
Working into the top of the stitch instead of around the post: This is the most common mistake. Double-check your hook placement!
-
Pulling the yarn too tight or too loose: This can affect the texture of your fabric.
-
Skipping stitches or adding extra stitches accidentally: This can throw off your stitch count and create uneven rows.
If you make a mistake, don't worry! Just frog back (that's crochet lingo for unraveling your work) and try again. Everyone makes mistakes, and it's all part of the learning process.
Variations of the Front Post Double Crochet
Once you've mastered the front post double crochet, you can start exploring variations. One popular variation is the back post double crochet (BPdc).
The back post double crochet is essentially the opposite of the FPdc. Instead of working around the post from front to back, you work around the post from back to front.
You can also try alternating FPdc and BPdc to create ribbing. In future tutorials, I'll be sure to cover these variations in more detail.
Creating Ribbing with FPdc and BPdc
Alternating front post and back post double crochet stitches is a simple way to create a ribbed effect in your crochet. Ribbing is great for adding elasticity and texture to your projects.
Here's how to create ribbing:
-
Work a row of FPdc.
-
Work a row of BPdc.
-
Repeat steps 1 and 2 to create the desired ribbing length.
You can use ribbing for cuffs, brims, edgings, and more. It's a versatile technique that can add a professional touch to your crochet projects.
Project Ideas Using Front Post Double Crochet
Ready to put your new skills to the test? Here are some project ideas that incorporate the front post double crochet:
-
Blankets: Use FPdc to create textured stripes or patterns. Explore the world of Easy Crochet Blankets for more inspiration.
-
Scarves: Add ribbing to the ends of scarves for a polished look.
-
Hats: Create textured hats with FPdc and BPdc ribbing.
-
Sweaters: Use FPdc to create interesting textures on sweater panels.
-
Baskets: Sturdy baskets can be made by using FPdc to create thicker 3-dimensional structures.
Pattern Examples
Looking for patterns that use the FPdc stitch? Here are a few places to find them:
-
Search Ravelry for free patterns using FPdc.
-
Find patterns on Etsy.
-
Check out the written patterns from The Secret Yarnery, if available.
The Secret Yarnery Community
Want to connect with other crocheters? Join The Secret Yarnery Crochet Community on Facebook! It's a place to share your projects, ask questions, and get support. I love seeing what you create, and I'm always happy to help!
Sharing Your Progress
I'd love to see your FPdc projects! Share them on social media and tag The Secret Yarnery on Instagram or Facebook. Use the hashtag #TheSecretYarnery so I can find your posts.
Call to Action: Subscribe and Join
If you enjoyed this tutorial, please subscribe to The Secret Yarnery YouTube channel! Click the notification bell to be notified of new videos. You can also click the "Join" button for exclusive perks.
More Crochet Classes
Want to learn more? Check out the other free crochet classes available! There are tutorials for all skill levels, from beginner to advanced.
Explore Other Tutorials
Don't miss these popular tutorials from The Secret Yarnery:
-
Drunken Granny Blanket
-
Sober Granny Baby Blanket
-
Gingham C2C Blanket
Behind the Scenes
Curious about how I make my videos? Check out the "Behind the Scenes" content for a glimpse into The Secret Yarnery. Behind the Scenes offers a look into how I create content for The Secret Yarnery.
Must-Have Supplies
Here's a quick list of must-have crochet supplies with links to Amazon:
-
Crochet Hooks
-
Yarn
-
Scissors
-
Stitch Markers
-
Tapestry Needles
-
Tape Measure
Merchandise
Show your love for The Secret Yarnery with some cool merchandise! Purchasing merchandise supports the channel and helps me create more content for you. The Secret Yarnery merchandise.

Connect on Social Media
Stay connected with The Secret Yarnery on social media:
-
Instagram
-
Facebook
-
Facebook Group: https://www.facebook.com/groups/secretyarnerycrochetcommunity/
-
Pinterest
-
Twitter
Follow me for updates, inspiration, and behind-the-scenes content!
FAQs
What is the difference between a regular double crochet and a front post double crochet?
A regular double crochet works into the top loops of the stitch, creating a flat surface. The front post double crochet works around the post of the stitch, adding texture and dimension by raising parts of the fabric.
Is the front post double crochet difficult to learn for beginners?
Not at all! While it may seem tricky at first, with practice and the step-by-step breakdown provided, beginners can master this stitch quickly.
What types of projects can I create with the front post double crochet?
You can use the FPdc stitch for textured blankets, ribbed scarves, detailed hats, sweaters with unique patterns, and even sturdy baskets. It's great for any project that benefits from texture.
How do I keep my stitches even when using the FPdc?
To maintain even stitches, keep consistent tension throughout your work. Practice is key, and using a larger hook and yarn when starting out can help you see and control your stitches better.
What is the difference between a front post double crochet (FPdc) and a back post double crochet (BPdc)
The FPdc wraps around the post of the stitch from front to back, creating a raised texture on the front. The BPdc goes around the post from back to front, which pushes the stitch to the rear, creating an indent on the front side.
Can I use the FPdc for ribbing?
Yes! FPdc can be combined with BPdc stitches in an alternating pattern to create ribbing. This technique is perfect for cuffs, brims, and other stretchy edges.
What hook size and yarn work best for learning the FPdc?
A medium-weight yarn (like worsted weight yarn) and a hook size recommended for that yarn (often size H/5mm) are great for learning. Using a light-colored yarn can also help you see your stitches more clearly.
How do I fix mistakes in the FPdc stitch?
If you place the hook in the wrong spot or the stitch looks uneven, simply unravel the yarn back to the mistake (a process known as "frogging") and try again. Crochet is forgiving, so don't stress over errors.
Can I combine the FPdc with other stitches in one project?
Absolutely! Pairing FPdc with regular double crochet, half double crochet, or BPdc can create stunning textures and patterns in your project.
How do I make FPdc stitches in the round?
When crocheting in the round, follow the same steps for the FPdc, working around the appropriate post from the front. Mark the beginning of your rounds with a stitch marker to help keep track.
![]()
Christa Patel is the creative force behind The Secret Yarnery, a vibrant crochet community for yarn lovers of all skill levels. With years of crochet experience under her belt, Christa specializes in crafting accessible tutorials that make even the most complex techniques easy to learn. Her passion for crochet shines through in her engaging video guides, blog posts, and interactive community content.
Based in Nairobi, Kenya, Christa's love for yarn and teaching led her to establish The Secret Yarnery to inspire others to create stunning projects with confidence. Known for her warmth and clear teaching style, she has helped thousands of crocheters master techniques ranging from beginner basics to intricate advanced designs.
When Christa isn’t crocheting or sharing her knowledge, she’s busy exploring vibrant yarn markets, designing new patterns, and connecting with her global community. Her mission is simple: to make crochet fun, approachable, and creative for everyone.
Follow Christa and The Secret Yarnery on YouTube, Instagram, Facebook, and other platforms to discover new tutorials, patterns, and inspiration every day!
About the Author
With a passion for crafting easy, beginner-friendly tutorials and patterns, Christa inspires crafters of all skill levels to unleash their creativity worldwide. She encourages yarn lovers to connect, create, and crochet a world filled with beautiful handmade treasures!
Crochet Class 20: Master the Front Post Double Crochet Stitch