Crochet Class 14: How to Change Yarn Color Without Knots!
|
Time to read 9 min
Product added to cart
|
Time to read 9 min
Hi, I'm Christa from The Secret Yarnery, and welcome to Crochet Class 14! In this post, I'm going to show you how to change yarn color at the end of a row to create a seamless transition. This is a great technique for crochet beginners who want to avoid messy knots and create professional-looking stripes or colorwork. Stick around for easy-to-follow steps and tips that will have you changing colors like a pro in no time!
Changing yarn at the end of a row is a game changer, especially if you want a clean, polished look. Have you ever struggled with bulky knots that ruin the flow of your crochet project? This method lets you say goodbye to those pesky knots and hello to smooth, invisible color changes.
There are so many great uses for this technique. Think about adding vibrant stripes to a cozy scarf, creating bold color blocks on a blanket, or tackling more complex patterns like intarsia. Learning to change colors at the end of a row opens up a world of creative possibilities.
While there are other ways to change yarn, I think this technique is perfect for beginners because it's simple and effective. Once you get the hang of it, you'll wonder why you ever did it any other way!
Before we dive in, let's gather our supplies. Here's what you'll need:
Crochet hook: Use the size recommended for your yarn.
Yarn: Pick out the colors you want to use!
Scissors: To snip the yarn.
Yarn needle: For weaving in those pesky ends.
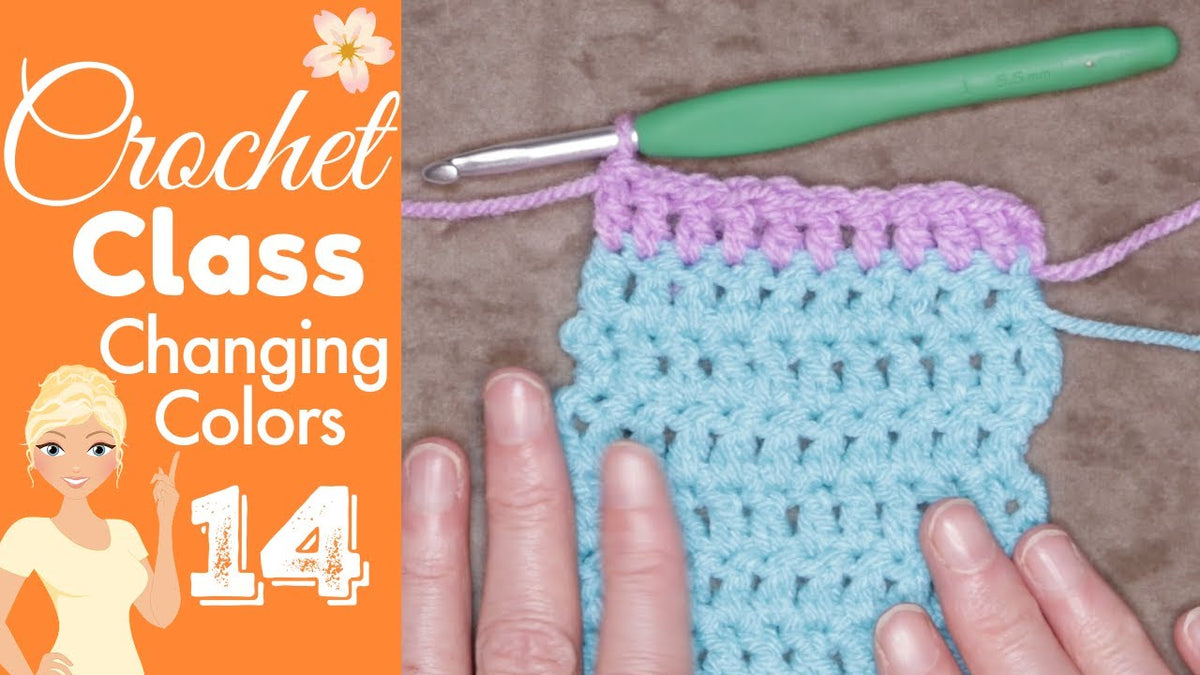
Okay, let's talk about the secret to a smooth color change: the last stitch. The key is to start your stitch as usual, but don't finish it completely with your old color. Instead, we're going to leave the last two loops on your hook (or three loops if you're doing a half double crochet).
Imagine you're making a single crochet. You'd insert your hook, yarn over, and pull up a loop. Now you have two loops on your hook, but instead of yarning over and pulling through both loops, we're going to stop right there. Those loops are where the magic happens!
Ready to get started? Here's how to change yarn at the end of a row, step by step:
First, grab your new color of yarn and create a loop. Leave a tail that's about 6-8 inches long. This tail is essential for weaving in the end later, so don't skimp on the length!
Hold that tail of the new yarn along the back of your work. This helps to secure it and keeps it out of the way. Now, put the loop of the new yarn on your hook and pull it through the remaining loops on your hook. That's it! You've just completed your last stitch with the new color.
Drop the tails of both the old and new yarn, making sure they stay behind your work. We want to keep the front nice and tidy.
Now it's time to create the turning chain with your new color. The number of chains you need depends on the stitch you're using (usually one for single crochet, two for half double crochet, and three for double crochet). Turn your work, and get ready to start the new row.
Work the first stitch of the new row into the previous row, just like you normally would. Continue crocheting across the row, and remember those tails are still hanging out in the back. We'll deal with them later.
Okay, let's talk about those tails. Weaving in ends is a must. It secures your yarn and stops your project from unraveling. It might seem tedious, but trust me, it's worth it!
Thread the tail onto your yarn needle. Then, weave it through the back of your work, following the path of the stitches. Try to weave in different directions to really secure the end. If possible, hide the tail along the same color yarn for an even cleaner look.
Sometimes things don't go as planned. Here are a few common problems and how to fix them:
If your stitches look loose or sloppy, it's probably a tension issue. Try tightening your tension on the new yarn as you pull it through the loops. Practice makes perfect! The more you change colors, the more consistent your tension will become.
Remember, we're trying to avoid knots altogether. Make sure your tails are long enough for weaving in, and double-check that you're not accidentally knotting the yarn as you change colors.
Uneven color changes can happen if your tension is inconsistent. Keep your tension consistent throughout the color change, and remember that blocking your finished project can help even out any minor imperfections.
Want to take your color changes to the next level? Here are a few extra tips:
I always tell my students to practice on a swatch before trying a new technique on a big project. It's a great way to get comfortable with the steps and work out any kinks.
I suggest using a color wheel to help you choose colors that look great together.
For the best results, use yarns of the same weight. This will help keep your stitches consistent and prevent any weird puckering or distortion.
For extra security, try tying a small knot after weaving in the ends, and then weave them back in again. It's like a double lock!
Blocking can work wonders for evening out your stitches and making your project look its best. Don't skip this step!
Ready to try out your new color-changing skills? Here are a few project ideas:
I think a Drunken Granny Blanket would look great with color-blocked stripes.
I would love to see what you create! Share your finished projects on social media.
You can find me on:
Use the hashtags #TheSecretYarnery, #EasyCrochet, and #BeginnerCrochet so I can find your posts!
If you enjoyed this tutorial, I encourage you to subscribe to The Secret Yarnery's YouTube channel here. By subscribing, you'll stay up-to-date on all my new tutorials, patterns, and crochet adventures.
If you're looking for even more exclusive content, consider joining the channel membership here.
I have so many other crochet classes available, and they're all free!
Looking for more crochet resources? Check out my written patterns for detailed instructions and inspiration.
I also offer Crochet Planners in both A4 https://bit.ly/3NVRsaE and Letter Size https://bit.ly/35Q8aXF to help you organize all of your projects.
Want to get a peek behind the curtain? Check out my behind-the-scenes content to learn more about me and my crochet journey.
Show your support for The Secret Yarnery by visiting my merch store. You'll find all sorts of fun goodies that any crochet lover will adore!
Here are some of my most popular tutorials:
Drunken Granny Blanket 🍋 https://youtu.be/mGqpNufvjr4
The Sober Granny Baby Blanket 🍋 https://youtu.be/nKOL0jhQdLI
The Speedy Granny Ruth Bedspread 🍋 https://youtu.be/M81RItCM5LE
Gingham C2C Blanket 🍋 https://youtu.be/mL_zZrgFD_Y
Huge Crochet Ball 🍋 https://youtu.be/lwd3H_I8vfY
Check out some of my most popular playlists:
Just a heads-up: this post contains affiliate links. This means I earn a small commission if you make a purchase through these links, but it doesn't cost you anything extra. These commissions help me keep creating free content for you!
So, there you have it: a simple, knot-free way to change yarn at the end of a row. I hope you found this tutorial helpful and that you're excited to start experimenting with color changes in your own projects. Remember, practice makes perfect, so don't be afraid to try it out a few times. If you have any questions, leave a comment below!
Thanks for hooking along! Stay hooked!
Pull the new color tightly when joining, but not so tight it puckers your work. Weave in tails securely on the back to avoid fraying.
Yes. Pause with two loops left on your hook, introduce the new color, and finish the stitch. Continue with the new color.
Weave each tail into the back of your work with a yarn needle. Go one way, then back the other for security, and trim the excess yarn.
This usually means your tension changed or the last stitch wasn’t finished properly. Practice and keep a steady hand for better results.
No need to knot them. Proper weaving is enough to keep ends secure and make the project look cleaner.
Leave about 6 inches of both old and new colors. This makes weaving easier and helps prevent unraveling.
If you weave in ends carefully, your project will stay strong and last long.
Yes. The method works for single, double, half-double, and most basic stitches.
Smooth, worsted-weight yarns show crisp changes, but fuzzy or textured yarns can hide mistakes if you’re still learning.
Keep each ball in a separate bag or container. Work with just two colors at a time if you can, and untwist as you go.
Christa Patel is the creator behind The Secret Yarnery. With years of experience in crochet, Christa shares easy-to-follow tutorials, free patterns, and practical tips for beginners and experts alike. Her teaching style is simple and encouraging, making crochet fun and accessible for everyone. Through her popular YouTube channel and website, Christa helps thousands of crocheters improve their skills and find inspiration for their next project.
You can find more of Christa’s work, videos, and community resources at The Secret Yarnery. She loves connecting with fellow crafters and believes that everyone can enjoy the creativity and relaxation that crochet brings.


