Crochet Class 11: How to Fix a Tight Foundation Chain!
|
Time to read 11 min
Product added to cart
|
Time to read 11 min
Have you ever started a crochet project, only to find that the beginning edge is tighter than the rest? It's a common problem: the dreaded tight foundation chain. A tight chain can ruin a project, causing it to be uneven, difficult to work into, and it can even prevent it from laying flat. But don't worry! There are ways to fix this frustrating issue and achieve a perfect, even start to your crochet creations. This post is based on Crochet Class 11.
Table of contents
In this guide, I'll share two effective methods for fixing a tight foundation chain, ensuring your projects start off right. So grab your hook and yarn, and let's get started!
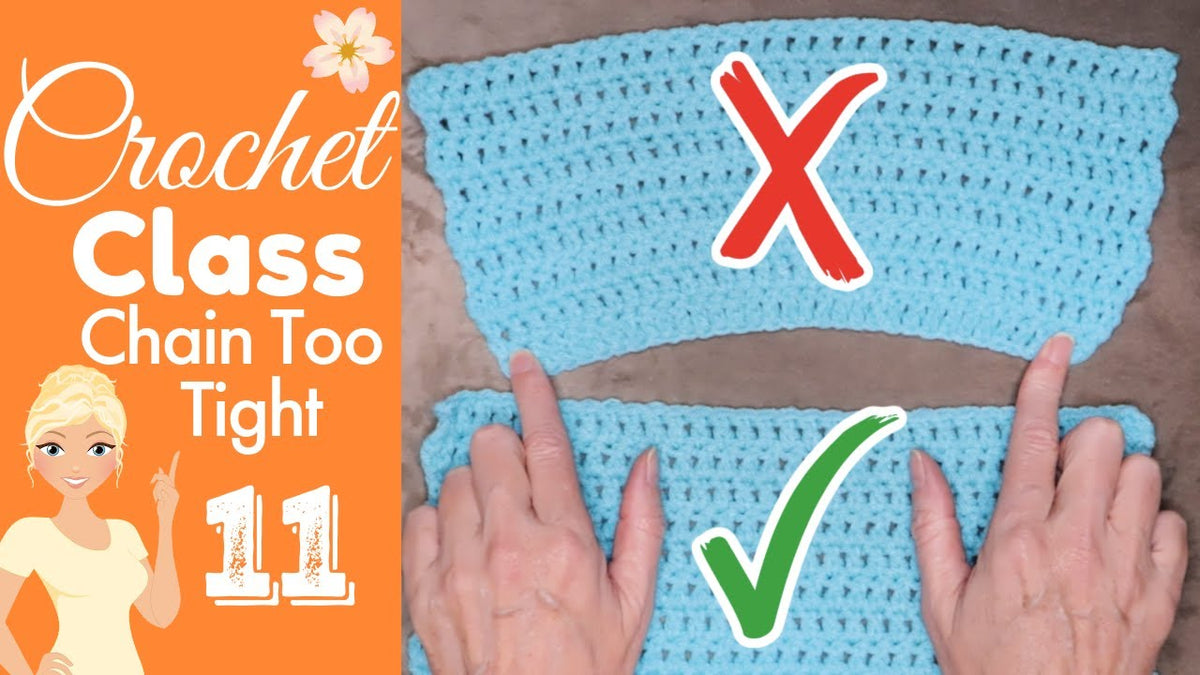
The foundation chain is the very first row you create in most crochet projects. It's the base upon which all subsequent rows are built. Think of it as the foundation of a house; it needs to be solid and even to support everything else. The length of your foundation chain determines the width of your project, making it a crucial element in achieving the correct size and shape.
A foundation chain that's too tight can cause a multitude of problems. Imagine trying to build a house on a wonky foundation – things are bound to go wrong! Here are some common issues caused by tight chains:
It can be discouraging, especially for beginners. But don't let a tight chain get you down! There are easy fixes and I am here to help.
How do you know if your chain is too tight? Here are two key indicators to watch out for:
Are you struggling to get your hook into the chain stitches? If you're really having to force your hook into the chain, it's likely too tight. It shouldn't require excessive force or wiggling. If you find yourself wrestling with your hook every time you try to work into a chain stitch, that's a major red flag.
Another way to tell if your chain is too tight is to compare its stretch to the stretch of the row of stitches above it. They should have a similar give. If the chain has significantly less stretch than the row above, it's too tight.
Here's how to test the stretch:
If the foundation chain feels stiff and unyielding compared to the looser, more flexible row above, you know it's time to make a change.
One of the simplest ways to fix a tight foundation chain is to use a larger hook just for the chain. It's a quick and easy adjustment that can make a world of difference.
Using a larger hook creates larger chain stitches, resulting in a looser foundation. This provides the necessary stretch and makes it easier to work into the chain. It's like using a bigger spoon to scoop ice cream – you get a bigger, easier scoop!
The general rule of thumb is to use a hook that is one or two sizes larger than the hook you're using for the rest of the project. For example, if you're using a 6mm hook for your project, try using a 7mm or 8mm hook for the foundation chain.
Here's how to use the larger hook method:
After creating your foundation chain with the larger hook, test the stretch again. The chain should now stretch more evenly with the rest of the fabric. You should also find it much easier to insert your hook into the chain stitches.
If you're looking for a more advanced technique that completely eliminates the problem of tight chains, try a chainless foundation. It might sound intimidating, but it's a valuable skill to learn.
A chainless foundation is a technique that creates the foundation chain and the first row of stitches simultaneously. This means you don't have to work into a separate chain at all! It's like killing two birds with one stone.
There are several benefits to using a chainless foundation:
There are different types of chainless foundations, each suited for different stitches:
Chainless foundations can be a bit tricky to learn at first. They require more practice and attention to stitch placement than a traditional chain. However, the benefits are well worth the effort.
Which method is best for you? Here's a quick comparison to help you decide:
I encourage you to experiment with both methods to see which one you prefer. Every crocheter has their own unique style and preferences!
Here are some general tips to help you avoid tight chains in the first place:
Tension is one of the biggest causes of tight chains. If you're holding the yarn too tightly, your stitches will naturally be tighter. Practice keeping your grip loose and flowing. Imagine you're holding a delicate butterfly – you want to hold it securely, but not crush it!
Incorrect stitch counts can lead to tension issues. Make sure you're counting your stitches correctly and following the pattern accurately.
Yarn with a lot of texture or fuzz can make it harder to create even stitches. Opt for smooth, easy-to-work-with yarns, especially when you're just starting out.
In summary remember:
A good foundation chain leads to a "square" and even start to your project. This sets the stage for a well-shaped and professional-looking finished item. It's like starting a race on a level playing field – everyone has an equal chance of success.
Sometimes, even using a larger hook isn't enough to completely solve the problem of a tight chain. Here are some possible causes and alternative solutions:
The number of chains you need for your foundation chain can vary depending on the type of stitch you're using. Here's a quick guide:
These extra chains, called turning chains, allow the project to be the right height.
Gauge is a measurement of stitches and rows per inch or centimeter. It's essential to check your gauge before starting a project to ensure that your finished project will be the correct size.
Here's how to check your gauge:
A foundation chain that is too loose can be just as problematic as a tight chain.
Here are some common crochet abbreviations to help beginners understand patterns:
Here are the different yarn weights:
Here are the different fiber types of yarn:
Weaving in ends is an essential step in finishing any crochet project. It secures the yarn tails and prevents them from unraveling.
Here's how to weave in ends:
Weaving in ends makes your project look clean and professional.
Blocking is the process of wetting or steaming a finished crochet project to shape it and even out the stitches.
There are three main ways to block your crochet project:
Blocking helps to improve the drape and appearance of the finished item. Be sure to check the label on the yarn before blocking.
Here's how to take care of your crochet project:
Crochet charts are visual representations of crochet patterns. They use symbols to represent different stitches. Charts can be helpful for understanding complex patterns.
Understanding how to read charts can greatly enhance your crochet skills.
Here are some helpful resources for crocheters:
A good foundation chain is essential for a successful crochet project. By using the techniques I've shared, you can say goodbye to tight chains and hello to even, beautiful beginnings. Experiment with the larger hook method and the chainless foundation to find what works best for you.
Now, grab your hook and yarn, put these tips into practice, and watch your projects transform! Happy Crocheting!
Christa Patel
Christa Patel is the creative mind behind the Secret Yarnery, a trusted resource for crochet enthusiasts worldwide. With years of experience, Christa specializes in designing beginner-friendly yet stunning crochet patterns that inspire creativity and confidence in crafters of all skill levels.
As a passionate crocheter, Christa is known for her clear and approachable teaching style, breaking down complex patterns into simple, easy-to-follow steps. Through her engaging video tutorials, written patterns, and helpful tips, she has cultivated a community where crocheters can connect, learn, and share their work.
Christa’s dedication to making crochet fun and accessible shines in every project she creates, from colorful blankets to intricate borders. Whether you’re a seasoned expert or just picking up a hook for the first time, Christa's guidance will help you craft something beautiful.
For more crochet patterns, tips, and inspiration, visit her website at The Secret Yarnery, or check out her YouTube channel filled with step-by-step tutorials.
Easy crochet tutorial
Both right and left handed video tutorials
Downloadable PDF pattern is written in plain English - no abbreviations to decipher!
Perfect for beginners!


