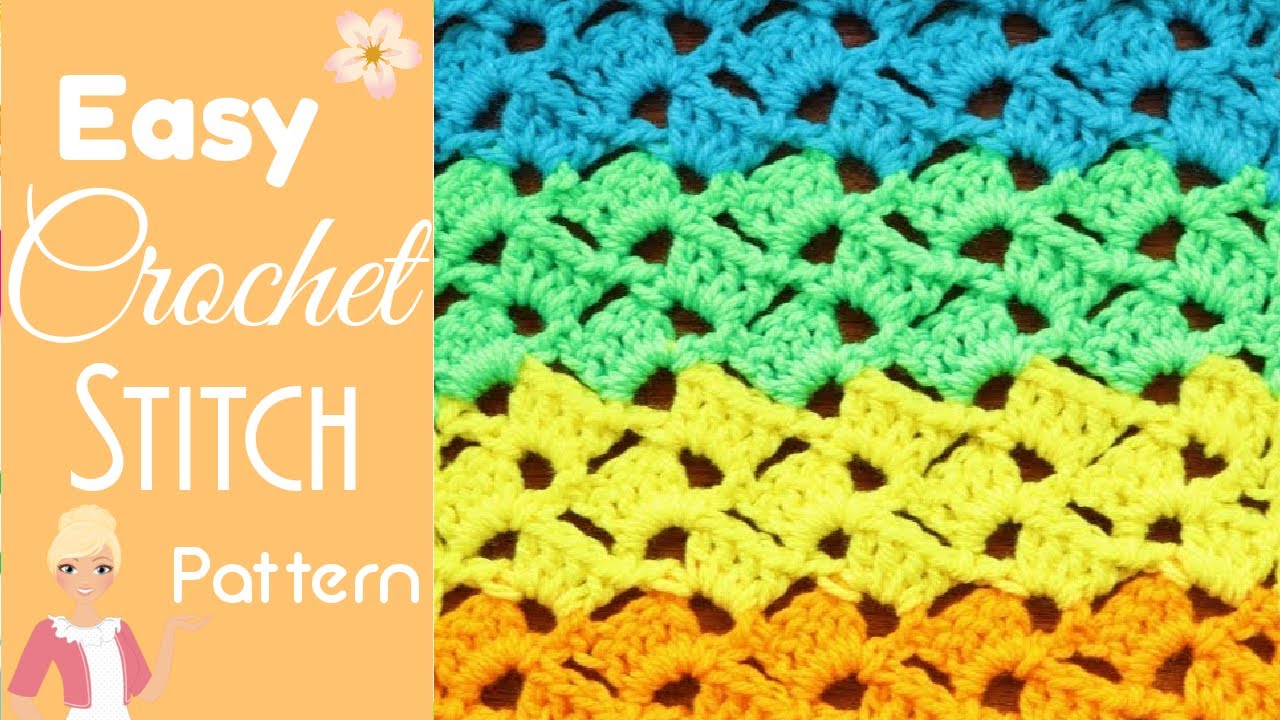
Drunken Granny Stitch Made Easy: Step-By-Step Guide!
Have you ever stumbled upon a crochet stitch that looks incredibly complex but is surprisingly simple to master? Let me introduce you to the Drunken Granny Stitch! It's a fun, textured stitch that’s perfect for beginners and experienced crocheters alike. What makes it so great? It's all about the easy, one-row repeat. You heard that right—just one row to learn, and you can create stunning blankets, scarves, and more.
Table of contents
I'm here to guide you through every step. So, grab your hook and yarn, and let’s get started on this exciting crochet adventure!
Materials You'll Need
Before we dive in, let's gather the necessary materials. Having everything ready will make the process smoother and more enjoyable.
Yarn Selection
For this tutorial, I recommend using a worsted weight acrylic yarn, similar to Kenyan acrylic. It’s a great all-purpose yarn that's easy to work with. However, the beauty of the Drunken Granny Stitch is that it's incredibly versatile. Feel free to use cotton, bamboo, wool, or even scrap yarn. This makes it a fantastic project for using up those odds and ends in your stash! If you're looking for a great place to source your yarn, explore the available options Shop yarn and crochet supplies at the Secret Yarnery.
Crochet Hook
The size of your crochet hook will depend on the yarn you choose. As a general guideline, use a hook size recommended on your yarn label. For worsted weight yarn, a size H-8 (5 mm) hook typically works well. However, don't be afraid to experiment to see what gives you the best tension and fabric drape.
Other Essential Tools
Besides yarn and a hook, you'll also need a few other essential tools:
- Scissors: For cutting the yarn.
- Tapestry Needle: For weaving in those pesky ends.
- Stitch Markers (Optional): These can be helpful for marking the beginning or end of rows, especially when you're still getting the hang of the pattern.
For a complete list of useful tools, be sure to check out my recommendations for Crochet Must Haves. As an Amazon Associate I earn from qualifying purchases.

Getting Started: Slip Knot and Foundation Chain
Now that we have our materials, let's get started with the foundation of our Drunken Granny Stitch project: the slip knot and the foundation chain.
Creating a Slip Knot
To begin, make a slip knot. This is the first loop on your hook that gets everything started. Here's how:
- Make a loop with your yarn, holding the tail and the working yarn.
- Insert your hook into the loop.
- Grab the working yarn with your hook and pull it through the loop.
- Tighten the knot by pulling on the tail, but don't make it too tight. You want it to move easily on your hook.
Foundation Chain
The foundation chain is the base upon which we'll build our stitch pattern. For the Drunken Granny Stitch, the chain needs to be a multiple of five stitches. This is key to ensuring the pattern works correctly.
- Technique for Counting Chains: To create a chain that is a multiple of five, you can count in increments of five until you reach your desired length. For example, you could count to 30, 100, or even 220, depending on the size of your project. If you are unsure what size to make the chain to begin with, use a measuring tape and measure as you go.
- Relaxed Chain Technique: When making your chain, try to keep a relaxed tension. Avoid pulling the yarn too tightly, as this can make the stitches smaller and the fabric stiffer. Aim for a chain that has a bit of give to it, creating bigger stitches.
- Adding Extra Chains: After you've reached your desired multiple of five, chain four additional stitches. This will set up the first row of the pattern. Remember, accuracy is important here, so double-check your count!
If you're new to crochet, take a look at this Step-by-Step Crochet Tutorial for a beginner’s guide to starting crochet today.

Creating Your First Double Crochet Block
With your foundation chain complete, we can start creating the first double crochet block. This block is the building block of the Drunken Granny Stitch, so it's important to get it right.
Identifying the Sixth Stitch
First, you need to identify the sixth stitch from your hook. To do this, count six "V" shapes down the chain, not including the loop on your hook. It's crucial to count accurately, as this will determine the placement of your first block.
We will be working into the bottom loop. Make sure you're going into the bottom part of the loop.
Making the First Double Crochet
Now, let's make our first double crochet stitch. Here's how:
- Wrap the yarn around your hook (this is called "yarn over").
- Insert your hook into the sixth chain from your hook, going into the bottom loop of the "V".
- Yarn over again, and pull the yarn through the chain stitch. You should now have three loops on your hook.
- Yarn over again, and pull the yarn through the first two loops on your hook. You should now have two loops on your hook.
- Yarn over again, and pull the yarn through the remaining two loops on your hook.
Congratulations, you've just made your first double crochet stitch!
Completing the Block
We're not done yet! We need to create three more double crochet stitches in the same spot. Repeat the steps above (yarn over, insert hook, yarn over, pull through, yarn over, pull through two, yarn over, pull through two) three more times, ensuring that all four double crochet stitches are in the same chain stitch.
Chain Three
Now, chain three. This creates the space that we'll work into in the next row.
Final Double Crochet
To complete the block, add one more double crochet into the very same stitch where you made the previous four double crochets. You should now have a cluster of five double crochet stitches with a chain-three space. This completes the building block for the Drunken Granny Stitch.

Building Additional Blocks
With your first block complete, let's move on to building additional blocks along the foundation chain.
Skipping Stitches
To create the characteristic spacing of the Drunken Granny Stitch, we need to skip four stitches along the foundation chain. Count the stitches along the bottom of the "V" shapes, and skip the first four after your initial block.
Creating the Next Block
In the fifth stitch, we'll work another building block. Repeat the process of creating four double crochet stitches, chain three, and one double crochet into that stitch. Remember to get two loops on the hook.
Continuing Along the Chain
Continue repeating the "skip four, create a block" pattern along the entire foundation chain. As you work, you'll begin to see the distinctive texture of the Drunken Granny Stitch emerge.
Handling the End of the Row
As you near the end of the row, you'll likely have a few stitches remaining. Here's how to handle them:
Dealing with Remaining Stitches
At the end of the row, you'll have a few stitches left. Skip two stitches.
Creating the Edge
Work one double crochet into the very last stitch. This creates a nice, clean edge for your project.
End of First Row
Congratulations! You've completed the first row of the Drunken Granny Stitch. Take a moment to admire your work and prepare for the next row.
Repeating the Pattern: Row Two and Beyond
The beauty of the Drunken Granny Stitch lies in its simplicity. Row two and all subsequent rows are a simple repeat of the same pattern.
Starting the Second Row
To begin the second row, chain three and turn your work. Remember, this chain three counts as the first stitch of the row.
Working into the Spaces
Now, we'll build another building block (four double crochets, chain three, one double crochet) into each chain-three space from the previous row. Skip over the stitches between the spaces.
Continuing the Pattern
Continue this process in each chain-three space across the row. You'll quickly find that the row is exactly the same every single row. This makes the Drunken Granny Stitch a relaxing and meditative project.
Speeding Up the Process
As you become more comfortable with the pattern, you'll find that the process speeds up considerably. Working into the chain-three spaces is much faster than working into the foundation chain.
If you’re looking for other Easy Crochet Projects for Beginners I have tutorials to help improve your skills.
Finishing the Row and Creating a Clean Edge
To finish each row and maintain a clean edge, follow these steps:
Working into the Last Space
Remember to leave the last space on the side.
Creating the Final Stitch
Work one double crochet into the top of the chain three from the previous row. To find this stitch, look for the "V" shape at the top of the chain.
Turning and Repeating
The edge of your work is now complete, and you're ready to turn and repeat the pattern for the next row. Repeat the row to create your fabric.

Tips for Achieving a Consistent Edge
A consistent edge can make a big difference in the overall look of your finished project. Here are a few tips to help you achieve one:
Maintaining Tension
If you tend to crochet tightly, try using a larger hook for the foundation chain. This will create a looser base and prevent the edges from curling.
Alternative Techniques
There are other techniques you can use to achieve a more consistent edge, such as using a different stitch for the first and last stitches of each row. Feel free to experiment and find what works best for you.
Changing Colors
One of the fun things about the Drunken Granny Stitch is that it lends itself well to color changes. Here's how to change colors seamlessly:
When to Change Colors
I recommend changing colors at the end of the row, after finishing the last double crochet.
Securing the Yarn
To secure the yarn, chain one, cut the yarn, and pull it through to create a knot. Snug it down to secure it.
Weaving in the Ends
Weaving in the ends can be a bit tedious, but it's important for a clean finish. Weave the yarn into the back loops.
Joining the New Yarn
To join the new yarn, push your hook into the top of the double crochet, attach a loop of yarn on the hook, bring it through, and slip stitch to join. Drop the tail, because you will have to sew it in.
Continuing with the New Color
Chain two, if you count the join as your first chain. Create four double crochets, a chain of three, and another double crochet.
FAQs
What is the Drunken Granny Stitch
The Drunken Granny Stitch is a textured crochet stitch made using groups of double crochets and chain spaces. It creates a wavy, eye-catching pattern but uses only a simple, one-row repeat.
What type of yarn works best for this stitch
Worsted weight acrylic yarn is recommended, but you can use nearly any yarn type, including cotton, wool, or blends. Adjust the hook size to fit your yarn.
How do I keep my edges straight
Make sure to count your stitches and work your final double crochet into the top of the turning chain at the end of each row. Keeping even tension and using stitch markers can also help.
How do I fix a mistake in my stitch count
If you realize a mistake early, undo (frog) back to the problem spot. For skipped stitches or extra blocks, adjust in the next row or use a crochet hook to add or remove stitches as needed.
Can I change colors in this pattern
Yes. Change colors at the end of any row for clear color blocks, or use variegated yarn for a blended look. Secure and weave in the ends for a neat finish.
Project Ideas for the Drunken Granny Stitch
Now that you've mastered the Drunken Granny Stitch, let's explore some project ideas to put your new skills to use!
Scarves
The Drunken Granny Stitch is perfect for scarves due to its lovely drape and texture. The stitch creates a fabric that is both warm and breathable, making it ideal for cooler weather. Experiment with different yarn weights for varied results – a lighter yarn will create a more delicate scarf, while a heavier yarn will result in a chunkier, cozier accessor

Blankets
This stitch is also ideal for baby blankets or larger throws. The repetitive nature of the pattern makes it a relaxing project to work on, and the textured fabric is soft and comforting. For a baby blanket, consider using pastel colors or a self-striping yarn for added visual interest. For a larger throw, play around with color combinations and stripe patterns to create a unique and eye-catching piece.

Washcloths and Dishcloths
Using cotton yarn for absorbency, the stitch’s scrubby texture, makes the Drunken Granny Stitch a great choice for creating washcloths and dishcloths. The texture of the stitch provides a gentle scrubbing action, making it effective for cleaning. Plus, cotton yarn is durable and easy to care for, making these items practical for everyday use.

Sweaters and Cardigans
The Drunken Granny Stitch can also be used to create stylish sweaters and cardigans. When making garments, be mindful of sizing and shaping considerations. It's essential to take accurate measurements and follow a pattern that is specifically designed for this stitch. I recommend blocking for a polished finish.

Other Creative Ideas
The possibilities don't end there! The Drunken Granny Stitch can also be used to create pillows, bags, and more. Don't be afraid to experiment with different yarns, colors, and embellishments to create unique and personalized projects.
Tips for Customizing Your Project
Want to add your own personal touch to your Drunken Granny Stitch project? Here are a few tips for customizing it:
Color Combinations
Color combinations can make or break a project. If you're unsure where to start, try using a color wheel for inspiration. Choose complementary colors (those opposite each other on the wheel) for a bold, vibrant look, or go for analogous colors (those next to each other) for a more harmonious feel.
Yarn Choices
The type of yarn you choose can significantly affect the final result. Experiment with different fibers to see how they alter the drape, texture, and overall look of the stitch. For example, wool will create a warm, cozy fabric, while cotton will be more lightweight and breathable.
Border Options
Adding a border can give your project a polished, finished look. For a simple border, try a single crochet stitch. For something more elaborate, consider a picot or shell border.
Common Mistakes to Avoid
Even with a simple stitch like the Drunken Granny Stitch, there are a few common mistakes to watch out for:
Tension Issues
Inconsistent tension can lead to uneven fabric. Try to maintain even tension throughout your project by practicing to maintain even tension.
Counting Errors
Miscounting stitches can disrupt the pattern. Use stitch markers to keep track.
Forgetting the Chain-3 Space
Missing this space will cause the pattern to collapse. Double-check each row to ensure all spaces are worked.
Advanced Techniques to Try
Once you're comfortable with the basic Drunken Granny Stitch, try incorporating these advanced techniques:
Working with Different Yarn Weights
Experiment with DK, bulky, or super bulky yarns for different textures. Adjust hook size accordingly.
Incorporating Beads
Add beads to the stitches for a decorative touch. String beads onto the yarn before starting the project.
Adding Fringe or Tassels
Create fringe or tassels to embellish edges. Cut yarn to the desired length and attach it securely.
Trying Different Edging Techniques
Experiment with scallops, picots, or reverse single crochet.
The Secret Yarnery Community and Resources
I invite you to subscribe to The Secret Yarnery’s YouTube channel. I also invite you to join the newsletter for updates and exclusive content.
Conclusion
The Drunken Granny Stitch is a delightful and versatile stitch that’s perfect for crocheters of all skill levels. Its simple, one-row repeat makes it easy to memorize, while its textured fabric adds a touch of elegance to any project. Whether you’re making a cozy blanket, a stylish scarf, or a set of charming washcloths, the Drunken Granny Stitch is sure to become a favorite in your crochet repertoire. So, grab your hook and yarn, and start creating something beautiful today!
Christa Patel is the creative mind behind the Secret Yarnery, a trusted resource for crochet enthusiasts worldwide. With years of experience, Christa specializes in designing beginner-friendly yet stunning crochet patterns that inspire creativity and confidence in crafters of all skill levels.
As a passionate crocheter, Christa is known for her clear and approachable teaching style, breaking down complex patterns into simple, easy-to-follow steps. Through her engaging video tutorials, written patterns, and helpful tips, she has cultivated a community where crocheters can connect, learn, and share their work.
Christa’s dedication to making crochet fun and accessible shines in every project she creates, from colorful blankets to intricate borders. Whether you’re a seasoned expert or just picking up a hook for the first time, Christa's guidance will help you craft something beautiful.
For more crochet patterns, tips, and inspiration, visit her website at The Secret Yarnery, or check out her YouTube channel filled with step-by-step tutorials.
About the Author
With a passion for crafting easy, beginner-friendly tutorials and patterns, Christa inspires crafters of all skill levels to unleash their creativity worldwide. She encourages yarn lovers to connect, create, and crochet a world filled with beautiful handmade treasures!
Drunken Granny Stitch Made Easy: Step-By-Step Guide!