Diamond Acorn Easy Crochet Bed Runner - Quick & Simple
If you're looking for a relaxing, quick, and beginner-friendly crochet project, the Diamond Acorn Easy Crochet Bed Runner is for you! It's perfect for adding a handmade touch of elegance to your room, and the pattern couldn't be more manageable. You’ll find it a delight to work on, even if you’re just starting out or simply looking for an easy and stress-free project.
This DIY crochet bed runner is available in both right-handed and left-handed versions, so no one is left out. You'll also appreciate that it’s accessible to non-native English speakers, with language settings available in different dialects. Plus, it’s fast to make because you aren’t working into every stitch. Instead, you're only working into the "acorns," giving it a unique texture while cutting down on the overall time. This project will move along quicker than you think and is extremely satisfying to see come together.
Check out the full tutorial video below:
Table of contents
Materials Needed
Before getting started with your easy crochet bed runner, let's review what you'll need for this project:
Yarn Specifications
I used Magic Worsted from Ice Yarns for most of the runner, and Softly Baby for the border. Magic Worsted yarn is an acrylic, worsted weight yarn with a label size of 4. You’ll use about 800 grams of the Magic Worsted yarn, which is equivalent to 1,480 meters. However, the great thing is, you can opt to use any worsted yarn you have on hand! No need to run out for specific yarn (unless you want to, of course) — just use what you’ve already got in your stash.

Crochet Hook Size
I used a 7 mm crochet hook, which pairs perfectly with the worsted yarn to create a soft, cozy texture. It’s a bigger hook size, so you’ll get that airy, light feel, and the project works up a lot quicker.
Additional Tools
Aside from yarn and crochet hooks, keep these tools handy:
- Needle (for weaving in ends)
- 31 stitch markers (to help you keep track of your stitches)
- Scissors (duh, you'll need these!)
Project Size and Customization
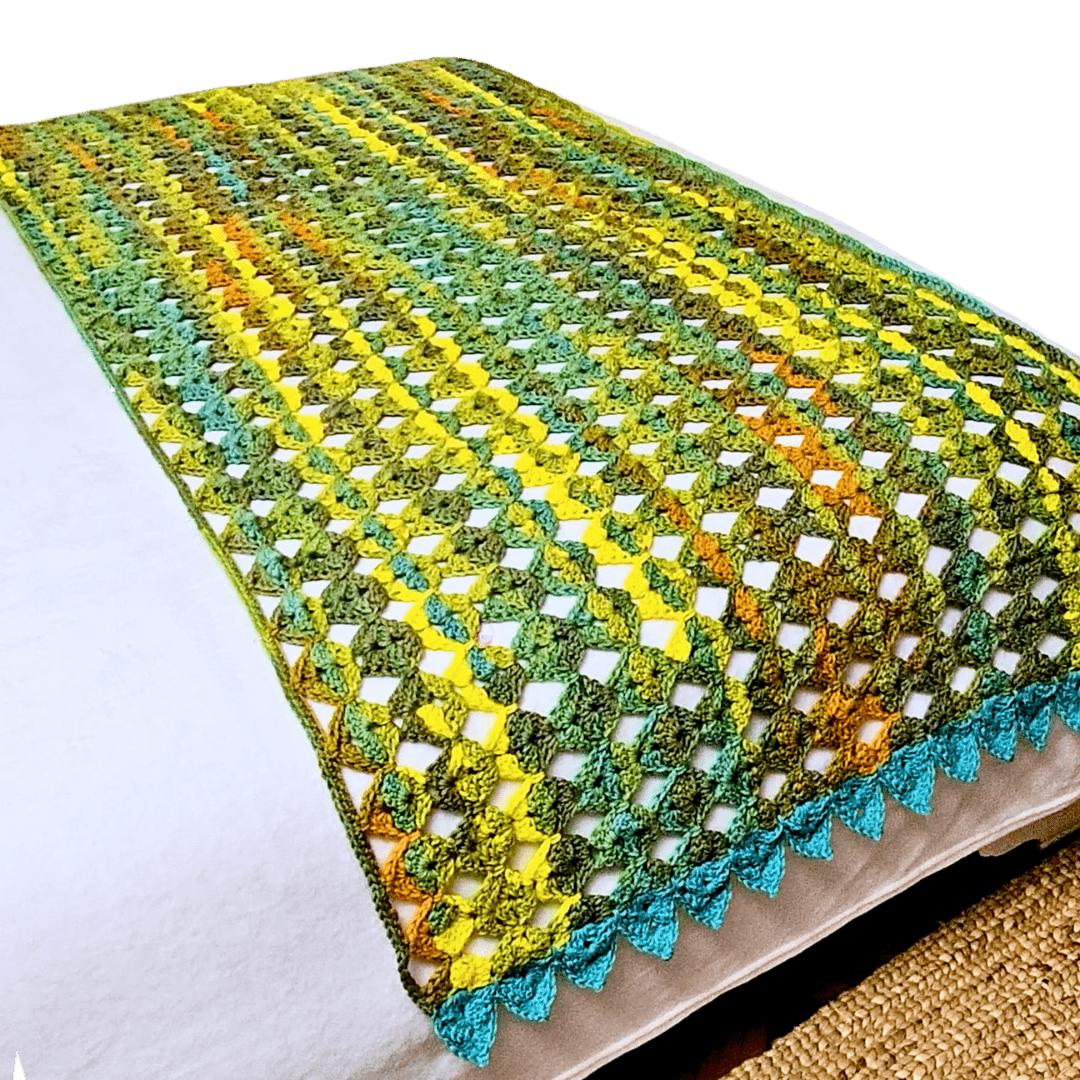
The finished size of my bed runner is 6 feet wide by 3 feet tall — perfect for layering at the end of your bed. But if you need a different size, don't worry! You can easily adjust the size by increasing or decreasing your starting chain.
To make this project suit your bed, just ensure you have a multiple of 7+3 stitches. This flexibility means you can create a bed runner for any bed size or even make a larger sized blanket.

Getting Started with the Pattern
To start, you'll make a slip knot, leaving a long enough tail to sew in with a needle later on. The pattern uses multiples of 7, so once you get the hang of that core number, it becomes easy to remember as you’re chaining along.
Chainless Foundation Technique
One of my favorite tricks for speeding up crochet projects and keeping the edge nice and flexible is the chainless foundation single crochet. This technique allows you to create the chain and the single crochet simultaneously. If you haven’t tried it yet, this is a great project to give it a go! Watch the demo on chainless foundation stitches here.
Of course, if chainless foundations aren’t your thing, you can use a traditional chain and single crochet back into it. Either way, you’ll get a nice smooth starting edge!

Working the Initial Rows
Row 1: The Chainless Foundation
You’ll start with a chain two and work right into the first chain you made. This is the foundation row that sets the stage, so take your time and get comfortable with the rhythm before proceeding.
Row 2: Building the Hills
Once your foundation row is ready, Row 2 begins with a chain three. In this row, you’ll be skipping six stitches to form hills with double crochets, creating a pretty lofty and dimensional texture. Basically, you’re making groups of three double crochets with a chain two in between.
Row 3: Fast Forward
Building off of Row 2, Row 3 keeps the same momentum. The brilliant part is that after Row 2, there’s no need to count so much. Just hop from hilltop to hilltop, working your sets of three double crochets in the spaces between.

Creating the Diamond Acorn Pattern
The magic really starts to come together during these rows. With Acorn rows, you’ll be using a two-row repeat that brings the Diamond Acorn pattern to life.
Pinching Rows Together
When you come across two strands of stitches lying parallel, you’ll be “pinching” them together. This means you’ll be working into two strands at once — creating these lovely horizontal acorns by joining the rows with a single crochet. As you continue this pattern, the acorn shapes appear between the vertical lines of the diamonds.

The Relaxation Factor
Everything about these two rows is designed to be both visually satisfying and meditative to work on. You’ll find the repeated motions almost therapeutic. The project grows fast, making it ideal for zoning out in front of the TV or working on during long car rides.
Continuing the Pattern
With the two-row repeat, you’ll start building up the acorns and diamonds — and soon, you’ll have a full bed runner in no time. Tracking your rows gets easier because of the repetition, and you can count on the stitch markers to show you where you're at.
Finalizing the Bed Runner
How do you know when to stop? It’s up to you and how much yarn you have, or how large you want your bed runner to be. But make sure to end after finishing a full Acorn row. Doing this maintains symmetry in the design, ensuring both ends of the bed runner look the same.

Adding the Border
The border is where the runner really starts to shine! For this part, I used Softly Baby yarn, which is a little lighter, giving the edging a delicate look. Here’s how you add that polished touch:
Getting Started
Start by making a slip stitch in the first stitch of the edge. You’ll then begin forming shells around the outer edge, using treble and double crochets to create that classic scalloped look.

Border Stitches Breakdown
For each shell, you’ll alternate between treble crochets and double crochets, chaining in between. This creates a frilly but easy-to-work border that perfectly complements the diamond acorn pattern. You’ll also be Pico stitching for added texture.
Finally, finish up with some single crochets to get a neat finish, and voila! Your runner will have crisp, clean edges.
Customizing the Runner
Want to switch things up? You can easily customize this bed runner based on the yarn colors available or the size of your bed.
- Different Beds: Whether you’re making a cozy runner for a small bed or something for a king-size bed, just tweak the starting chain length accordingly.
- Color Variations: Maybe try alternating colors for the diamonds and acorns to create a wild and playful look!
The options are endless, and the versatility of this pattern makes it friendly for experimentation.
Left handed?
Troubleshooting Tips
Here are some troubleshooting tips I’ve learned along the way:
- Edges not straight? Remember that the edges form by starting and finishing the same way on every row, so if things look a bit wonky, double-check that consistency.
- Lost your place in the pattern? To keep track of your rows more easily, just be sure to use your stitch markers consistently!
Need more help with your project? Check out other beginner-friendly crochet patterns and tips.
Project Care Instructions
It’s easy to care for your acrylic bed runner. You can throw it in the washer on a gentle cycle, though I’d recommend using a mesh bag to keep those lovely pico-edged borders from getting snagged. Let it air dry flat so it retains its shape.
Acrylic yarn is super low-maintenance, so your runner will stand up to regular use without fuss!

Encouragement and Motivation
For beginners, this is not only an easy crochet bed runner, but an incredibly rewarding project. You can truly take pride in seeing the pattern unfold before your eyes! Plus, the rhythmic flow of stitching makes for a wonderfully meditative experience.
So, whether you're a complete novice or just looking for a calming project, I'd highly recommend giving the Diamond Acorn Bed Runner a try.
Monitoring Progress and Time Management
With large projects, it can feel like they take ages to complete. But with the use of stitch markers, you can break it down into manageable sections. Estimate your time based on how much you've completed, and simply enjoy the process.
Bigger doesn’t always mean harder! Before you know it, you’ll have a finished piece that transforms your bedroom.
Explore More Variations on this Pattern
Looking to modify this pattern further? Try these:
- Add stripes by changing colors every row or every few rows.
- Include beads for a little sparkle and weight.
- Expand the pattern into a throw blanket by increasing the number of rows.
If you're up to explore more beginner-friendly crochet patterns, check out these easy options.
Sharing and Engaging with the Community
I LOVE seeing everyone’s creations from The Secret Yarnery! If you finish your Diamond Acorn Bed Runner, be sure to share photos with our community. There’s a vibrant crochet group out there just waiting to cheer you on! Use the hashtag #SecretYarnery on social platforms.
Promote Engagement and Future Projects
Don't forget to subscribe so you don’t miss out on more easy crochet ideas. I’ve got tons of neat projects lined up and ready to share, from blankets to home décor you’ll want to crochet next.
Join us again, and always stay hooked!
FAQs
What level of crochet skills do I need to make this bed runner?
This bed runner is designed to be beginner-friendly. You just need basic crochet skills, such as making slip knots, chains, single and double crochets.
Can I use different yarn types for this project?
Absolutely! While Magic Worsted from Ice Yarns and Softly Baby are recommended, any worsted weight yarn will work. Just ensure to check the yarn's weight and follow the gauge for consistency.
How do I adjust the size of the bed runner?
To customize the size, adjust the starting chain to a multiple of 7+3. You can make the project wider or narrower as needed for your specific bed size.
How do I prevent my edges from curling?
Ensure consistent tension throughout each row and use stitch markers to help maintain straight edges. Blocking your finished runner can also help in making the edges lie flat.
Can I add my personal style to this pattern?
Definitely! Feel free to play with color variations, add stripes, or even incorporate beads for extra flair. The pattern is very flexible for creative modifications.
What should I do if I lose track of my rows?
Use stitch markers to easily track your progress, and refer back to the two-row repeat pattern. Consistent use of markers can prevent confusion.
![]()
Christa Patel is the creative mind behind the Secret Yarnery, a trusted resource for crochet enthusiasts worldwide. With years of experience, Christa specializes in designing beginner-friendly yet stunning crochet patterns that inspire creativity and confidence in crafters of all skill levels.
As a passionate crocheter, Christa is known for her clear and approachable teaching style, breaking down complex patterns into simple, easy-to-follow steps. Through her engaging video tutorials, written patterns, and helpful tips, she has cultivated a community where crocheters can connect, learn, and share their work.
Christa’s dedication to making crochet fun and accessible shines in every project she creates, from colorful blankets to intricate borders. Whether you’re a seasoned expert or just picking up a hook for the first time, Christa's guidance will help you craft something beautiful.
For more crochet patterns, tips, and inspiration, visit her website at The Secret Yarnery, or check out her YouTube channel filled with step-by-step tutorials.
About the Author
With a passion for crafting easy, beginner-friendly tutorials and patterns, Christa inspires crafters of all skill levels to unleash their creativity worldwide. She encourages yarn lovers to connect, create, and crochet a world filled with beautiful handmade treasures!
Diamond Acorn Crochet Bed Runner – Elegant Textured Pattern