Master the Double Flat Braid Join for Granny Square Crochet!
Have you ever gazed upon a beautifully crocheted granny square blanket and wondered how the squares were joined together so seamlessly? The secret often lies in the joining technique, and today, I'm thrilled to share my ultimate guide to mastering the Double Flat Braid Join! I'm Christa from The Secret Yarnery, and I'm passionate about helping crocheters of all levels create stunning projects.
This blog post will walk you through each step of the process, transforming your granny square projects into heirloom-worthy creations. This particular join creates a lacy, intricate look, elevating your crochet work with a touch of elegance. Get ready to take your granny square game to the next level. Don't forget to subscribe to The Secret Yarnery for more crochet tips and tricks!
Table of contents
Why Choose the Double Flat Braid Join?
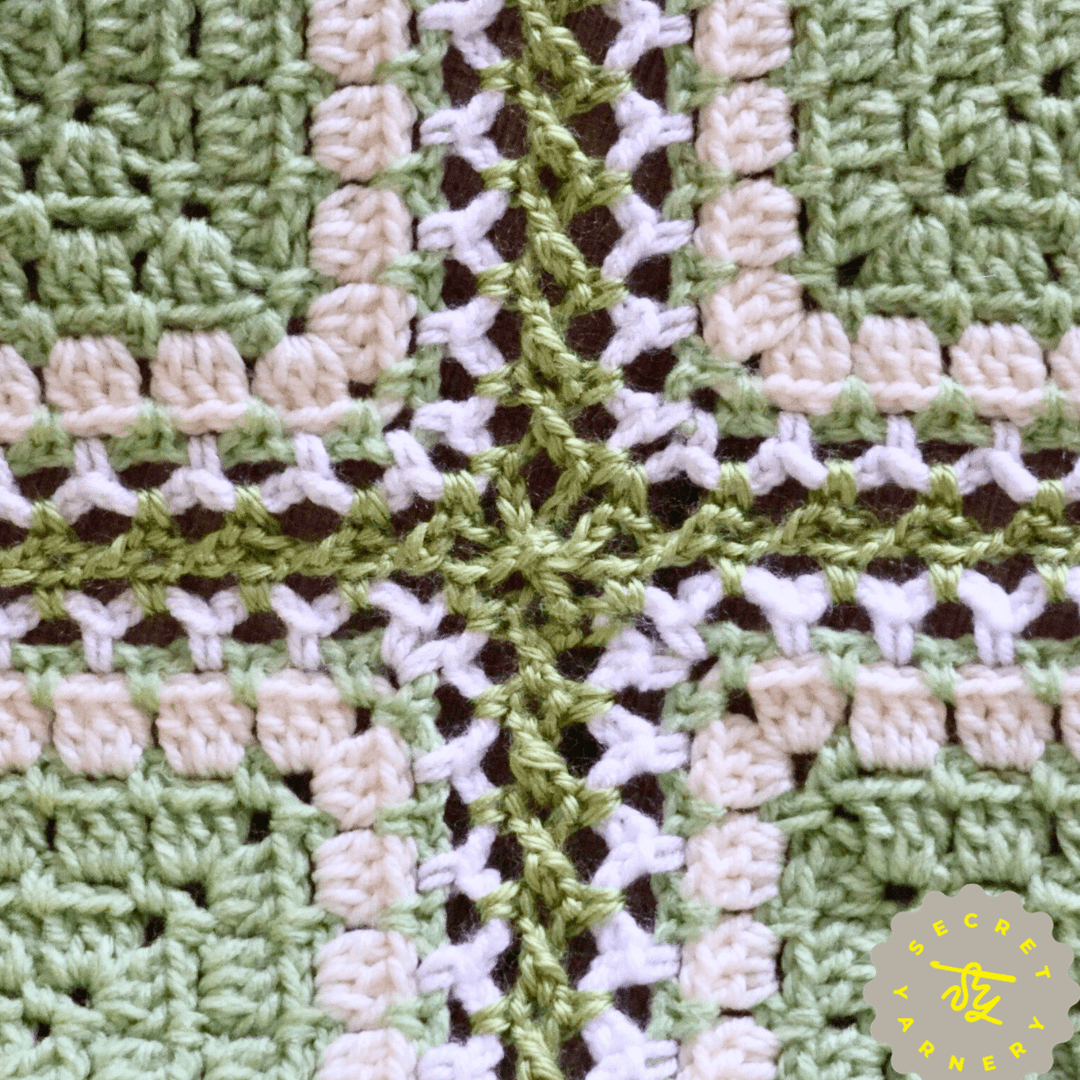
There are many ways to join granny squares, but the Double Flat Braid Join offers some distinct advantages. Unlike simpler joining methods that can create bulky seams, this technique results in a flat, almost invisible join that adds a unique touch to any granny square project.
The Double Flat Braid Join creates a beautiful, lacy effect that enhances the overall design. It adds approximately 2 inches (5 centimeters) between your granny squares, which can be a great way to increase the size of your finished project. I also like to edge the project using the same join, which creates a cohesive and professional look. It's amazing how this seemingly small detail can make such a big difference in the finished piece!

Gearing Up: What You'll Need
Before we get started, let's gather our materials. Here's what you'll need for the Double Flat Braid Join:
-
Granny squares (any type will work!).
-
Yarn (matching or contrasting colors – it's up to you!).
-
Crochet hook (the same size you used for your granny squares).
-
Yarn needle (for weaving in those pesky ends).
-
Scissors.
I always recommend using the same yarn and hook that you used for your granny squares to ensure consistent tension and a uniform look. Feel free to check out my recommended crochet must-haves on Amazon for some of my favorite tools!
Granny Square Basics: A Quick Refresher
For those new to crochet, a granny square is a classic motif made by crocheting in rounds from the center out. They are incredibly versatile and can be used to create blankets, scarves, bags, and so much more.
Want to create some gorgeous flower granny squares? I have a playlist for that! Check out these 12 Gorgeous Flowers granny squares for inspiration. But remember, the Double Flat Braid Join works with any type of granny square, so feel free to use your favorites.
Preparing Your Squares: The First Round of Loops
Alright, let's get started! The first step in the Double Flat Braid Join is to add a round of loops to each granny square. This creates the foundation for our beautiful braided join.
Here's how:
-
Find a fresh corner on your granny square – one where you haven't attached yarn yet.
-
Attach your yarn with a slip stitch, leaving a long tail for weaving in later.
-
Chain two.
-
Work one single crochet, chain two into each space along all sides.
-
In each corner, work one single crochet, chain three, and one single crochet.
-
Slip stitch to join the round.
-
Chain one and cut the yarn, leaving a long tail.

Adding the Second Round of Loops: A Pop of Color
Now, let's add a second round of loops using a contrasting color. This round adds depth and dimension to the braid, creating a visually stunning effect.
Here's how:
-
Attach your yarn (a contrasting color is recommended) to any corner space.
-
Chain four.
-
Work one single crochet, chain four into each space along all sides.
-
In each corner, work one single crochet, chain four, and one single crochet.
-
Slip stitch to join the round.
-
Chain one and cut the yarn, leaving a long tail.
If you want that leg looking perfect you can sew in this first tail just over the top of those two legs to bring it to the back side. From the back you can just sew in that tail.
Weaving in Those Pesky Ends: A Tidy Finish
I know, I know… weaving in ends is everyone's least favorite part of crochet. But trust me, it's essential for a professional finish! Grab your yarn needle and weave in all those tails, making sure to secure them well. A blunt-tipped needle is your best friend here, as it will help you avoid splitting the yarn. Remember, all tails should be sewn in before you start joining your squares.
Planning Your Project: Layout is Key
Before you start joining, take some time to plan the layout of your granny squares. Lay them out on a flat surface and arrange them until you're happy with the overall design. This will give you a good idea of how the finished project will look.
Once you're satisfied with the layout, stack the squares in rows to keep them organized during the joining process. This simple step will save you a lot of headaches later on!
Joining the First Block: Edging All Around
Okay, it's time to start joining! We'll begin by edging the first block on all four sides. This prepares it for joining with the other squares.
Here's how:
-
Attach your joining color yarn to any corner space.
-
Chain four.
-
Work one single crochet, chain four into each loop along all sides.
-
In each corner, work one single crochet, chain six, and one single crochet.
-
Slip stitch to join the round.
-
Chain one and cut the yarn, leaving a long tail.
Notice that the corner chain is different in this round (chain six instead of chain four). That's because we're creating a new corner that will be used for joining.

Joining Subsequent Blocks: The First Side
Now, let's join the second block to the first, focusing on one side only. This is where the magic of the Double Flat Braid Join really starts to happen!
Here's how:
-
Work the loops on three sides of the second block as in the previous step (single crochet, chain 4).
-
When you get to the last corner, single crochet, chain three.
-
Hold the first block above the second, aligning the corners. Remember: always be joining above!
-
Pull up a loop on the second block, remove the hook.
-
Insert the hook into the corner loop of the first block.
-
Place the loop from the second block back on the hook and pull through.
-
Chain three to complete the corner.
-
Chain two.
-
Pull up a loop, remove the hook.
-
Insert the hook into the next loop of the first block.
-
Place the loop from the second block back on the hook and pull through.
-
Chain two.
-
Repeat steps 8-12 along the entire side.
-
In the final corner, single crochet, chain three.
-
Pull up a loop, remove the hook.
-
Insert the hook into the corner loop of the first block.
-
Place the loop from the second block back on the hook and pull through.
-
Chain three.
-
Slip stitch to join into the legs of the first stitch made on the block.
-
Chain one and cut the yarn, leaving a long tail.
Joining the Top Row: Starting Kitty Corner
When joining blocks in the top row, we use a slightly different starting method to ensure a seamless join. Instead of joining directly to the adjacent block, we'll join "kitty corner" – that is, across from where we're joining.
Here's how:
- Work the loops on three sides of the block as before (single crochet, chain 4).
-
When you get to the last corner, single crochet, chain three.
-
Pull up a loop, remove the hook.
-
Instead of joining directly to the adjacent block, join to the block kitty corner (across from where you're joining).
-
Insert hook into the corner loop of the kitty corner block, place the loop back on the hook, and pull through.
-
Chain three.
-
Single crochet into that same corner space.
-
Chain two.
-
Pull up a loop, remove the hook.
-
Insert the hook into the next loop of the block you will join to.
-
Place the loop from the second block back on the hook and pull through.
-
Chain two.
-
Repeat steps 9-12 along the entire side.
-
When you get to the corner single crochet, chain three.
-
Pull up a loop, remove the hook.
-
Insert the hook into the loop of the first block.
-
Place the loop from the second block back on the hook and pull through.
-
Chain three.
-
Slip stitch to join into the legs of the first stitch made on the block.
-
Chain one and cut the yarn, leaving a long tail.

Joining Blocks in the Middle: Two Sides at Once
Now, let's tackle the remaining blocks, which involve joining two sides simultaneously. Don't worry, it's not as complicated as it sounds!
Here's how:
-
Work the loops on two sides of the block as before (single crochet, chain 4).
-
When you get to the last corner, single crochet, chain three.
-
Pull up a loop, remove the hook.
-
Join kitty corner to the opposite block, skip the first space.
-
Insert hook into the corner loop of the kitty corner block, place the loop back on the hook, and pull through.
-
Chain three.
-
Single crochet into that same corner space.
-
Chain two.
-
Pull up a loop, remove the hook.
-
Insert the hook into the next loop of the block you will join to.
-
Place the loop from the second block back on the hook and pull through.
-
Chain two.
-
Repeat steps 9-12 along the entire side.
-
When you get to the corner single crochet, chain three.
-
Pull up a loop, remove the hook.
-
Insert the hook into the loop of the opposite block.
-
Place the loop from the second block back on the hook and pull through.
-
Chain three.
-
Rotate your work.
-
Chain two.
-
Pull up a loop, remove the hook.
-
Insert the hook into the next loop of the block you will join to.
-
Place the loop from the second block back on the hook and pull through.
-
Chain two.
-
Repeat steps 21-24 along the entire side.
-
Chain three.
-
Slip stitch to join into the legs of the first stitch made on the block.
-
Chain one and cut the yarn, leaving a long tail.
It’s common for blocks to not line up perfectly during the joining. I promise everything will even out as you continue joining!
Joining the Last Block: Getting to the End
Now, you've made it to the last block! Remind yourself to follow the same steps as "Joining Blocks in the Middle".
Edging: Round One
Once all your blocks are joined, it's time to create a finished border around the entire project. We'll start with the first edging round.
Here's how:
-
Attach your joining color yarn to any loop on the outside edge (avoid joining on joins).
-
Chain three (counts as chain four).
-
Work one single crochet, chain four into each loop along the edge.
-
At joins, work one single crochet into each space (no chain in between).
-
In each corner, work one single crochet, chain six, and one single crochet.
-
Slip stitch to join the round.
-
Chain one and cut the yarn, leaving a long tail.
Before moving on, double-check your chain count at the joins to avoid any errors!
Edging: Round Two
Now for the second edging round!
Here's how:
-
Attach your next color yarn to any loop on the outside edge (avoid joining on joins).
-
Chain three (counts as chain four).
-
Work one single crochet, chain four into each loop along the edge.
-
In each corner, work one single crochet, chain four, and one single crochet.
-
Slip stitch to join the round.
-
Chain one and cut the yarn, leaving a long tail.

Edging: Round Three
Time to create the third edging round!
Here's how:
-
Attach your yarn to any loop on the outside edge.
-
Chain two (counts as single crochet and chain two).
-
Work one single crochet, chain two into each loop along the edge.
-
In each corner, work one single crochet, chain three, and one single crochet.
-
Slip stitch to join the round.
-
Chain one and cut the yarn, leaving a long tail.
This round helps snug up the loops and even out the edge, creating a nice, cohesive border.
Edging: Round Four
Here's how to work the fourth edging round:
-
Work two single crochets into each space.
-
Work one single crochet into the chain on the last round.
-
In each corner, work two single crochets, chain one, and two single crochets.
-
Join with an invisible join.
Mastering the Invisible Join
Want to achieve a truly seamless finish? An invisible join is the way to go!
Here's how:
-
Cut the yarn, leaving a tail.
-
Pull the loop through.
-
Thread the tail onto a yarn needle.
-
Insert the needle under the two strands of the first stitch of the round.
-
Insert the needle back down into the base of the last stitch.
-
Pull the yarn through, adjusting the tension to match the surrounding stitches.

Troubleshooting: Common Mistakes and How to Fix Them
Even the most experienced crocheters make mistakes from time to time. Here are a few common issues you might encounter while using the Double Flat Braid Join, and how to fix them:
-
Uneven tension: Pay attention to your tension and try to keep it consistent throughout the project.
-
Blocks not lining up: Don't panic! This is normal and will usually even out with blocking.
-
Too-tight or too-loose joins: Adjust the tension of your joining stitches to create a balanced look.
-
Forgetting the chain at corners: Double-check the corner instructions and make sure you're following them carefully.
The timestamps in the video description can help you navigate any tricky spots in the process!
-
Chain Spaces: 1:19
-
First Loops 3:29
-
Frist Row: 7:19
-
Joining on One Side: 16:26
-
Joining on Two Sides: 19:25
-
Edging Round One: 26:40
-
Edging Round Two: 31:01
-
Edging Round 3 & 4: 34:03
Inspiration: Project Ideas Using the Double Flat Braid Join
The Double Flat Braid Join is perfect for a wide variety of projects! Here are a few ideas to get you inspired:
-
Baby blankets
-
Afghan throws
-
Pillows
-
Scarves
-
Garments (cardigans, vests)
Level Up Your Crochet: Advanced Techniques
Once you've mastered the Double Flat Braid Join, why not explore some advanced techniques? You could try joining with different colors for a unique effect, incorporating beads or other embellishments into the join, or even designing your own granny square patterns.
Community Showcase: Share Your Projects!
I'd love to see your finished projects using the Double Flat Braid Join! Share them on social media using the hashtag #SecretYarneryBraidJoin. I might even feature some of them on my social media channels!
Stay Connected with The Secret Yarnery
Want more crochet tutorials and inspiration? Be sure to subscribe to The Secret Yarnery's YouTube channel! You can also find me here:
-
Website: https://secretyarnery.com
-
Newsletter: https://bit.ly/3ssa0tn
-
Behind the Scenes: https://bit.ly/3V104kL
-
Left-Handed Tutorials: https://bit.ly/3UWNmoJ
-
Buy Me a Coffee: https://ko-fi.com/secretyarnery
-
Join the group: https://bit.ly/44UC1bH
-
Written patterns: https://secretyarnery.com
With a little practice, you'll be joining granny squares like a pro in no time! The Double Flat Braid Join is a fantastic technique that adds a touch of elegance and sophistication to any crochet project. So grab your hook, yarn, and granny squares, and get ready to create something beautiful!
Left Handed?
FAQs
What is the Double Flat Braid Join?
The Double Flat Braid Join is a crochet method to connect granny squares with a lacy, decorative seam that adds space and strength between squares.
Why should I use the Double Flat Braid Join instead of other joining methods?
This joining method avoids bulky seams and gives your project a unique and professional finish. It also adds about 2 inches (5 cm) of space between granny squares, enhancing the overall design.
Do I need to use specific granny squares for this technique?
No, the method works with any type of granny square. You can use your favorite designs or experiment with different patterns.
What yarn works best for the Double Flat Braid Join?
Use the same yarn type and weight as the granny squares to maintain tension and consistency. You can use a matching or contrasting color depending on the desired look.
How many rows of edging do I need to finish the project?
Four rounds of edging are recommended for a polished look. Each round adds definition and structure to your project’s border.
Can I use this join for garments or smaller projects?
Absolutely! The Double Flat Braid Join works perfectly for garments, scarves, pillows, and even decorative projects like table runners.
![]()
Christa Patel is a passionate crochet designer, instructor, and the creative force behind The Secret Yarnery. With years of experience, she has helped countless crochet enthusiasts of all skill levels unlock their potential. Known for her clear, step-by-step tutorials and innovative patterns, Christa specializes in making advanced techniques approachable for everyone.
Her love for crochet began as a hobby but quickly transformed into a thriving global community. Through her blog, YouTube channel, and workshops, Christa empowers crocheters to turn their yarn and hooks into heirloom-worthy creations. Whether you’re crafting your first granny square or experimenting with advanced join techniques like the Double Flat Braid Join, Christa is here to guide you every step of the way.
When she’s not crocheting, you’ll find her exploring local markets for new yarn finds, sharing her crochet journey online, or inspiring her audience with unique project ideas. Connect with Christa and become a part of her vibrant crochet family!
About the Author
With a passion for crafting easy, beginner-friendly tutorials and patterns, Christa inspires crafters of all skill levels to unleash their creativity worldwide. She encourages yarn lovers to connect, create, and crochet a world filled with beautiful handmade treasures!
Master the Double Flat Braid Join for Granny Square Crochet!