Learn to Crochet an Easy Gift Card Holder Stocking – Perfect Holiday!
Stressed about last-minute Christmas gifts? Want something personal and unique? Learn how to crochet an adorable gift card holder stocking in minutes! This project is quick, easy, stash-busting, and beginner-friendly. I'm Christa from the Secret Yarnery, and I'm excited to share this fun and festive project with you. This free pattern will guide you every step of the way.
Why Crochet a Gift Card Stocking?
Crocheting a gift card stocking is a fantastic way to add a personal touch to your holiday giving. Here's why I think you'll love this project:
- Personalized Touch: A handmade gift shows you care, and this little stocking is sure to bring a smile.
- Budget-Friendly: It uses small amounts of yarn, making it perfect for using up your stash.
- Quick and Easy: Ideal for those last-minute gift-giving situations. You can whip one up in minutes!
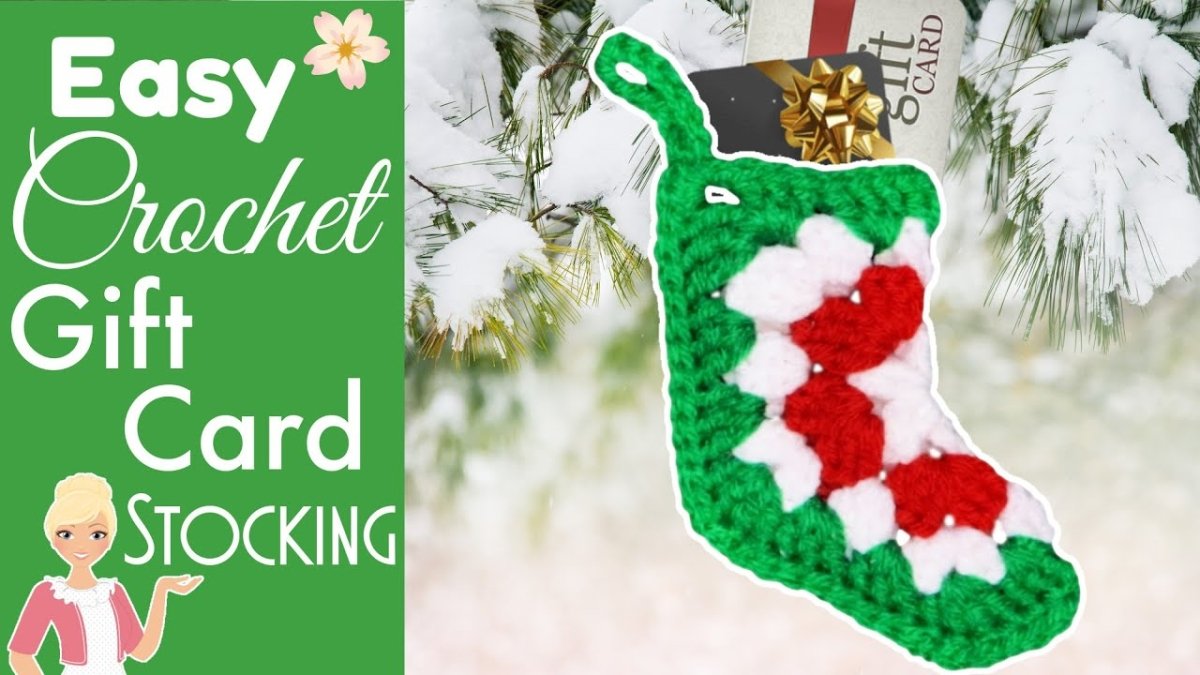
- Versatile: It's not just for gift cards! You can also tuck in cash, scratch tickets, or small treats.
- Beginner-Friendly: Simple stitches and clear instructions make it accessible to all skill levels. If you're just starting out, this is a great project to build your confidence.
- Stash-Busting: Got a bunch of leftover yarn scraps? This is the perfect project to use them up!
- Fun to make: Seriously, it's fun, and that's what matters most!
If you're looking for more Christmas crochet patterns, check out my collection at Secret Yarnery Christmas Crochet Patterns.

Materials You'll Need
To make your own easy crochet gift card holder stocking, you'll need just a few simple materials:
-
Yarn:
- Four-weight worsted acrylic yarn (approx. 16 grams). I recommend using a soft acrylic yarn for a cozy feel. You can find some great options here: Yarn.
- Get creative with your color combinations! Red and green are classic, but white and blue, or even bright rainbow colors, would be super festive.
- Crochet Hook: 5.5 mm crochet hook. A comfortable hook makes all the difference! This one is great: Crochet Hooks.
- Scissors
- Yarn Needle: For weaving in ends. Sharp tip needles are super helpful: Sharp Tip Needles.
- Optional: Stitch marker
Getting Started: Making the Magic Ring
Let's dive into the pattern! The first step is creating the center of your stocking. You can do this using either a magic ring or a chain 3 method. I'll explain both:
- Slip Knot: Start by making a slip knot. This is the loop that goes on your crochet hook.
- Magic Ring: If you're familiar with the magic ring, go for it! It creates a nice, tight center.
- Chain 3 Method: If you prefer, chain 3. Then, slip stitch into the very first chain you made to form a ring. This is the method I use in the video.
If you're using the chain 3 method, it's important to hold the tail and the U-shape to keep the ring open while you work your stitches.

Round 1: Creating the Base
Now it's time to start building the base of the stocking. Here's what you'll do:
- Chain 3 (this counts as your first double crochet).
- Double crochet into the center of the ring.
- Chain 2.
- Repeat the sequence of 2 double crochets, chain 2 a total of six times.
As you work, you might find that the ring gets a little crowded. Don't worry! Just slide the stitches back to create more room. Make sure all your stitches lay flat along the ring. It's a bit like organizing a tiny, yarny party.
Once you've completed the sequence six times, count your pairs of double crochets to make sure you have six. Then, slip stitch to join into the top of the chain 3. Chain 1 to secure your work, and cut the yarn, leaving a tail for sewing in later.
If you've managed to crochet over your tail as you went, you can snip off that center tail nice and close. That finishes round one.
Tip for Beginners: Keeping your tension consistent can be tricky at first. Try to relax your hand and avoid pulling the yarn too tight. Consistent tension will make your stocking look neater and more even.
Round 2: Adding Color and Shape
Time to add some color and start shaping the stocking!
- Grab your next color of yarn.
- Join the new yarn with a slip stitch in any space (corner) between the double crochet pairs, except where your tail is.
- Chain 2 (or 3 if you join your yarn differently – this counts as your first double crochet).
- Work 2 more double crochets into the same corner space.
- In the next space, work 3 treble crochets.
- Chain 2.
- Work 3 more double crochets into the same corner space.
- In the next space, work 3 double crochets.
Repeat the corner sequence (3 double crochets, chain 2, 3 treble crochets) in the next corner space. Then, continue with 3 double crochets in the next two spaces.
Now, create granite square corners by working 3 double crochets, chain 2, and 3 double crochets in each of the next two spaces. Repeat the corner sequence for the final corner.
Join with a slip stitch to the top of the beginning chain. Chain 1 to secure, cut the yarn, and leave a tail for sewing in.

Marking the Top
After round two, it's helpful to identify the top of the stocking. This is where your treble crochets are. You can use a stitch marker to mark the center spot, which can be especially helpful if you're a beginner. Marking the top will make it easier to orient your stocking in the next round.
Round 3: Creating the Heel and Toe
This is where the stocking really starts to take shape!
- Grab your next color of yarn.
- Join the new yarn with a slip stitch in the first corner space at the top of the stocking.
- Chain 2 (or 3 if you join differently, counting as the first double crochet).
- Work 2 double crochets into the same corner space.
- In the next space, work 4 double crochets (adding a double crochet).
- In the next corner space, work 3 double crochets, chain 2, and 3 treble crochets.
- In the space along the side, work 3 double crochets.
Now, we're going to create a "bend" (this will form the heel) by working 4 double crochets in the next space. Continue alternating 3 double crochets along the sides and 4 double crochets (bends) at the bottom. Repeat the bend sequence (4 double crochets) in the next space.
Continue with 3 double crochets along the side and 4 double crochets (bends). Complete the round, working 3 treble crochets, chain 2, and join with a slip stitch. Chain 1 to secure, cut the yarn, and leave a tail for sewing in.
It's important to understand the difference between the "corners" (at the top) and the "bends" (at the bottom). The bends create the curve of the heel and toe.
Round 4: Adding the Final Touches
We're almost there! This round adds the final touches to the shape and texture of the stocking.
- Grab your next color of yarn.
- Join the new yarn with a slip stitch in the corner space at the top of the work.
- Chain 2 (or 3 if you join differently, counting as the first double crochet).
- Work 2 double crochets into the same corner space.
- In the next space along the top, work 3 double crochets.
- Between the double crochets (two on each side), work 3 double crochets right in the middle of those stitches.
- In the next space, work 3 double crochets.
- In the corner space, work 3 double crochets, chain 2, and 3 treble crochets.
- In each of the next two spaces along the side, work 3 double crochets.
In the bend section, work 4 double crochets in the center of the stitches (creating a new bend). Continue alternating 3 double crochets along the sides and 4 double crochets (bends).
Complete the round, working 3 treble crochets, chain 2, and join with a double crochet (to keep the join along the edge). Chain 1 to secure, cut the yarn, and leave a tail for sewing in.
Keeping the join along the edge is important for a neat finish.
Joining the Stocking: Creating the Loop
Now it's time to bring the stocking together!
- Chain 15 to create the hanging loop.
- Fold the chain under to the other side of the stocking.
- Find the corresponding spaces on both sides of the stocking.
- Slip stitch to join and hold the sides together.
- Chain 1 to secure.
Make sure your loop isn't twisted.

Joining the Sides: Single Crochet Seam
This step creates a neat and secure seam along the sides of the stocking.
- Single crochet into the same corner space (through both sides).
- Align the next set of stitches, putting a finger through the bottom half and the top half to pinch them together.
- Make sure you have two strands of each stitch on your hook (four strands total).
- Single crochet into the next stitch of both halves.
- Continue single crocheting into each pair of stitches along the sides.
- Work three single crochets per set along the sides.
- Chain 1 to get around the heel.
- Continue single crocheting into each pair of stitches.
- When reaching the toe, work two single crochets and then chain 1 to ease around the corner.
- Finish off the join by single crocheting into each of the remaining stitches.
- In the very last stitch, work one single crochet and chain 1.
- Cut yarn, leaving a long tail for sewing in.
Shaping the Toe
Now, let's give that toe a nice shape!
- Thread your yarn needle.
- Shape the toe by going straight up into the stitch along the side.
- Shrink it up until you like how the toe looks.
- Work the yarn back and forth underneath the stitches to secure.
I like to create a rounded, cute toe rather than a pointy one. Sharp tip needles really help with this step.

Weaving in the Ends
Don't skip this step! Weaving in all those loose ends is essential for securing your project and giving it a professional finish. Use your yarn needle to weave the ends back and forth through the stitches, hiding them securely.
Final Touches and Embellishments
Now comes the fun part – adding your own personal touches! Consider adding buttons, beads, or other embellishments to personalize your stocking. A small pom-pom or tassel at the top would also be adorable. Get creative and make each stocking unique!
Gifting Ideas
This little stocking is so versatile! Here are a few ideas for how to use it:
- Hold gift cards to favorite stores, restaurants, or experiences.
- Tuck in cash or lottery tickets.
- Fill it with small treats like chocolates or candies.
- Pair it with a handmade ornament or other small gift.
Care Instructions
To keep your crochet gift card stocking looking its best, I recommend hand washing or gentle machine washing. Lay it flat to dry.
Conclusion
See? That was super easy! Crocheting this gift card stocking is a fun, quick, and satisfying project that's perfect for the holidays. I encourage you to try making your own and adding your own creative touches. The free pattern makes it super simple, so why not give it a go?
I hope you enjoyed this tutorial! Thank you for following along, and I can't wait to see what you create.
Call to Action: Share Your Projects!
I'd love to see your finished stockings! Share photos of your creations on social media using the hashtag #SecretYarneryStocking. Tag me, @SecretYarnery, in your posts so I can admire your work!
Download the Free Pattern
Ready to get started? Download the free pattern for this crochet gift card holder stocking here: Free Pattern. If you prefer a printable PDF, you can find it here: Printable PDF Pattern. Remember, all my patterns are written in plain English, so they're easy to follow!
Watch the Right-Handed Tutorial
If you prefer a visual guide, watch the right-handed video tutorial here: Right Handed Tutorial.
Watch the Left-Handed Tutorial
Explore More Christmas Crochet Projects
Get into the holiday spirit with more festive crochet projects! Check out my playlist of other Christmas crochet projects here: Christmas Crochet Patterns. You might also enjoy my Christmas Crochet Coal.
About the Secret Yarnery
I'm Christa, and I'm the creator behind the Secret Yarnery. My channel is all about easy patterns, inspiration, tips, and tricks for crochet lovers of all skill levels. Whether you're a beginner or an advanced crocheter, you'll find something to love here. Visit my website to explore more: Secret Yarnery.
Subscribe to the Secret Yarnery Channel
For more free crochet patterns and tutorials, subscribe to my channel! Click here: Secret Yarnery YouTube channel. Don't forget to hit the bell icon to receive notifications about new videos!
Join the Secret Yarnery Community
Want to connect with other yarn enthusiasts and get exclusive content? Join the Secret Yarnery community! Secret Yarnery membership.
Sign Up for the Newsletter
Stay up-to-date on the latest patterns, tutorials, and special offers by signing up for my newsletter: Secret Yarnery newsletter signup.
Explore Left-Handed Crochet Tutorials
Attention lefties! I have a whole playlist of tutorials just for you. Find them here: Left-Handed Crochet Tutorials.
Go Behind the Scenes
Get a glimpse into the making of Secret Yarnery content with my behind-the-scenes playlist: Behind the Scenes.
Support the Secret Yarnery
If you enjoy my content and would like to support my work, you can buy me a coffee on Ko-fi! Secret Yarnery Ko-fi. Thank you for your support!
FAQs
1. What skill level is required for this pattern?
This is a beginner-friendly pattern, featuring simple stitches and step-by-step instructions. It’s perfect for those new to crochet or looking for a quick and easy project.
2. How long does it take to complete one stocking?
On average, you can finish this stocking in less than an hour, making it an ideal last-minute gift or festive decoration.
3. What materials do I need?
- Worsted weight acrylic yarn (approx. 16 grams)
- 5.5 mm crochet hook
- Yarn needle, scissors, and an optional stitch marker
The full materials list is provided in the pattern PDF.
4. Can I customize the size or design?
Yes! You can adjust the yarn weight or hook size to create a slightly larger or smaller stocking. You can also customize the colors or add embellishments like pom-poms, buttons, or tassels for a personal touch.
5. Is there video support for this pattern?
Absolutely! This pattern includes links to free video tutorials for both right- and left-handed crocheters, ensuring clear guidance every step of the way.
6. What fits inside the stocking?
The stocking is perfectly sized for gift cards, cash, chocolates, small trinkets, or lottery tickets. It's versatile and can be used to hold small surprises!
7. Is this pattern suitable for stash-busting?
Yes! This project uses small amounts of yarn, making it a great way to put your leftover yarn scraps to good use.
8. What format is this pattern available in?
The pattern is provided as a PDF download, which is available immediately after purchase.
![]()
Christa Patel is the creative mind behind The Secret Yarnery, a vibrant hub for crochet enthusiasts worldwide. With years of experience and a passion for teaching, Christa specializes in designing step-by-step, beginner-friendly crochet patterns that inspire crafters of all levels.
Her work is known for its simplicity, practicality, and unique creative flair. Through her YouTube channel, blog, and online shop, Christa shares free tutorials, tips, and tricks, making the art of crochet accessible to everyone.
When Christa isn’t designing patterns or crafting with yarn, she’s building a supportive crochet community dedicated to sharing ideas, offering encouragement, and celebrating creativity.
Find more patterns from Christa Patel at The Secret Yarnery on Ravelry, or visit her website at www.secretyarnery.com.
About the Author
With a passion for crafting easy, beginner-friendly tutorials and patterns, Christa inspires crafters of all skill levels to unleash their creativity worldwide. She encourages yarn lovers to connect, create, and crochet a world filled with beautiful handmade treasures!
Learn to Crochet an Easy Gift Card Holder Stocking – Perfect Holiday!