Easy Crochet Rose Blanket: A Bouquet of Warmth and Beauty
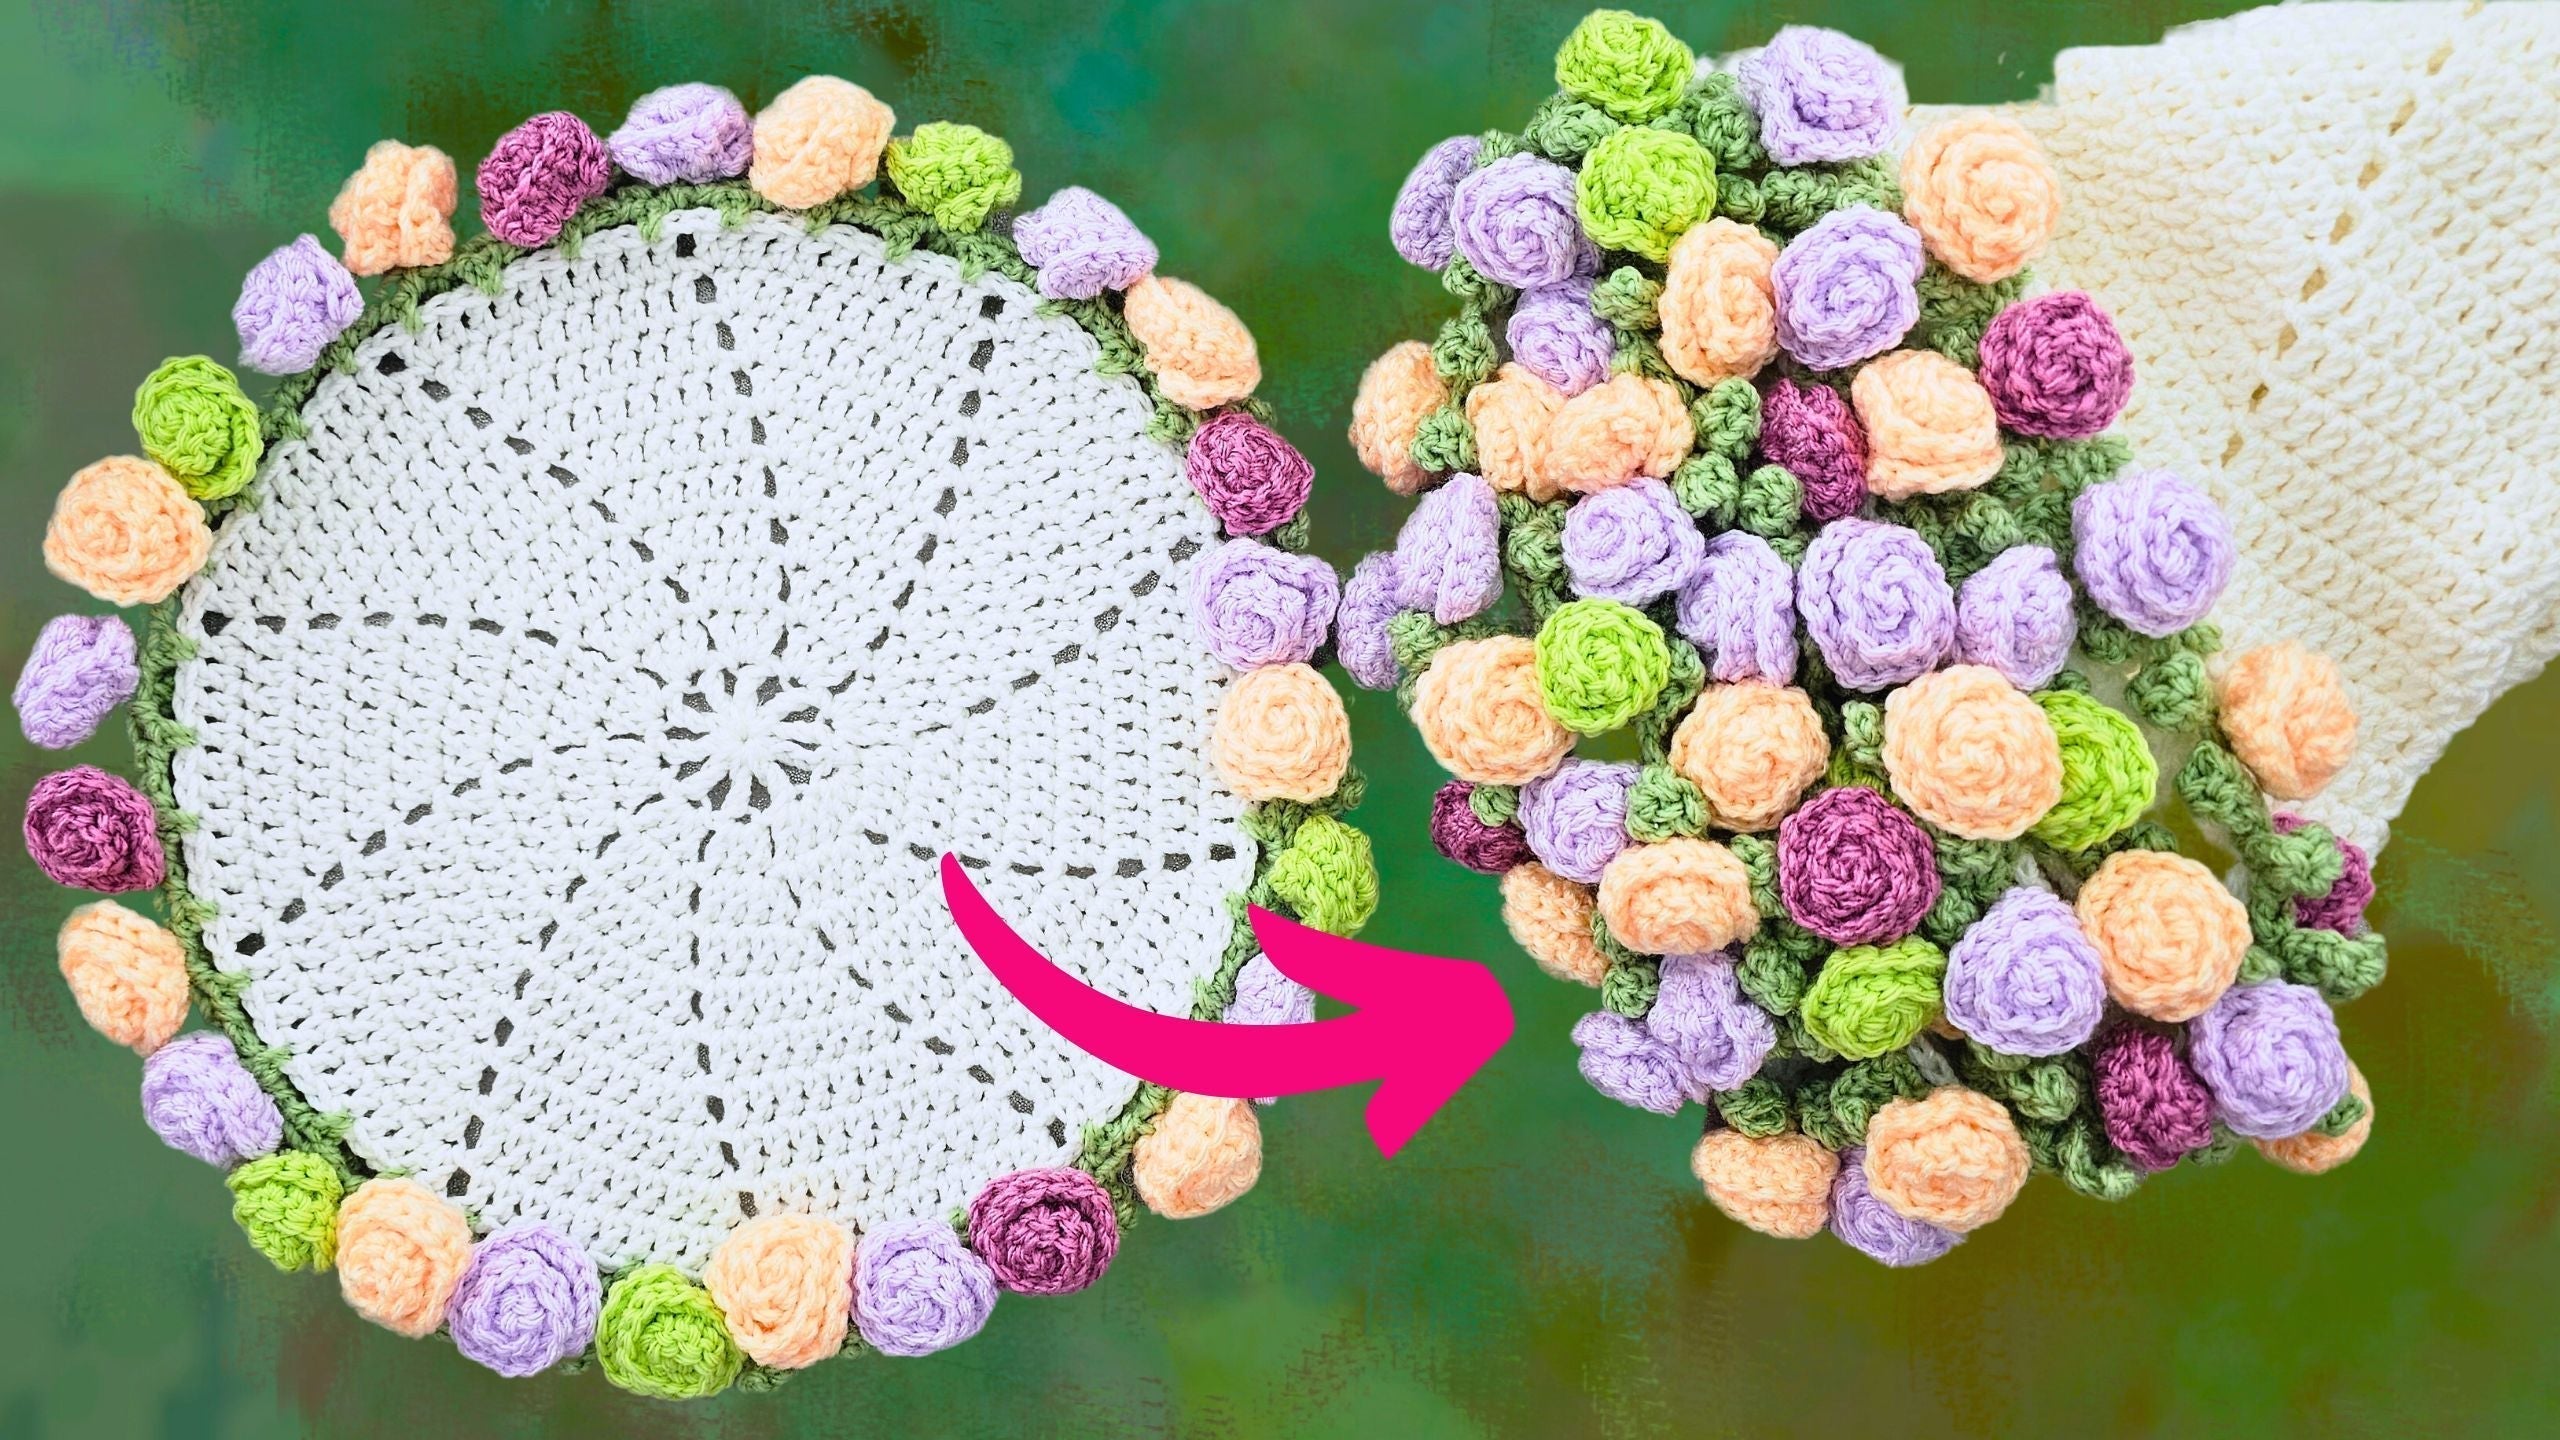
Imagine creating a cozy crochet blanket that unexpectedly transforms into a stunning rose bouquet. This delightful project combines the comfort of a blanket with the elegance of floral art. I'm Christa, from The Secret Yarnery, and I'm excited to guide you through this pattern. Whether you're just starting out or are an advanced crocheter looking for a relaxing pattern, you'll find joy in making this Easy Crochet Rose Blanket, Beginners.
Table of contents
This tutorial is based on the original video tutorial, and it's designed to be both fun and rewarding. Using a simple spiral crochet technique, you can create a beautiful piece. Get ready to settle in, relax, and create this project which is so much more than just a blanket.
What Makes This Crochet Project Special?
This isn't just another crochet blanket; it's a project with a delightful twist. Here's what makes it stand out:
-
Dual Functionality: It's a blanket that magically transforms into a beautiful rose bouquet.
-
Seamless Spiral: The spiral crochet method lets you crochet continuously without the hassle of joining rounds. This creates a seamless look.
-
Customizable: Play with different yarn colors and sizes to make it uniquely yours.
Materials You'll Need to Crochet Your Rose Blanket Bouquet
To get started, here's a list of the materials you'll need:
-
Yarn:
-
Approximately 300g of worsted weight acrylic yarn for the blanket's center. White is a classic choice, but feel free to use any color you love.
-
About 50g of soft green yarn for the leaves. Choose a shade that complements your flowers.
-
A variety of springtime/summery colored yarns for the roses. Don't be afraid to mix and match different brands and textures. I've used Saver, Favorite, Softly Baby, and Kenyon Acrylic in the past, and they all work wonderfully.
-
-
Crochet Hook: A 6mm crochet hook is ideal for worsted weight yarn.
-
Other Tools:
-
A yarn needle for sewing the flowers together and weaving in the ends.
-
A stitch marker (optional), especially helpful for beginners to keep track of the beginning of each round.
-
Scissors for cutting the yarn.
-
The beauty of this project lies in its flexibility. Don't feel limited by my suggestions! Use what you have and let your creativity shine.

Getting Started: The Magic Ring Method
To start your blanket, you have two options: a chain-3 slip stitch or the magic ring method. I prefer the magic ring because it creates a seamless center. Here’s how to do it:
- Lay the yarn tail over your non-dominant hand.
- Wrap the yarn around two fingers, making an "X."
- Hold the yarn in place with your thumb.
- Insert your crochet hook under the short strand and over the long strand.
- Pull the long strand under the short strand, creating a loop on your hook.
- Chain five to begin the first round.
Round 1: Creating the Center of Your Blanket
This round sets the stage for the entire project. Follow these steps carefully:
- Chain five (this counts as a tripouble crochet and chain one).
- Tripouble crochet into the center of the ring.
- Chain one.
- Repeat the tripouble crochet and chain one sequence until you have a total of 10 tripouble crochets, including the initial chain-5.
- Pull the yarn tail to tighten the magic ring.
- Slip stitch into the second chain of the initial chain-5 to join the round.
Remember, all of my patterns are available in plain English on my website, secretyarnery.com.
Round 2: Building the Foundation
In this round, we start adding the texture that will define the blanket.
- Chain one.
- In the same stitch where you joined (the top of the second chain of the initial chain-5), make one single crochet, one half double crochet, and one double crochet.
- Chain one.
- In the top of each tripouble crochet from the previous round, work three double crochets.
- Chain one between each set of three double crochets.
- Repeat this sequence around the entire circle.
It’s important to work into the top of each tripouble crochet from the previous round to create a consistent and even fabric.

Round 3: Increasing the Size
Now, let's start increasing the size of the blanket:
- Into the top of the initial single crochet from round 2, make two double crochets (this is your increase).
- One double crochet into each of the next two stitches.
- Chain one.
- Repeat the following sequence around the circle: Two double crochets into the first stitch of the next set of three, and one double crochet into each of the remaining two stitches.
- Chain one to jump to the next set.
If you're new to crochet, placing a stitch marker at the beginning of each round can be helpful.
Continuing the Spiral: Growing Your Blanket
As you continue crocheting in a spiral, you'll notice the blanket growing steadily. Here's the key to maintaining the pattern:
- Always increase into the first stitch of each set (two double crochets).
- Work one double crochet into each of the remaining stitches in the set.
- Chain one between each set.
Don't worry if the circle looks a little uneven at first; it will naturally even out as it grows. Just keep following the pattern until the center is the size you want it to be.
How Big Should I Make My Center?
The size of the center depends on the final look you're aiming for. For the larger bouquet, I made the center about 3 feet across, using approximately 300g of yarn. For a smaller sample, about 50g of yarn will do. Feel free to adjust the size to your preference.
Tapering Off and Finishing the Circle
When your center reaches the desired size, it's time to taper off and finish the circle. This creates a smooth edge for adding the leaves and flowers.
- A few stitches before the marked beginning of the round, work half double crochets into the next two stitches.
- Single crochet into the next two stitches.
- Slip stitch into the chain space at the beginning of the round.
- Chain one to secure the yarn.
- Cut the yarn, leaving a long tail for weaving in.
- Pull the yarn through and tighten the knot.
Tapering off with different stitches helps create a smoother transition.
Weaving in the Ends: Securing Your Work
To keep your blanket looking neat and prevent unraveling, it's important to weave in the ends securely.
- Thread the yarn tail onto a yarn needle.
- On the wrong side of the work, weave the tail around the stitches in one direction.
- Weave the tail back in the opposite direction to secure it.
- Repeat this process for both the center tail (from the magic ring) and the finishing tail.

How to Sew in a Magic Ring
The magic ring can be tricky to secure, so here's a detailed guide:
- Go around the ring in one direction, inserting your needle under the "fat" part of the stitches.
- Go back in the other direction to secure it.
- Repeat this process about three times in each direction to ensure the ring is tightly closed.
Adding the Leaves: A Touch of Greenery
Now it's time to add a touch of greenery to your project. The leaves provide a beautiful contrast to the colorful roses. You can choose a soft green for a subtle look or a vibrant green for a more eye-catching effect. Various greens can be used, like a dark, light, or even lime green.
Attaching the Green Yarn
To begin adding the leaves, follow these steps:
- Create a loop of green yarn, leaving a 4-inch tail.
- Insert your hook into the second stitch after any join.
- Place the loop on your hook.
- Slip stitch with both strands to join, holding the tail along the back of your work.
- Chain three.
Creating the Leaf Arches
The leaf arches form the base for the individual leaves. Here's how to create them:
-
Skip two stitches.
-
Single crochet into the third stitch.
-
Chain three.
-
Repeat the skip-two-stitches and single-crochet sequence all the way around the circle.
When you reach a chain space, remember that the chain counts as a stitch. So, you'll skip two stitches, including the chain.
Finishing the Leaf Arches Round
To join the leaf arches and prepare for the next step, follow these instructions:
- Chain three.
- Slip stitch into the legs of the initial join (single crochet).
Making the Leaves: Shaping the Greenery
Now for the fun part – shaping the leaves! Each leaf is created within a leaf arch. Here's how to make them:
- Single crochet into the first space.
- Chain five.
- Slip stitch into the second chain from the hook.
- Single crochet into the next chain.
- Half double crochet into the next chain.
- Double crochet into the last chain.
- Chain one.
- Slip stitch into the same last chain to create a point.
- Single crochet into the same space to finish the leaf.
Repeat this process in each space around the circle to create a ring of leaves.
Completing the Leaf Round
To finish the leaf round neatly, follow these steps:
- After the final leaf, single crochet into the space to pin it down.
- Slip stitch into the bottom of the first leaf.
- Chain one to secure the yarn.
- Cut the yarn, leaving a long tail for sewing.
- Pull the yarn through and tighten the knot.
Sewing in the Green Ends: Securing the Leaves
Just like with the white center, you'll need to sew in the green yarn tails using a yarn needle to prevent unraveling. Weave them in securely on the wrong side of the work.
Choosing Your Flower Colors: A Palette of Possibilities
Now, let's talk about the stars of the show – the roses! This is where you can really let your creativity shine. Springtime or summery colors are always a great choice. You could even opt for a single color for a more uniform look. This is also a fantastic opportunity to use up any scrap yarn you have lying around.
Attaching the Flowers: Preparing the Base
The way you attach the flowers gives the blanket its unique look. You'll be working into the front loop of the first row and the front loop of the row above. This technique keeps the flower yarn from showing through on the back of the blanket, maintaining a clean and polished look.
Attaching the First Flower
Ready to attach your first flower? Follow these steps:
- Insert your hook into the front loop of the first row and the front loop of the second row.
- Grab your flower-colored yarn, leaving a 7-inch tail.
- Place a loop of the yarn on your hook.
- Slip stitch with both strands to join, holding the tail along the back of your work.
- Chain 14.
Creating the Flower Petals
Here comes the magic! These steps will transform a simple chain into a beautiful rose petal:
- Into the third chain from the hook, make one double crochet.
- Into the next chain, make two double crochets.
- Into each of the remaining chains, make three double crochets.
Be careful to work into the correct part of the first chain to prevent the stitch from slipping down. Also, I really stress doing three double crochets into each loop to make the flower fluffy.
Finishing the First Flower
Almost there! Here's how to complete your first flower:
- Into the last chain, make three double crochets, making sure it's not between the legs of the first stitch.
- Slip stitch in between those legs, underneath one strand.
- Chain one to secure the yarn.
- Cut the yarn, leaving an 8-inch tail for sewing.
- Pull the yarn through and tighten the knot.
Flower Placement Options: Customizing Your Bouquet
The placement of your flowers will dramatically affect the final look of your bouquet blanket. Here are a few options to consider:
- Every other post: This is the method I used for the large blanket, creating a more spaced-out floral arrangement.
- Every post: For a denser, more abundant flower arrangement.
- In between posts (near the leaves): This creates a more integrated look, with the flowers nestled among the leaves.
Experiment with different placements to achieve your desired effect.
Attaching Subsequent Flowers: Repeating the Process
Simply repeat the flower-making process for each additional flower, using your chosen placement method.
Spacing out your flowers
Now that you have a few flowers attached, take a step back and assess your spacing. This is the perfect time to make sure you're happy with the arrangement and adjust as needed.
Creating a Rose: Sewing the Flower Together
Now, the real transformation begins! It's time to turn those crocheted pieces into beautiful roses.
- Thread the last yarn tail onto a needle.
- Unfold the flower slightly, making sure the center bud is in the middle.
- Roll the flower up flat, keeping the top edge even.
- Insert the needle straight across from where the tail emerges, through the center of the flower.
- Pull the tail snug to secure the roll.
- Jump over a few stitches and come back through halfway up the flower to catch all the layers.
- Continue stitching through the layers until the tail is shorter, making sure to catch any loose petals.
Finishing the Rose: Securing the Tails
To complete the rose and ensure it holds its shape, follow these instructions:
- Make sure the tail ends on the opposite side of the flower from where it started.
- Go through the same two stitches and leave the tail.
- Thread the initial tail (from the start of the flower) onto the needle.
- Weave this tail in a little bit on the bottom side of the flower.
- Pull both tails and tie a double knot, being careful not to shrink the flower up too much.
- Tie a couple more knots to secure.
- Hide the tails by weaving them back up and through the flower, then trim the excess.
Tying the tails in is essential to keep the flower from falling apart.
Completing Your Bouquet: Repeating the Process
Repeat the rose-making process for all the remaining flowers until your blanket is transformed into a stunning bouquet.
The Finished Product
Congratulations! You've created a beautiful crochet blanket that transforms into a stunning Rose bouquet.
Left Handed?
Customization Ideas
Want to make your blanket even more special? Here are a few ideas:
- Experiment with different yarn weights and hook sizes to change the texture and drape of the blanket.
- Create a gradient effect by using varying shades of yarn for the center or the flowers.
- Add embellishments like beads or buttons to the centers of the roses for a touch of sparkle.
Don't forget to share your creations on social media! I'd love to see what you come up with.
I have tons of other patterns if you want to explore those! From beanies and scarves to amigurumi, there's something for everyone check out these free crochet patterns.
I have crochet must haves in my Amazon store if you want to see all my favorites here.
For those who prefer to crochet left-handed, you can find a left-handed version of this tutorial here.
I hope you enjoyed this tutorial as much as I did!
Don't forget to:
- Subscribe to The Secret Yarnery YouTube channel here.
- Join The Secret Yarnery Community here.
- Visit the website for free patterns here and Printable PDF patterns here.
- Sign up for the newsletter here.
As an Amazon Associate I earn from qualifying purchases.
FAQs
1. How long does it take to crochet the Rose Flower Bouquet Blanket?
Most crocheters can complete the blanket in a few days to a week, depending on how much time you dedicate each day. The spiral design makes it go faster than many traditional blankets.
2. Do I have to use worsted weight yarn?
Worsted weight yarn is recommended, but you can use any weight you like. Just remember that the finished size and drape will be different if you use a lighter or heavier yarn.
3. Can I make the blanket larger or smaller?
Absolutely! Add or remove spiral rounds to adjust the size. There’s no set number—you decide how big or small to make it.
4. What is a magic ring, and do I have to use it?
The magic ring is a way to start crochet projects in the round with a closed center. It prevents a hole in the middle. If it feels tricky, you can use the chain 3 method instead.
5. Can I add more types of flowers?
Yes! Feel free to try out other flower patterns or border styles. Mix roses with daisies, mini sunflowers, or any of your favorite blooms.
Christa Patel is the creative mind behind The Secret Yarnery, a popular crochet blog and YouTube channel. Based in Kenya, Christa is known for her clear instructions, friendly teaching style, and passion for making crochet accessible to everyone—no matter their skill level.
Her journey with yarn began as a child, but her love for crochet truly blossomed after becoming a mom. Christa shares easy-to-follow patterns, helpful tutorials, and time-saving tips with a worldwide audience. Her mission is to help fellow crocheters enjoy the craft, build confidence, and create beautiful handmade pieces.
Join Christa and thousands of other makers on her YouTube channel or website for more free patterns, crochet inspiration, and community support.
About the Author
With a passion for crafting easy, beginner-friendly tutorials and patterns, Christa inspires crafters of all skill levels to unleash their creativity worldwide. She encourages yarn lovers to connect, create, and crochet a world filled with beautiful handmade treasures!
Easy Crochet Rose Blanket, Beginners: A Bouquet of Warmth and Beauty