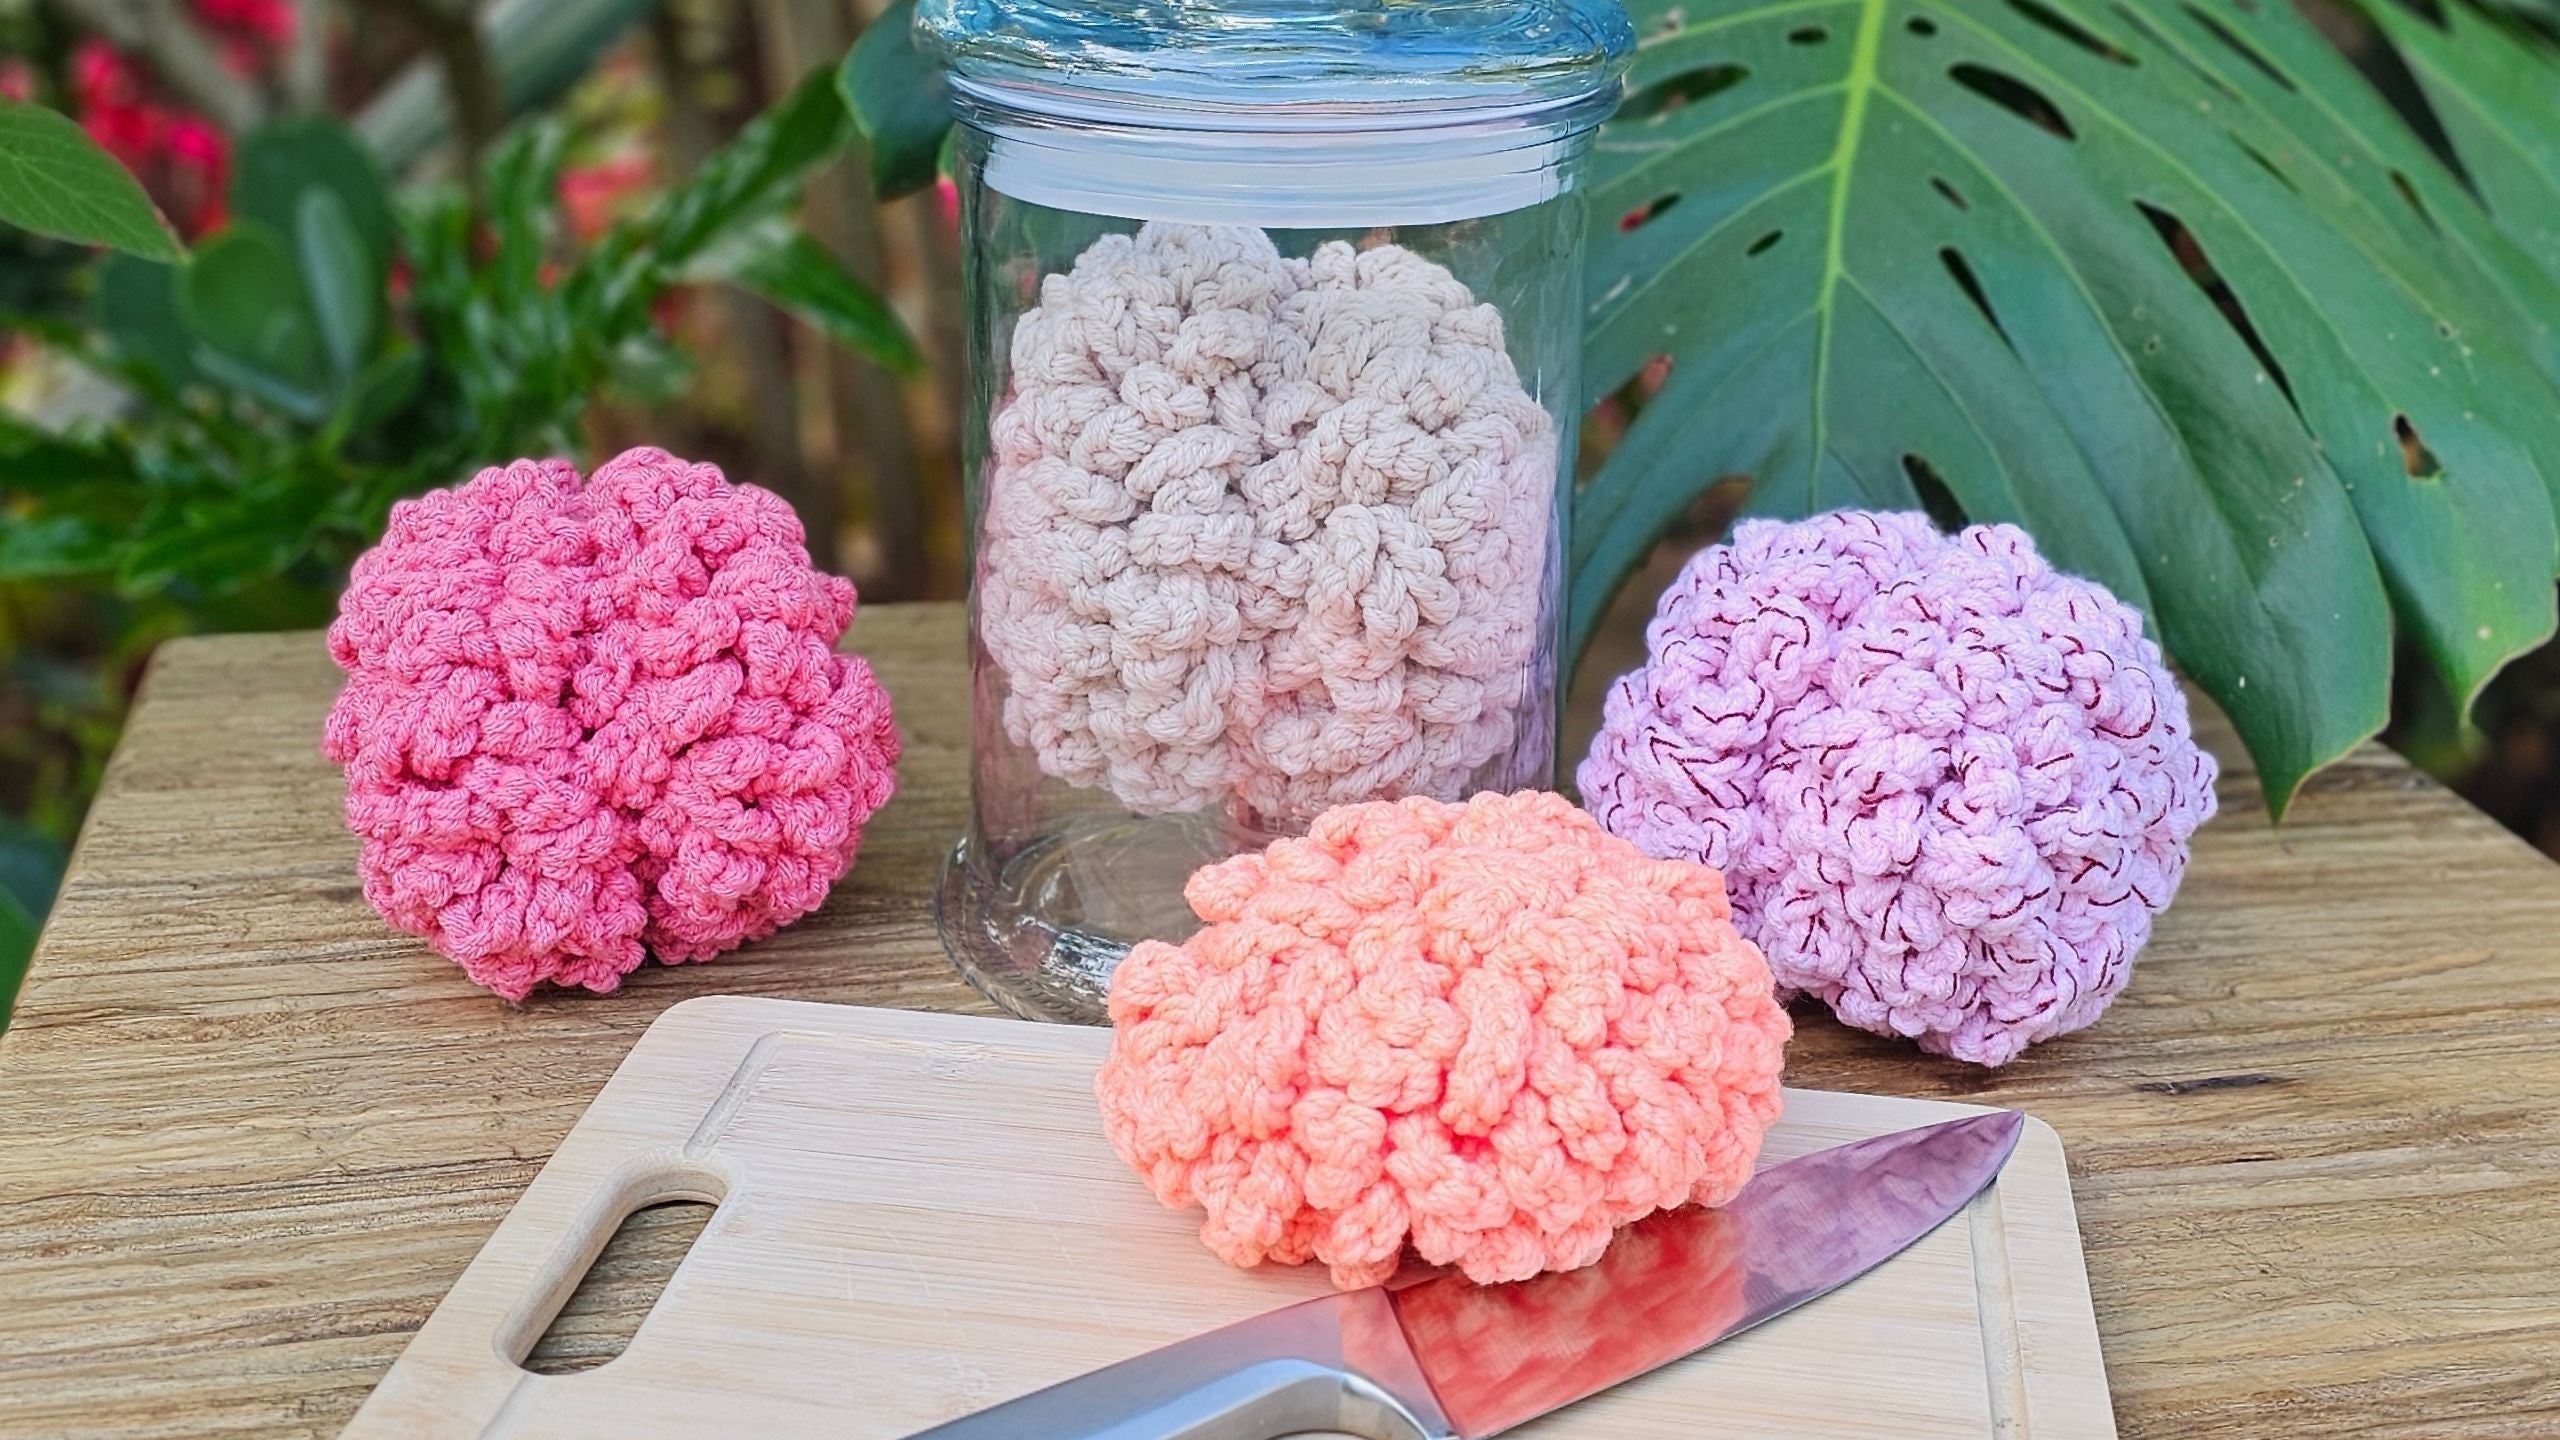
Easy DIY Halloween Crochet Brain Written Pattern In Minutes!
Looking for a quick win for spooky Halloween season that still looks amazing on display? I’ve got you covered with a fast, low-stress project that delivers big impact. This crochet pattern for a Halloween Crochet Brain is simple, squishy, and wildly fun to make. Dive into the Amigurumi Halloween Eyeball Jelly Brain Crochet Pattern, which captures that eerie, gelatinous vibe with an eyeball twist, or stick to the classic Halloween Eyeball Jelly Brain Crochet Pattern for a straightforward amigurumi style. It uses basic chains, a clever cinch method, and easy hand shaping, so you can whip one up in an evening. I’ll walk you through how to choose yarn, triple it for texture, chain your cord, gather the “brain fingers,” and sew two hemispheres together for that classic jar-ready look. You can go realistic with gray, go glam with sparkle, or go full “formaldehyde jar” vibe in muted tones.
Materials Needed for Your Crochet Brain
You only need a handful of tools and some yarn for this Amigurumi Halloween Eyeball Jelly Brain Crochet Pattern. I picked things that are easy to find and beginner friendly, following a simple crochet pattern that guides you through the process.
- Yarn: 200 g total, 100 g per hemisphere. Any color works. Gray gives that preserved brain look, and metallic thread adds sparkle. Size 4 worsted acrylic is perfect, or use size 6 bulky if you have it. For detail work, keep Black DK yarn scraps, Blue DK yarn scraps, or Green DK yarn scraps on hand.
- Crochet hook: 8 mm for quick chaining and a plump cord. Try this reliable option, my go-to 8 mm crochet hook.
- Blunt tip needle: A yarn needle with a rounded tip keeps the strands safe while you cinch and sew. I like these blunt tip yarn needles.
- Scissors: A sharp pair for trimming tails close to knots.
- Stitch marker: Handy for holding a tail in place during assembly.
- Toy stuffing: Optional for amigurumi projects like this if you want added fullness inside the brain.
- Safety eyes 30 mm: Optional if customizing the project to include an eye component for a spooky Halloween twist.
Tip: Italicize your creative choice with yarn. Want a glossy, eerie brain in a jar? Try gray or off-white. Want sparkle or a “science lab” vibe? Add a thin metallic thread along with your main yarn for a subtle shine. Consider Pink aran yarn 90 g for a fun, fleshy accent.

Breaking Down Yarn Selection
Work with two 100 g balls of yarn, each about 165 m. You can use a standard size 4 worsted acrylic tripled for thickness, or a size 6 acrylic if you prefer fewer strands. Both work great.
- Gray or off-white: A classic “preserved in a jar” feel.
- Bright or variegated: Bold, playful, and perfect for party decor.
- With a metallic strand: Just a hint of sparkle, still creepy cool.
Why These Tools Work Best
The 8 mm crochet hook builds a thick, soft cord fast. That gives the brain its cozy texture without complicated stitches. The blunt yarn needle glides under loops and cinch strings without splitting your strands, which matters when everything is tripled.
Getting Started: Preparing Your Yarn
We’re going for a thick rope-like chain in crochet without switching to bulky yarn. The trick is tripling the yarn before we chain.
- Lay your yarn out with the end in hand.
- Bring a loop of yarn back to the start so you have three parallel strands.
- Keep holding the original tail. That tail remains your working tail.
- Work from this three-strand setup for the entire ball.
Tip: Keep your tails a few inches long. It helps with securing and sewing later, and avoids accidental pull-throughs.

Making the Slip Knot
Grab the tail, make a slip knot, and place it on your hook. Leave a short tail for security. Adjust the loop to fit the hook well. Keep it snug but not tight. Bold move here, shrink it down so it slides easily while you chain.
Why Triple the Yarn?
Tripling makes a thick, structured cord for your crochet work. You get soft curves and defined “brain fingers” without advanced stitches like single crochet (sc) or double crochet (dc); this simple pattern bypasses traditional stitch counts. It builds fast and looks great for your amigurumi brain.
Chaining the First Hemisphere
This is the heart of the Halloween Eyeball Jelly Brain Crochet Pattern. You’ll chain the entire first 100 g ball of yarn using the tripled strand. Working on a flat surface helps the motion feel smooth. These how-to instructions guide you through this core construction step.
- Start chaining as usual with your three strands.
- When that loop begins to shrink, slide your finger and thumb through the loop before it disappears, grab the working yarn, and pull through to continue.
- You can pull out extra yarn and lay it in a wide sweep on a bed or table so the movement stays fluid.
- Keep your chain even. Aim for steady, relaxed tension.
- Chain the whole ball, then stop with enough yarn to secure the end.
Troubleshooting as you chain:
- Tangling on a couch or in your lap? Move to a desk or bed and lay it out in gentle arcs.
- Chain curling up? Relax your grip and lift your hook slightly as you pull through.
- Losing your rhythm? Slow down for five chains, then speed back up.
When you hit the end, keep about an 18 inch tail using just one strand. Work your last few chains down to the tiniest loop, then pull the last chain all the way up to lock the end. Follow the crochet pattern closely here to ensure a solid foundation.

Handling the Chain as You Go
That finger and thumb trick is key. When a loop starts to close, capture it with your fingers, then pull fresh working yarn through. It keeps the triple strands moving without friction in this crochet chaining technique.
Tip: If your chain starts catching, pull out more yarn from the ball and spread it out. That small reset keeps your flow smooth.
Securing the Chain End
At the very end, pull the last chain through itself to tighten and secure the cord. Check that there are no loose loops. Everything should feel firm and even. Double-check against the pattern to confirm you've followed the directions precisely.
How Long Will This Take?
It goes quicker than you’d think. Plan for a short sit-down per 100 g ball. This is a true “make in minutes” type of project once you get the rhythm.

Preparing to Cinch Your Chain
Now for the fun part in this crochet pattern, turning that cord into a brain half. You’ll use a length of contrasting yarn to gather the chain into evenly spaced loops.
- Cut about 5 to 6 feet of yarn in a neutral shade. Gray works nicely for the inner structure.
- Fold the length in half.
- Clip a Stitch marker to one end so it never pulls through by accident.
- Thread the other ends through your yarn needle.
Why so much yarn? A longer length makes it easier to assemble without stopping to re-thread. The neutral color also blends inside the finished brain.
Threading the Needle
Slide both cut ends through your blunt-tip needle. A smooth, rounded tip keeps it from snagging the chain loops. If you need a set, here are blunt tip yarn needles I’ve used for years.
Choosing Loops to Work Into
You can work into one loop along the side of your chain or into the back loops. I prefer the back loops because they’re consistent and give a nice path for the gathering yarn. Either method works, just keep it consistent. Following the pattern for the next step ensures even spacing.

Creating the Brain Fingers
This is where the brain texture appears in the Halloween Eyeball Jelly Brain Crochet Pattern. You’ll anchor the gathering yarn at one point, then catch the chain every 12 stitches to create little arches or “fingers” along one side of your crochet structure.
- Start by inserting the needle through one strand of the back loop near the end of your chain. Leave a few inches of the marker end exposed so you can tie later.
- Count forward 12 chains, from 1 to 12. Fold the chain over so you can reach that 12th chain easily.
- Insert the needle away from you, into the back loop of the 12th chain, and pull the yarn through.
- Count another 12 chains forward. Cover the 11th with your thumb so you don’t lose track, then insert into the 12th and pull through.
- Keep repeating that rhythm, working along the chain in neat increments.
Following the pattern, you’ll see the “little fingers” form in a tidy line on one side. This is exactly what creates the classic look. Don’t pull them tight yet. Leave them loose enough to see the contrasting yarn between each segment. This space matters later when we gather everything up. Unlike standard amigurumi shaping that relies on Increase (inc) or Decrease (dec), this cinch method builds the textured effect without complex adjustments.
If you reach the end and don’t have a full set of 12, just catch the last loop you have available. It will still sit nicely in the finished piece.
Counting Chains Accurately
Use your thumb to cover chain 11 each time. That habit makes it easy to find chain 12 without recounting. Always insert your needle in the same direction, working away from you, so the gathers stay uniform.
Tip: “Cover 11th with thumb” is the trick that keeps your count honest and your fingers even.

Working Along the Entire Chain
Repeat the 12 chain spacing to the end. If your last segment is short, attach the final back loop anyway. That small section will blend in when you shape the hemisphere.
Bold reminder: Pause and work along as needed. This isn’t a race, and neat spacing makes a tidy result.
Adjusting for Even Fingers
As you go, make sure the yarning needle path stays on the same side and does not jump on top of other strands. A long gathering tail helps keep the spacing open and visible.
Laying Out and Rotating the Chain
Before we gather, lay the crochet chain out flat and rotate the cord until you can see the contrasting gathering yarn facing up along the entire length. Nothing should cover the gathering strand.
- Start at one end and slowly rotate the chain as needed.
- Check that the gathering yarn is visible at every “finger.”
Tip: “No strands on top” here saves time later. You want a clear view before you start pulling, as this step links directly to the full assembly in the Amigurumi Halloween Eyeball Jelly Brain Crochet Pattern, which includes the eyeball.

Why Visibility Matters Here
If you can see the gathering yarn all the way along, your cinch will go smoothly and evenly. Use a flat surface for control and lay your non-working yarn in soft arcs to prevent tangles; this helps ensure the chain integrates well with components like the eyeball.
Gathering the Hemisphere
Time to cinch, following the pattern. Place your hand lightly over one half of the chain and pull the gathering yarn up through your fingers. This guides the “fingers” to stack neatly without twisting.
- Pull steadily, not hard. Watch the loops shrink toward the center line.
- Switch to the other side and do the same.
- Keep your pressure even, and let the cord sit flat as it tightens.
You’ll end up with a “flat little caterpillar,” a compact, tidy arc of evenly spaced loops. This is your brain hemisphere shape forming in real time, as outlined in the crochet pattern.
Bold reminder: Keep loops flat as you pull. That makes final shaping much easier.
Folding the Gathered Chain
Fold the gathered strip in half, flat side to flat side, with both tails pointing in the same direction. Remove the stitch marker and the needle from the contrast yarn.
Understanding the Shape Now
It will feel like two layers sandwiched together, with a clean, tight inner ring in the middle. That inner ring is the path you’ll sew later.

Tying the Cinch Securely
This tie is key to a neat crocheted hemisphere, as per the pattern. Use a Hockey skate tie (like tying your shoes, but looped twice before you pull tight) so it doesn’t slip.
- Tie the two cinch tails together, just like a shoelace.
- Loop the tie a second time before you pull.
- Pull side to side with steady pressure until it’s snug.
- Because of the double loop, the tie won’t slide back.
Once it’s tight, wiggle the tails back toward the center area where they came from. Pull again to confirm it’s as snug as you want. Then make a couple of regular knots on top, keeping the knot compact and free of caught loops.
Wiggling Tails Back
Bring the tied tails to the middle of the gathered piece. That keeps the pressure centered and avoids twisting the 'brain' shape.
Securing All Tails
You’ll need one long tail in the same color as your brain for sewing later. Keep that one. Trim the extra contrast tails close to the knot, but not the long matching tail.

Finding the Center Ring
Slide your fingers into the center, near the knot, and feel around. You’ll find a tight inner ring halfway down inside the shape, which forms the internal structure of the crocheted piece. That is your sewing path, as defined in this crochet pattern. It runs all the way around the hemisphere like a strong inner belt.
This is the edge you’ll stitch to the matching edge on the second half. It’s tidy and hidden once you join.
Feeling for the Ring
Keep your fingertip on the tight ring as you work. You’ll be passing a needle under that line over and over as you sew the halves of the brain together.

Making the Second Hemisphere
Repeat the pattern's full process with your second 100 g ball, as outlined in the Halloween Eyeball Jelly Brain crochet pattern.
- Triple your yarn.
- Chain the entire ball.
- Thread the contrast yarn into every 12th back loop.
- Lay the chain so the gathering strand faces up.
- Cinch into a flat arc.
- Fold, then tie with a double-loop shoelace tie.
- Keep one long matching tail for sewing.
When both halves are ready using this amigurumi technique, open each slightly so you can reach that center ring.
Matching the First One
Check that both halves are similar in size and feel. The “fingers” should be evenly spaced, and the arcs should mirror each other.

Sewing the Hemispheres Together
In the Amigurumi Halloween Eyeball Jelly Brain, thread the long matching tail from one hemisphere onto your blunt-tip needle. You’ll sew from one hemisphere to the other, catching that inner ring each time so the seam stays hidden and strong, just as the crochet pattern instructs for an invisible join.
- Start on hemisphere one. Insert the needle down into the brain, then scoop under the cinch ring. Pull the needle through.
- Move to hemisphere two. Find the matching cinch ring, scoop under it, and pull through.
- Repeat this “one side, then the other” all the way around. Keep your pulls firm but not tight. You want a neat join with no puckers.
Bold rhythm: From one to other keeps the seam balanced. That alternating motion also helps you stay on track when the ring is hard to see, creating a finish smoother than a slip stitch (slst) join.
Handling the Deep Ring
You won’t always see the ring clearly. Wiggle your thumb into the opening to feel it. It’s “right down in there,” so use your non-dominant finger on the tip of the needle to guide it through safely.
Going Around Fully
Work around the entire perimeter so the halves are fully attached. Once you reach your starting point, give the shape a gentle squeeze to even out the join. This completes the brain for your spooky project.
Securing the Sewing Tail
Weave the tail back and forth from one side to the other a few times. If you can find the other tail nearby, tie a small knot to secure both. Then weave the ends in and trim closely.

Finishing Touches for Brain Shape
This is where the amigurumi gets its character. A few small tweaks make a big difference.
- Push any longer loops near the center back down into the seam. This creates a defined center groove and keeps the profile neat.
- Mold the sides with your hands. Make one end slightly pointier and leave the other a bit rounder for a brain-like silhouette.
- On top, gently pull some of the “fingers” outward a bit to create fluffy ridges with small valleys between them.
The shape is forgiving. Take a moment to rotate it in your hands and smooth any sharp angles. For intricate shaping steps, the full colour photo tutorial provides clear visual guidance.
Creating the Center Definition
To make the center groove stand out, tuck longer strands into the middle seam and press the sides together a bit. That “split” shape reads like the real deal. Bold shaping trick: Fold back any overly long loops so they don’t hang.
Shaping the Sides
Want a more anatomical look? Pinch one end a little so it’s pointier, and let the opposite end stay fuller. Do this on both sides so it reads well from all angles.
Fluffing the Outer Layers
Give the ridges a gentle pull to bring out the texture. Light fluffing adds dimension. Think “fluffier like that,” not full-on tugging. This final touch creates a weird and wonderful overall form.

Why This Pattern is Perfect for Halloween
It looks great on a mantle, in a glass jar, or as party decor. It’s soft and squishy, and it reads instantly as a creepy-cute brain. This super fun and easy crochet pattern doesn’t need counting stitches or anything complex. And it’s fast. You can make one in an evening, then customize the next.
If you want more seasonal ideas, browse these 2025 Crochet Halloween Decor Ideas for projects that pair well with it, like tentacles or an eyeball, as part of the versatile Amigurumi Eyeball Jelly Brain Crochet design.
Customization Ideas from Yarn Choices
Small changes change the vibe completely.
- Classic lab style: Gray, off-white, or pale blush, perhaps with a subtle metallic strand.
- “Formaldehyde jar”: Soft gray or greenish-gray, kept neat and smooth.
- Party version: Neon or variegated yarn that pops under lights.
- Spooky sparkle: Add a thin metallic thread to your main yarn.

Common Mistakes and How to Avoid Them
These how-to instructions offer practical guidance to help you navigate challenges while working on your project.
- Cinching too tight at first: Leave space so the “fingers” show. Tighten later.
- Losing the inner ring: Feel for it with your thumb, then guide the needle under.
- Uneven chain tension: Lay the yarn out on a bed or desk to keep a smooth flow.
- Catching random loops while sewing: Keep your needle under the ring only, not through decorative loops.
Tip: Use your thumb to cover chain 11 every time you count, following the crochet pattern for stitch consistency. That simple habit keeps your spacing tidy.
Fixing Loose Fingers
If a section looks slack, rotate the piece, gently pull the gathering yarn near that area, and pat it into place. You can nudge things after tying, especially before sewing the halves.
What If Your Yarn Tangles?
Stop, set it on a flat surface, and lay the strand in a wide sweep. Use a sweeping motion to reset the flow before continuing.
Time-Saving Tips for Beginners
- Triple the yarn instead of switching to bulky. It gives the best texture and fewer joins.
- Chain the entire ball at once, then gather in one go. The rhythm helps.
- Count to 12 with your thumb on 11 for quick accuracy.
- Tie with the double-loop shoelace tie so nothing slips.
- Keep a blunt needle for sewing. It moves quickly through the ring.
Want a quick refresher on the basics, stitch names in US American terms, and tool choices like hook sizes while you work? Grab my handy Free Crochet Cheat Sheet and keep it nearby.
Using the Free Pattern
If you like to print and follow along, keep an eye on video descriptions for printable pattern versions when available. Subscribing helps you catch updates and new tutorials.
Advanced Variations
For Halloween, these advanced variations at an intermediate skill level offer weird and wonderful crochet patterns to elevate your project.
- Add a thin metallic thread for eerie shimmer.
- Go bigger by using more yarn per hemisphere.
- Make mini brains using amigurumi techniques with lighter yarn and a smaller hook.
- Stitch two small brains to a headband for a costume accessory.
- Combine elements like an eyeball or tentacles for more anatomical or creepy designs.
Tip: For a more “aged” or jar-ready look, keep your loops neat and your shape smooth. I know, “for melddahidy” in the transcript sounds funny, but that classic formaldehyde jar look is easy with even tension and a muted color.
Scaling Up the Brain
To scale, add more yarn to each hemisphere and keep your 12-chain spacing for fingers. You can size up your hook slightly if you want a softer, looser texture like jelly.
Caring for Your Crochet Brain
- Spot clean with a damp cloth. Avoid soaking.
- Store it flat or in a jar so it keeps its shape.
- If it compresses, fluff the ridges and pinch the ends again.
Bold advantage: Acrylic holds its body well and keeps the ridges perky.
Display Ideas
- Set it in a clear jar with faux labels and an eyeball accessory for a pickled effect.
- Group a few in different sizes on a tray for party decor.
- Use under a cloche on a side table for that mad-scientist vibe.
Resources for More Crochet Fun
Want to explore tools and quick wins that I love? Try these helpful resources, including full colour photo tutorials for clear visual guidance.
- Yarn I used and similar options: shop yarn picks on Amazon
- My favorite 8 mm hook: comfortable 8 mm crochet hook
- Blunt tip needles: rounded needles for easy assembly
- Subscribe for weekly tutorials: join the channel on YouTube
- Join the community: become a member for extras
- Free Cheat Sheet: download your quick-reference guide
- Left-handed tutorials: watch the lefty playlist
Tip: If you’re kitting up your tools, I keep all my favorites in one place in my Amazon store. It makes gathering supplies a breeze.
Left-Handed Tutorial Option
Prefer mirrored demos? Check out my left-handed tutorials. They follow the same steps with a flipped view.
Join the Community
Come hang out for weekly projects, Q&A, and tips. Become a member here and be the first to know when new holiday projects drop.

Final Thoughts on This Quick Project
This squishy brain builds fast and looks amazing on display. It’s the perfect “make in minutes” project that still feels special. If you try this crochet pattern, tag me with your color choices and display ideas. Ready for more eerie-cute decor? I’m already planning the next seasonal quickie, so subscribe, share your make with the Amigurumi Halloween Eyeball Jelly Brain Crochet Pattern, and stay hooked.
Left Handed?
FAQs
How long does it take to make the Halloween Crochet Brain?
I can finish one brain in an evening. Chaining each 100 g ball takes the longest, but the gathering and sewing go fast once you get the rhythm.
What yarn works best for this project?
I like size 4 worsted acrylic, tripled. It holds shape, fluffs well, and is easy to clean. Size 6 bulky works too if you prefer fewer strands. Gray, off-white, or muted tones look most realistic.
What hook size should I use?
I use an 8 mm hook for a plump, quick chain. If your tension is tight, size up to 9 mm. If your chain looks loose, size down to 7 mm.
How much yarn do I need for one brain?
About 200 g total, 100 g per hemisphere. If you scale up, add more yarn to each half.
What does “triple the yarn” mean?
I hold three parallel strands of the same yarn at once and chain with them together. It makes a thick, rope-like cord without switching to bulky yarn.
My chain keeps tangling. What should I do?
I lay the yarn out on a bed or table in wide arcs. Pull out extra yarn before you chain. If it snags, pause and reset the sweep.
How do I keep the “brain fingers” even?
I count to 12 every time and cover chain 11 with my thumb. I also insert the needle in the same direction (into the back loop) for consistent spacing.
I cinched too tight. Can I fix it?
Usually yes. Loosen the tie slightly, fluff the loops with your fingers, then re-cinch gently. Keep the loops flat as you tighten.
I can’t find the inner ring for sewing. Any tips?
I slide my thumb into the center and feel for the tight inner ring. It’s “right down in there.” Scoop under that ring from one half, then the other, all the way around.
Can I make a bigger or smaller brain?
Yes. For bigger, use more yarn per hemisphere and keep the 12-chain spacing. For mini brains, use lighter yarn and a smaller hook.
What colors look most realistic?
Gray, off-white, pale blush, or green-gray give a preserved-in-a-jar vibe. Add a thin metallic strand for eerie shimmer.
Can I use cotton or wool instead of acrylic?
You can. Cotton gives a neater, firmer look but less fluff. Wool is springy but may felt with handling. Acrylic is the easiest and holds ridges well.
What needle should I use for assembly?
A blunt tip yarn needle. It glides under the loops and the cinch ring without splitting the strands.
Do I have to gather every 12 chains?
Twelve gives a classic brain texture. You can test 10 for tighter ridges or 14 for wider ones. Stay consistent along the chain.
![]()
I’m Christa Patel, the maker behind Secret Yarnery. I design fast, beginner-friendly crochet projects that look polished and feel fun to make. My tutorials focus on simple methods, practical tips, and cozy textures so you can get great results without stress.
I publish new patterns and step-by-step videos every week on YouTube, plus printable guides and seasonal ideas on secretyarnery.com. Whether you’re chaining your first project or shaping advanced textures, I’m here to help you finish with confidence.
When I’m not filming or testing yarn, you’ll find me color-matching from my stash, answering crochet questions in the community, and planning quick wins for holidays and gifts.
About the Author
With a passion for crafting easy, beginner-friendly tutorials and patterns, Christa inspires crafters of all skill levels to unleash their creativity worldwide. She encourages yarn lovers to connect, create, and crochet a world filled with beautiful handmade treasures!
Easy DIY Halloween Crochet Brain Pattern to Make In Minutes!