If you love adding colorful, textured details to your crochet projects or want a unique way to use up even the smallest yarn scraps, the log cabin granny square is perfect for you. This dynamic twist on the classic granny square fits perfectly alongside any traditional five-round granny, bringing a fresh modern edge to your afghans, blankets, or cushions. In this complete step-by-step guide, I'll share how to create a vibrant log cabin granny square that looks fantastic, uses up your stash, and helps you mix and match colors with confidence.
What is a Log Cabin Granny Square?
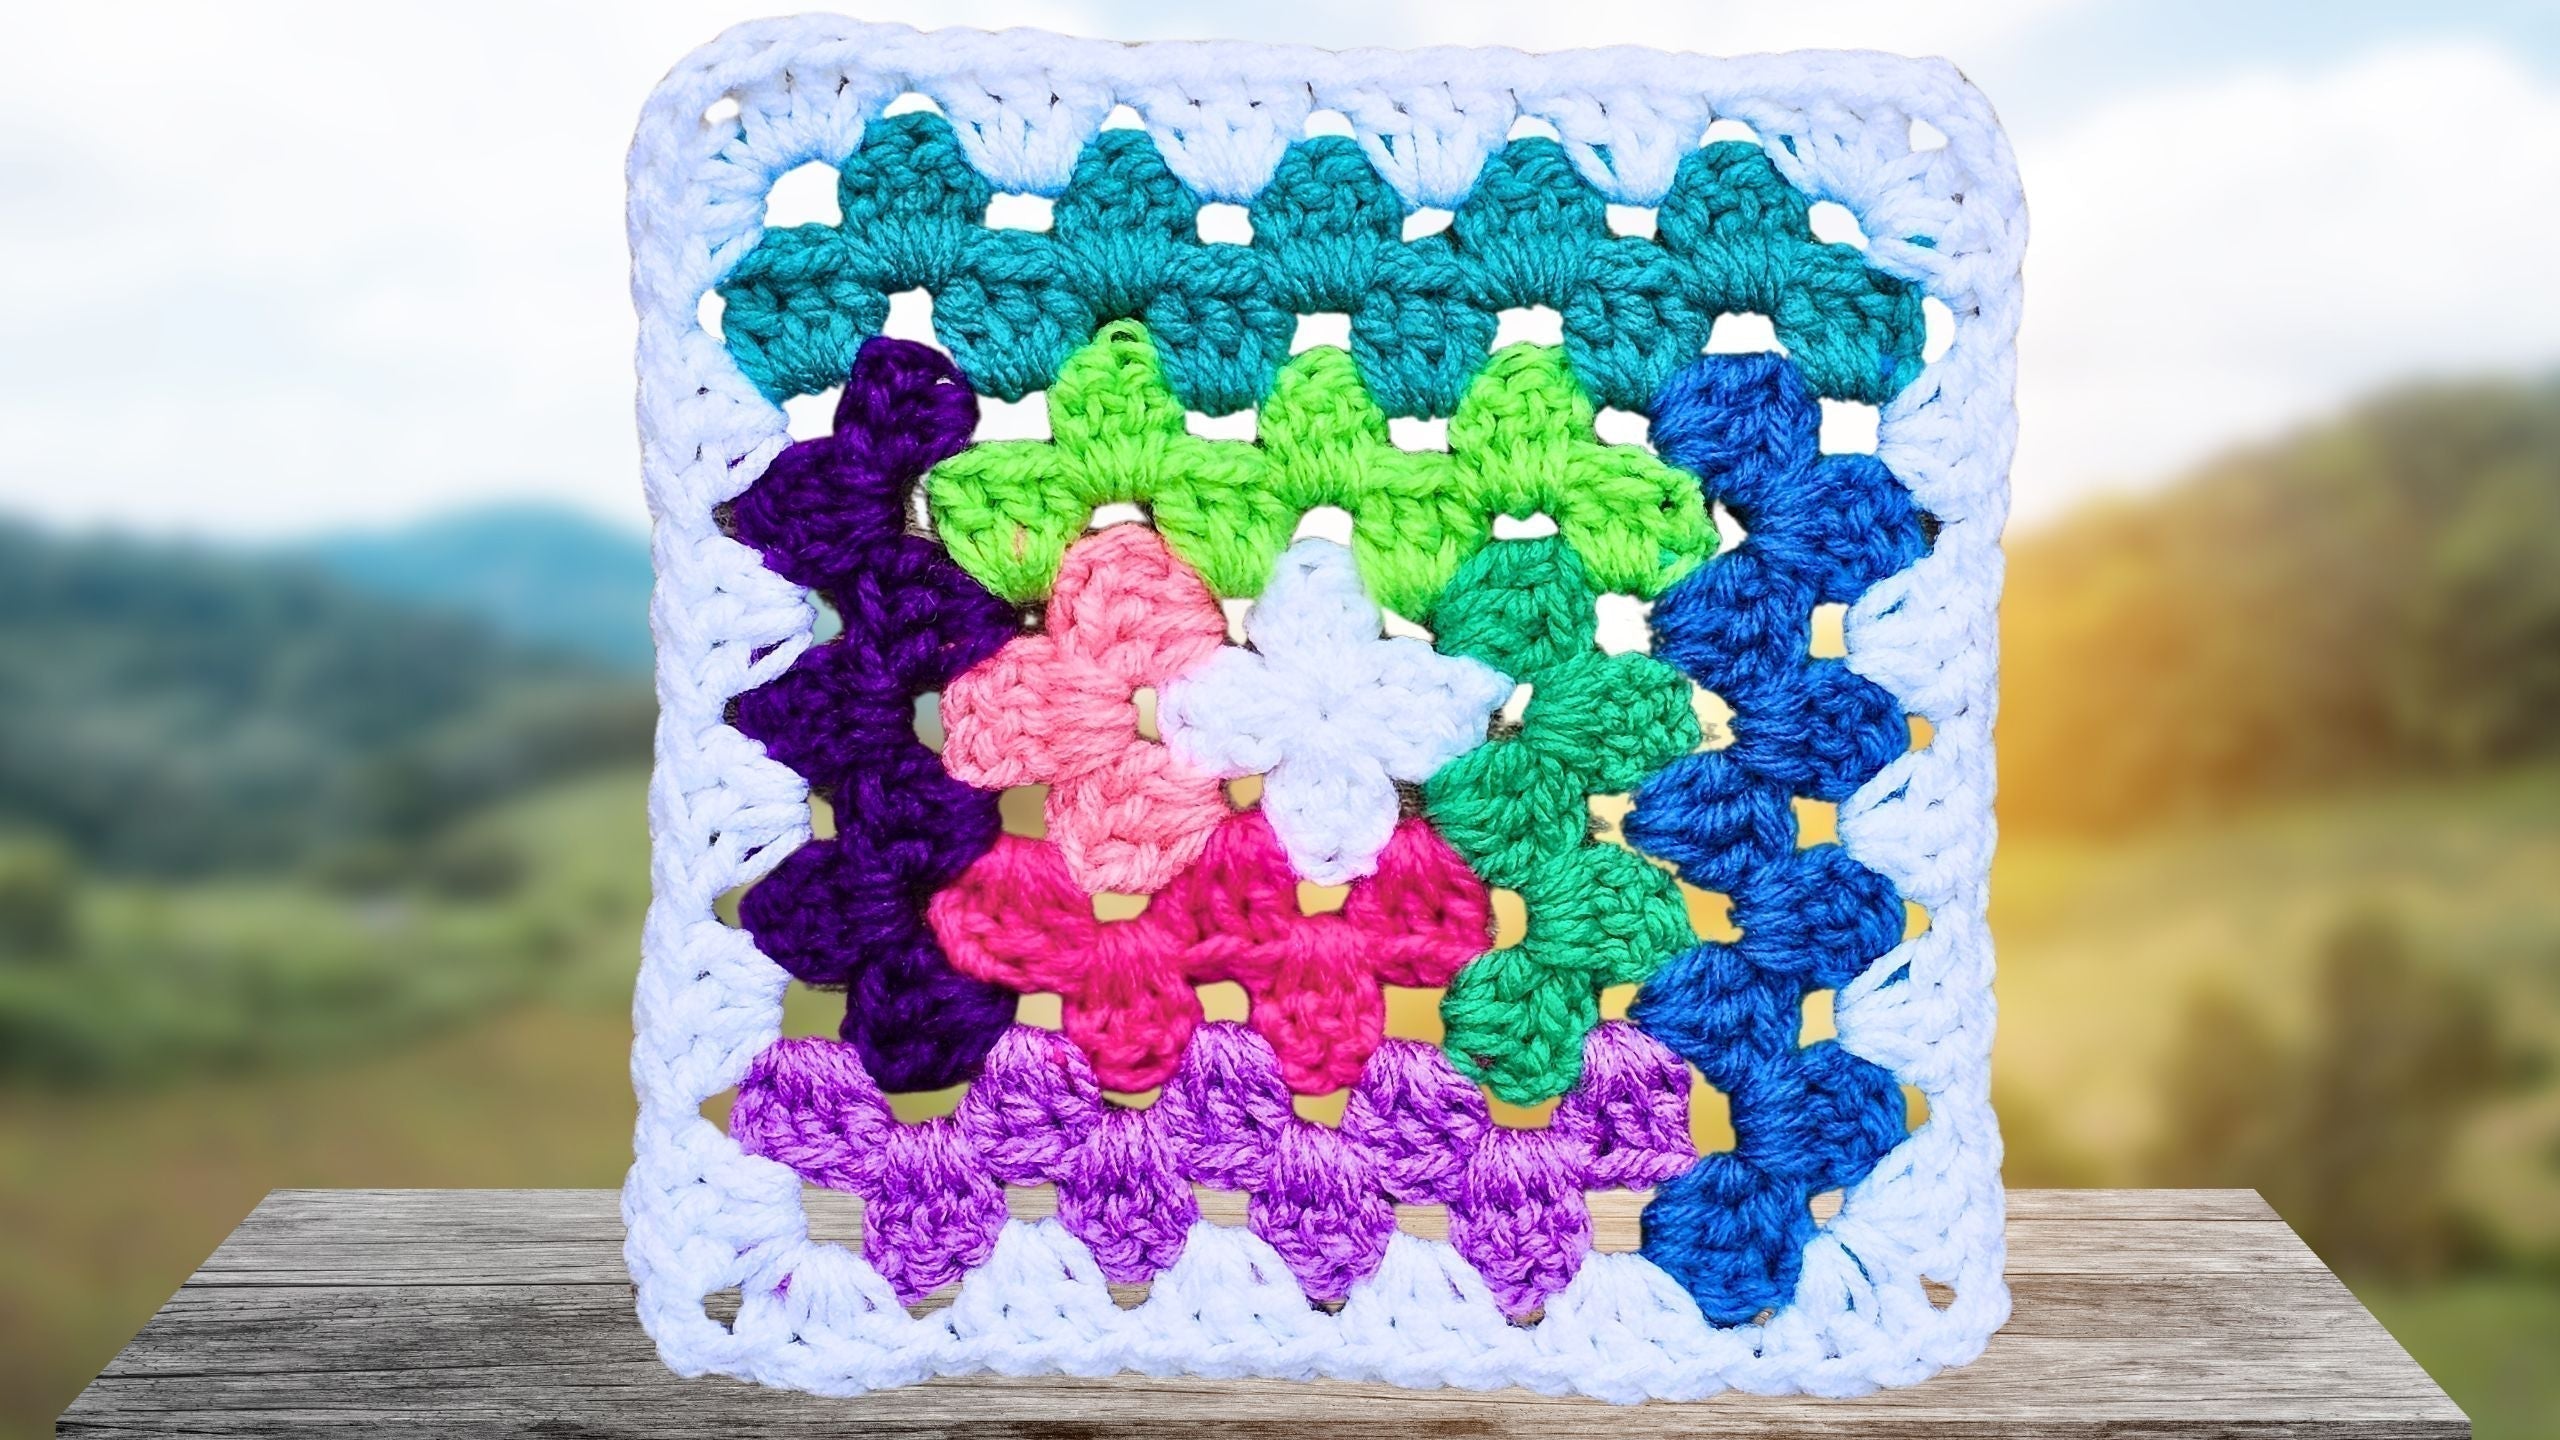
A log cabin granny square reimagines the traditional granny square with a construction inspired by the iconic log cabin quilt block. Instead of working in evenly spaced rounds, each “side” of your square grows as you add new colors, creating a playful patchwork effect with building blocks of color around the central square. This makes each square completely unique and perfect for mixing and matching with your other five-round granny squares.

One of the biggest draws for this design is that it's a true stash buster. Those tiny balls of leftover yarn finally have a purpose—you can use the smallest bits for the first rounds and save the more substantial scraps for the outer edges. With each addition, you see more color and creativity come together, making it ideal for blankets, throws, or anything that craves a pop of personality.
Materials Needed for Your Log Cabin Granny Square
To get started on your own log cabin granny square, you only need a handful of supplies. You can keep it simple or choose to invest in high-quality tools if you love a smoother crochet experience. Here’s everything I use for my squares:
- Yarn: Any yarn works, though I recommend size 4 (worsted weight) acrylic for beginners. Use your leftover scraps—the more colors, the better!
- Crochet hook: A 6 mm hook matches size 4 yarn. Always check your yarn’s label for the suggested hook size if you use a different weight.
- Sharp scissors: For cutting yarn cleanly between color changes.
- Needle: Essential for sewing in all those colorful ends later. Sharp tip needles like these are a favorite: Recommended sharp tip needles.
A log cabin granny square is forgiving and flexible, making it a go-to project for every crochet level.

Setting Up Your Workspace
A tidy, organized space makes for smooth crocheting—especially with frequent color changes. Here’s a quick checklist to prep your stash-busting session:
- Gather and group yarn scraps by color or size for easy selection.
- Keep scissors and your favorite needle within arm’s reach.
- Use a small basket or container to store yarn tails as you go.
- Lay squares and finished rounds flat as you work to keep them neat.
Organizing your supplies can help reduce frustration and keep your creativity flowing.
Starting Your Granny Square: Magic Ring vs Chain Three
There are several ways to begin the center of a granny square, but the two most common are the magic ring (also called the magic loop) and the chain three method. Both create a center ring, but they offer different looks and feels.
For a magic ring:
- Make a loop with your yarn.
- Insert your hook, yarn over, and pull through.
- Chain three, then crochet directly into the ring.
- Pull tail tight to close the ring.
For a chain three start (my preferred method):
- Make a slip knot and place it on your hook.
- Chain three.
- Insert your hook into the first chain made, just above the slip knot.
- Slip stitch to form a small loop, holding it open between your fingers.
The chain three start is easy for beginners and makes a small, tidy hole in the center—no fussing with tightening a magic ring. Either method works, so choose the one you’re most comfortable with.
Forming the First Round: Creating the Center Ring
Let’s break down the first round into manageable parts. This creates the solid center your log cabin granny square will grow from.
- Chain three (this counts as your first double crochet).
- Make two more double crochets into the center of the ring.
You now have your first group of three double crochets—this forms your square's first “side.” - Chain two to form a corner.
- Still working into the center of your ring, make three more double crochets.
- Continue:
- Chain two (corner), three double crochets
- Repeat until you have four groups of three double crochets, each separated by a chain two.
- If you run out of room, gently pull or slide your center ring to expand the opening.
- After the fourth group of double crochets, chain two and slip stitch into the top of your starting chain three to join.
- Chain one to secure and cut your yarn, leaving a long tail for sewing in later.
- Flip over and trim the tail you crocheted over.
At this point, your tiny square sets the stage for building the log cabin pattern outward, color by color.

Understanding Front vs Back of the Work
To get crisp, clean joins and attractive color changes, pay attention to which side of your granny square is facing up. The front shows neat “V” shaped stitches on the edge, while the back resembles little “macaroni” curves. Whenever you change colors or join a new round, make sure you’re working into the back—the “macaroni” side—as it helps hide tails and keeps seams tidy.
If you’re unsure which is which, just look for those little V’s (front) and curves (back) along the edges after the first round.
Color Two – Joining a New Color with a Slip Stitch
Now you’re ready to add some personality. Joining color two takes just a few steps:
- Insert your hook into any open corner space on the macaroni (back) side—avoid where the last round was finished.
- Loop your new color over your hook and pull through.
- Slip stitch both strands to secure the new yarn.
- Drop the tail and hold it along the edge so you can crochet over it.
- Chain two (this acts as your first double crochet if you’re joining as shown).
- Add two double crochets into the same corner space.
- Work three double crochets into the next corner space, again working over the tail where possible.
- Continue around the square, placing three double crochets in each space and chaining two at the corners.
- To finish, chain two and slip stitch to the top of the starting chain. Chain one to secure, then cut yarn, leave a tail, and pull through to finish.
By always working over tails and hiding them as you go, there’s less to sew in at the end and your joins will be seamless.

Color Three – Continuing the Pattern Along an Edge
Adding the third color follows a pattern similar to the previous step, but now you begin building “logs” around another edge.
- Turn your work and start in the macaroni area of the original square, in a space where you haven’t finished the previous round.
- Pull your new color loop through and slip stitch both strands to join.
- Chain two (or three, depending on your joining method) and add two double crochets to the same space.
- Move to the next two spaces, placing three double crochets in each.
- At the end, chain two and turn your work.
- Work three double crochets into each space going back.
- To finish this color, do a single double crochet into the top of the turning chain from the previous round.
- Secure with a chain one, cut the yarn and pull through the tail.
Each time you add a color, you repeat this process—working your way along one edge, turning, and working your way back.

Color Four – Repeating the Process with Yarn Changes
The beauty of the log cabin granny square is how easy the repeat is:
- Join in the space before the end of your last round, always on the back (macaroni) side.
- Chain two, then make two double crochets in the starting corner.
- Add three double crochets into each open space along the edge.
- Work over tails where you can for neatness.
- Chain two at the end, turn your work, and three double crochets into each space as you head back.
- Finish with a double crochet in the chain, chain one to secure, cut your yarn, and pull the tail through.
Tip: Keep working over your yarn tails with each new color—that way, most ends are hidden and secure by the time you sew in the final few.

Color Five – Completing the Fourth Side
You now get to close off all four sides of your block and really see the log cabin structure take shape. The process goes like this:
- Join new yarn in the first open space on the back side.
- Chain two and work two double crochets into this starting corner.

- Place three double crochets into each space along the side; you’ll have four sets for this round.
- Chain two, turn your work.
- Work three double crochets in each space as you head back across.
- Finish off with a double crochet into the top of the chain, then chain one, snip your yarn and pull it through.
With each completed color, you notice the “logs” wrap further around the square, growing chunkier as you go.

Optional Size Extension: Color Six
If you want a slightly larger log cabin square or need to match a specific size (to blend with other projects), simply keep building out.
- Start color six the same as before, joining yarn in a corner space before your last tail.
- Chain two, add two double crochets in that corner.
- Continue with three double crochets into each open space along the side—this time, you’ll likely have five sets.
- Chain two, turn, and crochet back along.
- Finish with a double crochet in the chain space, chain one, and snip yarn.
You can repeat this process to make your square as large as you’d like. The pattern stays the same; only the number of double crochet sets grows with each extension.

Colors Seven and Eight – Repeating the Pattern for Growth
To expand even further, follow this sequence for each new color:
For Each New Color:
- Turn the square with the back facing up.
- Join yarn in the corner before your last round’s tail.
- Chain two, add two double crochets in the same corner space.
- Make three double crochets into each open space along the edge (number of sets increases with each round).

- Chain two, turn your work, and crochet three double crochets into each space back to the start.
- Finish off with a double crochet into the top of the chain.
- Secure your yarn, snip, and pull through.
- Always bring that stray tail forward so you can crochet over it as you work; this keeps edges neat and minimizes sewing at the end.
By now, the log cabin motif should be very clear: strips of color work their way around the central square, each “log” adding to the overall design.
If you’re looking for more community inspiration and pattern-sharing, check out crocheters sharing their own log cabin granny squares projects on Reddit.

Final Round: Color Nine and Completing the Square
For this guide, I’m stopping at color nine—which matches a standard five-round granny. If you wish, you can keep going and make your square as big as you’d like; just repeat the sequence.
To complete the final round:
- Turn your work and join your last color into the corner before your ending tail.
- Chain two and two double crochets into the corner.
- Work three double crochets into each space along the side until you reach the end (the number of sets should be five if you’ve completed all previous rounds).

- At the end, chain two, turn your work, and crochet three double crochets into each space as you head back.
- Close the round with a final double crochet into the top of the chain, chain one, and cut your yarn.
- Pull through and snug your last stitch down to secure—all done

It’s that simple. You now have a completed log cabin granny square, which matches any five-round granny and can be easily extended for larger projects.
If you want another take or some alternate visuals on making log cabin granny squares, the Magic Owl Studios tutorial provides another detailed walkthrough.
How to Keep Your Granny Square Edges Straight and Clean
A square with crisp, even edges just looks better, and consistency makes joining squares easier later. Here are some quick tips:
- Make sure to put three double crochets in every open space along the edges.
- Always use chain two at each corner to prevent puckering.
- Keep your tension even to avoid wavy or bunched-up sides.
- Double check that you’re working into the right stitches—especially at the corners.
Correct stitch placement is key to a square that sits flat and aligns cleanly with other grannies.

Preparing Your Granny Square for Edging
Once you’ve finished your last color, pull all the tails to the back (one side) of your square to simplify the edging and sewing process. For the neatest appearance, lay your square with the center facing up so the prettiest stitches show off on the edge. Choose a color for the edge that complements your layout or blends in with other squares you plan to use.
Small planning steps here ensure a polished look once you finish and assemble your squares.
Edging Your Granny Square: Joining Yarn Anywhere
Adding an edge gives your project a professional finish and helps all your squares align perfectly. Edging is forgiving—you can join your yarn into any corner:
- Insert your hook into any corner space, loop your yarn over, and slip stitch both strands to join.
- Chain two (counts as your first stitch).
- Add two double crochets into the same corner.
- Work three double crochets into each space along the edge.
- At each corner, pause for the special stitch (see the next section for details).
- Continue around the whole square, always working three double crochets into every open space, and keeping chains and stitch counts consistent.
Edging brings everything together—take your time for a crisp, clean finish.

Creating Perfect Corners for Your Edging
Corners are the secret to a sharp square. Here’s the simple pattern you’ll repeat at every corner:
- In each corner space:
- Place three double crochets
- Chain two
- Add three more double crochets into the same space
- Rotate your work as you go to keep stitches side by side.
- Slide stitches back if you need a bit more space.
Repeat these steps for all four corners, then keep edging around the square. This pattern helps your corners sit flat and keeps your block shape consistent for easy joining with other squares.
Finishing the Edging Round
Complete the edging with these simple steps:
- When you reach your first corner (where you started), finish with three double crochets in that space.
- Chain two and slip stitch into the top of your original starting chain.
- Chain one to secure the yarn, then cut and pull through—snugging down the last stitch.
- For an invisible join, you can pull the yarn through and use a yarn needle to mimic your stitch into the top of the chain, hiding the join completely.
Tidy corners and a strong finish make every square look more professional.

Sewing in Tails: Tips for a Neat Finish
Weaving in your ends may not be the most exciting part, but it’s important for durability and aesthetics. Here are my go-to strategies:
- Use a sharp needle that glides smoothly through stitches.
- Weave tails back and forth in a zigzag or along the edge to secure.
- Hide ends under stitches you crocheted over, so nothing peeks out.
- Trim excess closely (but not too close—leave a bit of length inside the stitches).
Taking a couple of extra minutes with this step pays off with a neat, lasting finish.
Stash Busting with the Log Cabin Granny Square
The log cabin granny square turns small yarn odds and ends into a beautiful, practical project. Try to:
- Use short scraps or leftover bits for starting rounds.
- Save longer scraps for finishing side “logs” or your edging.
- Mix and match tones and textures for a bold, creative look.
- Experiment with color order—random, gradient, or repeating patterns all look great.
Don’t be afraid to play with your stash! There are no wrong choices with the log cabin granny square—every combination is unique and personal.

Matching Your Log Cabin Granny Square with Other Five-Round Grannies
Because this square grows out in logs, it lines up perfectly with traditional five-round granny squares. This means you can:
- Join log cabin squares with classic grannies for blankets with unique visual texture.
- Use a contrasting, matched, or gradient color for the edging to unify all your blocks.
- Assemble your finished pieces into blankets, pillows, bags, or anything else you dream up.
If you’d like even more ideas for combining log cabin blocks with other motif styles, there are plenty of creative project shares and support forums like Crochetville’s log cabin design help thread to browse for inspiration.
Left Handed?
Conclusion
Making a Log Cabin Granny Square is the perfect way to add color, use up scraps, and have fun with your crochet projects. Whether you’re a beginner or an experienced crocheter, this pattern works with any yarn, grows as big (or small) as you want, and fits right in with all your favorite grannies. From building your first “logs” to the final polished edge, you’ll discover how simple techniques come together in a square that truly pops.
For more written patterns in plain English or to print this guide, visit my website. Want to expand your skills or explore more patterns? Find tutorials, community shares, and yarn inspiration online. Grab your scraps, hook, and needle, and let’s enjoy every stitch. Your next stash-busting masterpiece starts now!
FAQs
1. What’s the benefit of making log cabin granny squares instead of classic grannies?
Log cabin granny squares use up leftover yarn and let you create bold color patterns. Their structure adds texture and a modern twist to classic projects.
2. Can I use any type of yarn for log cabin granny squares?
Yes. You can use almost any yarn, but stick to one thickness per square for a neat, even look. Worsted weight acrylic yarn is a popular choice for beginners.
3. How do I join log cabin granny squares with other motifs?
These squares match standard five-round grannies, so you can join them using slip stitch, whip stitch, or your favorite joining method.
4. Do I need to block my log cabin granny squares?
Blocking is optional but helps even out the shape and size, making assembly easier and giving your project a polished finish.
5. How do I avoid lumpy joins and loose yarn tails?
Work over yarn tails as you join each color to help hide ends. Use a sharp needle to weave in any leftover tails carefully to prevent lumps.
6. Can I make a log cabin granny square larger or smaller?
Yes. Add more “logs” in additional colors to make it bigger or stop after fewer rounds for a smaller square.
7. What’s the easiest color order for beginners?
Start with a light or neutral center, then add colors from light to dark or use random scraps for a scrappy look. There are no strict rules.
8. How do I keep my edges straight as my square grows?
Always check stitch counts, use three double crochets in every space, and chain two at the corners. Keep your tension steady.
9. What projects can I make with log cabin granny squares?
They’re perfect for blankets, pillows, bags, scarves, and even clothing. Combine them with standard grannies for extra interest.
![]()
Christa Patel is a crochet designer, teacher, and lifelong yarn lover. She specializes in creative, beginner-friendly patterns that help crafters use up their stash and try new styles with confidence. Christa’s tutorials focus on clear steps, practical tips, and colorful results—making crochet fun and accessible for everyone.
You can find more of Christa’s projects, patterns, and video tutorials on her website and YouTube channel. She loves sharing new ideas, answering questions, and building a friendly, supportive crafting community. When she’s not crocheting, Christa enjoys family time, exploring new techniques, and inspiring others to create with color.