Step-By-Step Guide: How to Crochet a Beautiful Flower Bouquet Poncho
I'm excited to walk you through how I made my crochet flower bouquet poncho—a project that's every bit as stunning to look at as it is fun to create. With cozy stitches, bold floral accents, and beginner-friendly instructions, this poncho brings a bouquet right to your wardrobe. Whether you're a seasoned crocheter or just learning, you'll appreciate how straightforward and rewarding this project is. Everything you need, from yarn choice to sewing those pretty flowers, is covered so you can create your own wearable work of art.
Project Overview: What Makes the Crochet Flower Bouquet Poncho Special
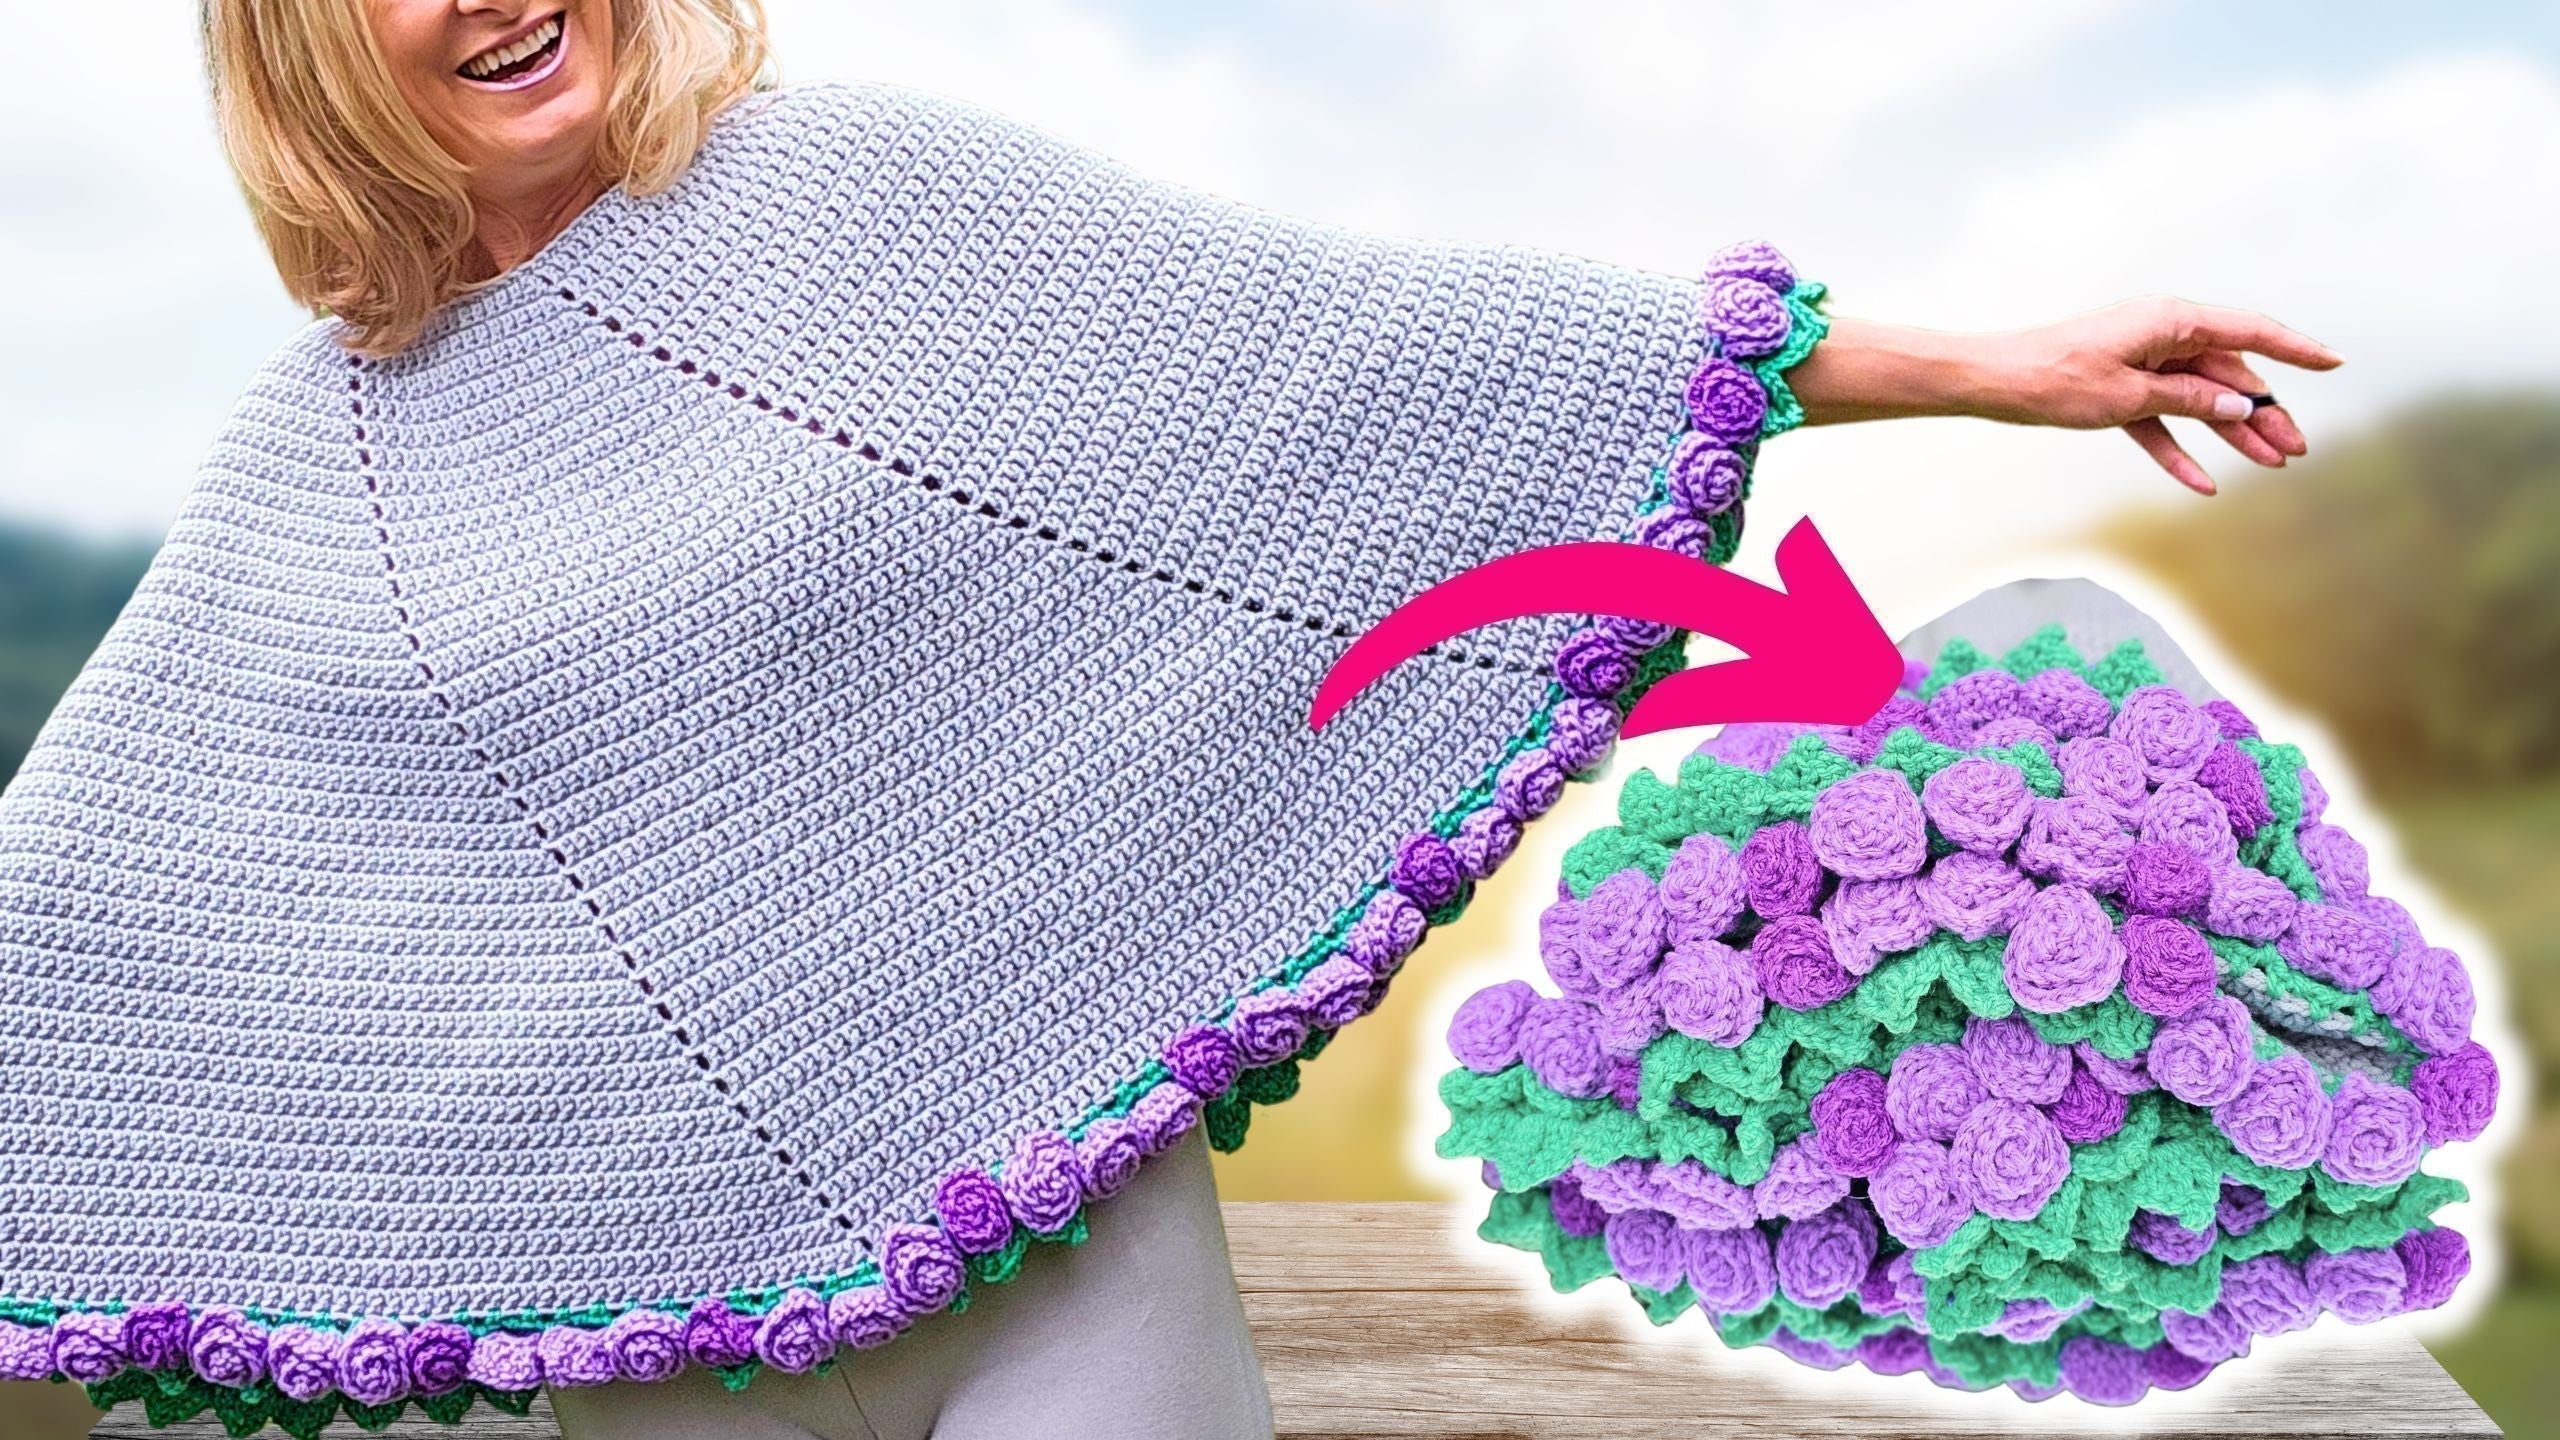
The flower bouquet poncho is more than just an accessory—it's a statement. Soft neutral shades combine with bursts of color in crocheted flowers, creating a look that both warms and brightens any outfit. The design starts with a clever spiral construction, grows seamlessly as you work, and is bordered with lovely leaves. Every detail, from the simple neckline to the cascade of blossoms, makes this poncho unique.
I've designed this step-by-step tutorial to be easy to follow, no matter your skill level. You don’t need fancy tools or tricky stitches—just patience and a love of yarn. By the time you’re done, you’ll have a poncho that feels like a cheerful bouquet you can toss over your shoulders any time.
If you love this project, check out the Easy Crochet Flower Poncho Pattern – Beginner-Friendly! for another fun floral-inspired design.

Materials Needed for the Crochet Flower Bouquet Poncho
Yarn Choices and Quantities
For this poncho, I used readily available size 4 worsted weight acrylic yarn, giving the piece structure and softness. Here are the exact quantities I used for a standard size:
- 550 grams of gray yarn (main body)
- 100 grams of green yarn (leaf and edging)—I recommend buying more than 100 grams so you don’t run short
- 200 grams (or two balls) of purple yarn (flowers)—pick any floral color that makes your heart happy
Tip: If you’re not sure about your tension or want your leaves extra lush, grab extra green.
Crochet Hook and Tools
To keep the stitches cozy and the project beginner-friendly, you’ll want these tools by your side:
- 6 mm crochet hook (main body)
- 6 stitch markers (5 of one color, 1 of a different color)
- Sharp scissors for trimming
- Yarn needle for sewing ends and assembling flowers
- If you don’t have stitch markers, you can manage without, but they’re a big help for counting and keeping track of sections.

Preparing to Begin: Stitch Markers and Starting Chain
The key to getting this project off to a good start is keeping track of your sections. Here's what to do:
- Gather your 6 stitch markers (five matching and one special).
- With your main body color, leave an 8-inch tail—a little extra helps for sewing later.
- Make a slip knot as you usually do.
- Chain 14 stitches. This set forms your first section.
- Find the “camel bump” or the back loop along the back of your chain—that raised ridge. Place a regular colored stitch marker into the first camel bump.
- Keep your chain turned on its side so you can spot those bumps with ease.
Creating the Base Chains for the Poncho Neckline
Chaining and marking sections keeps the neckline even and customizable. Here's how to set it up:
- Chain 14 and mark the first camel bump.
- Repeat: Chain 14 again, place another marker in the first bump.
- Keep chaining and marking until you’ve used all five regular stitch markers.
- On your last set, use the fancy color stitch marker—this helps mark the connection point as you start working in the round.
- Want a smaller poncho? Remove one repeat of 14 chains before continuing.
Numbered lists like this help keep count, especially if it's your first time working with sections.

Working the Single Crochet Row Along the Back Loops
Next step is to anchor your chains together using single crochet stitches—these create a more structured neckline.
- Chain 1 at the marker.
- Work a single crochet into the same back loop where the stitch marker sits.
- Continue with single crocheting into every back loop (camel bump) along your chained sections.
- Don’t forget the very last loop. If you miss one, your neckline may look uneven.
A bonus to this method—the chain might look a little wiggly or tighter than your stitches. That's good. This effect keeps the neckline firm so it won’t stretch out over time.
Tip: Working in the back loops gives the neckline a neat, train-track finish that looks professionally made.
Laying Out and Preparing for the Next Row
Once you’ve completed your first row of single crochet, gently lay the work flat before joining. It should look like a smooth, twist-free loop—a little like an oval railroad track with stitch markers shining along the way. Laying it flat like this is crucial before starting the next rows to avoid a twisted neckline, which can skew the entire piece.
The fancy colored stitch marker should be at the starting point, guiding you where to begin the next step. I love taking a quick photo of this layout—it keeps me accountable and helps spot any accidental twists before moving forward.

Starting the Round with Single and Half Double Crochet
To get your spiral-shaped poncho growing, start directly at the fancy marker:
- In the first stitch by the fancy marker, work:
- 1 single crochet
- 1 half double crochet (in the same stitch)
- In the next stitch, start with a double crochet. Double crochet into each stitch all the way until you reach the next marker.
If you're new to different stitches, remember:
- Single crochet is short and dense.
- Half double crochet is a little taller.
- Double crochet is even taller and creates a nice drape.
Stitch markers at section starts help you check your work as you build each row.
If you don't want to move markers around, add a new marker above the stitch you've just worked for easy tracking.
Working Double Crochets Around and Increasing at Stitch Markers
As you crochet around the poncho neck, use the stitch markers to guide your increases. At each marker:
- Remove the marker.
- Chain 1.
- Work 2 double crochets into that same stitch (this creates fullness).
- Replace the marker into the new chain space you’ve just made.
Repeat this pattern for every marker around the neckline. Here's a quick step-by-step guide at every marker:
- Remove the stitch marker
- Chain one
- Make two double crochets into the same stitch
- Place your marker into the new chain space
This repeat helps build the rounded shape that fits perfectly over the shoulders.
For more inspiration on beginner-friendly projects, visit the Easy Crochet Poncho for Beginners for another staple pattern.

Joining the Round and Beginning the Spiral
As you reach the end of your first round, make sure you’ve worked into each stitch before the joining point. When you arrive at the special marker:
- Don’t chain one here. Instead, jump directly into two double crochets in the first stitch past the join.
- Move your fancy stitch marker to just before these two double crochets, marking where your spiral now grows from.
- Continue double crocheting around, working one into each stitch until you hit the next marker.
From here, the poncho continues in a spiral. Whenever you reach a marker, chain one and make two double crochets into the next stitch after the marker. The spiral shape encourages even, seamless growth.
To see the spiral progression in another context, check out Easy Granny Stitch Poncho Tutorial for how spirals change the look and feel of a wearable project.
Managing Stitch Markers as the Poncho Grows
Now that the neckline is set, it's safe to remove the first set of stitch markers—they've done their job marking your base sections. Keep the new ones you placed in chain spaces for your increases.
As your poncho grows, move these markers up every couple of rows, always keeping them near the current edge. These visual cues make it easy to spot where your section increases need to happen.
A quick tip: leave the markers until the last moment to avoid losing your place.

Sewing the Neckline Join Closed
Once your poncho's grown to a size that’s comfortable, it’s time to sew the neckline's short join for a finished look:
- Thread your yarn needle with the starting tail (that extra 8 inches you left).
- Bring the two neckline edges together, matching the "V" stitches on each side.
- Sew under the first V on one side and then the other, gently pulling to close the gap.
- Repeat a couple of times for strength, then weave in the tail to secure.
Take your time here—a little patience means a neckline that disappears into your stitches.
Continuing to Increase Poncho Size
With the spiral now working, crochet around and around, keeping to the established formula. Every time you reach a marker, chain one and increase with two double crochets in the stitch after. This is where you can decide how long or dramatic you want your poncho.
My sample used 37 rows of double crochet, finishing at about 21 inches (53 cm) from the neckline to the hem. Your length is totally up to you—try it on as you go, or measure for your perfect fit.
For guidance on fit and sizing, you may also like the Cropped Flower Granny Square Poncho.

Tapering Off the Spiral to Finish the Body
When your poncho is the right length, it’s time to finish the spiral delicately:
- For the last four stitches, switch from double to half double crochet.
- Finish up with two single crochet stitches to smooth the final row.
- Slip stitch into the chain space, then chain one to secure the yarn.
- Cut your yarn, leaving a long tail for weaving in later.
Tapering down from double to single crochet creates a softer, cleaner edge instead of a hard stop, making the poncho look like it belongs together.
Starting the Leaf Border: Joining Leaf Color Yarn
Give your poncho a unique frame using a vibrant pop of green (or your chosen leaf color):
- Find any spot along the hem that’s not where you just finished off.
- Join the new yarn with a slip stitch.
- Chain two to begin.
- Single crochet into the stitch after the gap, chain two, skip the next stitch.
- Repeat: single crochet, chain two, skip a stitch—continue all around the hem.
Here's a quick outline for this repeat:
- Chain two
- Skip one stitch
- Single crochet into the second stitch
This round builds little spaces that form the foundation for your leaf border.

Finishing the Leaf Border Round
When you get back to where you started:
- Chain two, slip stitch into the legs of the first single crochet to join.
- Start the next round by slipping into the space, chain four.
- Single crochet into the next space, then chain three, and single crochet again.
- Repeat this pattern—chain three, single crochet in the next space—around to get a lacy effect.
If you reach the end and there’s not quite enough room, adjust the last chain to three instead of four. It keeps the spacing even and the look tidy.
This round sets up larger gaps for the leaves to nestle into on the next step.
Creating Leaves on the Poncho Border
Now for the magical touch. Each chain space gets crocheted into a pretty, shaped leaf.
- Chain two.
- One double crochet.
- One treble crochet (wrap the yarn twice before pulling through each loop).
- Create a pico (chain three, then slip stitch into the first chain).
- Work two more treble crochets.
- Add a double crochet.
- Chain two and slip stitch back into the gap between spaces to anchor your leaf.
Repeat this pattern in every space around the poncho. The pico creates that little point on each leaf—just like a spring bud.
If you're new to picot or treble crochet, work slowly and check your loops. The shapes pop off the border beautifully and give the poncho depth and character.

Finishing the Leaf Border Round
After working the last leaf:
- Slip stitch into the base of the first leaf to close the round.
- Chain one, secure the yarn, and cut, leaving a tail.
- Hide all loose ends by running them through the underside of your stitches with your yarn needle.
Here’s a bullet list for finishing:
- Slip stitch to join
- Chain one to lock in place
- Trim yarn, leaving enough length for weaving
- Sew in all ends on the backside
Beginning the Crochet Flower Petals
Time to crochet the “flowers” that will bloom along your poncho’s border.
- Leave a 6-inch tail and make a slip knot.
- Chain 14.
- In the third chain from the hook, make 1 double crochet.
- In the next chain, add 2 double crochets.
- For the rest of the chains: work 3 double crochets into each one.
You'll see the flower begin to spiral automatically as you go. The increasing stitches build up fullness for the petals.
Step-by-step tail and stitch plan:
- Start: 6-inch tail, slip knot, chain 14.
- 1 double crochet in 3rd chain from hook.
- 2 double crochets in next chain.
- 3 double crochets into every remaining chain.
- End: slip stitch into last chain, chain one, cut yarn leaving 12–14 inch tail for assembly.

Securing the Flower and Sewing it Together
Take your finished spiral and roll it up to form the rose shape:
- Start rolling from the end where you finished your single crochets, keeping the top edge as flat as you can.
- Thread your yarn needle with the long tail.
- Working from the back, sew through all layers, back and forth, to anchor the shape securely.
- As you work, check the flower doesn't unravel and secure right to the base.
- When there’s about 6 inches of tail remaining, finish up for a sturdy, soft flower ready for attaching.
Make one flower for each leaf space on your poncho. For the size I made, that meant 76 flowers—one for every leaf. If you’d like some variety, alternate colors or make a featured color pattern.
For more floral poncho patterns, Rachel's Flower Poncho Crochet Pattern is a wonderful reference in a different style.
Attaching the Flowers to the Poncho Border
Time to stitch it all together:
- Lay your flowers out along the leaves, organizing colors if you're alternating shades.
- Using a smaller hook (I like 3.75 mm), pull one tail through the stitch adjacent to a leaf on the border.
- Pull the second tail through the opposite side of that leaf base, so both tails come out on either side of the leaf.
- Tie a tight knot to anchor the flower directly to the leaf tip.
- Weave both tails through the base of the flower, then trim.
- Repeat for every leaf space, all the way around.
If you're alternating flower colors, lay them all out before attaching to make sure your color pattern is just how you want it. If single-color, just go one by one.
By the end, your poncho will be bursting with cheerful blooms, each one securely fastened and spaced evenly thanks to your earlier planning.

My Final Thoughts and Wearing Your New Poncho
The joy of this flower bouquet poncho is seeing the finished project take shape right before your eyes. Every section—from the spiral construction to the textured leaves and popping flowers—brings color and warmth to any season. Whether you chose soft pastels or vivid shades, wear it with pride. It’s not just a poncho, but a bouquet you created stitch by stitch.
Ready to explore more wearable projects? You’ll love the step-by-step process in the Beginner's Guide to Granny Stitch Poncho, or try a unique construction with the Cropped Flower Granny Square Poncho.
If you enjoyed making this poncho, share a photo, give it as a gift, or enjoy wearing your bouquet of flowers all year long. Stay hooked and happy crocheting!
Left Handed?
FAQs
1. Is this poncho pattern beginner-friendly?
Yes. The pattern uses basic stitches and includes step-by-step instructions. Even beginners can follow along with patience.
2. What type of yarn should I use?
Worsted weight (size 4) acrylic yarn is recommended. It’s sturdy, soft, and easy to care for.
3. Can I adjust the poncho size?
Absolutely. To make the poncho larger or smaller, adjust the number of chain sections at the neckline or the number of rows worked in the body.
4. How do I keep the neckline from twisting?
Lay your chained section flat before joining and double-check for twists. This helps ensure your neckline is smooth and even.
5. Can I use different colors for the flowers and leaves?
Yes. Mix and match any colors you love for the flowers and leaves. Play with shades to match your style.
6. How many flowers do I need to make?
For a standard adult size, you’ll need about 76 flowers—one for every leaf section. Adjust the count if you change the poncho’s size.
7. What if I don’t have stitch markers?
You can use scraps of yarn or safety pins to mark sections. Stitch markers just make counting easier.
8. Can I make this poncho with cotton yarn?
You can, but acrylic gives a cozier feel and better structure. Cotton will make the poncho lighter and cooler—a good choice for warm climates.
9. Where can I find more beginner crochet patterns?
Explore the additional links in this post for more step-by-step patterns and ideas perfect for all skill levels.
![]()
Christa Patel is a passionate crochet designer and educator who specializes in making crochet simple, joyful, and accessible for everyone. Known for her clear tutorials and creative patterns, Christa has inspired thousands through her YouTube channel, blog, and online classes. Her designs focus on fun textures, bright colors, and projects that boost confidence—no matter your skill level. Christa’s practical teaching style, combined with her love for fiber arts, makes her a trusted source for crocheters seeking both guidance and inspiration. Whether you’re picking up a hook for the first time or looking for your next project, Christa Patel offers expert help every step of the way.
About the Author
With a passion for crafting easy, beginner-friendly tutorials and patterns, Christa inspires crafters of all skill levels to unleash their creativity worldwide. She encourages yarn lovers to connect, create, and crochet a world filled with beautiful handmade treasures!
How to Make an Easy Crochet Flower Bouquet Poncho in a Spiral