Easy Mitered Granny Square Crochet Tutorial | Beginner-Friendly Guide!
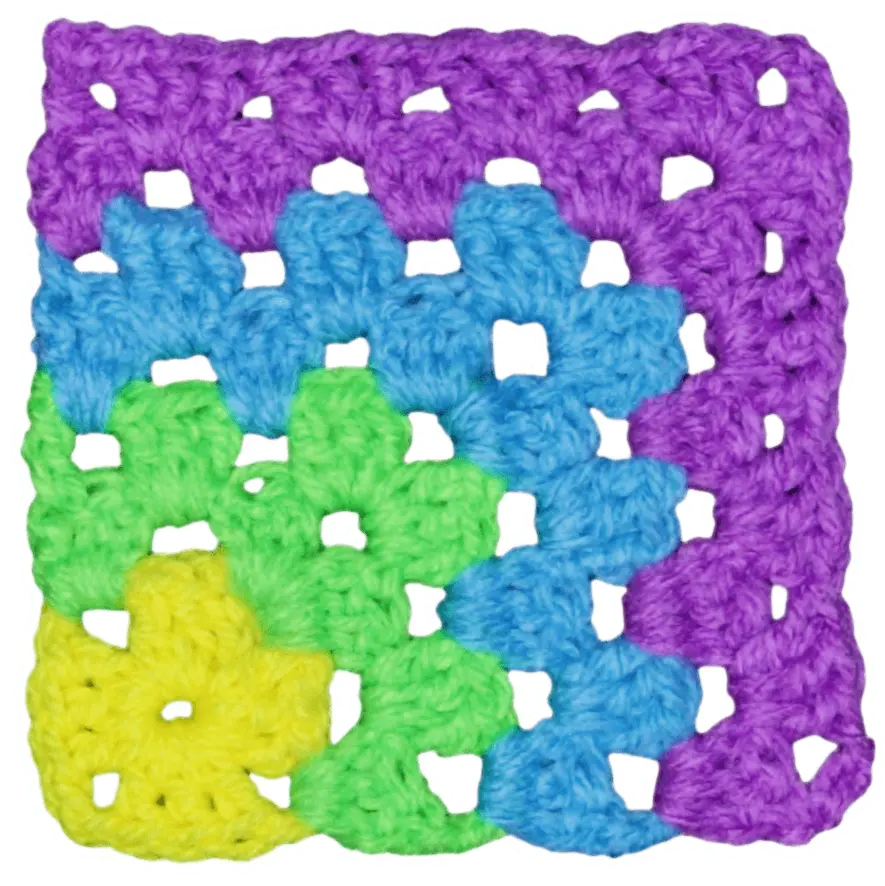
Have you ever wanted to create something beautiful and unique with your own two hands? Then, look no further! The mitered granny square offers a delightful twist on the traditional design, resulting in a captivating diagonal effect. It's easy to crochet and visually appealing.
Mitered granny squares are incredibly versatile. You can join them in countless ways to make a variety of patterns. Whether you prefer a neat, uniform grid or a more free-spirited arrangement, the possibilities are truly endless. The end result is a one-of-a-kind creation.
Ready to learn how to crochet this easy and fun design? The pattern is beginner friendly, and once you learn it you can apply it to so many of your future crochet projects. If you prefer to work with a written pattern, it's available on my website: Mitered Granny Square Pattern. Let's get started!
What You'll Need
Before diving in, gather your supplies. Having everything on hand will make the process smoother and more enjoyable. Here's what you'll need to crochet your mitered granny square:
Yarn
I recommend using worsted weight acrylic yarn for this project. It's readily available, comes in a wide array of colors, and is easy to work with. I will link some great options for you: Worsted Weight Acrylic Yarn.
However, feel free to use whatever yarn you have on hand. Scrap yarn is perfect for this project! You can also experiment with different yarn weights and fiber types to create unique textures and effects. Don't be afraid to mix and match colors to create a truly personalized design. You'll need one color for every two rows of your granny square. Feel free to use as many colors as you like.
Also, you can easily adjust the size of your granny square by adding more rows. Keep in mind that you’ll need to adjust the amount of yarn accordingly. This makes it easy to create squares of all shapes and sizes
Crochet Hook
I will be using a 6mm crochet hook, which is a great starting point for worsted weight yarn. However, the best hook size will depend on the yarn you choose and your personal tension. Always refer to the yarn label for the manufacturer's recommendation.
If you are looking to start a collection, here is a hook set I recommend: Crochet Hook Set.
Other Supplies
In addition to yarn and a hook, you'll also need a few essential tools:
- Scissors
- Yarn needle for weaving in ends

Getting Started: Round 1
Let's start building our mitered granny square. The first round forms the center of the square, so it's important to get it right. Here's how to do it:
- Make a Slip Knot: Create a slip knot using your preferred method. Place the loop on your hook and gently tighten it.
- Chain Three: Chain three stitches. This chain will count as your first double crochet.
- Slip Stitch to Form a Ring: Insert your hook into the very first chain you made, right on top of your slip knot. Yarn over and pull through both loops on your hook to create a ring.
- Hold the Center Open: Now, get yourself situated. You want to make a little u-shape underneath our hook with our tail going along our work. Hold the center of the ring open with your finger and thumb. This can be a little fiddly, but it will make it easier to work into the ring in the next steps.
- Chain Three (Counts as First Double Crochet): Chain three. This counts as your first double crochet for this round.
- Two Double Crochets: Into the very center of that ring, right where you're holding it open with your finger and thumb, make two double crochets.
- Chain Two: Chain two stitches.
- Three Double Crochets: Into the center of the ring, make three double crochets.
- Chain Two: Chain two stitches. Keep holding that tail along your work so we can keep working over it.
- Three More Double Crochets: Wrap your yarn and make three more double crochets into the center of the ring.
- Create More Space: To get some more space around our ring, grab that starting chain (those first stitches you made) and your last stitches you made, and just slide those new stitches back. That'll give you some more room along that ring so our stitches can lay down nice and flat.
- Chain Two: Chain two stitches.
- Three More Double Crochets: Make three more double crochets into the center of the ring, taking care to go over your tail.
- Chain Two: Chain two stitches.
- Slip Stitch to Join: Now, we're going to slip stitch to the top of that chain three to join. Slip stitch right there, and we want to get two strands of that stitch on the top of your hook. So, pop your hook in two strands of the stitch on the top of your hook and slip stitch to join.
- Chain One to Secure: Chain one to secure your yarn, leaving a long enough tail to sew in with a needle later. Pull your hook up and your yarn through and snug that down to secure.
That completes round one!

Color Change and Starting Rows 2 & 3
Ready to add some color? This is where the mitered effect really starts to take shape.
- Turn Your Work: Look for your pretty little V's. They're a nice little border here along the edge. Your pretty little V's are facing up. That is the front of your work. You want to be working into the back of your work. You want to be looking for these little macaronis just along here, so into the back of your work.
- Join New Color: Pop your hook in any corner space is fine. Loop of your new color on your hook, long enough tail to sew in with a needle later. Bring it through and slip stitch with both strands to join. Drop your tail, just holding it along the top of your work.
- Chain Two: Chain two stitches.
- Two Double Crochets: Into that same corner space, make two double crochets.
- Three Double Crochets into the Next Corner: Now, we're going to jump right over into the next corner space. I'm just going to hold that tail along the corner of my work. I'm going to put my yarn after that knot, after that chain one, just like that. Make three double crochets into that space.
- Chain Two, Three Double Crochets: Slide those stitches back to give yourself some more room in that corner space. Chain two stitches. Make three more double crochets into the same corner space.
- Three Double Crochets into the Next Corner: Into the next corner space, make three double crochets.
Now for row three:
- Chain Three, Turn: Chain three stitches, turn your work.
- Three Double Crochets: Into this first space right there, we're going to do three double crochets. So, wrap your yarn and make three double crochets into that very first space.
- Corner: Into the corner space, we're going to do a corner. Corners are three double crochets, chain two, and three double crochets, all into the same corner space.
- Three Double Crochets: Into the space along the side, make three double crochets.
- Finish Off: To finish off our color, we're going to make one double crochet into the top of that chain three, two strands of that stitch on the top of our hook. So you can look for your double crochets. Just follow those posts up, and there is your double crochet at the top. We want to go into that chain, top of the chain three right there. So wrap your yarn into the top of the chain three, two strands of that chain on the top of your hook, one double crochet to finish.
- Chain One, Cut Yarn: Chain one, cut your yarn, leaving a long enough tail to sew in with a needle later. Pull your hook up and your yarn through and snug that down to secure.

Continuing the Pattern: Rows 4 & 5
Let's keep growing our square and adding more color. These rows continue the established pattern, creating the diagonal lines that define the mitered look. If you want to make sure that you have a good foundation in crochet, check out the Easy Crochet Projects for Beginners I have available
- Turn Your Work: Turn your work. We're going to hold this tail along the top of our work just like that.
- Join New Color: Pop your hook into that very first space right along the edge. Grab a loop of your new color yarn, put that loop onto your hook, bring it through, and slip stitch with both strands to join. Drop your tail. You can hold it along with the other tails you have, two tails we're going to work over.
- Chain Two: Chain two stitches. If you join your yarn in a different way, you're going to want to do a chain three. Wrap your yarn and make two more double crochets into that same spot, into that same space. Drop your tails.
- Three Double Crochets: Into the space along the side, the very next space, make three double crochets.
- Corner: Into the corner space, we're going to do a corner: three double crochets, chain two, and three double crochets all into that same corner space. So, make three double crochets.
- Chain Two: Chain two. Grab your square and grab your stitches and slide those stitches back to give yourself some more space. You want your double crochets to lay nice and flat along in that corner. Make three more double crochets into the same corner space.
- Three Double Crochets: Into the space along the side, make three double crochets.
- Three Double Crochets: Into this last space along the side, make three double crochets.
- Chain Three, Turn: At the end of your row, chain three stitches and turn your work.
- Three Double Crochets: Into this very first space along the side, make three double crochets.
- Three Double Crochets: Into the next space along the side, make three double crochets.
- Corner: Into the corner space, we're going to do a corner: three double crochets, chain two, and three double crochets.
- Chain Two: Slide your stitches back to give yourself some more room. Chain two stitches. Make three double crochets into that same corner space.
- Three Double Crochets: Into each of these spaces along the side, make three double crochets into each. So, into the first space, make three double crochets.
- Three Double Crochets: Into the next space, make three double crochets.
- Finish Off: To finish off our row, into the top of that chain three, just here on the side, I want to put our hook in. Make sure you get two strands of that chain on the top of your hook. So, top of the chain three and two strands of that chain on the top of your hook. Wrap your yarn, one double crochet into the top of that chain three to finish off our color.
- Chain One, Cut Yarn: Chain one to secure your yarn, cut your yarn, leaving a long enough tail to sew in with a needle later. Pull your hook up and your yarn through and snug that down to secure.

Finishing the Square: Rows 6 & 7
Almost there! These final rows complete the square and give it a neat, finished edge.
- Turn Your Work: Turn your work. We always want to be working into the back.
- Join New Color: Hook into this very first space right along the edge. We want to have our tail laying along the top of our work so we can work over it a little bit. So, just hook into that space, loop of your next color yarn on your hook, bring it through, so slip stitch with both strands to join. Drop your tail, hold it along the top of your work.
- Chain Two: Chain two stitches. That counts as our first double crochet. But if you join your yarn in a different way, chain three. Wrap your yarn and make two double crochets into that same space.
- Three Double Crochets: Into the two spaces along the side, make three double crochets into each.
- Corner: Into your corner space, we're going to do a corner: three double crochets, chain two, and three double crochets.
- Now you can pause the video and make three double crochets into each of these spaces all along this side.
- To start row seven, chain three stitches and turn your work. Wrap your yarn and make three double crochets into this very first space. Make three double crochets into the next space. And into the next space, make three double crochets. Into your corner, make three double crochets, chain two, and three double crochets. Remember, you can slide those stitches back if you need more room for your stitches to lay down nice and flat. Now you can pause the video and keep working along, three double crochets into each of these spaces all the way along this side.
At the end of our row, just look for the top of that chain three. Trace those double crochets up if you need help, and it's the one right beside. Top of the chain three, two strands of that chain on the top of your hook. Wrap your yarn and make one double crochet into the top of the chain three to finish off. Chain one to secure your yarn, cut your yarn, leaving a long enough tail to sew in with a needle later. Pull your hook up and your yarn through and snug that down to secure.
Those stitches along the side, those just count as regular spaces, even though they look a little different. Each of those are going to be a space. And there is your mitered granny square with a nice edge!

Weaving in the Ends
Now that your granny square is complete, it's time to tidy up those loose ends. Weaving in the ends securely is essential to prevent your work from unraveling. Here’s how to do it:
- Thread the Yarn Needle: Thread one of the yarn tails onto your yarn needle.
- Weave Through Stitches: Insert the needle through the back of several stitches, following the path of the yarn as much as possible.
- Change Direction: After weaving through a few stitches, change direction and weave back through a few more stitches to secure the end.
- Trim the Excess: Trim the excess yarn close to the work, being careful not to cut any of the stitches.
- Repeat: Repeat these steps for all the remaining yarn tails.
Joining Mitered Granny Squares: Options and Techniques
One of the best things about granny squares is that you can join them together to create larger projects, such as blankets, scarves, and garments. There are several different methods you can use to join your mitered granny squares, each with its own unique look and feel. Here are a few popular options:
- Slip Stitch Join: A simple and flat join that creates a neat, clean line.
- Single Crochet Join: Creates a more visible ridge, adding a bit of texture to the finished project.
- Invisible Join: A seamless method that creates a smooth, almost invisible join.
- Flat Braid Join: A decorative and textured join that adds a unique touch to your project.
You can find tutorials and resources for learning these techniques on YouTube and other crochet websites. Learn more about granny squares here: Granny Squares.

Pattern Ideas: What Can You Make?
Now that you know how to crochet a mitered granny square, what can you make with it? The possibilities are endless. Here are a few ideas to get you started:
- Blankets and Afghans: A classic choice for using multiple squares.
- Pillows: Add a pop of color and texture to your home decor.
- Bags and Purses: Create unique and stylish accessories.
- Sweaters and Cardigans: A more advanced project for experienced crocheters.
- Scarves and Shawls: A great way to showcase the mitered design.
Tips for Success
Here are a few tips to help you create beautiful mitered granny squares:
- Tension: Maintain consistent tension throughout the project to create even, uniform squares.
- Color Choices: Plan your color scheme beforehand to ensure a cohesive and visually appealing design.
- Weaving in Ends: Do it as you go to avoid a massive task at the end.
- Blocking: Don't skip this step for a polished finish.
- Practice: The more you practice, the better you'll get!
Troubleshooting Common Problems
Even experienced crocheters encounter problems from time to time. Here are a few common issues and how to fix them:
- Squares Not Laying Flat: Adjust your hook size or tension. If your squares are curling, try using a larger hook or loosening your tension.
- Uneven Edges: Count your stitches carefully and maintain consistent tension.
- Gaps in Corners: Make sure to chain two in each corner space.
- Yarn Tangling: Use yarn bowls or organizers to keep your yarn from tangling.
Customizing Your Mitered Granny Square
One of the best things about granny squares is that they're so easy to customize. Here are a few ways to make your mitered granny squares unique:
- Size: Add more rows to make a larger square.
- Colors: Experiment with different color combinations.
- Yarn Weight: Use different yarn weights for varied textures.
- Border: Add a border to finish off the square.
- Texture: Use different stitch patterns for a unique look.
More Crochet Resources
Looking for more crochet inspiration and resources? Check out these helpful links:
Conclusion
The mitered granny square is a fun and easy project that's perfect for crocheters of all skill levels. With its unique diagonal design and endless customization options, you're sure to enjoy creating your own mitered granny squares. So grab your hook and yarn, and let your creativity flow!
Don't forget to subscribe to my channel for more crochet tutorials and inspiration: Subscribe. I'd love to see your finished projects! Share them on social media using #secretyarnery. Be sure to join the family for even more fun!
FAQs
What is a Mitered granny square
A mitered granny square is a variation of the traditional granny square that features a diagonal pattern, created by alternating rows of colors and following a specific stitch sequence. Its unique design makes it stand out and adds visual interest to any crochet project.
Is the mitered granny square suitable for beginners
Yes, this pattern is beginner-friendly! The step-by-step instructions and repetitive stitch pattern make it easy to follow, even if you’re just starting your crochet journey.
What type of yarn should I use for this project
Worsted weight acrylic yarn is recommended because it’s easy to work with and widely available. However, you can use any type of yarn you have on hand, experiment with colors and textures, or even use scrap yarn for a fun and creative look.
Can I change the size of the granny square
Yes, you can adjust the size of your mitered granny square by adding or reducing the number of rows. Just keep in mind that you may need more or less yarn depending on the size you decide to make.
How do I keep my square from curling or warping
To prevent curling, ensure you’re using the correct hook size for your yarn and maintain consistent tension while crocheting. Blocking your granny square after finishing will also help it lay flat and look polished.
What are the best ways to join multiple mitered granny squares
Some popular methods include:
- Slip Stitch Join: Creates a flat and clean look.
- Single Crochet Join: Adds a visible ridge for more texture.
- Invisible Join: A seamless method for a smooth finish.
- Flat Braid Join: Adds an elegant and decorative touch.
Choose the method based on the look and functionality of your project.
How can I plan my color scheme
Begin with a palette of 2–4 complementary colors for simplicity, or experiment with scrap yarns for a unique and vibrant look. Planning your color pattern before starting helps create a cohesive design.
What projects can I create with mitered granny squares
You can make endless creations, such as:
- Blankets and afghans
- Cushion covers
- Tote bags or purses
- Scarves and shawls
- Clothing items like sweaters or cardigans
Can I mix different yarn weights or materials in a single project
While it’s possible, mixing yarn weights or materials can affect the texture and uniformity of your project. If you choose to mix, be sure to experiment with gauge and tension to achieve a cohesive look and feel.
How do I weave in the loose ends properly
Use a yarn needle to thread the loose ends and weave them through the back of stitches in different directions. This will secure the ends effectively and prevent unraveling. Avoid cutting too close to the fabric for added durability.
How long does it take to crochet one square
It depends on your skill level and speed. On average, an experienced crocheter might finish a mitered granny square in about 30–60 minutes, while beginners may take a little longer![]()
![]()
Christa Patel is a passionate crochet enthusiast, designer, and creator of The Secret Yarnery, a popular online community for crochet lovers of all skill levels. With years of experience in crafting stunning crochet patterns and projects, Christa is dedicated to inspiring and teaching others the joys of crochet through easy-to-follow tutorials, detailed guides, and creative ideas.
Christa believes crochet is not just a craft but a way to express creativity and connect with a like-minded community. Her unique approach combines simple techniques with vibrant designs, making crochet accessible to beginners while still offering excitement for seasoned crafters.
Through her YouTube channel, blog, and online shop, she shares step-by-step patterns, helpful tips, and project ideas that can turn anyone into a confident crocheter. When she's not crocheting, Christa enjoys experimenting with yarns and helping others transform their creativity into beautiful, handmade masterpieces.
Stay connected with Christa and discover more crochet inspiration:
- Website: The Secret Yarnery
- YouTube Channel: The Secret Yarnery
- Social Media: Share your projects with #secretyarnery and join the crochet family!
Unleash your creativity with Christa Patel and fall in love with crochet today!
About the Author
With a passion for crafting easy, beginner-friendly tutorials and patterns, Christa inspires crafters of all skill levels to unleash their creativity worldwide. She encourages yarn lovers to connect, create, and crochet a world filled with beautiful handmade treasures!
Easy Mitered Granny Square Crochet Tutorial | Beginner-Friendly Guide!