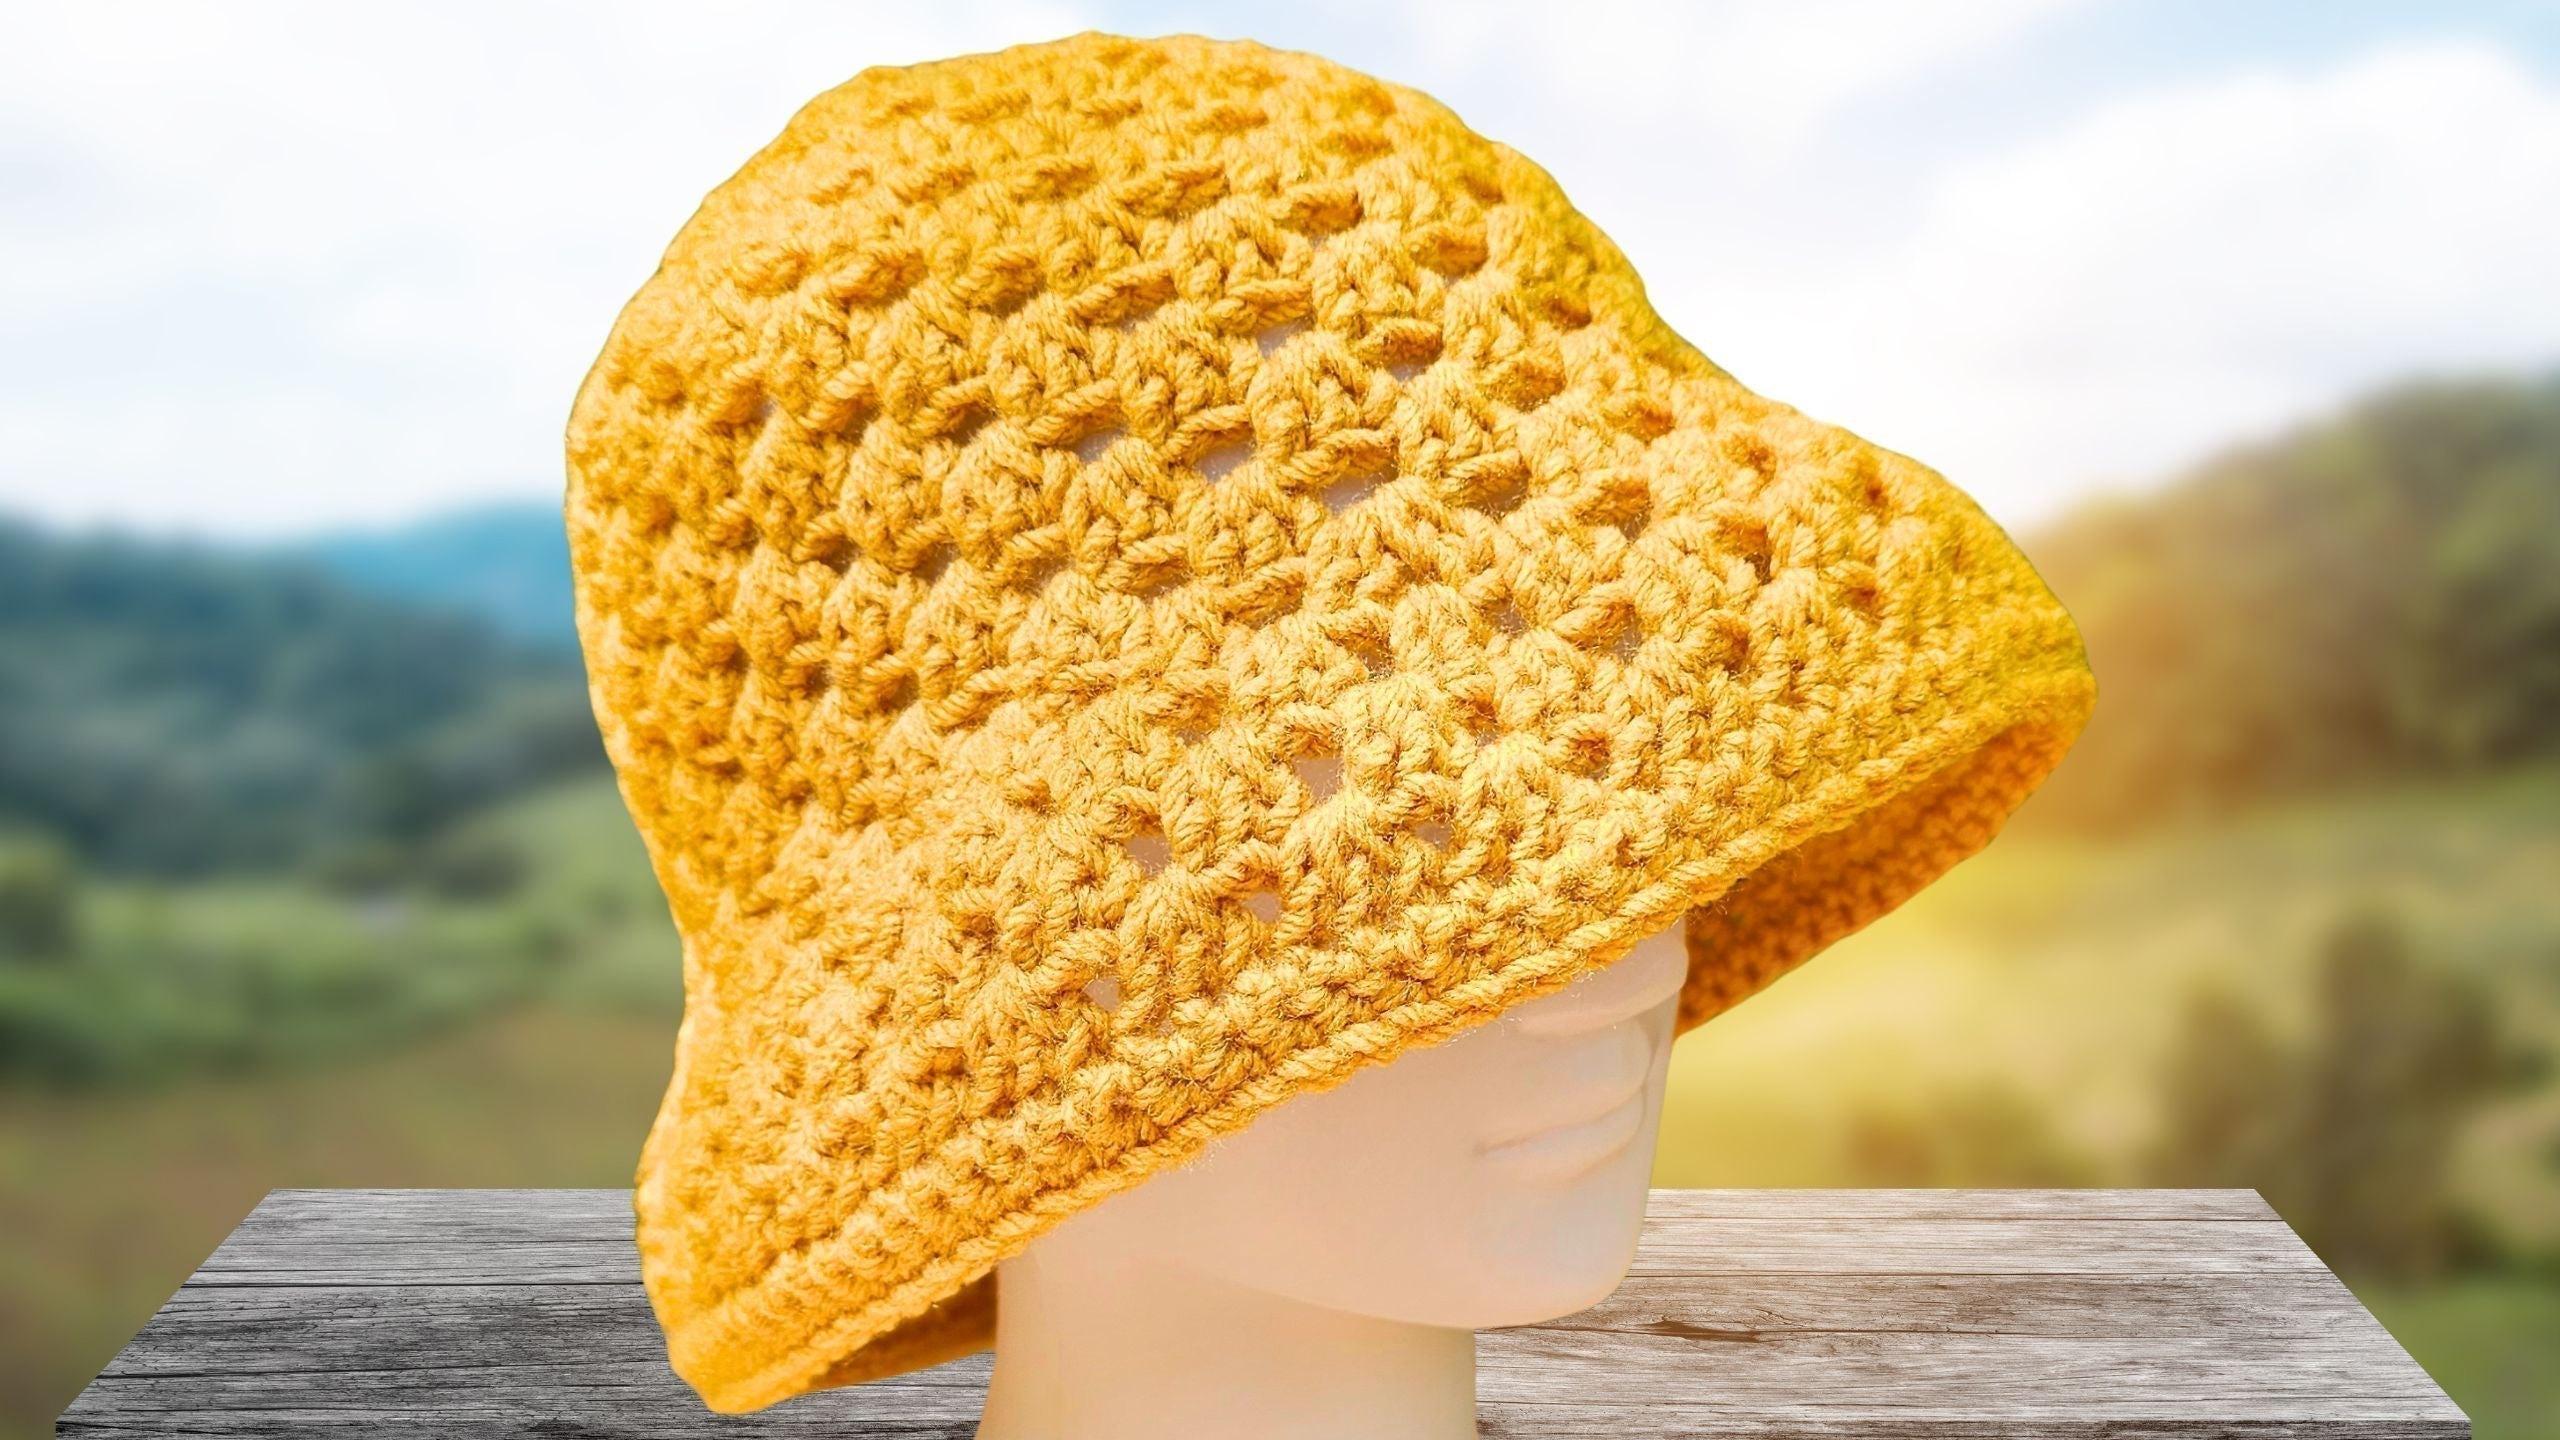
Easy One Color Crochet Bucket Hat Crochet Pattern: Step-by-Step Tutorial
Looking for a fast, beginner friendly bucket hat with only one tail to sew in? I’ve got you. This Easy One Color Bucket Hat works up quickly, looks clean in a solid color, and comes in three sizes. The small uses about 50 g of yarn, the medium about 80 g, and the large about 100 g. You can even skip the final edging row if you are playing yarn chicken. In this tutorial, I’ll walk you through every round, share sizing choices, and show simple finishing that leaves you with just one tail to weave in.
Why This Bucket Hat Pattern Is Perfect for Beginners
This pattern is simple and satisfying, and it leaves only one tail to sew in at the end. The design is built in rounds using easy double crochet clusters, with a tidy brim that keeps its shape. You can follow the steps exactly or make small choices as you go, like which ring to start with and how many brim rows to add. It is a great first hat and an even better market make.
- Minimal sewing: only one end to weave in.
- Yarn efficient: the optional second single crochet edging row can be skipped if you are short on yarn.
- Versatile edge: add one or two single crochet rounds for a different finish and more weight.
This step-by-step follows my video tutorial, so you can watch, pause, and work at your pace.
Available Sizes and Yarn Amounts
Choose the size that fits best, then adjust side rows to fine tune the height.
- Small (child): about 50 g of worsted yarn, 7 side rows.
- Medium (most adults): about 80 g, 8 side rows.
- Large (big hair or larger head): about 100 g, 9 side rows, often one full ball.
Tip: italics help call this out, but I’ll say it plainly. Medium fits most people, and you can add or remove a side row for a personal fit. The small size is a great stash buster.

Materials You’ll Need
Use what you have on hand, or pick up the recommended tools for a smooth experience.
- Size 4 worsted weight acrylic yarn, such as Saver from Ice Yarns.
- 6 mm crochet hook for relaxed stitches.
- Scissors.
- Yarn needle for weaving one tail.
- Stitch marker.
Helpful tools linked for convenience:
Note: As an Amazon Associate, I earn from qualifying purchases.
Choosing Your Yarn and Hook
Any size 4 worsted weight yarn works. Acrylic is soft, washable, and holds shape well, which is perfect for hats. A 6 mm hook gives a comfy drape without making the fabric floppy. If you tend to crochet tight, relax your hands. If you crochet loose, keep your starting chains small.
- Work over your starting tail to avoid extra sewing.
- Use a stitch marker to mark your side rows later on.
Optional Tools for Ease
A locking stitch marker keeps your row counting simple and avoids guesswork. Remember, there is only one tail to sew in at the end, which makes finishing fast and tidy.

Getting Started: Foundation Ring Options
Start your hat with a magic ring or a chain 3 ring. Both work. In the tutorial, I start with a chain 3 ring, because it is quick and easy.
Chain 3 ring steps:
- Make a slip knot, leave a 1.5 to 2 inch tail.
- Chain 3 with neat, small chains.
- Slip stitch into the first chain to form a ring. Hold the ring open in a U shape with your finger and thumb for control.
The magic ring is also great. Choose the method you prefer.
Slip Knot and Chain Basics
Pop the slip knot onto your hook and keep that short tail. Make three small chains. Small chains help the center of your hat stay tidy and firm.
- Keep a firm grip at the base.
- Small chains prevent a loose start.
- Hold the ring open as you join.
Joining the Ring
Slip stitch into the first chain to join. Chain one, then pull up the loop a little to give your first stitches room without stretching the center.

Round 1: Base Double Crochets
Work 11 double crochets into the center of the ring, over your tail. The chain one does not count as a stitch.
- Yarn over, insert into the center, complete one double crochet.
- Keep working over the tail so you can trim it later.
- Aim for 11 double crochets. The first real stitch is the one after the chain.
When you have your 11 stitches, slip stitch to the top of the first real double crochet to join. Keep the center neat and flat.
Working Over the Tail
Wrap your stitches over the tail as you go. That locks the tail in place so you can cut it later.
Counting Your Stitches
If counting is tricky, mark the first real stitch with a marker right after you make it.

Round 2: First Increases
Chain three with small chains, then make one double crochet in the same stitch. This gives you two double crochets in the first stitch because the chain counts as a stitch. Continue with two double crochets in each stitch around.
- Work right to the stitch before your starting chain.
- Put two double crochets in that stitch to keep the circle full.
- Slip stitch into the top of the first stitch to join.
If your chains run tall or loose, you can chain two instead. Small chains make a smoother join.
Handling the Starting Chain
Before joining at the end of the round, remember that last pair before the chain. Those two extra stitches help keep the circle even.
Checking for Evenness
Your piece should be flat, not ruffled or cupping. A slight curve is fine at this stage, but not a fold.
Round 3: Introducing Granny Clusters
Join with a single crochet into the top of the starting chain. Make sure two strands of the chain sit on top of your hook for a strong join. Chain two. This counts as your first double crochet. Work two double crochets into that same space.
Now, make three double crochets in the space between each pair from the round below. You are now working granny-style clusters into spaces rather than into stitches. This is what makes the fabric soft, airy, and quick.
- Wiggle your finger between each pair to find the space.
- Keep clusters even, three double crochets in each space.
- At the end, join with a single crochet to the top of the chain again.
Single Crochet Join Technique
Insert into the top of the starting chain and make one single crochet to anchor your round. This lands your hook exactly where you need to start the next round cleanly.
Building the Granny Effect
Three double crochets in each space makes a smooth, round top for the hat. The fabric feels light but solid.

Round 4: More Double Crochet
Chain two, then make two double crochets into that same space. Continue with three double crochets between each set of three from the round below. Spaces are larger now, so it is easy to see where to go.
- Work three double crochets in every space all the way around.
- Join with a single crochet into the top of the chain.
Your circle might start to dish a little. That is exactly what we want for the crown.
End of Top Section
You now have the top of your hat. Next comes the round where you pick your size.
Sizing Your Hat: Round 5 Choices
This round controls the size. You will mix regular clusters and increases. A regular cluster is three double crochets in one space. An increase is two double crochets, chain one, then two double crochets in the same space. The increase makes a little hill with a space in the center.
- Small: regular, regular, increase, repeat.
- Medium: regular, increase, regular, repeat.
- Large: increase in every space, all the way around.
For medium in the tutorial, chain two and add two double crochets into the starting space to set yourself up. Then work your chosen repeat. Keep an eye on the difference between regular clusters and increases so the spacing stays even. When you finish the round, join with a single crochet to the top of the chain. If you did the large size, place two double crochets in the corner space before joining so the round balances out, then single crochet to join.
Visual Size Comparison
Small has fewer increases spread out, so it stays tighter. Medium spaces increases a bit more evenly. Large uses increases all the way for the widest crown.
Written Pattern Reference
Prefer reading along? My written patterns are in plain English and match the steps in the video.
Round 6: Uniform Clusters
From here, all sizes work the same. Chain two and add two double crochets into the starting space. Then make three double crochets in every space around the hat. Do not miss the chain one spaces inside your increase clusters. Those also get three double crochets.
- Three double crochets everywhere, including centers of increases.
- Join with a single crochet to the top of the chain, then chain two to start the next round.
Counting Spaces Accurately
Treat the chain one in an increase cluster as a regular space. That keeps the stitch count growing evenly.
Starting the Sides: Stitch Marker Placement
After joining Round 6, chain two and add two double crochets into the starting space. Pop a stitch marker into the cluster you just finished in the previous round. This marks the base of the sides. From here, you will build straight down without more shaping until it is time for the brim.
Why Use a Marker
It keeps row counting simple. You will count the side rows on a slant from this marker to track your height.

Building the Sides
Work straight rows of three double crochets in each space, joining each round with a single crochet, then chaining two and adding two double crochets to start the next round. Keep your tension even so the sides go straight down.
- Small: 5 more side rows.
- Medium: 8 more side rows.
- Large: 10 more side rows.
Count on an angle from your marker: 1, 2, 3, and so on. The medium size, which fits most, has eight rows on top of the marker.
Row-by-Row Guidance
The rhythm stays the same. Join with a single crochet, chain two, two double crochets in the same space, then three double crochets in every space around. This simple flow creates smooth sides.
Adjusting for Size
If you want a deeper hat, add a side row. For a shallower hat, remove one. The side rows are where you tune the fit.
Transition to the Brim
When your sides are done, it is time for the brim. Join with a single crochet into the top of the chain, chain two, and work two double crochets into the same space. Now alternate one regular cluster and one increase.
- Regular cluster: three double crochets.
- Increase: two double crochets, chain one, two double crochets.
Alternate these all the way around. Join with a single crochet into the top of the chain to finish the round.
Brim Increase Purpose
These increases flare the brim gently so it frames your face and stays down.
Brim Rows: Building Width
Move your stitch marker up to mark the increase round you just finished. Work three rows total for the brim section by making three double crochets in every space, including the chain one spaces in the increases. That gives the brim a consistent fabric.
- Join with a single crochet at the end of each round.
- Start each round with chain two and two double crochets in the same space.
- Work three double crochets in every space.
This fills in the increases and evens the brim.
Handling Chain One Spaces
Treat chain one spaces like any other space. Three double crochets go right there to keep the curve smooth.
Final Brim Rows
Continue with two more rounds of regular clusters, three double crochets in every space. Join and start each round the same way. At this point, your brim should flare nicely, with a clean edge that is ready for finishing.
Checking Brim Shape
Lay the hat on a flat surface. The brim should sit flat with a soft outward curve.

Edging the Brim: Back Side First
To keep the brim from flipping up, finish with single crochet rounds that add weight and structure.
- Slip stitch to the top of the chain, chain one, and turn your work.
- Make one single crochet in each stitch all the way around on the back side of the fabric.
- At the end, ignore the join bump and slip stitch to your first single crochet.
This first single crochet round locks the brim into place.
Single Crochet Technique
Work one single crochet per stitch, no increases. Keep your tension even so the edge is neat.
Edging the Brim: Front Side
Chain one, turn again, and work one single crochet in each stitch on the outside of the hat. This gives a pretty edge and adds a bit more weight.
- Single crochet in each stitch around.
- Slip stitch to the first single crochet to join.
- You can also use an invisible join for a seamless finish.
Invisible Join Option
After your last single crochet, pull up a loop and cut your yarn with a tail. Thread your needle. Go under the two loops of the first single crochet you made, then go back down into the last stitch where the yarn came out. Gently pull until it looks like a stitch. It is easy and looks great.
Finishing Touches: Weaving In Ends
There is only one tail to sew in because you worked over the starting tail. Use a sharp tip needle to weave the end through the back of your stitches in a few directions. Sharp needles pass through fibers, not around them, which holds better.
- Weave up and down, then side to side.
- Do not pull too tight. You want the fabric to rest flat.
- Trim the tail close without snipping your stitches.
If you did not work over the center tail at the beginning, weave that one in now, then trim.
Securing the Invisible Join
Pull the join until it matches the size of your other stitches. It should mimic a true stitch and disappear into the edge.
Trimming Excess
Cut tails cleanly and check the edge again. Your brim should sit flat and look smooth.

Optional Edge Variations
Short on yarn? Work only one single crochet edging round instead of two. It still looks neat and saves a bit of yarn.
- Two edging rows: adds weight for a brim that stays down.
- One edging row: a lighter finish that still looks polished.
When to Skip the Edge
If you are near the end of your ball, finish after the first single crochet round. The hat will still wear beautifully.
Tips for Success in Your Crochet Bucket Hat
Keep your chains small so joins look tidy and rounds stack straight. Marking your base row before the sides makes counting fast. If the brim curls, the single crochet edging will help settle it.
Common fixes:
- Loose starting chains: chain two instead of three at the start of rounds.
- Uneven crown: recount Round 1 and Round 2.
- Brim flips up: add the second single crochet edging round.
Slow or speed up the video using the gear icon if you like to stitch at a different pace.
Gauge and Fit Adjustments
Try on the hat after a few side rows. Add or remove a row to tweak the depth. The increase round sets the width, and the side rows control how it sits on your head.
Selling or Gifting Your Hat
This is a great craft fair project. It uses a small amount of yarn, has an easy repeat, and looks neat in a single color. Make a few sizes to cover more heads and styles.
- Small is sweet for kids and quick gifts.
- Medium suits most people.
- Large is perfect for a fuller head of hair or a looser fit.
Yarn Efficiency for Multiple Hats
A large takes about one ball, so planning for markets is simple. Keeping to one color speeds up production and keeps your booth cohesive.
Helpful Resources
- Prefer left-handed videos? Watch the left-handed tutorials collection.
- Want to subscribe for weekly crochet tutorials? Join me here: Subscribe to The Secret Yarnery on YouTube.
- Grab the free crochet cheat sheet if you like quick stitch references while you work.
If you enjoy browsing more bucket hat ideas, this curated list of free crochet bucket hat patterns can spark style tweaks like color changes or seasonal yarn choices. For another simple approach, this beginner friendly quick and easy crochet bucket hat pattern shows how different yarn and hook combos change drape and structure.
Troubleshooting Common Mistakes
- Ring too tight: hold the ring open in a U shape with your finger and thumb as you begin.
- Stitch count off: the first round should have 11 double crochets into the ring center, not counting the chain.
- Sides curling in: relax your tension and keep your chains small and consistent.
- Brim uneven: be sure to alternate regular and increase clusters on the first brim round.
- Tail peeking out: work over the center tail from the start, or weave it deeply through the back later.
Fixing Increases
If your increase clusters do not line up cleanly, pull back a few clusters and reset the pattern. Regular clusters have no center space. Increases do, and they look like a tiny hill.

Customizing Your Bucket Hat
Stick to one color for a sleek look, or swap colors between the crown, sides, and brim for a simple style change. You can also add or subtract a side row to tune the depth, or add an extra brim row for more shade.
- Full two row edge for weight.
- One row edge for a lighter finish.
Keep it simple. The clean lines are what make this hat shine.
Conclusion
That is your Easy One Color Bucket Hat, with a smooth crown, straight sides, and a tidy brim, all with one tail to weave in. Choose your size, keep your chains small, and let the clusters do the work. Whether you make one for yourself, a stack for gifts, or a batch for your next market, this hat will be a quick favorite. Thanks for crocheting with me today, and happy stitching!!
Left Handed?
FAQs: Easy One Color Crochet Bucket Hat
What skill level is this pattern?
Beginner. You only need slip knot, chains, single crochet, and double crochet. The cluster rhythm is simple and repeats.
What sizes are included?
Small, medium, and large. Medium fits most adults. Add or remove a side row to tweak depth.
How much yarn do I need?
Small about 50 g, medium about 80 g, large about 100 g of size 4 worsted. One full 100 g ball usually makes a large.
Can I use cotton instead of acrylic?
Yes. Cotton gives more structure and less stretch. Acrylic is softer and bounces back. Both work well for bucket hats.
Do I have to start with a magic ring?
No. The pattern uses a chain 3 ring. You can use a magic ring if you prefer.
Why is there only one tail to weave in?
You work over the starting tail from Round 1. At the end, you only weave the final tail.
My crown is ruffling or cupping. What should I do?
Ruffling means it is too loose or you added stitches. Cupping means it is too tight. Recheck Round 1 and 2 counts, keep chains small, and even out tension.
How do I choose my size?
Measure head circumference. Small about 20 inches, medium about 21 to 22 inches, large about 23 inches or bigger. Then adjust side rows for height.
How many side rows should I make?
Small 7, medium 8, large 9. Add or remove a row for a deeper or shallower fit.
Do I need the second single crochet edging row?
No. It is optional. Two edging rows add weight so the brim stays down. One row still looks neat and saves yarn.
My brim flips up. Any fix?
Add the second single crochet edging row. Keep tension even. You can add one more plain cluster round before edging for extra weight.
Can I change colors?
Yes. Keep it one color for the “clean look,” or switch at the start of any round. If you change colors, you will have extra ends to weave.
What if I missed a chain-one space in an increase?
Pull back to that point and place a three double crochet cluster into that center space. Every space gets a cluster.
How do I count rounds easily?
Place a marker where the sides begin. Count rows at a slant from that marker. Move the marker up when you start the brim.
![]()
Christa Patel is the maker behind The Secret Yarnery on YouTube, where she shares simple, follow-along crochet tutorials every week. She loves clean, beginner friendly designs that work up fast and look polished, with smart tricks like working over ends to cut down on weaving. When she is not filming, Christa is testing patterns, answering community questions, and cheering on makers of all skill levels.
Find more:
- Website: secretyarnery.com
- YouTube: The Secret Yarnery
- Free cheat sheets and resources: linked here
About the Author
With a passion for crafting easy, beginner-friendly tutorials and patterns, Christa inspires crafters of all skill levels to unleash their creativity worldwide. She encourages yarn lovers to connect, create, and crochet a world filled with beautiful handmade treasures!
The Easiest One Color Bucket Hat That You Can Make Today!