How to Crochet a Stunning Petal Flower Granny Square in Easy Steps!
Creating a crochet granny square is always rewarding, but this petal-popping flower granny square takes it to another level! With its vibrant layers and textured petals, it’s all about unleashing your creativity. Whether you’re new to crochet or a seasoned pro, this step-by-step guide will walk you through the process, alongside resources from Christa at The Secret Yarnery. Let’s dive in!
What Makes This Pattern Special?
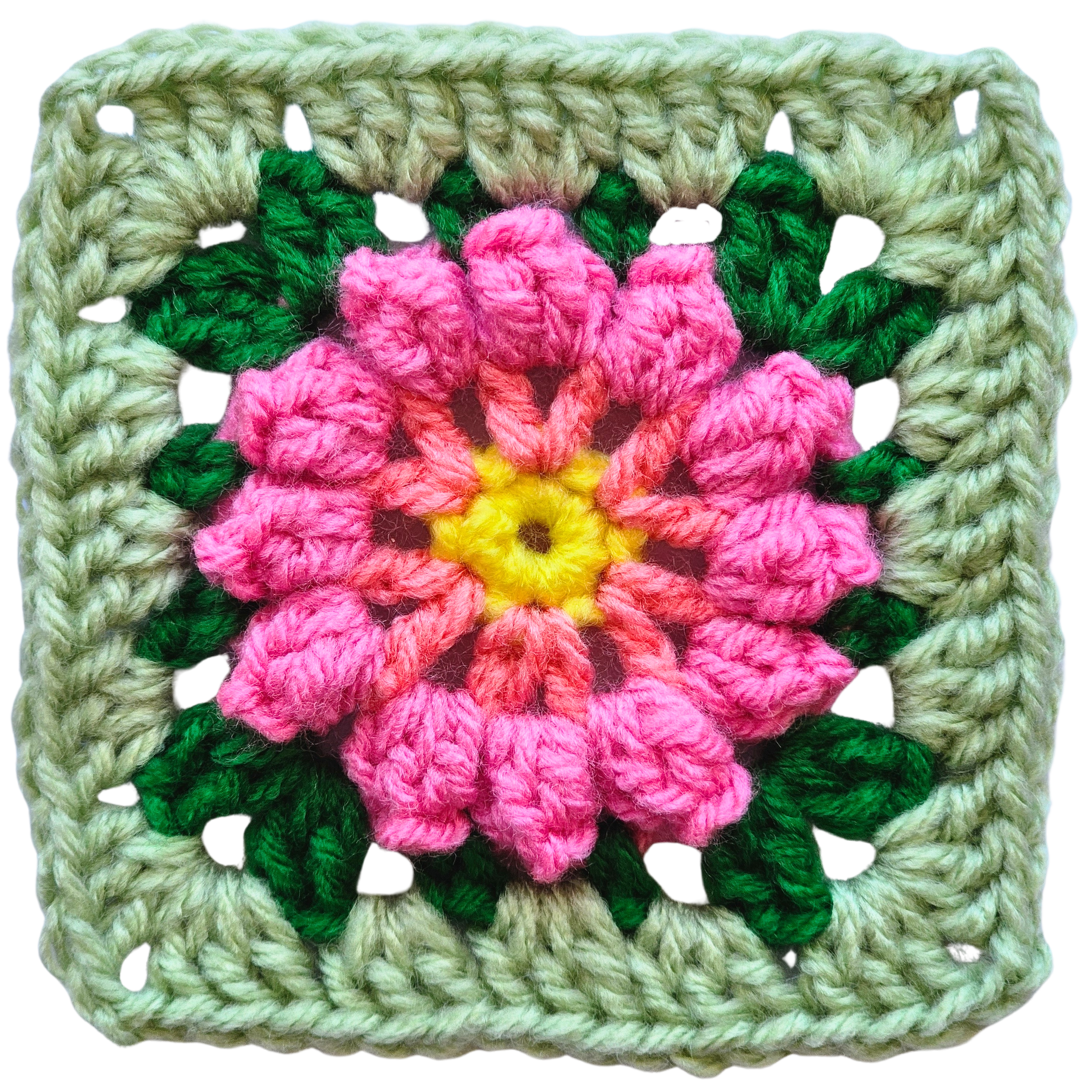
This pattern results in a colorful flower granny square with a charming 3D effect, thanks to its petal-popping design. The steps are broken down into simple actions, making it approachable for beginners while still being exciting for experienced crocheters. It’s perfect for adding a burst of spring to blankets, pillows, or other crochet projects.

Materials Needed: The Yarn and Colors
The first step in any crochet project is gathering your supplies. For this granny square, you’ll need five different colors of yarn. The yarn used in the demonstration is from Ice Yarns, labeled as four weight, although it feels slightly thinner. Don’t let that stop you! The beauty of this project lies in its adaptability—you can use any yarns you love.
For color ideas, mix and match hues that simulate a garden in bloom—bright pops of floral tones framed by lush greens.
Looking to expand your yarn knowledge? Check out this Yarn Conversion Chart to explore different types and weights.

Understanding Yarn Weight and Hook Adjustments
A key detail to note: if you’re working with a thicker four-weight yarn, you may need to pick a larger crochet hook—around six millimeters. This will keep your flower granny square light and airy while maintaining the design’s texture. Always consult the yarn label for guidance.
If you’re looking for beginner-friendly hooks and patterns, take a peek at these Easy Crochet Projects for Beginners.
Essential Tools You’ll Need
In addition to yarn and your chosen hook, a few other tools will come in handy:
- Scissors: For cutting the yarn after completing each round.
- Darning Needle: Essential for sewing in those loose ends and ensuring a clean finish.
These simple tools might not seem like much, but they’ll save you time and keep your project looking polished.

Written Patterns and Resources
For those who like to follow along with a written guide or project planner, you can find the pattern and additional resources over at The Secret Yarnery’s Patterns Section. The beauty of these patterns is in their simplicity—they’re written in plain English, matching the style used in tutorials. No crochet jargon here!
Preparing Your Yarn to Start
The foundation of this project starts with picking your first yarn color. It sets the tone for the entire piece. Once you have your yarn, make a simple slip knot, leaving just about 1–2 inches as a tail. Don’t worry—this will be worked into your design as you go.
Starting with a Slip Knot and Chain 3
First things first: create your slip knot and position it securely on your hook. With your yarn in place, chain three stitches. Count them as you go—“One, two, and three”—these will form the base for the center of your flower.
Getting the Flower Center Right
After creating your foundational loop, it’s time to work single crochets into the center of that chain ring. Take your hook into the first chain and work five neat single crochet stitches. At the end of Round 1, secure it all with a slip stitch. Voila! The base of your flower is done.
This might sound technical, but if you’re new to working in the round, just take a deep breath and enjoy the rhythm. It all comes together beautifully.
Adding the Vibrant Petals
Here’s where the flower starts to pop. For Round 2, switch colors for a stunning layered effect. Attach your new yarn with a slip stitch and begin building the “petals.” Each petal is made by working a series of double crochets, separated by chain stitches.
Want more creative crochet designs? Check out Written Patterns Tagged "Changing Colors" for tips on adding color variations to your projects.

Creating Textured Popcorn Stitches
This round introduces popcorn stitches, which give the flower its iconic “pop.” Don’t be intimidated by the name—it’s just a fun way of grouping stitches together. In each space, work four double crochets, remove your hook from the loop, insert it into the first double crochet, and bring it all together. This method creates a rounded, plush petal.
Shaping the Leaves
Working with green or another leaf-like color, you’ll add “leaves” around the flower in the next round. These are made by creating clusters of stitches in each space, alternating one single crochet and two double crochets. Corners are formed to make the square shape. This element ties everything together, framing the flower with a delicate, leafy texture.
Need inspiration on designing corners? Visit this page on Crochet Ideas.

The Granny Box: Final Touches
To finish the square, a simple “granny” box stitch is worked around the perimeter. This involves three double crochets in each space, with chain stitches at the corners to complete the square’s shape. You can change colors for a bordered effect or stick with a single color for a more unified look.
If you’d love a deeper dive into this type of stitch, don’t miss this helpful tutorial on Crochet Patterns for Beginners.
Expanding Your Granny Square
What if you want an even larger square? You can keep going by repeating the granny box stitch pattern. Turn your work periodically to avoid twisting, and maintain the neatness of your stitches. This can transform your flower granny square into a centerpiece for an afghan or a throw.
Why ‘Plain English’ Patterns Work Best
Many crochet enthusiasts get discouraged by overly complex patterns. That’s why following plain-English patterns is a game-changer—it makes crocheting approachable. Whether you’re following this guide or one of the Beginner Crochet Patterns available, you’ll feel confident every step of the way.
Final Steps: Securing Your Ends
The last thing to do is sew in all the loose yarn tails with your darning needle. This isn’t just about tidiness—it keeps your work secure, so it holds up well over time. Take your time here; it’s the finishing touch that turns a good project into a great one.

Conclusion
This petal-popping flower granny square is a delightful way to combine texture, color, and creativity. From the playful petals to the leafy accents, every step builds on the last to produce a stunning square you’ll be proud of. Whether you’re making a blanket, pillow, or joining a larger project, this granny square is sure to add that “wow” factor.
There’s always something new to learn in crochet, so don’t stop here! Explore other patterns and tutorials from The Secret Yarnery’s Crochet Tutorials, and share your creations with a community of like-minded crochet lovers. Happy hooking!
Left Handed?
FAQs
1. What size should the finished granny square be?
The size of your granny square depends on the yarn weight and hook size you use. Typically, using a four-weight yarn with a six-millimeter crochet hook will yield a square around 6–8 inches. Adjustments can be made by altering yarn or adding more rounds.
2. Can I use different yarn weights?
Yes, this pattern is very adaptable. If using a lighter yarn, opt for a smaller hook to maintain stitch integrity. If using bulkier yarn, increase your hook size for an airy, flexible square.
3. How many colors should I use for the best effect?
The guide suggests five colors for a vibrant, layered look, but you can customize it to suit your project. Monochromatic designs or even a two-tone color palette can also work beautifully.
4. Can beginners try this pattern?
Absolutely! This pattern is beginner-friendly. The step-by-step instructions and videos provide clear guidance even if you're new to crochet.
5. What’s the best way to secure my yarn ends?
Use a darning needle to weave loose ends into the stitches on the back. Make sure you follow the direction of the stitch flow for a neat and durable finish.
6. Can I make larger projects using this square?
Yes, these squares are designed to be joined together for larger projects like blankets, pillows, or table runners. Use the granny box stitch to add size and uniformity.
7. What’s a popcorn stitch, and why does it matter?
A popcorn stitch is created by grouping double crochets and securing them together, giving a plush, textured “pop.” It adds depth, making the flower petals more pronounced and decorative.
8. How do I avoid gaps between stitches?
Maintain even tension throughout your work. If gaps appear, try using a smaller hook or pulling your yarn slightly tighter as you crochet.
9. Do I need advanced knowledge for corner shaping in the square?
Not at all. Corner shaping uses simple chains and double crochets to create smooth turns. The guide explains this in easy steps, so it’s achievable even for beginners.
10. Where can I find more crochet tutorials like this?
Check out The Secret Yarnery’s Crochet Tutorials for a vast array of guides, patterns, and ideas for different skill levels.
![]()
Christa Patel, the creative mind behind The Secret Yarnery, is a passionate crocheter, designer, and educator. With years of experience in crafting vibrant, beginner-friendly crochet patterns, Christa has built a community of crafters who adore her approachable teaching style.
Based in Nairobi, Kenya, Christa finds endless inspiration in local culture, colors, and nature. Her mission is to unlock creativity in others by simplifying even the most intricate crochet designs. Through her YouTube channel, blog, and e-commerce platform, she shares video tutorials, written patterns, and helpful resources like yarn conversion charts, guiding crocheters of all levels to success.
Christa’s work stands out for its focus on plain-English instructions and her knack for breathing life into classic crochet staples like granny squares and textured designs. When she's not crocheting, you can find her spending time with her family or exploring fresh ideas to inspire her global audience.
Explore her tutorials, patterns, and more at The Secret Yarnery to join her ever-growing crochet community!
About the Author
With a passion for crafting easy, beginner-friendly tutorials and patterns, Christa inspires crafters of all skill levels to unleash their creativity worldwide. She encourages yarn lovers to connect, create, and crochet a world filled with beautiful handmade treasures!
How to Crochet a Stunning Petal Flower Granny Square in Easy Steps!