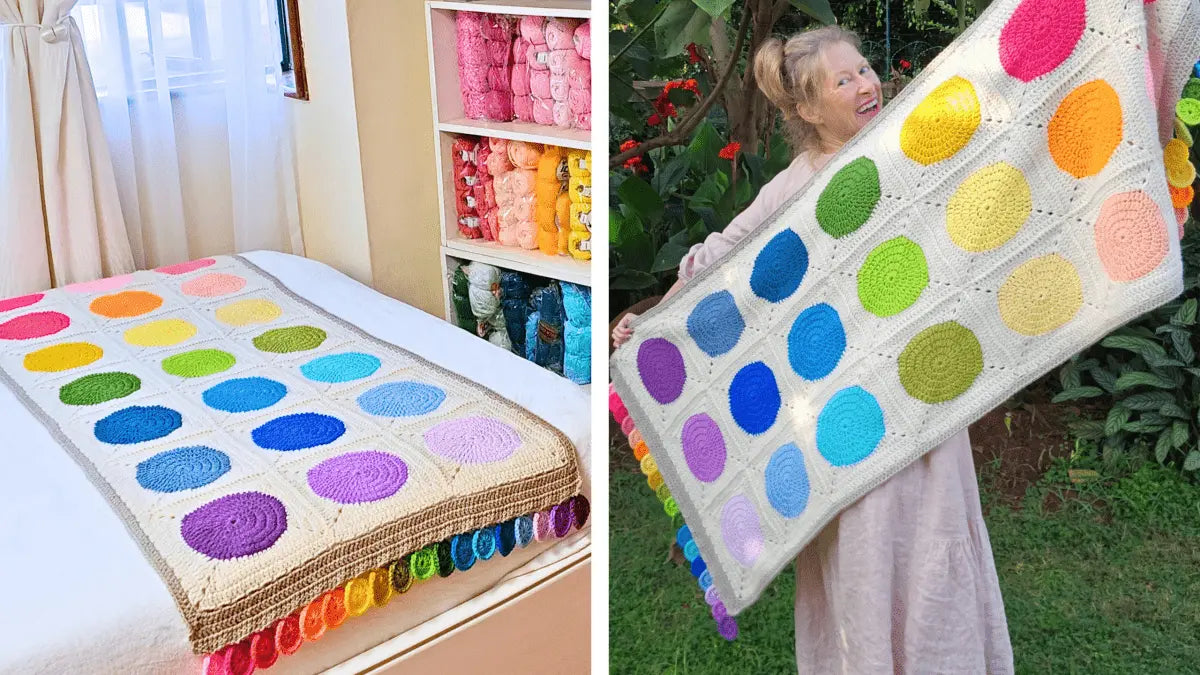
Easy Crochet Blanket: The Paintbox Polka Dot Masterpiece
Have you ever wondered how to create the perfect crochet blanket that’s functional, stylish, and incredibly fun to make? This Paintbox Polka Dot Blanket is your answer! Whether you’re looking for a cozy throw, a colorful bed runner, or even a trendy wrap, this project is ideal. Using basic crochet stitches, it’s perfect for beginners and seasoned crafters alike.
Table of contents
Why This Project Is Perfect for All Skill Levels
This beginner-friendly project combines straightforward stitches with vibrant colors. The step-by-step pattern ensures success whether it’s your first time with a hook or you’re a long-time crocheter. Plus, the tutorial is available in both right- and left-handed versions to suit your needs.

Using the Video and Written Pattern Together
While following the tutorial, you can easily switch to written instructions on my website for detailed steps. Written in simple English, the downloadable pattern is available for all, and multi-language options in the video make it accessible globally. If you're ready to follow along, grab the pattern here.
Gather Your Materials: Let’s Get Started!
To make this stunning crochet blanket, you’ll need:
- Yarn: Four-weight worsted acrylic or DK weight yarn works best.
- Crochet hook: A 6 mm hook is recommended for even tension.
- Other tools: 21 stitch markers, scissors, and a needle for weaving in the ends.
For a range of fabulous blanket designs, explore these blanket patterns.

Yarn Suggestions and Color Inspiration
The project thrives on versatility! I blended 21 vibrant colors for the polka dots with two neutral shades for the joins and border. You’ll need approximately 15 g of yarn per dot, 400 g for the joining, and 200 g for the border. Brands like Ice Yarns and local options, such as Kenyon acrylics, provide excellent choices for vibrant and durable blankets.
To elevate your blanket's appearance, you can also explore the different color-blocked and textured designs available at Crochet Blanket Patterns.
Starting Your Blanket: Foundation of the Flat Circle
The blanket begins with a simple flat circle, forming the base for each polka dot. Use a magic knot or chain three to create a slip knot for a neat and secure start.
Once the chain is formed, arranging it into a U-shape sets you up for success. This simple yet vital step ensures even tension and a clean circle.

Building Up the Circle: Rounds 1 to 5
- Round 1: Work 12 double crochets into your ring. Remember, the initial chain two is just for height and is not counted.
- Round 2: For a perfect circle, double the stitches by making two double crochets into each base stitch (24 stitches total).
- Round 3: Alternate one double crochet with two double crochets to create an even, expanding pattern. By the end, you’ll have 36 stitches.
- Round 4 & 5: Keep building with alternating increases, maintaining uniform spacing for a flawless base.
Counting your stitches after each round is crucial to keep the pattern aligned, ensuring a smooth transition as your circles expand.
Transforming Circles into Polka Dots
Creating the smaller polka dots is just as straightforward. After completing the initial 12 double crochets, switch to single crochet around each dot, adding texture and definition. Small polka dots not only add charm but also make joining squares easy and seamless.

Turning Circles into Squares
Ever wondered how to get those perfect squares? By strategically adding double and half-double crochets around the edges, you’ll turn every circle into a square. This step creates the foundation for seamless joining while maintaining the whimsy of polka dots.
For more ideas on squares and polka dot-inspired designs, check out the easy crochet projects for beginners.
Joining Blocks: The Easy JAYGO Method
Here’s why this project shines: the Join As You Go (JAYGO) technique makes assembly a breeze. Begin by finishing three sides of each square before connecting to the next. This method keeps the blanket smooth, flat, and evenly joined.
Aligning polka dots is simple but adds so much fun to the process. Always start by matching corners to ensure impeccable rows!
Adding the Border: A Gorgeous Finishing Touch
Once all squares are joined, your crochet blanket still holds room for brilliance—a border! Use soothing neutral tones to frame your dots. A single round of chain-two gaps adds softness and depth, while the final row of single and half-double crochets secures the edges.
How Polka Dots Make All the Difference
Have you noticed how polka dots bring joy to almost anything? In this crochet project, they add a playful yet elegant texture. Whether you drape it over a sofa or wear it as a wrap, the cheerful design is always a conversation starter.
If polka dots spark your creativity, you’ll love exploring related designs in the Patterns Section.

Styling Ideas for Your Blanket
Get creative with how you use your new accessory. It’s more than a crochet blanket—it’s a statement piece. Here’s how you could use it:
- Bed Runner: Drape it diagonally for elegant layers.
- Wrap: Take it along for an evening stroll or a cozy night on the balcony.
- Throw: Transform your living room with vibrant pops of color.
Why You’ll Love This Blanket
This crochet blanket is more than just a project—it’s a journey into creativity, color, and comfort. With step-by-step guidance, you'll create something meaningful. Plus, with the JAYGO method, you'll realize that crochet can be as stress-free as it is beautiful.
If you're looking for even more inspiration, browse through patterns designed to keep your crochet journey exciting.

Ready to Start?
It’s time to pick up your supplies and make a crochet blanket you'll be proud of. Whether you keep it, gift it, or snuggle in its warmth, this Paintbox Polka Dot Blanket is bound to bring joy. Ready to craft a masterpiece? Stay hooked!
FAQs
1. Can a beginner make this Paintbox Polka Dot Blanket?
Absolutely! The project uses basic crochet stitches, making it perfect for beginners. With the step-by-step video tutorial and written pattern, you'll have all the guidance you need.
2. How much yarn do I need for the blanket?
Here’s a detailed breakdown:
- Polka Dots: Approximately 15 grams per dot.
- Joining: About 400 grams.
- Border: Around 200 grams. You can adjust these amounts based on the size of your blanket.
3. What type of yarn works best for this project?
A four-weight worsted acrylic yarn or DK weight yarn is ideal. It provides the perfect balance of durability and softness for blankets.
4. Can I customize the size of the blanket?
Yes! Add or reduce the number of squares to make the blanket larger or smaller. You can also adjust the sizes of the polka dots depending on your preference.
5. Do I need special tools?
Not at all. You’ll need:- A 6 mm crochet hook
- Scissors
- Stitch markers (21 recommended)
- A yarn needle for weaving in the ends
6. What is the JAYGO method?
JAYGO stands for "Join As You Go," a technique that lets you join squares as you make them. It eliminates the need for sewing and keeps your pieces perfectly aligned.
7. Can I use fewer colors for the polka dots?
Yes! While 21 colors create a vibrant design, you can use fewer colors or color families for a simpler aesthetic. Neutral tones also add an elegant touch.
8. How long does it take to finish this blanket?
The timeline depends on your crochet speed and the blanket size. Beginners might take a bit longer, but the project is straightforward, allowing you to work at your own pace.
9. Are there tips to keep the circles even?
Certainly! Here are a few tips:- Count your stitches after each round.
- Use stitch markers to track your starting point.
- Maintain even tension while crocheting each round.
Christa Patel is the creative mind behind the Secret Yarnery, a trusted resource for crochet enthusiasts worldwide. With years of experience, Christa specializes in designing beginner-friendly yet stunning crochet patterns that inspire creativity and confidence in crafters of all skill levels.
As a passionate crocheter, Christa is known for her clear and approachable teaching style, breaking down complex patterns into simple, easy-to-follow steps. Through her engaging video tutorials, written patterns, and helpful tips, she has cultivated a community where crocheters can connect, learn, and share their work.
Christa’s dedication to making crochet fun and accessible shines in every project she creates, from colorful blankets to intricate borders. Whether you’re a seasoned expert or just picking up a hook for the first time, Christa's guidance will help you craft something beautiful.
For more crochet patterns, tips, and inspiration, visit her website at The Secret Yarnery, or check out her YouTube channel filled with step-by-step tutorials
About the Author
With a passion for crafting easy, beginner-friendly tutorials and patterns, Christa inspires crafters of all skill levels to unleash their creativity worldwide. She encourages yarn lovers to connect, create, and crochet a world filled with beautiful handmade treasures!
Easy Crochet Blanket: The Paintbox Polka Dot Masterpiece