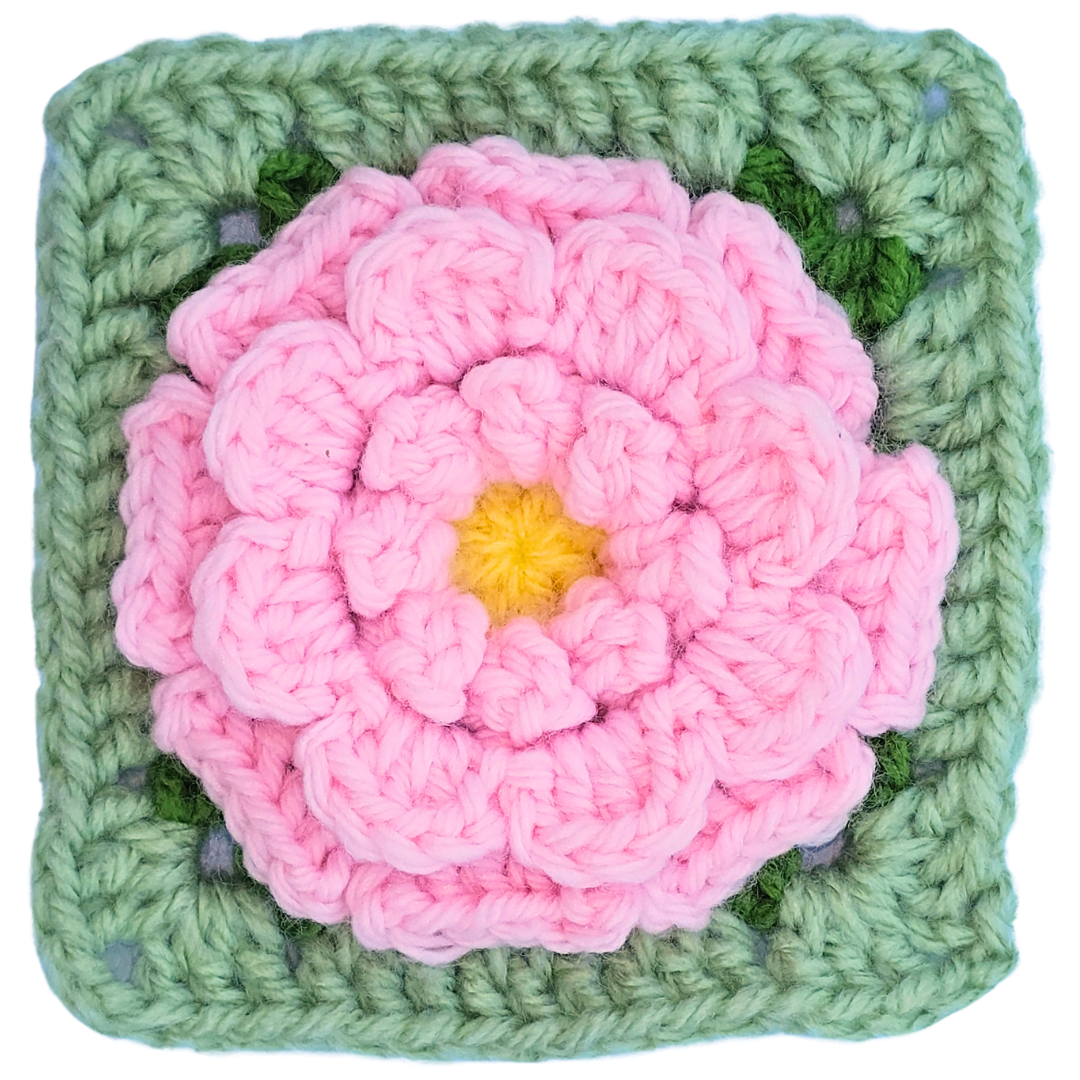
Easy Granny Square Crochet Flower Pattern: Make the Single Zinnia!
If you're a crochet fan looking for a beginner-friendly project that also delivers stunning results, you’re in the right place! Today, we’re tackling the Zinnia Single, a vibrant 3D crochet flower that’s not only beautiful but also forms a functional granny square. Unlike traditional patterns where flowers are sewn onto squares, this unique design is seamlessly integrated—no extra sewing required. Let’s turn your yarn and hook into a masterpiece!
Table of contents
Meet Christa and The Secret Yarnery
I’m Christa, the crochet enthusiast behind The Secret Yarnery. My mission is simple—to make crochet accessible and fun for everyone. I break down patterns into bite-sized steps, all explained in plain English, so it feels like I’m sitting beside you. Whether you're a seasoned crocheter or picking up a hook for the first time, you'll feel right at home here.

Why the Zinnia Single is Perfect for Beginners
This granny square project is ideal for beginners. Why? It doesn’t require any advanced techniques like working in back loops or front loops. Instead, you’ll create a real, functional granny square with a bold flower center. And it’s more than just a pretty piece—it’s part of the Bloomscape CAL (Crochet Along), where we’re stitching flower-inspired granny squares every month, eventually joining them into a striking blanket.
Feeling inspired already? You can find a host of granny square tutorials on The Secret Yarnery.

What You’ll Need
Before diving in, here’s a list of crochet essentials:
- Yarn: Four colors—one for the flower center, another for the petals, one for the leaves, and one for the granny square background. Even leftover scraps will work!
- 5mm Crochet Hook: Perfect for a worsted 4-weight acrylic yarn.
- Scissors: For trimming any excess yarn.
- Needle: Needed for sewing in the ends securely.
This simple set-up makes this project affordable and accessible.
Choosing Colors for a Stunning Flower
Your color choices set the tone for the entire design. Use a bright hue for the flower petals, a green for leaves, and a neutral or coordinating shade for the square background. A quick tip: repurpose scrap yarn to add a personal touch while keeping things cost-effective!
For even more flower crochet inspiration, check out Crochet Flowers for Beginners for additional patterns and ideas.

Why 4-Weight Acrylic Yarn and a 5mm Hook Work Best
Worsted weight acrylic yarn is a go-to for this kind of project. It’s durable, soft, and easy to handle—especially for beginners. Paired with a 5mm crochet hook, it ensures your stitches are neat and evenly sized. Consistency is key when creating such intricate designs.
Starting with a Magic Ring
The magic ring is the foundation of many crochet designs, including this one. It allows you to create a tightly closed loop for the flower’s center. If the magic ring feels tricky, don’t worry—a chain three ring works just as well.
Crafting the Magic Ring
Here’s how to make it step by step:
- Lay the yarn across your non-dominant hand, holding it down with your ring finger.
- Wrap it around your two front fingers to create an “X” shape.
- With the hook, slide under the first strand and pull the second strand through.
- Secure the loop on your hook by pulling through once more.
And voila, you’ve got your ring!
Closing the Magic Ring
Once you’ve worked your crochet stitches into the ring, gently pull the yarn tail to close the loop. Secure it with a slip stitch, ensuring everything stays snug and neat. Proper tension here makes all the difference.
Building the Flower Center
Round one focuses on creating the tightly stitched core of the Zinnia. This is achieved by chaining three and working seven double crochets into the magic ring. That totals eight initial stitches—a vital component for the symmetry of the flower.
Shaping the Petals in Round Two
Round two introduces the first layer of petals. You’ll replace the traditional “into the stitch” method by working between the stitches. This small change adds extra texture and dimension to the petals, setting the stage for a truly 3D flower.
Popcorn Stitches for Petal Volume
The popcorn stitch is a game-changer for adding bulk and texture to your petals. By clustering double crochets in one spot before pulling back through the first stitch, you’ll get a "puffed" effect that makes each petal pop.
Expanding with Small and Large Petals
The third and fourth rounds build on the prior layers. Through a series of chains, double crochets, and slip stitches, you’ll create alternating layers of small and large petals. These layers mimic the natural density of real zinnias, adding depth to your granny square.
Working on the Leaves
Once the flower is complete, it’s time to add greenery. Flip the petals forward to access the back loops where the leaves will grow. Round five involves placing single crochet stitches into these loops, while follow-up rounds shape the leaves into a rounded form.
Completing the Granny Square
Finally, round six transitions your flower into a granny square by adding corners and sides. The technique? Add double crochet clusters for the edges and incorporate chain spaces for corners. This phase solidifies the flower into the square frame. Pretty cool, right?
Browse more intricate designs like this one over at Granny Squares & Shapes.
Sewing and Finishing Touches
Don’t rush this final step—it’s where everything comes together! Use a sharp needle for weaving in your ends. For the magic ring’s tail, sew back and forth multiple times to prevent loosening. A professional finish ensures durability for years to come.
Why You’ll Love This Project
Whether you’re joining the Bloomscape CAL blanket challenge or just love standalone granny squares, the Zinnia Single checks all the boxes—it’s gorgeous, functional, and beginner-friendly. Plus, it’s a great way to practice key techniques like the magic ring, popcorn stitches, and creating corners.
Final Words
Crochet is about more than just making things—it’s about creating something beautiful with your own hands. The Zinnia Single granny square brings that joy in spades. So grab your yarn, hook, and some tea. Let’s make crochet magic together!
Looking for more floral crochet ideas? Check out Easy Crochet Patterns: Plants & Flowers for Home Décor to keep those creative juices flowing.
Stay Hooked!
FAQs
1. How long does it take to crochet the Zinnia Single Granny Square?
On average, it takes about 2-3 hours to complete the Zinnia Single, depending on your skill level. Beginners may take a little longer.
2. Can I use different yarn weights or hook sizes?
Yes, but keep in mind that it might change the final size and texture of your granny square. Lighter yarn will make it smaller, while heavier yarn can give it more bulk. Adjust your hook size accordingly.
3. Do I have to use a magic ring?
No, if you find the magic ring challenging, a chain-three loop works perfectly fine as an alternative.
4. What’s the best way to keep my petals clean and neat while crocheting?
Push completed petals forward gently and hold them in place with one hand while working on other rounds. This helps maintain the design's shape and avoids accidental folding.
5. Can I use cotton yarn instead of acrylic?
Absolutely! Cotton yarn is a great option, especially if you want a sturdier texture. However, it may not stretch as much as acrylic, which could affect stitch flexibility.
6. How do I join multiple Zinnia Single squares into a blanket?
Use a slip stitch, single crochet, or a whip stitch to join the squares together. Choosing a coordinating yarn color for the joins will enhance the overall look.
7. What can I make with the Zinnia Single other than a granny square blanket?
You can use it for cushions, tote bags, table runners, wall art, or even coasters. Get creative and explore what fits your needs!
8. I’m new to crochet. What should I practice before attempting this project?
Practice basic crochet techniques like chaining, double crochet, and slip stitches. Familiarizing yourself with the process of starting and closing a magic ring will also help.
9. How do I prevent my magic ring from unraveling over time?
Ensure you weave the yarn tail back and forth several times using a needle. This reinforces the ring’s structure and reduces the chance of it coming undone.
10. Where can I find more flower-inspired crochet patterns?
Visit The Secret Yarnery’s website for more tutorials or browse the Plants & Flowers section for inspiration.
![]()
Christa Patel is the creative mind behind the Secret Yarnery, a trusted resource for crochet enthusiasts worldwide. With years of experience, Christa specializes in designing beginner-friendly yet stunning crochet patterns that inspire creativity and confidence in crafters of all skill levels.
As a passionate crocheter, Christa is known for her clear and approachable teaching style, breaking down complex patterns into simple, easy-to-follow steps. Through her engaging video tutorials, written patterns, and helpful tips, she has cultivated a community where crocheters can connect, learn, and share their work.
Christa’s dedication to making crochet fun and accessible shines in every project she creates, from colorful blankets to intricate borders. Whether you’re a seasoned expert or just picking up a hook for the first time, Christa's guidance will help you craft something beautiful.
For more crochet patterns, tips, and inspiration, visit her website at The Secret Yarnery, or check out her YouTube channel filled with step-by-step tutorials.
About the Author
With a passion for crafting easy, beginner-friendly tutorials and patterns, Christa inspires crafters of all skill levels to unleash their creativity worldwide. She encourages yarn lovers to connect, create, and crochet a world filled with beautiful handmade treasures!
Easy Granny Square Crochet Flower Pattern: Make the Single Zinnia!