How to Crochet a Polka Dot Blanket – Getting Ready for the October 2018 Crochet Along
The Polka Dot Blanket Crochet Along is finally here, and I’m thrilled to get started with everyone! This special project brings together the crochet community to make something bright, cheerful, and oh-so-soft. If you love blankets that make a statement, you’re in the right place. This guide is all about preparing for our crochet along, so you’ll have everything you need ready before we dive into the first stitches. The project officially kicks off on October 1st, 2018. Let’s get organized, share our excitement, and get those supplies together for the polka dot adventure!
Introduction to the Polka Dot Blanket CAL
As the leaves begin to turn and we move into October, the Polka Dot Blanket Crochet Along is the perfect opportunity to bring some fun color into your home. Our CAL kicks off on October 1st, and the focus now is getting set up for a successful, joyful experience. This post is all about what you’ll need, what to expect, and a little behind-the-scenes look at how to make sure your blanket turns out just right. If you’re excited for bright dots, soft fibers, and easy-to-follow instructions, gather your supplies because we’re about to make some magic together. There’s no better way to welcome autumn than with the comfort of yarn and the company of friends, both new and old.
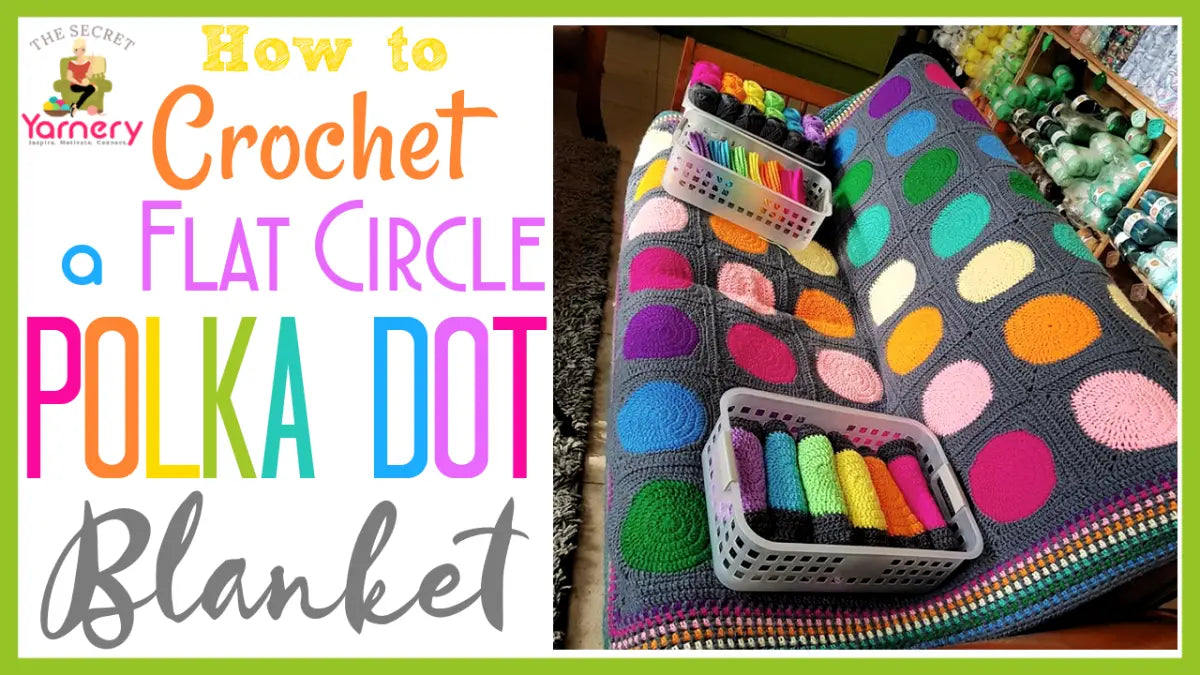
Understanding the Polka Dot Blanket Design
The heart of this project lies in playful circles and soft squares that come together beautifully.
- Each polka dot is built using five rounds to create a perfect, plump circle
- Circles then transform into squares with special “winged” corners for better drape and shape
- This updated design improves on earlier versions by keeping the polka dots perfectly round, even after the blanket stretches
- The blanket features a generous mix of colors for a cheerful effect
With every motif, the blanket grows into a cozy, eye-catching display of color and softness.

Yarn Selection Essentials
Yarn Weight and Type
The yarn you choose sets the whole tone for your Polka Dot Blanket. I reach for worsted weight (4 thickness) yarns for this project. They’re easy to find, durable, and work up quickly. Red Heart Super Saver is a favorite, but any quality acrylic or blended yarn in a similar weight works.
Yarn weight affects more than just size—it changes how cozy your blanket feels. Thicker yarns provide warmth and quick results, while still keeping each polka dot beautifully defined.
Color Choices
For this blanket, you’ll need six different colors for your polka dots and a larger quantity of a neutral (joining) color. I’m partial to grays for the backdrop, as they really make the dots pop, but white, off-white, or black can work beautifully too.
Here’s a sample color palette:
- Six vibrant colors for the polka dots (imagine playful gumdrops)
- Twelve balls of your background color
Having leftover yarn is a bonus—these shades look good in any stash!
Crochet Hook Recommendations
A 6mm crochet hook keeps the fabric soft and flexible, which is important for a blanket meant for snuggling. If you’re choosing between two hook sizes for your yarn, go for the larger. This makes the resulting fabric less stiff and more inviting.
Tip: Choose larger hook for softness. Using a bigger hook lets the yarn open up, giving a blanket that lovely drape everyone loves. Test a small swatch, and you’ll notice the difference right away.

Yarn Quantity Breakdown
Getting your yarn amounts right keeps the momentum going once we start. Here’s the breakdown:
| Yarn Color Type | Number of Balls | Weight per Ball | Total Weight |
|---|---|---|---|
| Polka Dot Colors | 2 per color × 6 | 100g | 1,200g |
| Background/Joining | 12 | 100g | 1,200g |
If you’re using 200g balls (like Super Saver), halve the number per color. Always round up; having extra is never a problem when it’s this pretty.
Getting Your Supplies Ready
Here’s your checklist for a smooth start:
- 12 balls in six colors for polka dots
- 12 balls in background/joining color
- 6mm crochet hook
- Scissors
- Stitch markers
- Measuring tape
- A yarn needle for weaving in ends
For a complete guide to these essentials, check out the Beginner Crochet Tools Guide. Organize your yarn in a cute basket (if you can find one you love), so everything is at your fingertips.
Polka Dot Motifs: What to Expect
To build your blanket, you’ll start by making five-round circular motifs in all your chosen colors. You need six circles for each color. The first tutorial will lead you step-by-step through this process, landing in your notifications on Monday.
Bold reminder: Check your stitch count with mine! Consistency in the final round’s stitch count means each square fits together without stress.
Tips for Working Ahead
If you’re itching to start, you can go ahead and make some circles before the official start. Just be sure your stitch count matches mine at the end—this keeps everything in sync later on. Patience is key, and if you work ahead, double-check your math!
Motivational note: Progress isn’t about speed—it’s about making something you’re proud of, stitch by stitch.

Transforming Circles into Squares
This pattern’s secret sauce is in how we turn those circles into squares. My earlier versions sometimes had pointy corners, making the dots look more like ovals than perfect circles. This time, we’ll create subtle “Batman” corners that gently wing out, so when your blanket stretches or drapes, every polka dot stays round and happy.
The slight outward shaping at the corners helps the whole blanket lay flat and prevents polka dots from becoming distorted. The difference seems small but really pays off once your blanket is in use.
Joining the Squares: Stitching Together
Once every circle becomes a square, the real fun begins—joining them together! I’ll show stitch-by-stitch instructions during the CAL, so you can follow along live or at your own pace.
Keeping your joining color consistent makes the finished piece feel polished and cohesive. Community support is at your fingertips too: join us in the Secret Yarnery Crochet Community on Facebook for live help, Q&A, and plenty of encouragement.
Yarn Color Inspiration and Personal Choices
I love experimenting with colors, but I always come back to gray for joining. Gray offers a modern, cozy touch and makes every color pop. Still, the background color can totally change the mood—white for crisp brightness, black for drama, or any color that makes your heart sing.
Use this project to play and experiment. Your polka dot blanket will be uniquely yours, whether you follow my palette or create one that matches your favorite room.
Yarn Brand Equivalency Tips
If you have yarn in your stash with different ball sizes, don’t worry! The math is easy: double the number of 100g balls to equal one 200g ball. For example, if Red Heart Super Saver comes in 200g, you’ll only need one ball per polka dot color and six for the background.
Always calculate based on the total grams needed—yarn labels make this part easy. When you swap brands, just make sure yarn weight/type matches so stitch size and drape don’t change.

Hook Size and Blanket Texture
Hook size matters for the feel of your blanket. I always recommend working a small sample square first to test the softness. Larger hooks mean fabric that feels like a gentle hug instead of a piece of cardboard.
Aim for a gentle, flexible hand—your hands should glide and your fabric should wiggle. Try both your preferred and the next size up to see which one feels best.
Choosing Your Background Color
Picking the right background color lets your polka dots stand out or blend, depending on your style. I almost always use gray for a polished, modern look. White brightens any room, while black can anchor a blanket with a pop-art edge.
Lay your yarns out together before starting. Seeing them side by side can help you picture the finished effect—sometimes an unexpected combo steals the show.
Preparing for the Crochet Along Schedule
Everything starts on October 1st, 2018, but don’t worry if you join a bit later. I’m releasing new tutorials on a regular schedule, and you can always catch up. Be sure to subscribe to the Secret Yarnery YouTube channel and ring the bell, so you never miss a new part.
For those who prefer reading to watching, check out the written patterns section. Take your time with each step and enjoy every part of the process.
Important Crochet Along Community Links
I always say, crochet is better with company. That’s why the Secret Yarnery Crochet Community on Facebook is open for questions, sharing progress, swapping tips, and making friends. Join us there and follow along on Instagram, Pinterest, and Twitter for even more inspiration.
- Instagram: @secretyarnery
- Pinterest: @secretyarnery
- Twitter: @TYarnery
Whether you’re a silent observer or a super-sharer, you’ll find support and plenty of cheerful encouragement.
How to Store and Organize Your Yarn
Keeping your yarn tidy makes the project smoother. I tried to find the perfect basket for my blanket-in-progress but came up empty. Any roomy, sturdy container (even a pretty box or large tote) will do the trick. Organize your yarn by color for easy access.
Top tips:
- Place polka dot yarns together in one bin, joining color in another
- Use zip bags for each project stage (circles, squares, joinings)
- Label if you’re using lots of shades or dye lots
A little organization makes for stitch-time happiness.

Yarn Weight and Texture Terms Explained
Let’s break down the basics:
- Worsted weight (thickness 4): A medium-weight yarn with good balance between warmth and lightness. Great for blankets.
- Texture: Smooth, bouncy yarns make stitchwork pop and are easier to handle.
Choosing the right weight and texture will help your blanket look and feel its best. If you’re new, check out an easy guide to must-have supplies and yarn terms.
How to Check Your Stitch Count
To keep circles and squares the same size across your Polka Dot Blanket, do this:
- Finish the last round of your circle.
- Count the number of stitches (usually at each “peak” or space).
- Make sure each motif matches the tutorial count.
If you’re off, frog a round or add a stitch to balance things out. Match my count for smooth joining later!
Adjusting the Blanket Size
Want a bigger or smaller blanket? It’s as simple as adding or subtracting motifs. Measure as you go and use your squares to “map” the planned final size.
To estimate yarn, multiply the number of planned squares by the yarn needed per motif. For planning sheets and worksheet help, visit the downloadable crochet planner section.
Best Practices for Joining Motifs
Motif joining can be as personal as stitch style. Whip stitch, slip stitch, or crochet joins all work well—as long as your tension stays even.
During the CAL, I’ll show my favorite joining techniques, but you’re free to choose one you like. Try a few on spare squares and go with the method that feels most comfortable.
How to Achieve Softness in Your Blanket
Softness starts with the right yarn and hook. Softer yarns, open stitches, and a gentle hand all help. Washing and blocking the finished blanket brings out even more drape.
Go for softness over stiffness: Test how your fabric feels every so often and don’t be afraid to change hooks if you want a little more squish.
Troubleshooting Before Starting
Common hiccups include:
- Using the wrong yarn weight
- Picking a too-small hook
- Miscounting stitches
If you’re unsure, double-check your supplies or ask the Secret Yarnery Crochet Community. I love seeing questions, and so do lots of other crafters.

Why This Polka Dot Blanket is Special
There’s something magical about seeing classic circles turn into perfectly draping, modern squares. My own “aha” moment came when tweaking the corners—those gentle Batman wings keep every dot round and happy.
“The small changes in design lead to a blanket that’s modern, fresh, and undeniably soft.” You’ll feel the difference as soon as you cuddle up.
How Many Motifs Will You Need?
Here’s the motif math:
- Six motifs in each dot color (for six polka dot colors)
- Twelve squares in the background/joining color to tie it all together
Lay out your squares before joining; this helps with color placement and catching any last details before stitching.
Conclusion
Getting ready for the Polka Dot Blanket CAL is half the fun—color planning, yarn squeezing, and dreaming about that final, poppy piece. Whether it’s your first time joining in or you’re a returning friend, you’ll find support, inspiration, and a few laughs along the way. Grab your supplies, clear a cozy corner, and get set for the journey. I can’t wait to see your creativity shine through every stitch of your own polka dot masterpiece.
For more inspiration and step-by-step help, visit the Polka Dot Blankets Collection, check out an Easy Crochet Blanket Tutorial, or read more tips in the Fun Polka Dot Blanket Crochet Guide.
Let’s get started and stay hooked!
FAQs
1. Can beginners join this Crochet Along?
Yes! The pattern is beginner-friendly. All techniques are shown step-by-step, and community help is always available if you get stuck.
2. What yarn brands work best for this blanket?
Any worsted weight (thickness 4) yarn works well. Red Heart Super Saver is recommended, but Lion Brand, Caron, or Paintbox Yarns are good options if they’re a similar weight.
3. How much yarn do I really need?
You’ll need about 2 x 100g balls in each of six dot colors and 12 x 100g balls in your background color. If using 200g balls, halve these numbers.
4. Can I use fewer or more colors for the dots?
Yes. Adjust the color count to suit your style. Just make enough motifs to cover your chosen layout.
5. What if my circles or squares aren’t the same size as yours?
Check your hook size, yarn weight, and stitch count. Making a test square helps. Adjust your hook up or down to match the pattern’s measurements.
6. Can I use cotton or wool yarn?
Yes, but keep in mind cotton is heavier and wool is warmer than acrylic. Make a sample square first to see if you like the feel and drape.
7. How do I fix mistakes if I notice them late?
If you spot a mistake in a square or circle, you can carefully undo (frog) back to the error and re-crochet that section. Fixing mistakes early helps your blanket come together more smoothly.
8. Can I crochet the motifs together instead of sewing?
Yes! Crochet joins look beautiful and add texture. Experiment with whip stitch, slip stitch, or single crochet joining to see what you prefer.
9. Where can I get help or share my progress?
Join the Secret Yarnery Crochet Community on Facebook for help, progress pics, and encouragement.
![]()
Christa Patel is the creative mind behind Secret Yarnery. She has a passion for sharing simple, colorful crochet patterns and helping crafters of all levels find joy in making. Christa’s easy-to-follow video tutorials, friendly blogs, and vibrant community groups give beginners and seasoned crocheters the tools they need to succeed.
Living in Nairobi, Kenya, Christa mixes bright color palettes, clear instructions, and a touch of fun into every project. Her designs focus on comfort, versatility, and making crochet accessible for everyone. Through Crochet Alongs, free patterns, and honest advice, Christa inspires crafters worldwide to try new stitches and create something beautiful, one stitch at a time.
About the Author
With a passion for crafting easy, beginner-friendly tutorials and patterns, Christa inspires crafters of all skill levels to unleash their creativity worldwide. She encourages yarn lovers to connect, create, and crochet a world filled with beautiful handmade treasures!
How to Crochet a Polka Dot Blanket – Getting Ready for the October 2018 Crochet Along