How to Crochet Cute Beer Bottle Covers for Parties: Step-by-Step Guide
Bring life and personality to your summer gatherings with handmade beer bottle cozies! These Crochet Cozies keep drinks cold and hands dry, stay put without slipping, and don’t leave any gaps. They’re an easy, stash-busting project perfect for using up leftover yarn. The best part? These work just as well for soda bottles, making them suitable for all your favorite refreshments.
Want to create reusable covers that look polished and fit snugly on any bottle? With this guide, you’ll learn an approachable pattern, tips for adapting to different bottle shapes, and how to make your project look professional from start to finish.
Materials Needed for Your Crochet Beer Bottle Cozy
Getting started is easy when you have the right tools. Here’s what you’ll need:
- Size 4 worsted weight acrylic yarn in your main color, plus a bit of white and some colorful scraps for the top accent
- A 5 mm crochet hook for skinny bottles like Corona or Heineken, or a 6 mm hook for curvier bottles
- Yarn needle with a sharp tip (for sewing in ends securely)
- Stitch marker (optional, but great for tracking your starting point)
- Scissors
This cozy is a fantastic stash buster! You only need scraps for the colored top, and acrylic yarn is durable and affordable, making it the perfect choice for projects that get frequent use.

Choosing Your Yarn and Hook Size
Using worsted weight acrylic ensures your cozies are sturdy, washable, and insulate drinks well. Acrylic yarn holds its shape, resists shrinking, and dries quickly.
If you’re using bottles with a slim shape, like many beer varieties, stick with a 5 mm hook. For bottles with curves, size up to a 6 mm hook so the cozy fits without straining.
Don’t worry about perfection—these cozies are flexible and can easily be adjusted by adding or removing rows to suit your bottle height and diameter.
Starting the Cozy: The Magic Ring
Understanding the Magic Ring Technique
A magic ring lets you start crochet in the round with a tightly closed base. Here’s how you make it:
- Hold the yarn tail over your non-dominant hand and secure it with your ring finger and thumb.
- Wrap the yarn around two fingers to form an X; finish by securing it under your thumb.
- Flip your hand to find a short and a long strand.
- With your crochet hook (6 mm for thick bottles, 5 mm for slim), place it under the short strand and over the long strand.
- Pull the long strand under the short to form a loop. Slide your hook under the yarn and turn it towards you to catch the long strand, pulling up a loop.
- Let go with your thumb slightly, turn the hook away from yourself, and bring it under the long strand once more.
- Pinch the base and bring the yarn through the loop on your hook.
A magic ring gives a seamless, hole-free start to your cozy, ensuring the bottom stays solid and your bottle doesn’t leak condensation.

Visualizing the Magic Ring
Your finished ring should look like an adjustable loop with a loose tail. This tail will be pulled tight after your first round of double crochets, sealing the bottom without gaps.
Creating the Solid Base
Chain One and Starting Double Crochets
- After making your magic ring, chain one.
- Work 11 double crochets into the center of the ring, making sure the chain one isn’t counted as a stitch.
Keeping the Tail in Place
Work over the yarn tail as you crochet your double crochets. If your tail becomes short, pause to gently tug it so you have enough length.
Finishing the Round
- When you finish all 11 double crochets, pull the tail tight to close the ring.
- Slip stitch into the top of the first real double crochet (not the chain) to join the round.
Always double check your stitch count—having 11 ensures the base is flat and even.
- Chain three as you prepare for the next round.

Second Round: Increasing Stitches
Chain 3 Counts as First Double Crochet
Your starting chain three now acts as the first double crochet in this round.
- Into the same stitch, make another double crochet.
Two Double Crochets in Each Stitch
Continue around the ring:
- Place two double crochets into each of the previous round’s stitches.
- By the time you complete the round, you’ll have 22 stitches (11 pairs).
Ending the Round
Slip stitch to join at the top of your beginning chain three. This even increase keeps your base circular and prevents bunching or puckering.
Third Round: Back Post Half Double Crochets
What Are Back Post Half Double Crochets?
This textured stitch wraps around the post of the previous row’s stitch from the back, adding thickness and grip so your cozy hugs the bottle and looks more finished.
- To work this: Yarn over, insert your hook from the back of your work, first before the post and then after, wrapping around the stitch. Finish your half double crochet as usual.
Crocheting Back Post Half Double Crochets Around the Round
Complete one back post half double crochet into every stitch from the previous round.
*If holding the project feels awkward, flip it over or adjust your fingers for better comfort—this round can feel a bit different if you’re new to posting around stitches.
Practice Tips
This is a great moment to pause, check your tension, and get used to the feel of this movement. Consistent tension creates a cohesive look and helps the cozy slide smoothly on and off bottles.
Want more help with stitches? Try the overview in Crochet Stitches Every Beginner Should Know for quick, clear instructions.

Finishing the Bottom: Changing Hook and Sewing in the Tail
Switching to the 5 mm Hook
Now that the base is set, switch down to a 5 mm hook. The smaller hook creates tight, sturdy stitches for the body of your cozy.
Sewing in the Center Tail
Thread your yarn needle and carefully sew the center tail into the middle of your base:
- Run the tail under several stitches in one direction, then back the other way. This ensures the ring won’t open up with use.
- Snip off the extra yarn for a neat finish.
Sharp tip needles are a huge help for this step, and you can find them in my recommended crochet supplies and tools.
Getting Ready for the Next Step
Slip the working loop back onto your 5 mm hook, ready to build up the sides of the cozy.
Joining and Starting the Cozy Body
Joining the Back Post Half Double Crochet Round
Slip stitch into the top of the first back post half double crochet to join.
Beginning the Body Pattern
- Chain one.
- In the same stitch, work a half double crochet.
- In the next stitch, make a double crochet.
- Chain two, skip two stitches, then work two double crochets each into the following two stitches.
Here’s the body pattern sequence:
- Chain two.
- Skip two stitches.
- Work two double crochets, one into each of the next two stitches.
- Repeat this pattern around the cozy.
This creates a bold, raised “chicklet” texture while keeping the sides snug and free of holes.

Working in a Spiral: The Chicklet Pattern
Keeping the Chain Two and Skip Two Consistent
Now, stop joining at the end of each round! You’ll work in a continuous spiral, repeating the body pattern. This prevents an obvious seam and keeps the cozy looking smooth.
Working Double Crochets Into Stitches Below the Chain Space
After the first round of the body pattern, you’ll begin:
- Placing each new pair of double crochets into the two stitches sitting directly under the chain two space from the round below.
This unique method gives the chicklets their distinctive look and adds stability.
Tips for Curling Work
As the cozy grows, the fabric may curl inward. Gently bend it open or tip the stitches upward as you work, so you can clearly see where to place your hook under the V’s at the top of each stitch.
Want more inspiration for fun, easy crochet projects? Don’t miss these Beginner Crochet Projects for fresh ideas.

Marking Your Starting Point
With continuous rounds, it’s easy to lose track of where you began. Use the first chain two space you made as a visual marker, or place a stitch marker there.
Tip: Always mark your starting point to simplify row counting and color changes.
Counting Rows and Understanding the Pattern Repeat
Every time you complete a full spiral, you add a row to your cozy.
To count your pattern repeats:
- At the bottom, find the first tall pair of double crochets (these count as two rows).
- Count up by twos, marking each subsequent tall pair.
- When you reach 12 total rows, your cozy is the perfect height for most bottles.
If you want a taller cozy, simply keep adding rounds before changing color!

Changing Colors: Adding the Frosty Top
When and How to Switch Colors
To create the frosty accent at the top of your cozy:
- Before you finish your last double crochet in the current round, leave two loops on your hook.
- Pick up your new color yarn (typically white for a frosty look).
- Yarn over with the new color and pull through the loops to finish the stitch.
Managing Tails and Knots
Hold both the old and new color tails along the back of your work while you crochet the first few stitches of the next row. This ensures they’re anchored in place and you won’t have to weave in long ends later.
Continuing with the New Color
Continue your chain two, skip two, and double crochet pairs for two rounds (until each chicklet is topped with white). Anchor those yarn tails before knotting or trimming.

Adding the Final Accent Color
When to Change Colors Again
Once you complete the rounds and every chicklet has a white top, it’s time for a final pop of color.
How to Change Color with a Clean Join
Just as before, leave two loops on the hook of your last double crochet, switch to your chosen color accent yarn, and finish the stitch.
Hold your yarn tails at the back, chain two, and continue the body stitch pattern around for one final round.
Covering Color Changes
When making your first stitches after a color change, always work into the stitches below the chain and pull any loose color tails to the inside. This hides the transition and leaves a crisp finish.
For more pro tips on clean color transitions, try the methods in the Beginner’s Guide to Crochet Colorwork.
Filling in the Spaces: Last Round of the Pattern Body
Time to transition from the open chicklet texture to a snug, finished edge!
- In the chain two spaces, work two half double crochets.
- Next, into each of the double crochet stitches below (not into the chains), crochet two double crochets.
- Alternate this pattern: two half doubles in the chain space, then two doubles in the stitches.
The half double crochets reduce the height for a smooth taper at the top.
Pause to check your progress and make sure every space is filled with the right stitches.

Tapering the Cozy for a Clean Finish
Creating the Taper
After you finish the last space, make one double crochet in the first stitch and a half double crochet in the final stitch of the round.
Skipping a Stitch and Making the Final Round
Skip the next stitch, then work one single crochet into each of the remaining stitches around. It’s helpful for beginners to mark that first single crochet so you don’t go around twice accidentally.
This step not only closes the top of the cozy but also ensures it hugs the bottle neck for a custom fit.
Finishing the Cozy: Slip Stitch vs Invisible Join
The Slip Stitch Join
After working single crochets all the way around, slip stitch into the first single crochet to close the round.
You can chain one, cut the yarn, and pull through to finish—or try an invisible join for a seamless look.
The Invisible Join Method
For the neatest possible finish, skip the slip stitch:
- Cut your yarn, leaving a 6-inch tail.
- Thread your tail on a yarn needle.
- Insert the needle under the two top loops of the next stitch.
- Bring the needle back down into the last stitch you crocheted, creating a “false” stitch head.
This creates a perfectly smooth edge ideal for gifting or markets.

Sewing in Tails and Final Touches
Securing Color Change Tails
Turn your cozy inside out. Tie the color change tails with double and triple knots for security, then trim them close.
Acrylic yarn holds these knots well for casual gifts or personal use, but you can also sew in the tails with a needle for added strength if you plan heavy use or want that professional look.
Final Trimming and Inspection
Smooth out your cozy, trim any stray threads, and make sure all tails are fully secure and invisible from the outside.
Putting Your Beer Bottle Cozy to the Test
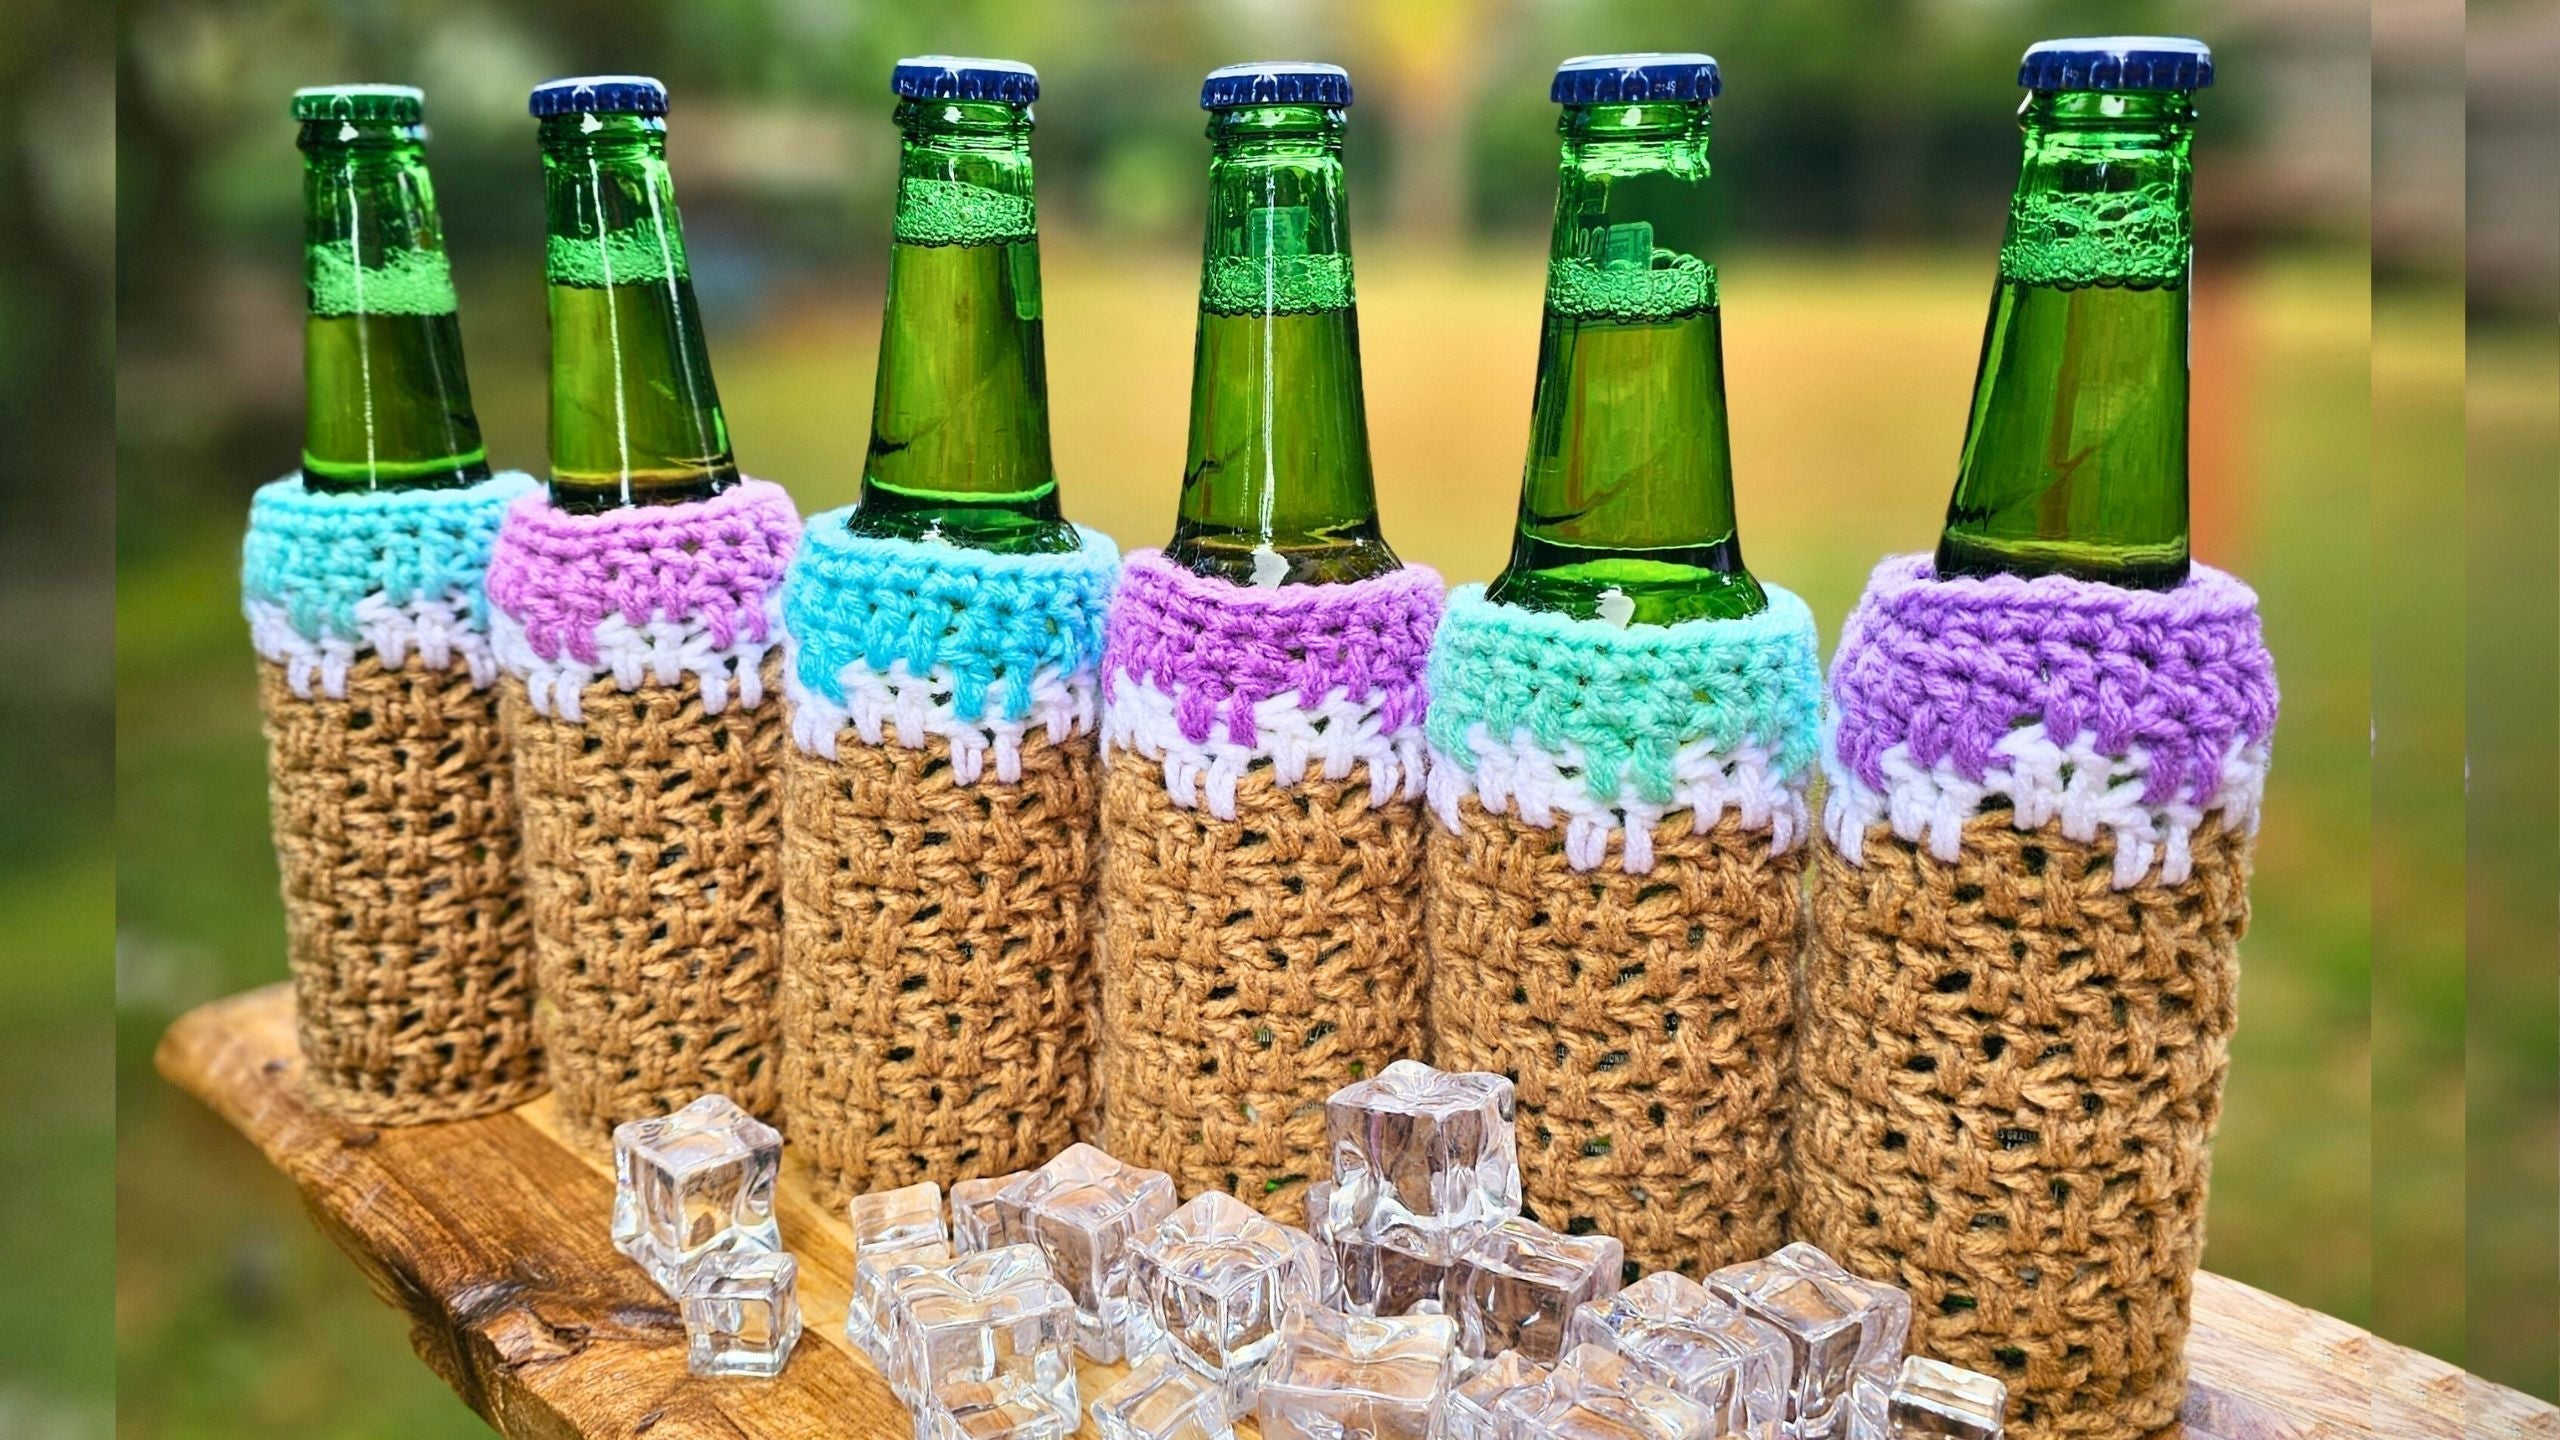
Slip your finished cozy onto your bottle, gently working it down until the solid base sits flat. Admire how snugly it fits and how stylish your bottle now looks. The tight stitches keep labels hidden for a polished effect, while no-slip sides mean your drink stays put even at bustling parties.

Party-Ready and Customizable
These cozies are a brilliant way to use up leftover yarn, add personality to gatherings, and even make memorable gifts for friends and family. Customizing the top bands with sports colors, wedding hues, or birthday themes is easy—just swap out the accent yarns!
For more beginner-friendly patterns and fresh inspiration, take a look at the Secret Yarnery Collection.
Want even more fun crochet ideas? Here are 15 Fun Crochet Projects to Try that are perfect for parties, gifts, and every season.
Conclusion
Crocheting beer bottle cozies is a fun and relaxing project with results you can use at every barbecue, picnic, or cozy night in. The process is fast, flexible, and a wonderful way to use up every scrap of yarn. With options for endless color combos and the satisfaction of a solid, slip-free fit, you’ll find yourself making these for every occasion.
Now’s your chance to bring practical style to your drinks and show off your crochet skills with flair. Grab your yarn, hook, and let your creativity bubble over—your next party will never be the same!
Looking to build on the basics or polish your crochet skills even more? Check out this Step-by-Step Crochet Tutorial for a foundation in all things yarn-y.
Stay hooked, and enjoy your ice-cold drinks in style!
Left Handed?
FAQs
1. What type of yarn works best for Beer Bottle Cozies?
Use worsted weight acrylic yarn. It’s durable, washable, keeps its shape, and won’t get soggy when your drink is cold.
2. Can I use cotton yarn instead of Acrylic?
Yes, cotton works but might stretch more after several uses. Acrylic is better for long-lasting snugness, but cotton can give a softer feel.
3. What size hook should I use for different bottles?
Use a 5 mm hook for slim bottles (like Corona or Heineken) and a 6 mm hook for wider or curvier bottles (like craft beer).
4. How do I adjust the pattern for tall bottles or cans?
Add more rounds in the body section before changing colors. For shorter bottles or cans, work fewer rows.
5. What is a magic ring and why use it?
A magic ring is a crochet technique for starting projects in the round without leaving a hole in the center. It gives a tight, neat finish to the base.
6. How do I change colors cleanly?
Change colors during the last yarn-over of a stitch, then hold tails along the back and crochet over them to tuck in the ends neatly.
7. My cozy is too loose—how can I fix it?
Try using a smaller hook or fewer stitches in the base round. Tighter tension makes a snug, secure fit.
8. Are there other styles or variations I can try?
Absolutely! Try stripes, add surface crochet, use two strands of yarn, or personalize with appliques. Explore patterns for cans, mason jars, or even mugs.
![]()
Christa Patel is a crochet designer, teacher, and founder of Secret Yarnery. She loves making easy-to-follow patterns and creative DIY tutorials for all skill levels. With a passion for bright colors and practical projects, Christa believes anyone can learn to crochet and add handmade touches to everyday life. Her clear instructions and helpful videos inspire hundreds of thousands of makers around the world.
Follow Christa for more crochet tips, patterns, and crafty inspiration on YouTube, Instagram, and her blog at Secret Yarnery. Whether you’re a beginner or looking for new ideas, Christa’s friendly style and creative patterns make crafting fun and stress-free.
About the Author
With a passion for crafting easy, beginner-friendly tutorials and patterns, Christa inspires crafters of all skill levels to unleash their creativity worldwide. She encourages yarn lovers to connect, create, and crochet a world filled with beautiful handmade treasures!
How to Crochet Cute Bottle Covers for DIY Party Decor 2025