How to Join Treasure Map Popcorn Granny Squares – Easy JAYGO Crochet Tutorial
Ready to turn a pile of granny squares into a gorgeous blanket that feels as fun as a treasure map? In this guide, I'll show you exactly how I created a colorful blanket using the Join As You Go (JAYGO) technique with treasure map popcorn granny squares. JAYGO is a simple yet clever way to join granny squares while you work the final round, without having to sew or stitch them together afterward. For my project, I made a blanket that’s eight squares long and six squares wide, and used fourteen skeins of yarn for the main squares (not counting the border). Each square pops with texture thanks to the popcorn stitch pattern, and you can learn how to make the squares too.
If you want to make your own squares before joining, check out my Easy Treasure Map Popcorn Granny Square pattern for a beginner-friendly design. Whether you use a rainbow of colors or stick with your favorite palette, the JAYGO technique keeps your project neat and quick.
Getting Ready: Preparing the Granny Squares
Before you can start joining, make sure your granny squares are ready. I like to use different colors for a playful look, but you can also stick with all the same shades if you prefer. Each square in my tutorial has six rounds. To count your rounds, just find the center and count the popcorns diagonally—one for each round up to six.
To prepare your squares for JAYGO joining:
- Complete one granny square with all six rounds finished.
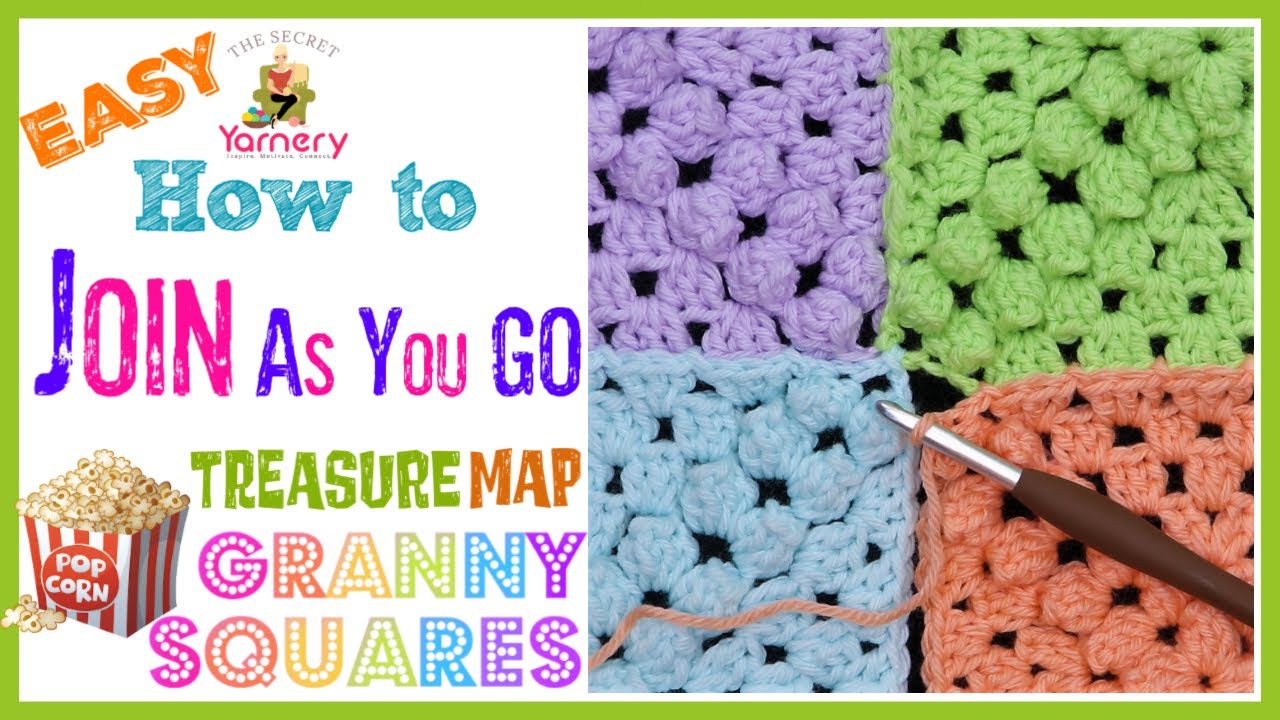
- For the next square you'll be joining, stop after round five.
- Start round six but only finish the popcorn and the shell stitches on one side.
This way, you have one finished square and one partially finished square, positioned perfectly for the join. If you want smaller or larger squares, just adjust the number of rounds. The joining technique works with any size square as long as you set them up with one full square and one at the last round.
Step-by-step for square preparation:
- Decide on your square size and color sequence.
- Make your first square with all rounds complete.
- Crochet your second square up to the last round, finishing only one side of the final row.
- Repeat for as many squares as you plan to join.
Check out the Treasure map crochet granny square pattern guide if you want a closer look at the popcorn stitch and layout.

The Basics of JAYGO: Setting Up for Success
When joining granny squares using the JAYGO technique, I start by laying my fully completed granny square above my workspace. This square becomes the anchor for the next one. Keep the yarn tension just comfortable—not too tight or loose—so your joins don’t look baggy or pull the squares out of shape.
While working, keep both squares flat and aligned. Always check that your joining stitches line up with the matching spaces on the completed square. For each join, popcorn and chain 2 on the first side of your unfinished square before you start joining. This sets up your square for a tidy connection to the base square.
Step-by-Step: Side Joining Process
Let’s get into the actual process of joining a new granny square to an already finished one. I take things one step at a time and repeat the process for every new addition.
Here’s how I join the side of a new square:
-
Work the first popcorn and chain 2 on the joining square.
- This starts the sixth round on your second square.
-
Insert your hook into the corner space of the completed square above.
- Bring your yarn through for a slip stitch join.
- Chain 2 again after your slip stitch; this completes half the corner at the join.
- Continue with a popcorn stitch on the joining square into the next space.
- After each popcorn or shell (three double crochets) on your joining square, insert your hook down into the matching space on the completed square and work a slip stitch.
- Work a shell on your joining square, keeping everything flat.
- In the next space, insert your hook into the completed square’s space, yarn over, and slip stitch to join.
- Repeat steps 5–7 for each space along the side you’re joining.
- At the corner, chain 2 and finish the half-corner join as before (popcorn, chain 2, slip stitch, chain 2).
- Finish off round six on your joining square as normal.
Quick tips for smooth joining:
- Keep your workspace neat and squares well-aligned.
- Popcorn stitches add bulk, so tug gently to avoid puckering.
- Slip stitches should be snug but not tight to keep everything laying flat.
Side Joining Cheat Sheet
| Step | What to Do | Stitch Type |
|---|---|---|
| 1 | Chain 2 after popcorn | Chain |
| 2 | Slip stitch into corner | Slip stitch |
| 3 | Chain 2 to finish corner | Chain |
| 4 | Popcorn on joining square | Popcorn |
| 5 | Slip stitch after each shell | Slip stitch |
| 6 | Shell (3 dc) on each space | Double crochet |
It’s easy to repeat this pattern for each side you join, and as you get used to it, your hands will remember where the hook should go each time.

Building a Row: Joining Multiple Granny Squares
Once you’ve joined one square, you can keep building your row using the same approach. Each new square you add follows the popcorn, chain 2, slip stitch join, and repeat shells with slip stitches.
As I worked my blanket, I liked using bright colors like turquoise and other contrasting shades, but the structure is the same no matter what palette you use. The key is to maintain an even tension and keep all your squares lined up, so the edges don’t wobble as you connect each square.
Here’s a checklist to keep your row joining on track:
- Finish the first side of round six on your next square.
- Begin each join with a popcorn and chain 2, and slip stitch into the corner of the aligned finished square.
- Remember to chain 2 after each slip stitch at a corner.
- Slip stitch after each shell into the corresponding space.
- Complete the square before starting on the next one in the row.
Keep your row flat as you move along, checking the joins regularly. It’s easier to adjust now than to fix tension problems later.
Vertical Joining: Starting New Rows Below
After completing a full row, it’s time to start the next one below. Vertical joining is similar to the side join, with a small twist.
The main difference: Instead of joining directly below, you’ll start your join in a diagonal (kitty-corner) corner of the square above.
To join vertically below:
- Complete five rounds and one side of round six (with a popcorn and chain 2) on the new square.
- Instead of starting your join on the square directly above, insert the hook into the diagonal (kitty-corner) square’s corner space. This is important for the neat, crisscross look.
- Slip stitch to join, then chain 2 to finish the corner.
- Continue with popcorn and chain 2.
- Work shells and slip stitches as done on the side, but always make sure you’re joining across and down while keeping everything flat.
Tips for vertical joining:
- Keep the squares lined up, especially when starting from the diagonal.
- Don’t let the work twist out of shape; pause often to lay the blanket flat.
- Always start the join at the diagonal corner, not directly below, to avoid gaps.
Step-by-step for vertical joining:
- Finish one side of the last round on the new square.
- Hold it next to the blanket, lining up the diagonal corners.
- Insert hook into the diagonal corner, slip stitch, and chain 2.
- Continue popcorns and shells along the side, joining spaces as you go.
- Finish off the square and move to the next.
Bold reminder: Always join to the kitty-corner for neat, tight vertical joins and avoid “holes” at your corners.

Joining Corners: Tackling Two Sides at Once
Once you’ve built a few rows, sometimes a new square will need to be joined on two sides at once, right into a corner where two existing squares meet. This is where the process gets a little trickier, but it’s still easy to get right.
How I handle corner joining:
- Start your new square with five rounds completed and one side of round six with the popcorn and chain 2 ready.
- Position the square you're joining so its unfinished side lines up with the two already-joined sides of your blanket.
- Start by joining at the opposite (kitty-corner) corner space, slip stitch, and then chain 2.
- Work the popcorn, then chain 2, always keeping your work flat.
- Slip stitch into the first space after the corner of the adjoining square.
- When shells or popcorns line up with more than one finished square, insert your hook under both corner spaces for a super secure join.
- Continue working shells with slip stitches into corresponding adjacent spaces, alternating between sides if necessary to catch every space.
Diagram placeholder:
Imagine a T-junction where the corner of your new square meets two completed squares, sharing both corners at once. By always starting your join at the diagonal, you anchor all four corners into one tight, tidy knot.
Corner joining troubleshooting:
- Gapping at corners: Tension is too loose; pull the yarn snug while slip stitching.
- Ridges or bumpiness: Ease off tension and pull work flat after each set of stitches.
- Uneven edges: Always check squares are flat before joining a new one.
Keep both sides of your joint balanced, and check after each step that all seams are sitting smoothly.
Finishing Off Each Joined Square
After you’ve stitched up all sides that need joining, you’ll finish the last round of the square as if completing any round. Work your popcorn and shell stitches along the remaining sides. Double-check your joins are lying flat and adjust any tension issues right away.
To secure your square:
- Popcorn and shell along unfinished sides.
- Chain and stash your hook between each join for even tension.
- At the end, join with a slip stitch back into the starting point.
- Weave in ends with a blunt-tipped needle to keep everything tidy.
If you check your work at this stage, you can spot uneven tension or gaps before you add another square. Smooth, flat joins set the stage for a stunning finished blanket.
Tips for Seamless JAYGO Joining
Consistent results come down to paying attention to a few simple habits:
- Keep yarn tension even. Avoid loose loops, especially with slip stitches and popcorns.
- Lay your work flat. This stops your blanket from curling or cupping.
- Don’t pull too tight or stretch squares as you add joins.
- Use stitch markers or clips to keep squares aligned (especially if working with many colors or large blankets).
- If your yarn tangles or hook slips out, pause, untwist, and readjust—the best joins come from relaxed hands and a calm pace.
- Turn your work as needed, but always keep track of right and wrong sides.
- Check your progress after every few joins to catch issues early and keep your blanket looking sharp.
Bold tip: A quick break and a second glance can save hours of fixing later!
Building the Blanket: Planning and Progress
Keep joining rows and columns using the techniques above. Some like to join all the rows first, then stack those into columns. Others prefer to join squares across one row, then add rows below.
Benefits of JAYGO for granny square blankets:
- No massive pile of unwoven squares at the end.
- Each join is tidier and more secure.
- Both the front and back of the blanket look clean and finished.
- You can adjust your blanket’s size as you go.
Table: Planning Your Blanket Assembly
| Blanket Size | Squares Long | Squares Wide | Total Squares | Yarn Needed* |
|---|---|---|---|---|
| Small Lap Blanket | 4 | 5 | 20 | 7–8 skeins |
| Medium Throw (sample) | 8 | 6 | 48 | 14 skeins |
| Large Bedspread | 10 | 10 | 100 | 25+ skeins |
*Estimates are for squares only, not for borders.
As you join, consider making a paper map or checklist to track your rows and columns. This planning makes finishing your project a breeze.
More Tutorials and Support for Granny Square Joining
Need more help with your treasure map popcorn granny squares or want a reference while you crochet? Return to the full step-by-step video tutorial or dive deeper into the Treasure map crochet granny square pattern guide.
For a community of crocheters or more ideas about joining techniques, check out the Ultimate Guide to Joining Granny Squares playlist, and if you like written patterns and tips, you’ll enjoy browsing my easy popcorn stitch tutorial for treasure map squares. For related tools, storage, and materials, the video description has quick links for all my go-to gear.
Troubleshooting Common Granny Square Joining Issues
Sometimes things don’t go as planned. Here’s how I handle the most common joining headaches with granny square projects:
- Joins too loose: Pull snugger on slip stitches. Experiment with a smaller hook.
- Joins too tight or warping: Relax your hand and let the yarn flow naturally. Don’t yank the hook through at joins.
- Gaps between squares: Check that you’re always joining to the corresponding space on both squares. Rework joins if the gaps show.
- Edges curling up: Usually from tight joins or missed chains. Frog (undo) and redo with softer tension.
- Need to redo a join: Gently pull out stitches back to a clean edge and work again, taking care not to split the yarn.
When in doubt, check with other crocheters in groups or forums. Sometimes a second pair of eyes helps pinpoint tricky spots.

Finishing, Displaying, and Caring for Your Popcorn Granny Square Blanket
Make your hard work stand out with a bit of finishing TLC.
- Blocking: Lay the finished blanket flat, mist lightly with water, and pin out the edges for a perfect finish. Let it dry in shape.
- Washing: Use a gentle cycle, cold water, and mild soap. Lay flat to dry to keep those popcorn stitches perky.
- Adding a border: A neat border makes the whole blanket look polished. Borders also help even out any small sizing quirks from handmade squares.
- Displaying or gifting: Drape over a couch, fold on a bed, or wrap as a special handmade gift. These blankets are showstoppers!
Share Your Work and Stay Connected
Crocheting is always more fun with friends. Once your treasure map popcorn granny square blanket is done (or even in progress!), take a photo and share it in our Facebook group, The Secret Yarnery Crochet Community, or tag me with your projects. Sharing your makes is a great way to inspire others and get advice or encouragement.
For more free patterns, weekly Q&As, and live tutorials, don’t forget to follow and subscribe on YouTube. Being part of a crochet community boosts creativity and keeps the motivation going for your next project.
FAQs
-
What does JAYGO mean in crochet?
- JAYGO stands for Join As You Go. You join each new granny square to the blanket while working its final round, so there’s no sewing later.
-
Do I need to finish each square before joining?
- Finish one square completely. For the next square, stop after round five, then start round six and work only one side. Begin joining on that side.
-
What hook size should I use?
- Use the hook that matches your yarn label for the square pattern. If your joins look tight or your blanket is curling, try one hook size larger for the joining round.
-
How many skeins will I need?
- For the sample throw (8 by 6 squares), I used about 14 skeins for the squares only. Add extra for borders. Yardage varies by yarn weight and your tension.
-
Can I use any granny square pattern with JAYGO?
- Yes. The method works with most squares that have chain spaces around the edge. Adjust the join placement to match your square’s edge structure.
-
How do I count rounds on the treasure map popcorn square?
- Start at the center and count popcorns diagonally outward. Each popcorn along the diagonal equals one round.
-
How do I keep the joins from being too tight?
- Keep slip stitches snug, not tight. Maintain even tension, and don’t yank the yarn. If needed, loosen your grip or size up your hook for the joining round.
-
My joins look loose and gappy. What should I do?
- Pull slip stitches a bit snugger, verify you’re joining into the matching space on the finished square, and rework any sections with obvious gaps.
![]()
I’m Christa, the maker behind Secret Yarnery. I teach simple, joyful crochet you can follow without stress. If you love color, texture, and clear step-by-step help, you’re in the right place.
I started crocheting as a kid, then came back to it as a busy mom who needed a creative break. Now I film easy tutorials, design beginner-friendly patterns, and share weekly tips to make crochet fun and doable.
What you’ll find here:
- Granny squares with personality, like my Treasure Map Popcorn Square
- Join-as-you-go techniques that skip the sewing
- Straightforward patterns, written for real life
- Color planning ideas and quick fixes when things go wonky
When I’m not filming or stitching, I’m chatting with our crochet community, testing new yarns, and dreaming up the next blanket. Come hang out with me on YouTube for live demos and Q&As, or browse my patterns and tools.
About the Author
With a passion for crafting easy, beginner-friendly tutorials and patterns, Christa inspires crafters of all skill levels to unleash their creativity worldwide. She encourages yarn lovers to connect, create, and crochet a world filled with beautiful handmade treasures!
How to Join Treasure Map Popcorn Granny Squares!