Have you ever finished a beautiful crochet project only to find the edges looking wavy, uneven, or just plain messy? You're not alone! Keeping straight edges in crochet is one of the most common challenges that both beginners and experienced crocheters face. But don't worry - with a few simple techniques and a bit of practice, you'll be creating perfectly straight edges that give your projects that professional, polished look. Let's dive into the secrets of crisp, clean crochet edges!
Why Straight Edges Matter in Crochet

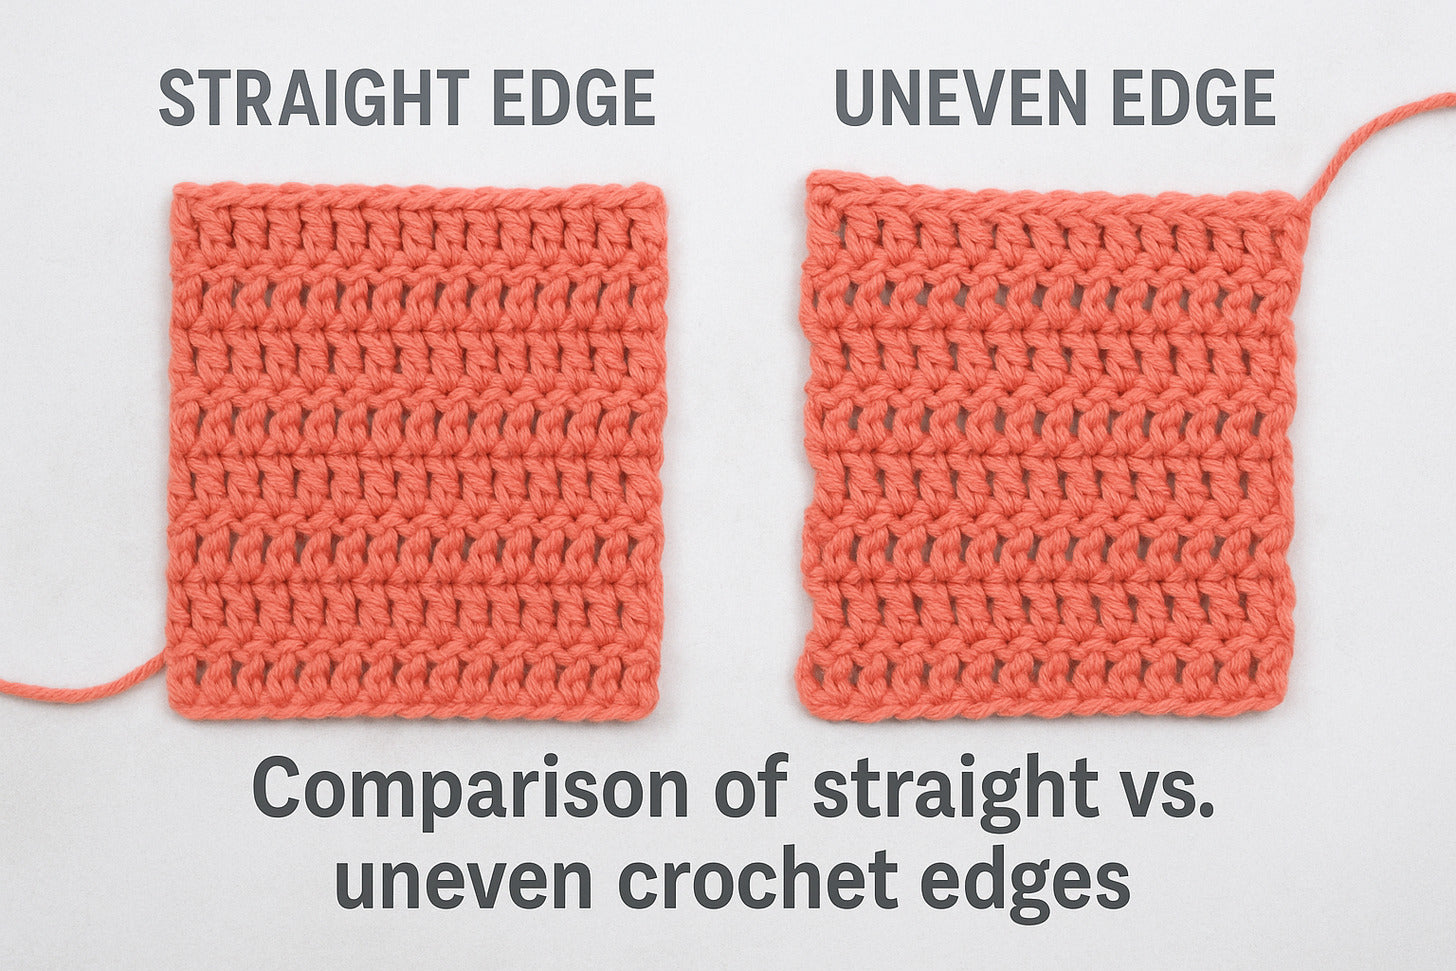
Straight edges make a huge difference in the professional appearance of your finished projects
I can't stress enough how important straight edges are to your crochet projects! When your edges are nice and straight, your work looks so much more professional. Think about it - straight edges make seaming pieces together a breeze (no more struggling to match up wavy edges!), they help your blankets and scarves hang beautifully, and they give your finished items that store-bought quality that we all secretly aim for.
Plus, straight edges actually make your crocheting experience more enjoyable! You'll spend less time frogging (ripping out) rows, less time blocking, and more time actually enjoying your craft. And isn't that what we all want? More crochet joy, less crochet frustration!
Common Causes of Uneven Crochet Edges
Before we jump into solutions, let's understand what causes those pesky uneven edges in the first place. Identifying the problem is half the battle!

Inconsistent Stitch Count
The most common culprit! Adding or losing stitches as you work creates edges that wave in and out. This usually happens at the beginning or end of rows where it's easy to miss a stitch or accidentally add an extra one.
Turning Chain Problems
Your turning chain can make or break your edge! Using the wrong height for your turning chain or inconsistently counting (or not counting) it as a stitch leads to uneven edges that just won't behave.
Tension Troubles
If your tension varies as you crochet, especially at the beginning and end of rows, your edges will show it! Tight edges pull inward while loose edges flare out, creating that wavy look we're trying to avoid.
Essential Techniques for Perfect Straight Edges
Master Your Stitch Count

I know, I know - counting stitches isn't the most exciting part of crocheting! But trust me, it's absolutely essential for keeping straight edges in crochet. Even experienced crocheters (myself included!) can miss a stitch when we're watching TV or chatting with friends.
You don't need to count after every single row (whew!), but I recommend counting every 3-4 rows to catch any mistakes early. This simple habit will save you from the heartbreak of realizing you've been adding or losing stitches for the past 20 rows!
Never Lose Count Again!
Download my free "Stitch Counter Tracker" printable to easily keep track of your rows and stitch counts. Perfect for beginners and busy crocheters!
Get Your Free TrackerPerfect Your Turning Chain

The turning chain is your secret weapon for straight edges! Here's my foolproof guide to turning chains based on stitch height:
| Stitch Type | Chain Height | Counts as a Stitch? |
| Single Crochet (SC) | Chain 1 | No |
| Half Double Crochet (HDC) | Chain 1 or 2 | No |
| Double Crochet (DC) | Chain 2 (not 3!) | No |
| Treble Crochet (TR) | Chain 3 | No |
Here's my personal secret: I never count my turning chain as a stitch, regardless of what the pattern says! This consistently gives me straighter edges with fewer gaps. When you don't count the turning chain as a stitch, you'll work into the very first stitch of the previous row, not the second one.
Control Your Tension

Maintaining consistent tension is crucial for straight edges! Pay special attention to your tension at the beginning and end of each row, as these are the spots where most crocheters unconsciously tighten or loosen their grip.
Try this: Before starting each row, take a deep breath and check your grip. Are you holding the yarn too tightly? Did you just get a text that made you tense up? Our emotions often show up in our tension, so being mindful can make a huge difference!
Using Stitch Markers: Your Best Friends for Straight Edges
Stitch markers are absolute game-changers when it comes to keeping straight edges in crochet! I use them religiously, and they've saved me countless hours of frustration.
Where to Place Your Stitch Markers
Beginning of Rows
Place a marker in the first actual stitch of each row (not the turning chain). This helps you identify exactly where to place your last stitch when you come back around on the next row.
End of Rows
Mark the last stitch of each row. This is especially helpful when working with patterns that have a lot of texture or when using dark-colored yarns where stitches can be hard to see.
Pro Tip: Don't have store-bought stitch markers? No problem! You can use safety pins, paper clips, small pieces of contrasting yarn, or even earrings in a pinch!

Fixing Uneven Edges Mid-Project

Noticed your edges are getting wonky halfway through your project? Don't panic! Here's how to fix the situation without starting over:
"Don't be afraid to frog (rip out) a few rows if needed. It's better to fix a problem early than to continue with a project that will never look quite right."
Blocking: The Final Touch for Perfect Edges

Blocking is like magic for crochet projects! It can transform slightly uneven edges into perfectly straight ones. Here's my simple blocking method:
Step 1: Wet or Steam
Either soak your project in lukewarm water with a bit of wool wash, or use a steamer to dampen it. For acrylic yarns, steam blocking works best.
Step 2: Shape
Lay your damp project on blocking mats or a towel-covered flat surface. Gently stretch and pin the edges straight, using rust-proof T-pins.
Step 3: Dry
Allow your project to dry completely before removing the pins. This sets the fibers in their new, straight position!

Essential blocking tools for achieving perfectly straight edges
Tools That Help Maintain Straight Edges

Ergonomic Hooks
Hooks with comfortable grips reduce hand fatigue and help maintain consistent tension, which is key for straight edges!

Stitch Counters
Digital or mechanical counters help you keep track of your rows and stitches without relying on memory alone.

Blocking Mats & Pins
Interlocking foam mats and rust-proof T-pins make blocking your finished projects a breeze!
Master Straight Edges Once and For All!
Join my weekly newsletter for more crochet tips, tricks, and exclusive patterns delivered straight to your inbox. Plus, get my "Straight Edges Cheat Sheet" as a welcome gift!
Practice Project: Simple Dishcloth with Perfect Edges

Ready to practice your straight edge skills? This simple dishcloth is the perfect project! It's small enough to finish quickly but gives you plenty of rows to practice maintaining those straight edges.
Materials Needed:
Skills Practiced:
Remember: Even if your dishcloth edges aren't perfectly straight on your first try, that's okay! It's a practice piece, and you'll still have a useful dishcloth when you're done. Each project gets better!
Frequently Asked Questions About Straight Crochet Edges
Why do my crochet edges keep getting wider?
If your project is getting wider, you're likely adding extra stitches. The most common places this happens are: working into the turning chain when you shouldn't, accidentally making two stitches in one, or missing the last stitch and working into the turning chain instead. Try using stitch markers to mark the first and last actual stitches of each row.
Should I always count the turning chain as a stitch?
It depends on the pattern, but I personally find that NOT counting the turning chain as a stitch (regardless of height) creates straighter edges with fewer gaps. If you're following a pattern, do what it says for best results. If you're creating your own project, experiment with both methods and see which gives you straighter edges with your particular tension.
Can blocking fix severely wavy edges?
Blocking can work wonders for minor to moderate waviness, but it can't completely fix severe structural issues caused by significantly inconsistent stitch counts. Think of blocking as fine-tuning rather than major reconstruction. For best results, try to maintain consistent stitch counts throughout your project and use blocking as the final perfecting touch.
Why are my edges still uneven even when my stitch count is correct?
If your stitch count is correct but edges are still uneven, the culprit is likely tension issues. Pay attention to how tightly you're working the first and last few stitches of each row. Many crocheters unconsciously tighten up at the beginning of rows and loosen at the ends (or vice versa). Try to maintain the same relaxed, consistent tension throughout.
You're Ready for Perfect Straight Edges!

Keeping straight edges in crochet doesn't have to be a mystery anymore! With consistent stitch counting, proper turning chain techniques, and mindful tension control, you'll be creating beautifully straight edges in no time. Remember, even experienced crocheters occasionally struggle with edges - it's all part of the crafting journey!
The most important thing is to be patient with yourself and practice regularly. Each project is an opportunity to refine your skills. Before you know it, straight edges will become second nature, and you'll be creating professional-looking projects that you're proud to display or gift to others!
Ready to Take Your Crochet Skills Further?
Download my comprehensive "Straight Edges in Crochet" guide with printable cheat sheets, troubleshooting tips, and practice patterns!
Get Your Free Guide NowChrista Patel is a passionate crochet artist, teacher, and pattern designer with over ten years of experience. She loves helping people discover the joy of making with their hands, no matter their skill level. Christa specializes in beginner-friendly tutorials and clear, practical tips that make each project easier and more fun.
When she’s not crocheting, you’ll find Christa exploring yarn shops, sipping chai, or sharing her latest creations online. You can read more from Christa and find her patterns at Secret Yarnery.
About the Author
With a passion for crafting easy, beginner-friendly tutorials and patterns, Christa inspires crafters of all skill levels to unleash their creativity worldwide. She encourages yarn lovers to connect, create, and crochet a world filled with beautiful handmade treasures!
How to Keep Straight Edges in Crochet: Pro Tips for Neat Results