Do your hands ache after a long crochet session? Those thin metal hooks can cause serious discomfort over time. Crafting your own DIY crochet hook handles is an affordable solution that can transform your crocheting experience. Custom handles reduce hand fatigue, improve your grip, and allow you to crochet longer without pain. In this guide, I'll show you multiple ways to create ergonomic handles using materials you might already have at home.

Benefits of Custom DIY Crochet Hook Handles
Creating your own Ergonomic crochet hooks offers numerous advantages over standard hooks. The most immediate benefit is improved comfort during long crocheting sessions. The wider, custom-shaped handles distribute pressure more evenly across your hand, reducing strain on specific pressure points.
Custom handles also provide better grip control. No more hooks spinning between your fingers or slipping during complex stitches! This improved stability leads to more consistent tension in your work and fewer mistakes.
For those with arthritis, carpal tunnel syndrome, or other hand conditions, DIY handles can be life-changing. You can design the exact shape, weight, and texture that works best for your specific needs.
Finally, there's the cost factor. A set of ergonomic hooks can cost $50-$100, while making your own might cost just $10-$15 for an entire set. Plus, you get the satisfaction of creating something beautiful and functional!
Materials You'll Need
Essential Supplies for Your DIY Handles
Having the right materials on hand will make your DIY project much easier. You don't need everything listed below - just choose the method that works best for you.
Shop Materials on AmazonFor Polymer Clay Handles
- Polymer clay (Fimo, Sculpey, or similar)
- Old metal crochet hooks
- Clay adhesive (Bake 'n' Bond)
- Toaster oven (dedicated for clay only)
- Craft knife or razor blade
- Cotton batting (for baking surface)
- Optional: glitter, wire for structure
For Foam/Rubber Handles
- Shelf liner cushion or foam tubing
- Small hair elastics or rubber bands
- Scissors
- Permanent marker
- Ruler
- Crochet hooks (any type)
- Optional: double-sided tape
For Upcycled Handles
- Old pens or markers with caps
- Hot glue gun and glue sticks
- Craft knife or scissors
- Sandpaper (medium grit)
- Crochet hooks
- Optional: decorative tape, washi tape
- Optional: polymer clay for details

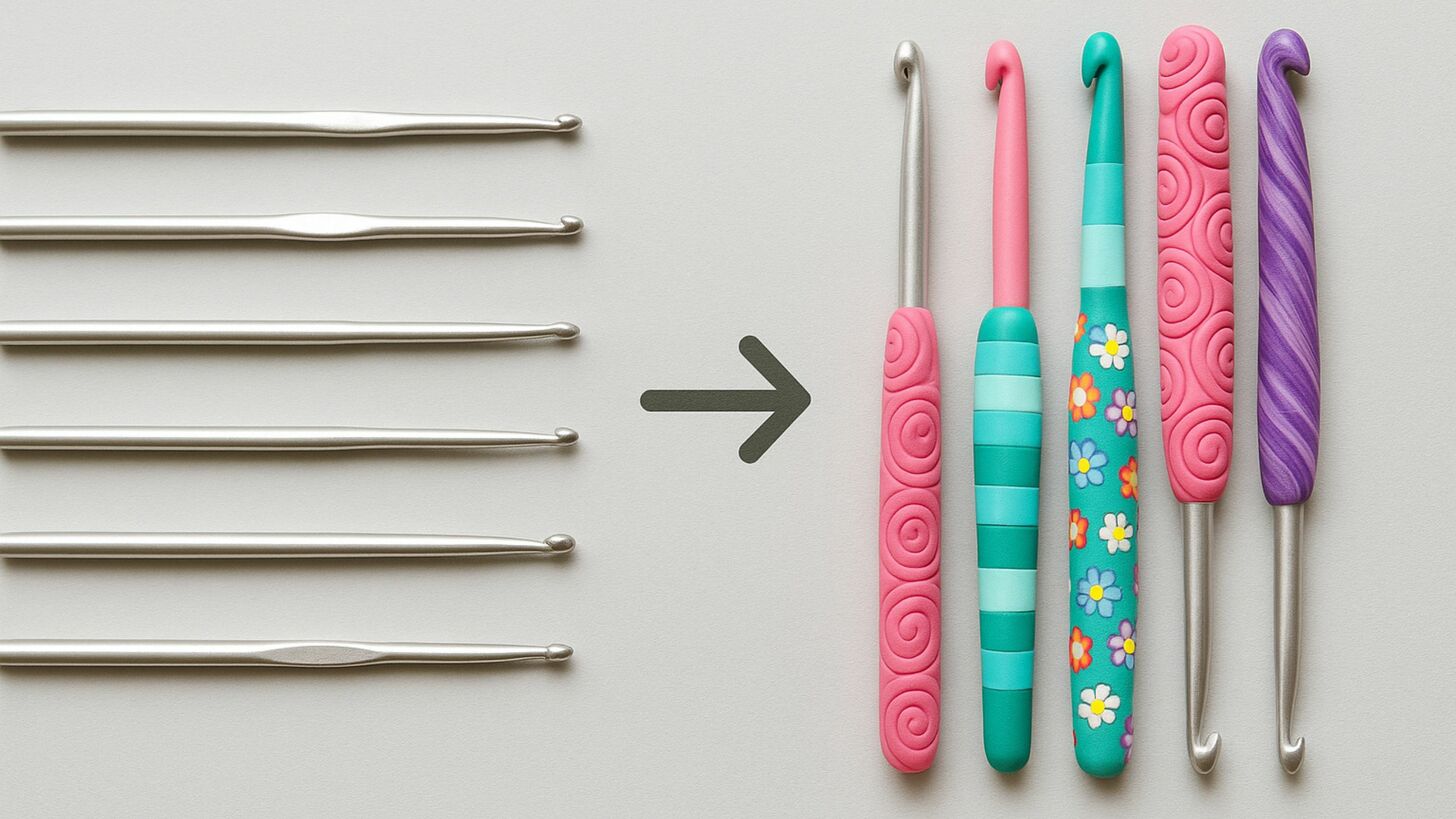
Method 1: Polymer Clay Handles
Safety Note: Polymer clay contains chemicals that become plastic when baked. Use a dedicated toaster oven for clay projects, preferably in a well-ventilated area or outdoors. Keep all clay tools separate from kitchen utensils.
Step 1: Prepare Your Hooks
If your hooks already have rubber handles, you'll need to remove them first. Using a craft knife, carefully cut a slit down the length of the rubber handle. Make several passes until you can peel the rubber away from the metal hook. Save the original handles to reference the hook sizes later.

Step 2: Condition and Marble the Clay
For each hook, you'll need about 1 ounce of polymer clay (typically half a standard package). To create beautiful marbled effects, choose 2-3 complementary colors. Work the clay between your hands until it becomes soft and pliable.
- Divide your clay into several sections and roll each into thin ropes
- Press the ropes together, then cut into sections
- Press sections together into a bundle
- Roll into a rope again and twist
- Repeat the cutting, rolling, and twisting process until you achieve the desired marbling effect
You can color-code your handles by hook size to make them easy to identify. For example, use warm colors (reds, oranges) for smaller hooks and cool colors (blues, greens) for larger hooks.
For solid colors without marbling, simply work the clay until it's soft and pliable, then proceed to the next step.

Step 3: Shape the Handle
Now comes the fun part - creating the ergonomic shape that will feel comfortable in your hand.
- Roll your clay into a tapered log shape, about 5 inches long, thicker in the middle and thinner at the ends
- Cut a slit down the center of the entire length, about 3/4 of the way through (not completely in half)
- Apply a thin layer of clay adhesive to the metal hook handle
- Insert the hook into the slit, positioning it so the top edge of the clay stops about 1.5 inches from the hook tip
- Gently press the clay around the hook, closing the gap
- Blend the seam with your fingertip and reshape as needed

Step 4: Add Details and Size Markers
Before baking, add personal touches and practical features to your handles:
- Create grooves or texture patterns using a knitting needle
- Add thin ropes of contrasting clay as decorative elements
- Roll the handle in fine glitter for a sparkly effect
- For hooks that extend past the metal, insert small pieces of wire for added strength
Don't forget to mark the hook size! Create a small disc of clay, imprint the hook size letter or number, and attach it to the end of the handle with a dab of clay adhesive.
You can experiment with different handle shapes - some crocheters prefer a bulbous middle section while others like a more tapered design.
Step 5: Bake Your Hooks
Follow these steps to properly bake your polymer clay handles:
- Preheat your dedicated toaster oven to 200°F (lower than the package recommendation of 230°F)
- Place small pieces of cotton batting on the oven rack
- Lay your hooks on the batting, making sure they don't touch each other
- Bake for approximately 60 minutes (longer than package instructions, but at a lower temperature)
- Turn off the oven and let the hooks cool inside with the door open
- Once cool, remove any batting fibers that may have stuck to the clay
The lower temperature for a longer time ensures the clay bakes thoroughly without burning. Your hooks will be slightly more fragile while hot, so handle with care until fully cooled.

Step 6: Apply a Protective Finish (Optional)
For added durability and shine, you can apply a protective finish to your handles:
- Stand your hooks upside-down in a piece of styrofoam or clay
- Apply a thin coat of Fimo Gloss Varnish with a small paintbrush
- Let dry completely (about 24 hours)
- Apply a second coat if desired
Get Fimo Gloss Varnish for Your Handles
A quality varnish will protect your polymer clay handles and give them a professional finish that lasts.
Shop Fimo VarnishMethod 2: Quick Foam or Rubber Grip Handles
If you want a simpler, no-bake solution, foam or rubber grip handles are perfect. This method takes just minutes and can be easily adjusted or removed.
Using Shelf Liner Cushion
Shelf liner cushion is an ideal material for temporary handle modifications. It's inexpensive, easy to work with, and can be found at most dollar stores or home improvement shops.
You'll Need:
- Roll of shelf liner cushion (the type with holes)
- Small hair elastics or rubber bands
- Scissors
- Permanent marker
- Ruler (optional)
Basic Steps:
- Cut a strip of shelf liner about 12" long and 4-5" wide
- Roll it tightly around your hook handle
- Secure with small elastics or rubber bands
- Mark the hook size on the outside with permanent marker
The beauty of this method is that you can easily adjust the thickness by adding or removing layers, and you can transfer the handle to different hooks as needed.

Creating Tapered Handles
For a more ergonomic shape, try this tapered handle design:
- Cut a strip of shelf liner 12" x 4-5"
- Cut triangle shapes from the long sides (deeper triangles on the hook end, shallower triangles on the handle end)
- Roll the modified strip around your hook
- Secure with elastics
This creates a handle that's thicker in the middle and tapered at both ends, similar to commercial ergonomic hooks. It works well for both knife and pencil grip styles.

Using Foam Tubing
Pre-made foam tubing (often sold as pipe insulation or for swimming pool noodles) offers another quick solution:
- Purchase foam tubing with an inner diameter slightly smaller than your hook handle
- Cut a piece to your desired handle length
- Slice it lengthwise on one side
- Spread the slit open and press your hook handle inside
- Secure with tape if needed
This method works best for larger hooks (size G/4.0mm and up). For smaller hooks, you may need to use thinner foam or the shelf liner method instead.
Method 3: Upcycled Materials for Handles
Don't throw away those old pens and markers! They can be transformed into comfortable crochet hook handles with just a few simple steps.
Using Old Pens and Markers
You'll Need:
- Old pens or markers with comfortable grips
- Hot glue gun and glue sticks
- Craft knife or scissors
- Sandpaper (medium grit)
Look for pens with ergonomic grips or thicker barrels. Gel pens and highlighters often have comfortable rubber grips that work perfectly.
Basic Steps:
- Remove the ink cartridge and any internal components from the pen
- If necessary, cut the pen to your desired length
- Sand the cut edge smooth
- Apply hot glue to the hook handle
- Insert the hook into the pen barrel while the glue is still hot
- Hold in place until the glue sets

Decorating Upcycled Handles
Make your upcycled handles more attractive and personalized:
- Wrap with decorative or washi tape for added color and grip
- Add polymer clay details to the ends for hook size identification
- Use paint markers to add patterns or your initials
- Wrap with embroidery floss in a spiral pattern for texture
The key advantage of upcycled handles is that they're free and environmentally friendly. Plus, if you've found a pen that feels comfortable in your hand, you know the crochet hook will feel good too!

Customization Tips for Perfect Handles
Shape Considerations
The ideal handle shape depends on your grip style:
- Knife grip: Thicker, rounded handles work best
- Pencil grip: Slightly flattened sides provide better control
- Arthritis-friendly: Very thick middle section with tapered ends
- Tension control: Add subtle texture for better grip
Weight Adjustments
Customize the weight of your handles for better control:
- Add small metal washers inside polymer clay for more weight
- Use lightweight foam for those who prefer lighter hooks
- Balance the weight distribution by making the end slightly heavier
- Test different weights to find what reduces your hand fatigue
Organization Systems
Keep your custom hooks organized:
- Color-code handles by size (warm colors for small, cool for large)
- Add size markers at the end of each handle
- Create a matching polymer clay hook holder
- Use different textures for different hook brands

Benefits of DIY Handles
- Significantly reduces hand fatigue and pain
- Much more affordable than buying ergonomic hooks
- Fully customizable to your exact preferences
- Makes hooks easier to identify by size
- Adds personality and beauty to your tools
Potential Challenges
- Polymer clay method requires dedicated baking equipment
- First attempts might not be perfect
- Some methods are temporary and may need adjustment
- Time investment to modify multiple hooks
- Finding the perfect shape may take experimentation
Safety Considerations
Important Safety Notes for DIY Crochet Hook Handles
While creating your own handles is generally safe, there are a few important precautions to keep in mind:
Polymer Clay Safety
- Use a dedicated toaster oven for baking polymer clay, never your food oven
- Bake in a well-ventilated area to avoid inhaling fumes
- Keep all clay tools separate from kitchen utensils
- Wash hands thoroughly after handling raw clay
- Protect work surfaces with disposable mats or plastic
Handle Durability
- Avoid materials that can crack or splinter during use
- Ensure handles are securely attached to prevent slipping
- Test handles before starting important projects
- Apply protective finishes to polymer clay handles
- Inspect regularly for signs of wear or damage

Start Crafting Your Custom Crochet Hook Handles Today
DIY crochet hook handles are a game-changer for anyone who loves to crochet. They transform uncomfortable metal hooks into ergonomic tools that reduce hand fatigue and make crocheting more enjoyable. Whether you choose the artistic polymer clay method, the quick and easy foam grip approach, or the eco-friendly upcycled option, your hands will thank you.
Remember that finding the perfect handle shape and size might take some experimentation. Don't be afraid to try different materials and techniques until you discover what works best for your unique crocheting style and hand shape.

Share Your DIY Crochet Hook Handles!
We'd love to see your creative handle designs! Tag your photos with #DIYCrochetHandles on social media or leave a comment below with your experience.
Share Your ExperienceFAQs
1. What makes a crochet hook handle "ergonomic"?
An ergonomic handle is wider, softer, and shaped to fit the natural curve of your hand. It offers more support and reduces stress on your fingers and wrist compared to thin, standard handles.
2. Which type of yarn is best for wrapping crochet hook handles?
Cotton yarn works well because it’s soft, has little stretch, and absorbs moisture. Acrylic yarn is also popular for its cushion and color range, while wool adds extra softness but may shed.
3. Can I use any crochet hook for making a DIY ergonomic handle?
Most metal and plastic hooks are perfect for wrapping or covering with clay. Avoid using wooden hooks with polymer clay, as they can crack in the oven.
4. Do yarn-wrapped handles stay secure during long projects?
If wrapped tightly and secured with glue or clear tape, yarn handles stay in place. Check your wrap after a few sessions and re-tighten if needed.
5. How thick should I make the handle?
Aim for a handle slightly wider than a regular pencil or pen. Test as you wrap or sculpt—a comfortable grip should let your hand relax without slipping.
6. How do I clean DIY handle covers?
Wipe yarn handles with a damp cloth and let air-dry. Clay handles clean easily with a soft, damp cloth or a cotton swab with rubbing alcohol for stubborn spots.
7. Can I add designs or labels to my custom handle?
Yes! Add stripes, texture, or beads to personalize. Embroider sizes onto yarn or press size markers into fresh clay before baking.
8. Are DIY ergonomic handles good for arthritis or joint pain?
Yes, wider and softer grips can help reduce pressure on sore joints. Always test different materials and sizes to find what feels best for your hands.
9. What if I don’t like my first try?
DIY handles are easy to adjust or redo. Remove the yarn or shape new clay and try again until you find the perfect fit.
![]()
Christa Patel is a passionate crochet designer, educator, and maker with years of experience transforming simple yarn into beautiful, functional pieces. She loves sharing step-by-step guides, clever hacks, and project inspiration to help others crochet with confidence and creativity. Christa believes in making every craft session enjoyable and pain-free, which is why she focuses on practical, real-world ergonomic tips.
Her tutorials have empowered thousands of beginners and experienced crafters to customize their tools, learn new techniques, and find the perfect materials for every project. When she isn't stitching or teaching, Christa enjoys testing out new yarns, creating cozy home decor, and connecting with fellow makers around the world.
Follow Christa for more crochet advice, tool reviews, and DIY ideas to take your handmade journey further, one stitch at a time.
About the Author
With a passion for crafting easy, beginner-friendly tutorials and patterns, Christa inspires crafters of all skill levels to unleash their creativity worldwide. She encourages yarn lovers to connect, create, and crochet a world filled with beautiful handmade treasures!
How to Make DIY Crochet Hook Handles for Ergonomic Comfort