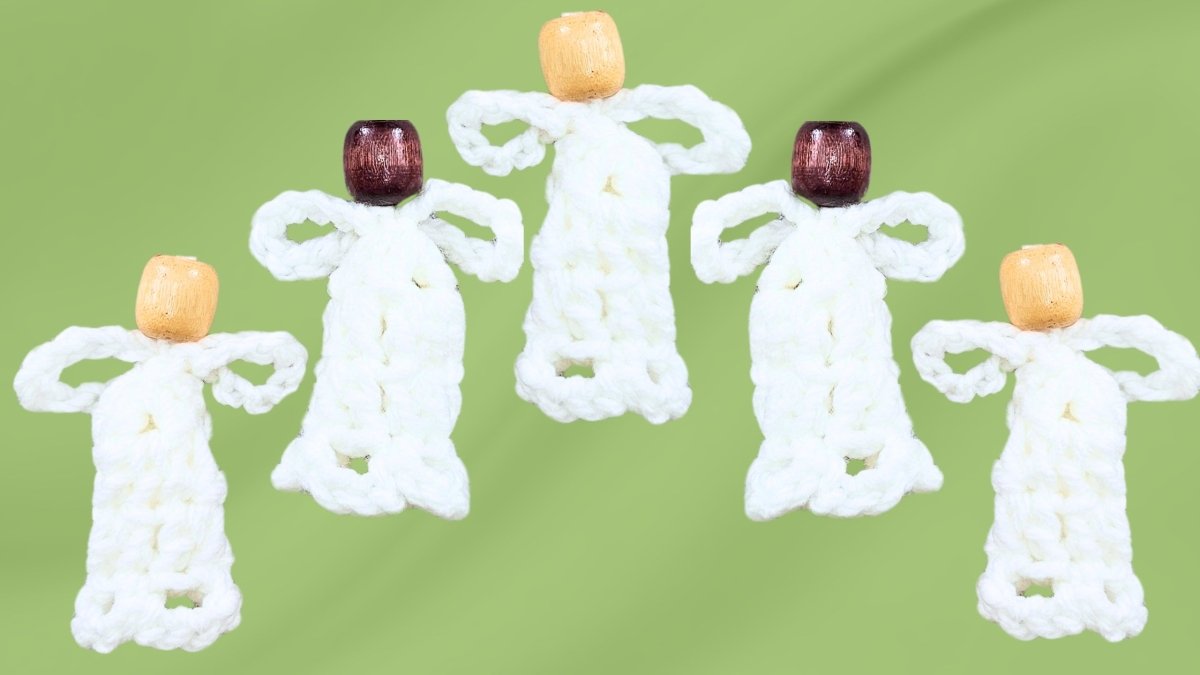
How to Make Super Easy Crochet Angels
Crochet angels are the perfect addition to your holiday decor. Whether hanging on your Christmas tree, topping gifts, or as handmade ornaments, these tiny angels blend simplicity with heartfelt charm. If you're frustrated with crochet patterns that over-complicate things, this project's easy-to-follow steps will have you crafting adorable angels in no time.
Here's the full tutorial along with everything you need to know to make these crochet angels effortlessly. Watch the video tutorial below for a step-by-step demonstration:
Materials Needed
To create your crochet angel, you'll need just a handful of materials:
- Yarn: Size 4 worsted weight (or 10-ply in Australia) works great, but feel free to use scraps in your favorite shades.
- Crochet Hook: 5 mm works perfectly for this project.
- Needle: For sewing in tails.
- Scissors: Any pair of sharp scissors will do.
- Wooden Bead: Just one per angel for the head. These beads can be found at your local craft shop. As a fun alternative, you can repurpose beads from items like a beaded car seat mat—an economical and creative option that yields hundreds of beads!
If you're looking for beginner-friendly patterns, check out Festive Free Christmas Crochet Patterns for All for other ideas to complement your angel ornaments.

Why You'll Love These Crochet Angels
These little angels are quick, simple to make, and require only basic crochet stitches. Each angel is worked in one seamless piece, so there's no extensive sewing or assembly after you're done. You can whip up a bunch of them in a single afternoon!
Use them as tree ornaments, attach them to gift wrapping for an extra special touch, or even give them as thoughtful handmade gifts.
Step 1: Preparing the Tail and Magic Ring
Start by leaving a 12-inch tail of yarn. This tail doubles as your hanging loop at the end—simple and functional.
Next, create a magic ring:
-
Wrap your yarn around your fingers to form an "X".
-
Insert your crochet hook under the initial strand and over the long strand. Pull the long strand back through and twist your hook to form the ring.
-
Chain a few stitches to secure the ring.
Don't worry if you're new to magic rings; it's much easier than it sounds, and you'll get the hang of it with practice.

Step 2: Make the Wings
With the magic ring in place, it's time to work on the angel's wings:
- Chain 20 stitches.
- Slip stitch back into the magic ring to secure. Be careful to keep the chain untwisted—this becomes the angel's wings.
Set aside the wings for now; you'll position them toward the end of the project.
Step 3: Build the Angel's Body
The body takes shape with simple double crochet clusters worked from the magic ring:
-
Chain 3. This acts as your first double crochet.
-
Into the center of the magic ring, work this pattern: 2 double crochets, chain 1, 2 double crochets. Repeat this sequence twice more, including chain 1 between clusters.
-
Close the magic ring tightly by pulling the tail.
Slip stitch to the top of the first chain-3 to complete the first round.

Step 4: Add Structure to the Body
To form the distinctive bell-like shape of your angel:
- Chain 3 and work into the same stitch to start.
- In each chain-1 space from the previous round, make 3 double crochets.
- Repeat this for each space around.
- Slip stitch into the top of the chain-3 to close each round.
For the final round, chain 4 and add decorative loops around the bottom. Chain 4, skip a stitch, and single crochet into the next. Repeat.
At the end, secure your work by chaining 1, cutting your yarn, and pulling the tail through snugly.
Step 5: Position and Secure the Wings
Fold the chain-20 loop you made earlier in half to form the angel's wings. Use the long tail to sew the loop into place along the back of the angel's body.
Make sure the wings are centered and even. Once they're secure, bring the same tail back up to the top of the angel—we'll use it to attach the bead for the head.

Step 6: Attach the Wooden Bead
Now, thread the wooden bead. To create a neat loop for hanging:
-
Measure out roughly 4.5 to 4.75 inches of yarn (about 12 cm).
-
Tie a knot roughly 1 cm above the angel's body. This ensures the bead stays firmly in place.
Insert your bead onto the loop. If needed, use a smaller crochet hook to help pull the yarn through the bead. Carefully tuck the knot into the bead for a polished finish.
Step 7: Finishing Touches
To finish your crochet angel:
-
Hide or knot any additional yarn tails. You can either sew them into the body or tie a sturdy knot inside the angel's form.
-
Adjust the wings and bead to ensure everything sits nicely.
That's it! Your crochet angel is complete.
Check out Easy Crochet Projects for Beginners for more crochet inspiration if you're just getting started.
Tips for Success
- Use acrylic yarn: Acrylic is durable and pulls tightly, ensuring a perfect magic ring.
- Adjust for bead size: If your bead's hole is large, use a double knot to secure it.
- Work slowly: If you're a beginner, take your time. Practice chaining and double crochets before starting.
Left Handed?
Creative Customization Ideas
- Experiment with colors: Try red and green yarn for festive angels or soft pastels for year-round decor.
- Add embellishments: Attach a ribbon bow or glitter glue to make your angels shine.
- Use different beads: Wooden, glass, or even ceramic beads can give each angel a unique personality.
For more creative crochet ideas, browse the patterns page on The Secret Yarnery.
Wrap Up
Making these crochet angels is a simple, rewarding project that spreads holiday cheer. Whether you're decorating your home or sharing as gifts, these angels are a heartwarming handmade touch.
Feel free to share your finished angels with us using #SecretYarnery and tag your creations online. For more crochet resources and patterns, visit The Secret Yarnery.
Stay hooked!
FAQs
1. How long does it take to make one angel?
Each angel can be completed in about 30 minutes to 1 hour, depending on your crochet experience.
2. Can I customize the angel’s design?
Absolutely! Use different yarn colors, bead types, or add embellishments like glitter, ribbons, or bells for a unique touch.
3. What do I do if my magic ring won’t stay tight?
Ensure you’re using acrylic yarn, which holds tension well. Practice forming magic rings with scrap yarn until you’re comfortable with the technique.
4. Can I make these angels larger or smaller?
Yes! Adjust the size of the crochet hook and yarn thickness to change the overall size of your angels.
5. What can I use these angels for?
- Christmas tree ornaments
- Gift toppers
- Home décor
- Stocking fillers
- Handmade gifts for loved ones
6. What is the purpose of the long tail you leave at the start?
The long tail serves as a hanging loop or can be used to secure the wings to the back of the angel. It’s a functional and decorative detail.
Christa Patel is the creative mind behind the Secret Yarnery, a trusted resource for crochet enthusiasts worldwide. With years of experience, Christa specializes in designing beginner-friendly yet stunning crochet patterns that inspire creativity and confidence in crafters of all skill levels.
As a passionate crocheter, Christa is known for her clear and approachable teaching style, breaking down complex patterns into simple, easy-to-follow steps. Through her engaging video tutorials, written patterns, and helpful tips, she has cultivated a community where crocheters can connect, learn, and share their work.
Christa’s dedication to making crochet fun and accessible shines in every project she creates, from colorful blankets to intricate borders. Whether you’re a seasoned expert or just picking up a hook for the first time, Christa's guidance will help you craft something beautiful.
For more crochet patterns, tips, and inspiration, visit her website at The Secret Yarnery, or check out her YouTube channel filled with step-by-step tutorials.
About the Author
With a passion for crafting easy, beginner-friendly tutorials and patterns, Christa inspires crafters of all skill levels to unleash their creativity worldwide. She encourages yarn lovers to connect, create, and crochet a world filled with beautiful handmade treasures!
How to Make Super Easy Crochet Angels – Perfect for Beginners 2024