Super Fast Two-Hour Crochet Slippers for Beginners: Step by Step!
Are you ready to step into a world of warmth and comfort? What if you could create your own custom-fit slippers in just a couple of hours? These crochet slippers are not only a dream to wear but also a breeze to make, perfect for beginners and seasoned crochet enthusiasts alike!
Handmade gifts are always special, aren't they? Imagine the joy of gifting these cozy slippers to friends and family, or simply treating yourself to a little bit of handmade happiness. Let's dive in and create something fantastic together!
Why You'll Love These Crochet Slippers
These slippers aren't just quick to make; they're designed with comfort and customization in mind. Here's why you'll adore this project:
- Speed & Simplicity: Using double crochet stitches, these slippers work up in no time at all. Perfect for a quick win!
- Customizable: Big foot? Small foot? No problem! Adjust the size to fit anyone – kids, adults, men, and women.
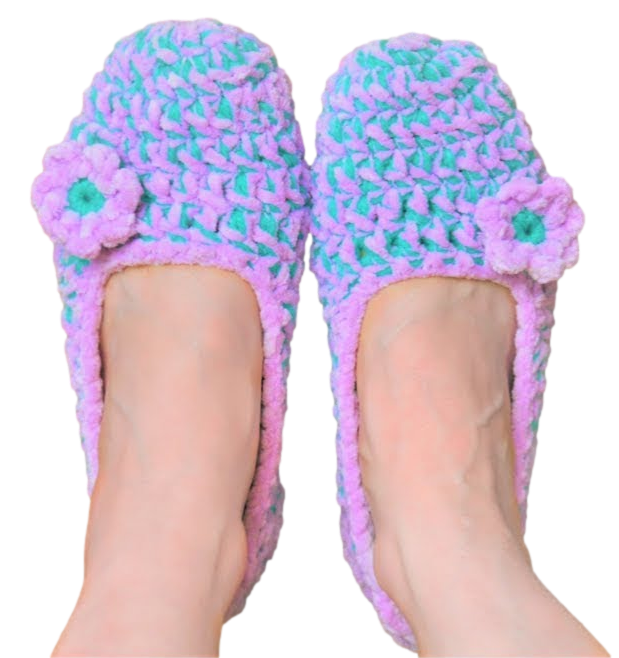
- Comfort: The magic is in the yarn. Combine soft chenille or velvet yarn with acrylic for a slipper that's both durable and incredibly squishy.
- Budget-Friendly: Got some yarn scraps lying around? This is the perfect project to use them up! Two strands of regular acrylic yarn will work just fine.
- Great Gift Idea: Birthdays, holidays, or just because – these slippers make a thoughtful and practical gift.

Yarn Talk: Choosing the Right Materials
Choosing the right yarn can make all the difference. Let's explore some options.
Yarn Options
I usually go with a combination of craft acrylic yarn, like Red Heart Super Saver, and a super soft chenille or velvet yarn, such as Bernat Blanket. This combo gives you the best of both worlds: durability and cloud-like softness. The acrylic provides structure, while the chenille makes them incredibly cozy.
Don't feel limited, though. If you're looking to make these slippers and need some yarn, check out the yarn options available at the Secret Yarnery or find similar options on Amazon.
Hook Size
A 5.5 mm crochet hook is generally ideal for this project. However, feel free to adjust based on the yarn you choose. A smaller hook size will give you a tighter stitch, which can be helpful for durability.

Getting Started: Let's Gather Our Supplies!
Ready to begin? Here's what you'll need:
- Two balls of yarn (one acrylic, one chenille/velvet recommended)
- 5.5 mm crochet hook
- Scissors
- Yarn needle (for weaving in those pesky ends)
The Magic Ring (or Alternative): Your Slipper's Foundation
The magic ring is a fantastic way to start your crochet slipper, creating a seamless center. But if it feels a bit too magical, there's an alternative!
Magic Ring Tutorial
Here's how to make a magic ring, step by step:
- Hold the yarn in your non-dominant hand, with the tail end draped over your fingers.
- Wrap the yarn around your index and middle fingers, creating an "X" shape.
- Insert your hook under the first strand, grab the second strand, and pull it through.
- Twist the hook to create a loop, then yarn over and pull through to secure the ring.
- Chain one to start.
Pull the tail tight to close the ring. If you're still unsure, there are plenty of video tutorials available online to guide you through the process.
Alternative: Chain 3 Method
If the magic ring feels too tricky, you can create a ring using a chain 3. Simply chain 3, then slip stitch to the first chain to form a ring. It can be a bit more challenging to work into, but it's a perfectly viable alternative.

Building the Toe: Double Crochet Rounds
Now for the fun part – building the toe of your slipper!
Round 1: The First 10 Double Crochets
- Chain 1 (this doesn't count as a stitch).
- Work 10 double crochets into the magic ring. Make sure to crochet over the tail to secure it.
Round 2: Increasing for Size
- Slip stitch to join the round.
- Chain 1.
- Work 2 double crochets into each stitch around (20 stitches total). Continue to work over the tail.
Rounds 3-6 (or 7): Creating the Toe Depth
- Slip stitch to join.
- Chain 1.
- Work 1 double crochet into each stitch around (20 stitches total).
- Repeat for 4-5 more rows, or until the toe covers your toes.
Pro-Tip: Counting Your Stitches It's easy to get lost in the rhythm of crochet, but keeping an accurate stitch count is essential!
Customizing the Fit: Making It Perfect for You!
One of the best things about these slippers is how easily you can adjust the fit.
Adjusting for Different Sizes
- Baby Slippers: Start with 8 double crochets instead of 10.
- Different Foot Sizes: Add or subtract rows to adjust the length.
- Men's Slippers: Add an extra round or two to the toe.
Shaping the Heel: Adding Length and Contour
Let's move on to shaping the heel, adding both length and a comfortable contour.
Turning the Work
Turn your work so you're now working back and forth in rows, rather than in rounds.
Creating the Heel Flap
- Work 1 double crochet into each stitch across, leaving 6 stitches unworked at the end of the row.
- Chain 1, turn, and work back across the row.
- Repeat this back-and-forth motion for 6 rows (ladies) or 7 rows (men).
Contouring the Heel
- Add one extra stitch at the end of each row to create a slight increase.
- Continue until the slipper reaches the back of your heel.
Joining the Slipper: Whip Stitching the Seam
Time to seam up the heel!
Cutting and Securing the Yarn
- Cut the yarn, leaving a long tail for sewing.
- Finish off with a slip stitch and pull tight.
Whip Stitching
- Align the edges of the heel flap.
- Whip stitch the seam together, working from one side to the other.
- Reinforce the bottom of the seam with extra stitches.
- Weave in the ends to secure.

Adding a Decorative Edge: The Finishing Touch
Adding a decorative edge gives your slippers a polished and professional look.
Attaching the Chenille Yarn
- Attach the chenille yarn to the back of the slipper with a slip stitch.
- Chain 1.
Single Crochet Edging
- Work 2 single crochets into each row along the side of the slipper.
- At the top of the slipper, work a single crochet decrease to create a smooth edge.
- Continue with single crochets across the top of the slipper.
- Work another single crochet decrease at the opposite corner.
- Continue with 2 single crochets into each row down the other side.
- Slip stitch to join the round.
- Chain 1 and cut the yarn, leaving a tail for weaving in.
- Weave in the ends to secure.
Flower Power: Adding a Cute Embellishment
Want to add an extra touch of charm? A little crochet flower is the perfect embellishment. The Secret Yarnery offers a ton of awesome crochet projects.
Creating the Flower Center
- Make a chain 3 with your acrylic yarn.
- Slip stitch into the first chain to form a ring.
- Chain 1.
- Work 6 single crochets into the ring.
- Slip stitch to join the round.
Making the Petals
- Push your hook in and slip stitch with both to join drop your tail chain 1.
- Wrap your yarn, one double crochet into the same stitch, chain one, slip stitch into that same stitch.
- Continue around the center, creating petals in each stitch.
Attaching the Flower
- Thread the tails through a yarn needle.
- Position the flower on the slipper and sew it in place.
- Secure the tails on the inside of the slipper and cut off the excess.
Step Back and Admire Your Hard Work
You did it! Your cozy crochet slippers are complete. Now, you have warm slippers perfect for padding around the house. Why not share your finished project with friends and family?

Links to Resources
- FREE PATTERN: Free Pattern
- WRITTEN PATTERN: Written Pattern
- RIGHT HANDED TUTORIAL: Right Handed Tutorial
- LEFT HANDED TUTORIAL: Left Handed Tutorial
Check out the Easiest Crochet Slippers for Beginners at the Secret Yarnery website.
Crochet Must-Haves (Amazon Affiliate Links):
- Bags - Yarn Ball Storage: Yarn Ball Storage
- Bags - Large UFO Zipper Pouches: Large UFO Zipper Pouches
- Bags - Regular UFO Zipper Pouches: Regular UFO Zipper Pouches
- Ball Winder: Ball Winder
- Baskets - WIPS: Baskets - WIPS
- Color Wheel: Color Wheel
- Crochet Hooks: Crochet Hooks
- Foot Warmer: Foot Warmer
- Measuring Tape: Measuring Tape
- Neck Light: Neck Light
- Needle Threaders: Needle Threaders
- Needles - Blunt Tip: Needles - Blunt Tip
- Needles - Sharp Tip: Needles - Sharp Tip
- Scissors: Scissors
- Stitch Markers: Stitch Markers
- Tea - Kericho Gold: Tea - Kericho Gold
- Tins - Accessories: Tins - Accessories
- Yarn: Yarn
FAQs
1. How long does it take to crochet these slippers?
It typically takes about 2 hours to crochet these slippers, making them an excellent quick project for beginners or those short on time.
2. Can I use different yarn types?
Yes! You can experiment with a variety of yarns. A combination of soft chenille or velvet yarn with a durable acrylic yarn works best, but you can use what you have on hand. Just make sure to adjust your hook size to match the yarn.
3. What crochet hook size should I use?
A 5.5 mm crochet hook is recommended for this project. However, you can adjust the hook size depending on the weight of your chosen yarn or the tightness of your stitches.
4. Can I adjust the slipper size for kids or larger feet?
Absolutely! You can customize the size by altering the number of starting double crochets or adding/subtracting rows for length and width.
5. What’s the easiest way to start if I struggle with the magic ring?
If the magic ring is challenging, you can use the chain 3 method to form a ring. This method is just as effective for beginning your slipper.
6. How do I ensure the slippers fit perfectly?
Check the size as you work by measuring against the wearer’s foot or referring to standard foot measurements. Adjust toe and heel rounds as needed.
7. Can beginners make these slippers?
Yes, this pattern is beginner-friendly! Basic stitches like double crochet and single crochet are enough to complete the slippers. You’ll also learn simple shaping techniques.
8. How do I make the slippers more durable?
To increase durability, use tighter stitches or combine sturdier yarns like acrylic. Adding a slip-resistant sole may also prevent wear and tear.
9. What are some alternatives to the flower embellishment?
You can decorate your slippers with buttons, pom-poms, appliqués, or contrasting yarn edging for a unique touch.
10. Can I sell the slippers I crochet?
Yes, you can sell the slippers you make! If using a specific pattern by someone else, check for any restrictions in their pattern usage guidelines.
11. How do I properly weave in ends?
Using a yarn needle, thread the tail into the inside stitches in different directions and trim the excess. This prevents unraveling over time.
12. What if my stitches don’t look even?
Practice consistency in tension while crocheting. If they still vary, switching to a smaller or larger hook might help even the stitches.
![]()
Christa Patel is a passionate crochet designer and blogger who loves turning simple yarn into cozy, functional creations. With over a decade of crochet experience, Christa enjoys sharing beginner-friendly tutorials that inspire creativity in crafters of all skill levels. Her mission is to simplify crafting and make it accessible to everyone through detailed instructions and clever tips.
Christa specializes in quick, practical projects – from slippers to home décor – always emphasizing customization and comfort. She is the creator and voice behind The Secret Yarnery, a space where crochet lovers can find engaging patterns, interactive tutorials, and high-quality yarn recommendations.
When Christa isn’t crocheting, you can find her sourcing the softest yarns, sipping on her favorite Kericho Gold tea, or helping others discover the joy of handmade creations. She believes crafting is an art that connects people around the world, one stitch at a time.
Follow Christa Patel for more crochet inspiration and exciting patterns:
- Website: The Secret Yarnery
- YouTube Channel: The Secret Yarnery
- Instagram: @SecretYarnery
Let Christa’s expertise guide you into the cozy and creative world of crochet!
About the Author
With a passion for crafting easy, beginner-friendly tutorials and patterns, Christa inspires crafters of all skill levels to unleash their creativity worldwide. She encourages yarn lovers to connect, create, and crochet a world filled with beautiful handmade treasures!
Super Fast Two-Hour Crochet Slippers for Beginners: Step by Step!