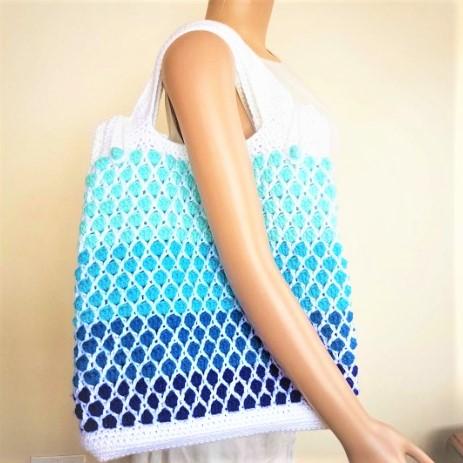
Crochet Your Own Marble Stack Tote: Part 1
Ready to create a stunning and practical accessory? I'm so excited to guide you through the first part of our Marble Stack Tote project! This tote is not only a beautiful statement piece but also a testament to your crochet skills. In this tutorial, we'll focus on creating the sturdy base of the bag, which sets the foundation for the eye-catching tile pattern to come. So, grab your hook and yarn, and let's get started!
Before we dive in, here are some helpful resources:
- Follow along with the Written Pattern
- Watch the Right Handed Tutorial
- View the Left Handed Tutorial
Gather Your Supplies
Having all your materials prepared beforehand will make the process smoother and more enjoyable. Here's what you'll need:
- Base Color Yarn: I recommend a neutral color like white, as it will serve as the "grout" lines between the tiles.
- Accent Color Yarns: Choose your favorite shades for the tiles! I'm using various blues, from dark to light, to create a beautiful gradient effect.
- Crochet Hook: A 5mm hook is a good starting point, but you may need to adjust based on your yarn and tension.
- Scissors: For cutting your yarn.
- Stitch Markers: These are essential for keeping track of your rows. If you don't have stitch markers, you can use safety pins, paper clips, or even bobby pins.
- Insert for Bag Bottom (Optional): If you want a firm base for your bag, find a tray lid, piece of cardboard, or any other flat object that fits the bottom of your bag.
Here are direct links to some of the supplies that I recommend:

Choosing Your Yarn and Hook
Selecting the right hook size for your yarn is crucial for achieving the desired look and feel. The yarn label usually suggests a hook size, but it's always a good idea to do a gauge swatch to see if you need to go up or down a size. For the bag's base, a slightly smaller hook is generally preferable as it creates a denser fabric. If you tend to chain tightly, consider going up half a hook size to avoid a stiff or puckered base. Ultimately, the best way to determine the right hook size is to experiment and see what works best for your yarn and tension.
Creating the Foundation Chain
Let's start with the foundation chain! This will determine the length of your bag's base.
- Make a Slip Knot: Create a loop with your yarn, then bring the yarn over and through the loop. Place the loop on your hook and adjust it so that it slides easily on the shaft.
- Chain: Now, begin your foundation chain. Grab the yarn with your hook and pull it through the loop on your hook. Repeat this process until you reach your desired chain length.
If you're using an insert for the bottom of your bag, make your chain the same length as the insert. Remember to make your chain length a multiple of three, as this is essential for the tile pattern we'll be creating later. For example, I'm starting with a chain of 45. If you don't have a specific number in mind, just count "1, 2, 3; 1, 2, 3" and so on, until you reach the desired length.
Single Crochet Across the Chain (Row 1)
Now that we have our foundation chain, it's time to start single crocheting!
- Turning Chain: Chain one. This turning chain does not count as a stitch.
- Single Crochet: Insert your hook into the second chain from the hook. Wrap the yarn around your hook and pull it through the chain (two loops on hook). Wrap the yarn around your hook again and pull it through both loops on the hook. That's a single crochet!
Repeat the single crochet stitch into every chain down the row. Take your time and make sure you're working into each stitch accurately.
Turning and Continuing with Single Crochet (Rows 2+)
We are building rows now, so it's time to turn!
- Chain One and Turn: At the end of the row, chain one and turn your work.
- Identify the First Stitch: Pull your chain and hook to the side. This will help you see the first stitch.
- Single Crochet: Insert your hook into that first stitch, making sure to get both loops of the "V" onto your hook. Wrap the yarn around your hook and pull it through the stitch (two loops on hook). Wrap the yarn around your hook again and pull it through both loops on the hook.
Continue single crocheting back along the row, just as you did before. Maintain consistent tension. This will create a neat and even fabric.

Achieving the Desired Base Width
Keep crocheting row after row until your piece reaches the desired width for the bottom of your bag. Remember, it’s important to work in multiples of three rows for the tile pattern.
Using Stitch Markers to Track Rows
Keeping track of your rows can be tricky, especially when working with a simple stitch like single crochet. Here's a helpful tip: use stitch markers! Place a stitch marker at the beginning of every third row. This will allow you to easily count your rows in groups of three. If you don't have stitch markers, you can use safety pins or even small pieces of yarn.
Counting Your Rows Accurately
If you are not using stitch markers, here's how to count your rows: Look closely at your work, and you'll notice horizontal lines running across the fabric. Each of these lines represents two rows. So, to count your rows, simply count the lines and multiply by two. Any extra row will be easy to spot on top.
Preparing for the Bag Sides
Before we start working on the sides of the bag, we need to prepare the edges. We want to have a specific number of single crochets along the edge—27 in my case. This number needs to be divisible by three, as it's essential for the tile pattern. We'll be working our stitches into the spaces between the rows, not into the rows themselves.
Single Crocheting Along the Edge (Side 1)
Now, let's start single crocheting along the edge of our base.
- Insert Hook: Insert your hook into the first space along the edge.
- Single Crochet: Make a single crochet stitch.
- Repeat: Continue making single crochet stitches into each space along the edge.
As you work, make sure to count your stitches. If you're slightly off, you can make minor adjustments by doing a decrease or increase. Try to do this discreetly so it doesn't stand out.
Turning the Corner
When you reach the corner, don't add any extra stitches or make any decreases. Simply continue with a single crochet into the first stitch of the chain on the next side.
Single Crocheting Along the Bottom (Side 2)
Now, we'll single crochet along the bottom of the base, working into each foundation chain. Maintain the same number of stitches as the original chain. Again, count your stitches to ensure accuracy. If you need to add a stitch, this is the least conspicuous place to do it.
Completing the Second Corner
Just like the first corner, don't add any stitches. Transition directly to the next side.
Single Crocheting Along the Edge (Side 3)
Repeat the instructions for single crocheting along the edge. Remember to count your stitches!
Finishing the Round
When you reach the end of the round, slip stitch to the first single crochet of the round. Then, chain one and single crochet into the same stitch. Place a stitch marker in this first stitch to mark the beginning of the next round.
Continuous Rounds of Single Crochet
Continue the process of single crocheting around and around, removing unnecessary stitch markers as you go. Make sure to only leave the one marking the beginning of the round.

Navigating the Join
As you work in continuous rounds, you might notice an extra stitch at the join. This is where you did your slip stitch and chain one in the previous round. To avoid increasing the stitch count, skip the slip stitch from the previous round and work directly into the first single crochet. Remember to place your stitch marker in the first single crochet of each round.
Building the Height of the Bag Base
Keep crocheting around until the base of your bag reaches the desired height. I recommend about 1.5 to 2 inches. Feel free to adjust based on your preferences.
Starting the Chain Space Row
Now, it's time to create the chain space row, which will form the loops for our tile pattern.
- Chain Three: Chain three (this counts as a single crochet and chain two).
- Skip Two Stitches: Skip the next two stitches.
- Single Crochet: Single crochet into the third stitch.
Creating Chain Spaces Around
Repeat the "chain two, skip two, single crochet" sequence around the entire base. Keep that stitch count correct! Visually this looks like this "single crochet chain two skip two single crochet chain two skip two"
Joining the Chain Space Round
When you reach the beginning of the round, slip stitch to the first chain of the round. Pull up a loop and replace the stitch marker to secure the end.
Preparing for Color Change and Tile Pattern
The bottom of the bag is complete! The next step is to change colors and start working on the tile pattern. Flip the bag inside out to prepare the "pretty" side for the tile pattern. I have a lot of great crochet patterns for you to look at!
Quick Recap of Steps
- Foundation chain and single crochet rows
- Creating the bag base shape
- Working the chain space row
Importance of Accurate Stitch Counts
Remember, accurate stitch counts are essential for achieving the desired result. Double-check your work and make adjustments as needed.
Tension Considerations
Tension can affect the size and shape of your bag. Try to maintain consistent tension throughout the project.
Seaming Tips
More detailed seaming tips will be provided in later parts of the tutorial.
Customization Options
Feel free to experiment with different colors and yarn types. You can also add embellishments or personal touches to your bag.

Troubleshooting Common Issues
Here are some solutions to common issues:
- Uneven edges: Blocking the finished piece can help even them out.
- Holes or gaps: Maintain consistent tension and stitch counts.
- Curling: Add more stitches or use a larger hook size.
Importance of Blocking
Blocking can dramatically improve the look of your finished project.
Care Instructions
Hand wash or gently machine wash your bag. Lay it flat to dry.
Yarn Substitution Guide
Consider yarn weight, fiber content, and gauge when substituting yarns. There are many helpful crochet guide tutorials online to help.
Abbreviations Used
- st: stitch
- ch: chain
- sc: single crochet
- sl st: slip stitch
Gauge Information
Check your gauge and adjust your hook size if needed.
Construction Notes
The bag is worked in rounds, and a stitch marker is used to mark the beginning of each round.
Share Your Progress
Share your progress on social media using the hashtag #MarbleStackTote!
Ask Questions
Ask questions in the comments section of this blog post or on the YouTube video if you have any!
Call to Action: Subscribe and Like
Subscribe to my channel for more tutorials, and like this video if you found it helpful!
Preview of Part 2
In Part 2, we'll focus on the tile pattern and color changes.
Must-Have Crochet Items
- Ball Winder
- Color Wheel
- Measuring Tape
- Neck Light
- Needle Threaders
- Needles - Blunt Tip
- Needles - Sharp Tip
- Tea - Kericho Gold
- Tins - Accessories
Concluding Remarks
Thank you for joining me for Part 1 of the Marble Stack Tote tutorial! I'm excited to continue this project with you in Part 2. See you soon!
Remember to check out the Secret Yarnery for more inspiration and easy crochet projects!
FAQs
1. What type of yarn works best for the Marble Stack Tote?
A sturdy worsted weight yarn works best for this project. Choose a base color for the "grout" lines and multiple accent colors for the tiles. Experiment with blends like cotton-acrylic for durability and flexibility.
2. What size crochet hook should I use?
Start with a 5mm crochet hook, but adjust based on your tension. If your stitches feel too tight or too loose, go up or down a size.
3. How do I measure the length of my foundation chain?
If you're using an insert for the bag bottom, make the chain the same length as the insert. Otherwise, decide on the desired base length and ensure it is a multiple of three for the tile pattern.
4. Do I need a bag insert for the bottom?
A bag insert is optional but useful for a firm base. You can repurpose items like a piece of cardboard, plastic canvas, or a tray lid.
5. Can I use different colors and types of yarn?
Absolutely! You can customize the look by choosing various colors or switching yarn types. Just be mindful of mixing different weights or fibers, as this could affect the bag's texture and structure.
6. Why do I need stitch markers?
Stitch markers are essential for tracking rows, especially when working in rounds. Without them, it’s easy to lose count and make mistakes in your stitch pattern.
7. How do I count my rows accurately?
Count the horizontal lines across your fabric. Each line counts as two rows. For odd numbers of rows, the last row will stand out on top.
8. Can I handwash or machine wash the tote?
Yes, but it depends on the yarn. Generally, handwash or use a gentle machine cycle with cold water. Always lay the bag flat to dry to prevent distortion.
9. What if my bag edges are uneven?
Blocking the base and edges after finishing can even out the shape. Use a spray bottle to lightly dampen your bag, pin it into shape, and let it air dry.
10. What if my stitches don’t match the pattern?
Double-check your stitch counts. If you’re off, use stitch adjustments like increases or decreases discreetly without affecting the design.
![]()
Christa Patel is an avid crochet enthusiast, author, and founder of The Secret Yarnery. With over a decade of experience in crafting and designing unique crochet patterns, Christa has built a thriving online community for beginners and seasoned crocheters alike. Known for her clear instructions and attention to detail, she specializes in making intricate projects accessible to everyone.
Christa enjoys sharing her passion for crochet through tutorials, blog posts, and her YouTube channel, where she inspires others with creative designs like the Marble Stack Tote. Dedicated to fostering creativity, she emphasizes the joy of personalizing projects and exploring new techniques.
When she’s not crocheting, Christa loves spending time with her family, exploring vibrant yarn colors, and building a sustainable, yarn-filled lifestyle to inspire crochet lovers worldwide. You can find more of her work on her website The Secret Yarnery or connect with her on social media for tips, patterns, and Q&A sessions.
Whether you're taking your first steps into crochet or mastering advanced techniques, Christa’s guidance and charming style make every project a fulfilling experience.
About the Author
With a passion for crafting easy, beginner-friendly tutorials and patterns, Christa inspires crafters of all skill levels to unleash their creativity worldwide. She encourages yarn lovers to connect, create, and crochet a world filled with beautiful handmade treasures!
Crochet Your Own Marble Stack Tote: Part 1