Crochet a Simple Sunflower Granny Square – Step-by-Step Guide!
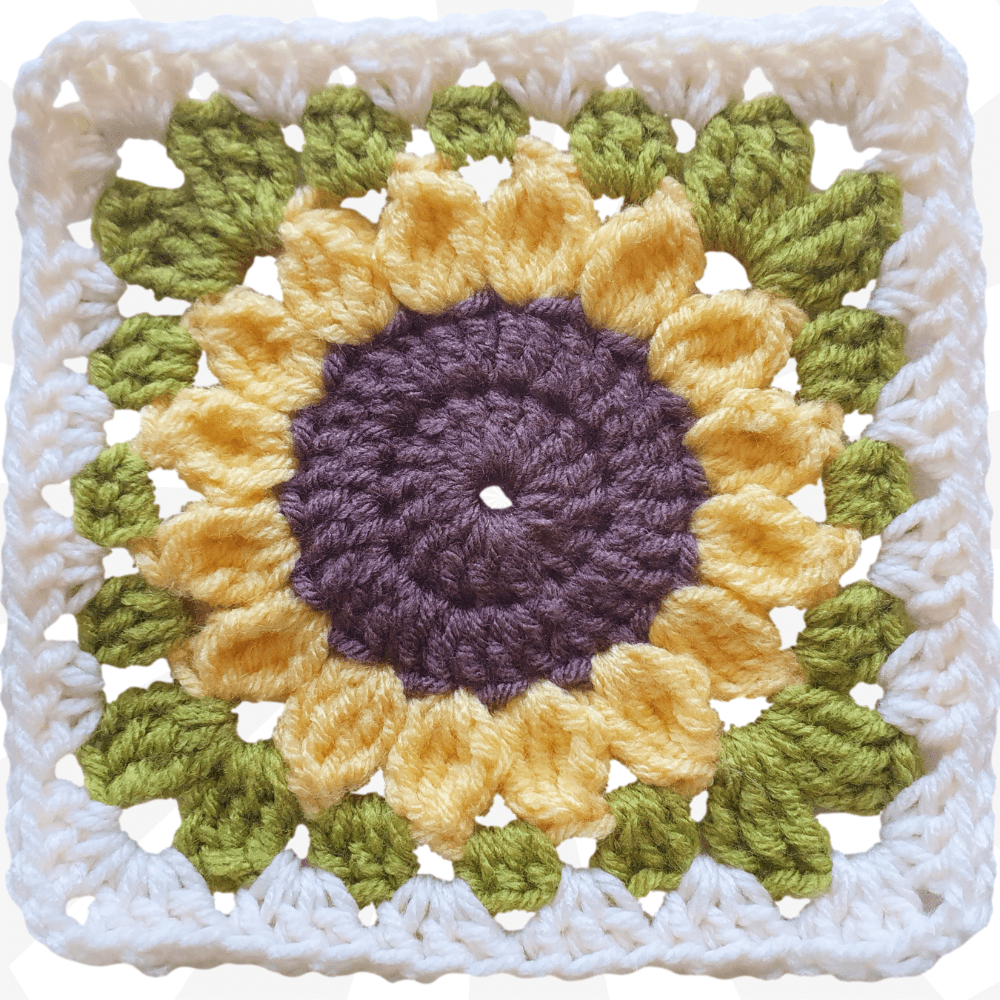
Have you ever wanted to create something beautiful and functional with your own two hands? Imagine a vibrant sunflower, captured in yarn, that you can turn into a cozy blanket, a stylish bag, or a unique piece of home decor. It's all possible with this simple sunflower granny square crochet pattern!
I'm Christa, and I'm thrilled to guide you through this fun and easy project. This pattern is perfect for beginners, uses just a few colors, and results in a beautifully flat granny square. Plus, I've got a written pattern available if you prefer to follow along that way.
Why Crochet a Granny Square?
Granny squares are incredibly versatile. You can join them to make just about anything! Think blankets, tote bags, decorative scarves, or even unique cushion covers. There's a real joy in creating something handmade. And it's super satisfying to use up those bits of leftover yarn that might otherwise go to waste. Are you ready to turn your yarn stash into something amazing? The possibilities are endless. Crochet can be an easy hobby, check out these crochet tutorials.
What Makes This Sunflower Granny Square Special?
This sunflower granny square is designed to lay completely flat. This makes it ideal for projects where you want to avoid bulkiness. It's also easily customizable with different color combinations to suit your personal style.
If you're looking for a granny square that pops, I also have a 3D Sunflower Granny Square Tutorial!
Best of all, this pattern is beginner-friendly. Even if you're new to crochet, you'll be able to follow along with ease. Plus, there are a lot of crochet patterns on my website you can try!

Materials You'll Need
To make your own sunflower granny square, you'll need a few basic materials:
- Worsted weight yarn in three or four colors: one color for the center, one for the petals, one for the leaves, and optionally, a fourth color for the final joining round.
- 6mm crochet hook.
- Scissors.
- Yarn needle for weaving in ends.
I used a size 4 worsted weight acrylic from Ice Yarns for this project. While I don't have a direct link to the exact yarn I used, you can explore similar options online or at your local yarn store.
Feel free to experiment with different yarn types and hook sizes to achieve your desired square size and look. Keep in mind that using a thicker yarn and larger hook will result in a larger square, while a thinner yarn and smaller hook will create a smaller square.

Gauge and Finished Size
The finished size of the granny square is:
- 5.75 inches (14.5 cm) before the final joining round.
- 6.75 inches (17 cm) after the final joining round.
Gauge isn't critical for this project. However, it's important to maintain consistent tension throughout your work to ensure a uniform and even result.
Abbreviations
Here are some common crochet abbreviations used in this pattern:
- ch - chain
- dc - double crochet
- tr - treble crochet
- sl st - slip stitch
- st - stitch
Understanding the Pattern
This pattern is written in plain English, just like I speak in the video tutorial. I want to make crochet accessible to everyone! Don't be intimidated if you're a beginner. Refer to the video for visual guidance as you work through the pattern.
If you're left-handed, don't worry! I've got you covered with a left-handed tutorial.

Color Choices and Customization
One of the best things about granny squares is the ability to get creative with color! Consider these color palettes:
- Traditional sunflower colors: yellow, brown, and green.
- Pastel shades: for a softer, more delicate look.
- Bright and bold colors: for a modern and eye-catching design.
Don't be afraid to experiment! See how you like your granny square by adapting the pattern for different yarn weights and hook sizes.
Step-by-Step Tutorial: The Center
Let's start with the center of our sunflower.
- Make a slip knot and chain three.
- Work into the first chain to form a ring. To do this, slide your hook into the first chain, make a U-shape underneath your hook, grab the yarn, turn your hook, and slip stitch to form a ring. Hold it open with your finger and thumb.
- Chain two (or three if you tend to make small chains). This counts as your first double crochet.
- Make 15 double crochets into the center of the ring.
- Join with a slip stitch to the top of the chain two.
- Chain two again to start the next round.
Helpful tips:
- Hold the yarn tail along with your work as you crochet. This way, you won't have to sew it in later.
- If you need more room in the center of the ring, gently pull the ring to create more space.
- When you slip stitch to the top of chain 2 to join, it makes the center look tidy.
The purpose of creating the center is to provide a solid foundation for the petals of the sunflower.
Round 2: Increasing the Center
Now, we'll increase the size of the center to prepare it for the petals.
- Two double crochets into each stitch around.
- Join with a slip stitch to the top of the chain two.
- Chain one to secure the yarn and cut, leaving a tail for weaving in.
Remember to work into both the front and back loops of each stitch. This creates a more secure and even fabric. If you need a refresher, pause the video and rewind.
Step-by-Step Tutorial: The Petals
Time to add the signature sunflower petals!
- Join the petal color in the third stitch after the join from the previous round.
- Chain two.
- Make three incomplete treble crochets into the same stitch, leaving the last loops on the hook.
- Yarn over and pull through all four loops on the hook (cluster stitch).
- Chain two.
- Skip a stitch and repeat the cluster stitch four times.
The cluster stitch (four treble crochets together) creates a textured, petal-like effect. Skipping a stitch between each petal ensures that they are evenly spaced around the center. Maintaining even tension will result in uniform petals.
Completing the Petal Round
- Repeat the cluster stitch and chain two sequence around the entire circle.
- Join with a slip stitch to the first chain after the first cluster.
- Chain one to secure and cut the yarn, leaving a tail.
Count your petals to make sure you have 16. Don't worry if your work looks a little "dish-shaped" at this point. It will flatten out as you add more rounds.
This process creates the distinctive sunflower petal effect.
Step-by-Step Tutorial: The Leaves
Now, we'll add the leaves that transform the circle into a square.
- Join the leaf color in the fourth space after the petal join.
- Chain three.
- Make two treble crochets into the same space.
- Work three double crochets into the next space.
- Work three half double crochets into the next space.
- Work three double crochets into the next space.
- Work three treble crochets, chain two, and three treble crochets (corner) into the next space.
- Repeat the sequence along each side to create the square shape.
This stitch sequence forms the leaf and corner shapes. The chain two in the corners creates the square shape. Weaving in the yarn tails as you go saves time later. This is the round that turns the sunflower into a square!

Finishing the Leaf Round
- Complete the final corner and join with a slip stitch to the top of the chain three.
- Chain one to secure and cut the yarn, leaving a tail.
Don't worry if your square looks uneven at this point. It will lay flatter after the next round.
Optional: Adding a Final Round
Adding a final round is a great way to:
- Increase the size of the square.
- Create a more uniform edge for joining.
- Add a contrasting color border.
Here's how:
- Join the new color in a corner space.
- Chain two and make two double crochets into the same space.
- Work three double crochets into each space along the sides.
- Make three double crochets, chain two, and three double crochets in each corner space.
- Join with a slip stitch (or a chain one and single crochet, as I demonstrate) to the beginning chain.
I like to use a chain one and a single crochet join to create a seamless look. Just remember to maintain consistent tension for a neat finish.
Alternative Joining Methods
Here are a few more methods to join.
- Chain 3 and turn your work
- Chain 2 and slip stitch to the top of that chain
Weaving in the Ends
Securely weave in all yarn tails. Use a yarn needle and weave along the back of the stitches. Secure the ends to prevent unraveling.
Blocking Your Granny Square
Blocking is optional, but highly recommended for best results. Blocking helps even out the stitches, creating a more professional finish and ensuring the square is perfectly flat.
Here's how to block your granny square:
- Wet blocking: Dampen the square, pin it to a blocking board, and let it dry.
- Steam blocking: Use a steam iron to gently steam the square while pinning it to a board.
Joining Granny Squares
There are different methods for joining granny squares:
- Slip stitch join.
- Single crochet join.
- Flat braid join.
- Invisible join.
Experiment with different joining techniques to find a favorite.

Project Ideas
Here are some of the projects you can make with granny squares:
- Blankets and afghans.
- Pillows and cushions.
- Bags and totes.
- Scarves and shawls.
Share your finished projects on social media using #SecretYarnery!
Customization Tips
Personalize your granny square by:
- Adding beads or embellishments.
- Changing the color order.
- Experimenting with different stitch patterns for the border.
- Creating different sizes of squares.
Adapt the pattern to your own style and preferences.
Troubleshooting
Here are some common issues crocheters might encounter:
- Uneven tension.
- Holes or gaps in the stitches.
- Curling edges.
- Difficulty with the cluster stitch.
Don't worry there are solutions to these problems! Maintain consistent tension, follow the pattern accurately, and seek help from online crochet communities if needed.
Care Instructions
Here are general care instructions for crocheted items:
- Hand washing or gentle machine washing.
- Laying flat to dry.
- Avoiding harsh detergents or bleach.

The Secret Yarnery Community
Join The Secret Yarnery community to:
- Share projects and inspiration.
- Get help and advice from other crocheters.
- Participate in contests and giveaways.
Visit The Secret Yarnery on these sites:
- Website: https://secretyarnery.com
- YouTube: https://bit.ly/3VvXdCd
More Crochet Resources from Secret Yarnery
Check out these other resources:
- Left Handed Tutorials: https://bit.ly/3UWNmoJ
- Free Crochet Classes: https://bit.ly/3jD7vzi
- Right Handed Tutorials: https://bit.ly/3VeozfY
Support The Secret Yarnery
You can support The Secret Yarnery by:
- Subscribing to the YouTube channel.
- Liking and commenting on videos.
- Visiting the website and purchasing patterns.
- Donating through Ko-fi: https://ko-fi.com/secretyarnery
Call to Action
Start crocheting your own sunflower granny squares! Share your progress and finished projects on social media, and leave comments and questions below.
Left Handed?
FAQs
Q: What if I'm a complete beginner to crochet?
A: This pattern is designed with beginners in mind! My clear instructions and the video tutorial make it easy to follow along, even if you've never crocheted before. Start with the basics and don't be afraid to pause and rewind the video as needed.
Q: Can I use different yarn weights for this project?
A: Yes, you can! However, keep in mind that using a different yarn weight will affect the finished size of your granny square. Adjust your hook size accordingly to achieve the desired look and feel.
Q: My granny square is curling. What am I doing wrong?
A: Curling can be caused by a few things, such as uneven tension or adding too many stitches. Make sure you're maintaining consistent tension throughout your work and that you're following the pattern accurately. Blocking your finished granny square can also help to flatten it out.
Q: Where can I find more crochet patterns from The Secret Yarnery?
A: You can find a wide variety of crochet patterns on The Secret Yarnery website: https://secretyarnery.com. You can also explore my YouTube channel for free video tutorials.
Glossary of Crochet Terms
- Back Loop Only (BLO): Working a stitch into the back loop of the stitch on the previous row, instead of under both loops. This creates a ribbed texture.
- Chain Space (ch-sp): The space created by one or more chain stitches. This is often where you work additional stitches in the next row or round.
- Fasten Off: The method of securing the yarn at the end of your project. Typically involves chaining one and cutting the yarn, then pulling the yarn tail through the loop and tightening to create a knot.
- Foundation Chain: The initial chain of stitches that you create to start a crochet project. The first row or round of stitches is typically worked into this chain.
- Magic Ring/Adjustable Ring: A technique used to create a closed center for projects worked in the round, such as hats or amigurumi. It allows you to pull the center tight and eliminate any gaps.
Advanced Techniques for Granny Squares
- Joining as You Go (JAYGO): A method of joining granny squares together as you crochet the final round, eliminating the need to sew them together later. This can be a more efficient and seamless way to create larger projects.
- Motif: Another term for a granny square or other small, repeating design element in a crochet project. Motifs can be combined in countless ways to create unique and intricate patterns.
- Overlay Crochet: A technique where you work stitches on top of previous rows or rounds to create a textured or decorative effect. This can be used to add dimension and visual interest to your granny squares.
- Tapestry Crochet: A colorwork technique where you carry multiple colors of yarn and switch between them to create intricate designs. This can be used to create stunning and unique granny squares.
The History of Granny Squares
Granny squares have been around for generations, with their popularity surging in vintage crochet patterns. They are now experiencing a resurgence in modern crochet, a timeless design that is still beloved today.

Tips for Choosing the Right Crochet Hook
- Consider the material of the hook (aluminum, bamboo, plastic).
- Choose a hook size that corresponds to the yarn weight.
- Look for ergonomic features for comfortable crocheting.
- Experiment with different hook styles to find what works best for you.
Understanding Yarn Weights
- Explain the different yarn weight categories (lace, fingering, sport, DK, worsted, bulky, super bulky).
- Discuss how yarn weight affects the gauge and drape of your project.
- Provide tips for substituting yarns of different weights.
- Remind readers to always check the yarn label for recommended hook sizes.
Creating a Color Palette
- Use a color wheel to find complementary and analogous colors.
- Consider the mood and style you want to create.
- Look for inspiration in nature, art, or fashion.
- Create a swatch to see how the colors look together before starting your project.
Ergonomics for Crocheters
- Maintain good posture while crocheting.
- Take frequent breaks to stretch your hands * Use ergonomic crochet hooks to reduce strain.
- Ensure adequate lighting to prevent eye strain.
The Environmental Impact of Yarn
- Discuss the environmental impact of different yarn fibers (acrylic, cotton, wool).
- Encourage readers to choose sustainable and ethically sourced yarns.
- Suggest using recycled or upcycled yarns.
- Promote responsible yarn consumption.
Crochet for Charity
- Encourage readers to use their crochet skills to help others.
- Suggest organizations that accept crocheted donations.
- Highlight the therapeutic benefits of crocheting for a cause.
- Explain that crocheting for charity is a rewarding way to give back to the community.
Crochet Stitch Dictionaries
- Recommend useful crochet stitch dictionaries for learning new stitches.
- Suggest online resources and books for expanding crochet knowledge.
- Explain that stitch dictionaries are valuable tools for crocheters of all skill levels.
The Benefits of Crochet
- Stress relief and relaxation.
- Improved focus and concentration.
- Increased creativity and self-expression.
- A sense of accomplishment and pride.
- A way to connect with others and build community.
Conclusion
I hope you enjoyed learning how to crochet this cheerful sunflower granny square! There's nothing quite like the joy and satisfaction of creating something beautiful with your own hands. I encourage you to share your finished projects, and ask any questions you may have! Thank you for following along with this tutorial. I hope you'll subscribe to The Secret Yarnery for more crochet inspiration.
![]()
Christa Patel is a passionate crocheter, yarn enthusiast, and the creative mind behind The Secret Yarnery. With years of experience and a love for teaching, Christa's mission is to help people of all skill levels explore the joy of crochet. Whether you're picking up a hook for the first time or looking to expand your techniques, Christa's approachable tutorials and patterns make it easy to create something beautiful. She focuses on designing beginner-friendly projects while inspiring creativity and fun.
Join her thriving community of crocheters on social media or dive into her collection of patterns, tutorials, and resources on her website. Christa's dedication to fostering a love for crochet makes her an invaluable resource for anyone looking to explore this timeless craft.
About the Author
With a passion for crafting easy, beginner-friendly tutorials and patterns, Christa inspires crafters of all skill levels to unleash their creativity worldwide. She encourages yarn lovers to connect, create, and crochet a world filled with beautiful handmade treasures!
Crochet a Simple Sunflower Granny Square – Step-by-Step Guide!