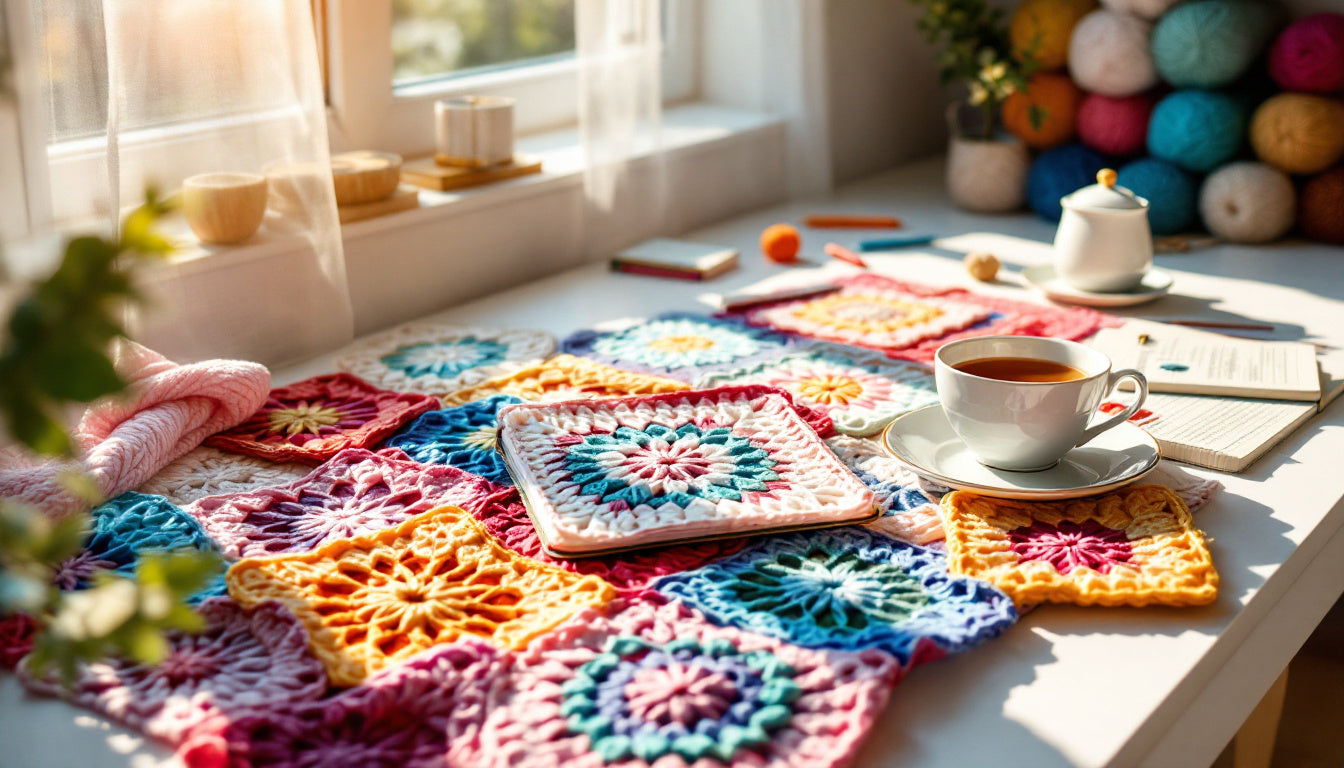
Stress-Free Finishing and Joining for Spring Crochet Projects
Joining and finishing crochet projects can often feel like an uphill battle. We’ve all felt it—those moments where ends won’t stay hidden, or seams just don’t align. But it doesn’t have to be this way. With a few simple tips, you can turn those frustrating tasks into something satisfying and rewarding. Whether you’re working on a breezy spring crochet blanket or delicate seasonal décor, this guide will help you master stress-free finishing and joining techniques.
For more spring crochet inspiration, check out the Eggtastic Easy Spring Crochet Blanket or dive into the Amazing Crochet Eggtastic Blanket for Spring.
The Importance of Perfect Finishing and Joining
Finishing and joining might seem like the last few steps in your spring crochet project, but they are far from a mere afterthought. They make the difference between a project that wows and one that feels a little unfinished. Let’s take a closer look at why these steps are so essential.
How Finishing Impacts Durability
Have you ever pulled on a sweater or handled a cozy crochet throw only for it to fall apart right at the seams? That’s the silent scream of improper finishing! Proper finishing is what holds your crochet projects together, ensuring that they can withstand everyday use and the test of time.
When ends are woven in securely, they won’t wiggle free, even after repetitive washing or stretching. Without it, your hard-earned work could unravel—literally. A strong finish starts with choosing the right yarn, paying attention to tension, and taking the time to sew or weave ends with care. I’ve found that giving this step the attention it deserves not only boosts durability but also gives me peace of mind. Nobody wants to spend hours creating something for it to wear out after just a few uses.
For a more in-depth look at durable joining methods, check out this Flat Braid Join for Granny Squares: Easy Guide for a Smooth Finish. It’s a fantastic way to ensure longevity while keeping things stylish.
Aesthetic Appeal of Clean Joins
Let’s talk about looks—because, let’s face it, we all want our projects to be as beautiful as they are functional. Crisp and clean joins do wonders for the visual appeal of your crochet pieces. Whether it’s a spring crochet blanket, a set of placemats, or a cardigan, neat joins tie your whole project together, making it look professional and polished.
Think about it this way: messy joins are like trying to display a gorgeous painting inside a tarnished frame. It simply doesn’t do justice to your hard work. Clean joins act as the perfect frame, enhancing the overall look and highlighting your craftsmanship. If you’ve ever struggled with joins looking bulky or uneven, learning the right techniques can change everything.

Here’s a little tip—blocking is your best friend when it comes to clean joins. It lets your stitches and joins relax into their perfect shape, giving your project that flawless finish. For more tips on professional-looking finishing, be sure to visit How to Join a New Ball of Yarn in Crochet.
Taking the time to master proper finishing and joining will elevate your spring crochet projects from good to show-stopping. No one will want to stop at just looking; they’ll want to use and cherish it for years to come!
Essential Tools for Finishing and Joining
When it comes to finishing and joining your spring crochet projects, having the right tools in your kit can make all the difference. It's like baking a cake—you wouldn't frost it with a spoon when a spatula provides a smoother finish. With the right gadgets, you can make weaving in ends and connecting pieces much more seamless and fuss-free. Let’s dive into a few essentials to keep frustration at bay.
Threading Needles and Safety Pins
Threading needles and safety pins might just be the unsung heroes of finishing and joining. Why? Because they simplify the tedious task of weaving in ends and securing joins. With a proper yarn needle, weaving those loose ends into your crochet piece becomes a breeze. Use a wide-eye needle specifically designed for yarn, as it accommodates thicker fibers without splitting them.
Safety pins, on the other hand, are perfect for holding pieces together while joining. They’re like your third hand, keeping everything secure and making it easier to visualize the final piece while you work. For larger projects like blankets or wearable items, using locking stitch markers in place of pins can be another excellent alternative. These tools ensure everything stays neat while preventing mishaps, like accidentally stitching layers together.
![]()
Want to learn more about mastering these techniques? Check out the Flat Braid Join for Granny Squares: Easy Guide for a Smooth Finish for a foolproof method that enhances both durability and aesthetics.
Joining Hooks and Adhesive Alternatives
Specialized joining hooks have become a game-changer in modern crochet. These hooks are specifically designed to assist with connecting crochet pieces and are often smaller and more precise for intricate work. They allow you to thread and weave with accuracy, making your joins look almost invisible. For spring crochet projects like floral designs or delicate doilies, these tools bring a touch of finesse to your crafting.
If hooks aren’t your style, adhesive alternatives like fusible webbing or fabric glue can also provide solutions for non-wearable projects. These methods, while less traditional, offer quick fixes for those moments when sewing feels daunting. However, I recommend testing these adhesives on a scrap piece of yarn first to ensure compatibility with your materials—no one wants an unpleasant surprise after hours of work.
For a more comprehensive look at how to improve your joining skills, browse the Joining Techniques Collection. It's packed with solutions to elevate your projects with professional-looking finishes.
Having these essential tools on hand means you're set up for stress-free finishing and joining, turning even the trickiest projects into manageable tasks. With the right approach and reliable tools, every spring crochet creation can truly shine as a masterpiece!

Common Challenges in Finishing and Joining
Finishing and joining are like the final stitches in your creative tapestry—they tie everything together, giving your work that polished, professional look. Yet, they can also present some of the most frustrating obstacles in crochet. Let’s explore two of the most common challenges: managing loose ends and dealing with uneven tension, and how to overcome them without breaking a sweat.
Managing Loose Ends
Weaving in those sneaky loose ends is absolutely essential to a professional finish, but it’s a task that many crafters find tedious. Why is it so important? Because if loose ends aren’t secured properly, they can work their way free, unruly and determined to unravel your hard work—especially on items like spring crochet projects that might see frequent washing or handling.
There are a few popular methods you can use to weave in ends effectively:
- The Tapestry Needle Method: This is a classic approach where you use a needle to weave the yarn back and forth through stitches in multiple directions, ensuring it stays put.
- The "Weave-As-You-Go" Technique: Incorporate your loose end directly into your stitches as you crochet. This method is a time-saver but requires some practice.
- The Fold & Knot Method: This involves folding the loose end back, knotting gently, and weaving it in—a great option for thick yarn on projects like borders or blankets.
For more tips on ending projects smoothly, check out How to end a crochet project. If you want to explore creative hacks, 10 Clever Crochet Hacks to Boost Your Skills is also worth a look for tricks like "weave-as-you-go."

Dealing with Uneven Tension
Keeping an even tension when joining pieces can feel like controlling a rogue thread; it's essential for creating clean, neat joins that don’t look bulky or uneven. Uneven tension can cause joins to pucker, misalign, or even curl—a frustration many crocheters face.
To combat uneven tension:
- Work Mindfully: Pay close attention to your grip on the yarn while joining. If your tension tends to tighten, try relaxing your hold slightly.
- Block Your Work Before Joining: Blocking your pieces ensures they’re in the correct shape and size, giving you a consistent surface to work with.
- Use the Same Yarn and Hook Throughout: Switching hook sizes or using mismatched yarns can throw off your tension completely.
- Practice Invisible Joins: This method keeps the tension uniform and avoids the bulky look of traditional knots.
Uneven stitches can also lead to curling, so if this is an issue in your work, it might be worth reviewing Why Crochet Curls? Causes, Fixes, Prevention Tips for insights into maintaining even tension throughout.
For additional help, some crafters swear by tools like tension rings, or you can dive into How to Use a Crochet Tension Ring for Consistent Stitches for a steady grip and precise stitching.
By tackling these common challenges head-on, you’ll be better equipped to add that perfect finishing touch to your spring crochet projects. Loose ends and uneven tension don’t stand a chance against these tried-and-true techniques!
Step-by-Step Guide to Better Finishing
Achieving a polished, professional look in your crochet projects hinges on your finishing touches. Whether you’re wrapping up a spring crochet throw or a delicate scarf, proper finishing ensures your work shines and endures. In this section, we’ll explore two key techniques that make all the difference: trimming and cleaning edges, and mastering the art of weaving in ends.

Trimming and Cleaning Edges
Before you start joining, neat edges lay the foundation for a smooth process. Think of it as preparing a canvas before painting—it’s all about setting yourself up for success. Start by carefully trimming any uneven yarn tails or frayed ends. Precision here saves you from frustration later.
Here’s a quick guide to get your edges looking clean:
- Snip Precisely: Use sharp scissors or thread snips to cut any excess yarn flush with your stitches.
- Smooth Stray Fibers: Gently run your fingers along the edges to make sure no sneaky threads remain.
- Check for Consistency: Consistent edges mean fewer surprises when joining, especially with patterns like granny squares.
If you’re looking for ways to keep edges tidy during your project, check out Flat Braid Join for Granny Squares. This technique is not only functional but also adds a decorative touch.

Weaving in Ends Like a Pro
Weaving in ends might feel tedious, but it’s essential for that “store-bought” look. Plus, when done right, it ensures your project holds up against wear and washing. The key here is to blend the ends so seamlessly they’re practically invisible.
Follow this step-by-step process to weave ends like a pro:
- Thread Your Yarn Needle: Use a tapestry needle with a large eye to make threading your yarn easy.
- Hide the Tail Within Stitches: Weave your end back and forth through multiple stitches in different directions. This creates a strong grip without bulk.
- Trim the Excess: Once woven securely, snip any excess yarn, leaving your project looking neat and intentional.
For those itching to explore different techniques, you’ll love the Joining & Techniques page. It’s packed with methods that enhance both function and style.
A helpful note: if you often struggle with yarn tails popping out over time, you’re not alone. Consider using methods like the “Weave-As-You-Go” technique, where loose ends are incorporated directly into your stitches as you work. For inspiration on combining techniques like these with modern crochet patterns, check out BloomScape CAL Crochet Join.
By keeping edges clean and mastering the art of weaving in ends, finishing your spring crochet projects will soon become as satisfying as beginning them. Ready for the next step? Stay tuned for more tips to make your crochet projects truly frustration-free!
Joining Techniques for Every Level
Joining crochet pieces together is like piecing together a beautiful puzzle—every method brings its own flair and finesse to the final outcome. Depending on your skill level and the look you’re going for, some techniques might appeal to you more than others. Let’s look at three popular approaches: slip stitch, flat braid joins, and invisible seams.
Slip Stitch Joins: Beginner-Friendly and Practical
Photo by Mike van Schoonderwalt
Slip stitch joins are an excellent starting point for beginners. Think of it as a gentle handshake between two pieces, clean and functional. This method involves using a simple slip stitch to bring your crochet pieces together, ensuring a reliable bond that remains understated yet effective.
What makes slip stitch joins unique? They don’t dominate the design but blend into the background, letting your pattern shine. They’re perfect for spring crochet projects like lightweight scarves or beginner-friendly blankets. Plus, this technique is forgiving—mistakes are easy to fix.
Ready to dive in? Check out Joining & Techniques for tips tailored for beginners.
Flat Braid Crochet Joins: A Decorative Upgrade for Adventurous Crafters
For those looking to add a decorative flair, the flat braid join is a complete showstopper. This method creates an intricate braided edge that not only holds your pieces together but also serves as a design element in itself. If you’re like me and enjoy adding a signature touch to your projects, this technique is a must-learn.
The flat braid join is ideal for projects like granny square blankets or hexagon motifs. Its elegant detail works beautifully for both modern and vintage-inspired spring crochet creations. However, it does require more patience and skill compared to simpler joins. But trust me, the results are worth every bit of effort.
Learn how to master this method and elevate your crochet game with the Flat Braid Join Guide for Granny Squares.

Invisible Seam Techniques: Seamless Joins for Advanced Finishers
If you’re an advanced crocheter, invisible seaming might be the trick up your sleeve. This technique is about finesse—hiding the joins so well that only you know they’re there. Perfect for wearables, delicate spring projects, or anything requiring a seamless transition, it’s the ultimate professional touch.
Methods like the mattress stitch or the “zipper seam” achieve this magical effect. Because these techniques focus on blending the yarn into the stitches, they require attention to detail and a steady hand. But once mastered, they open the door to creating truly flawless projects.
Need guidance? Discover more advanced tips and tricks through this Crochet Joining Techniques Playlist on YouTube—a treasure trove for crochet enthusiasts.
From the simplicity of slip stitches to the detailed artistry of flat braid joins, these techniques cater to every level of crochet mastery. What are you waiting for? Grab your hook, pick a method, and let your creativity flow!

Spring Crochet Finishing Tips
When it comes to spring crochet projects, the finishing steps can truly determine whether your creations look professional and stand the test of time. Whether you're working with delicate yarns for lightweight accessories or piecing together intricate seasonal designs, the right finishing and joining techniques make all the difference.
Lightweight Yarn Tips
Lightweight yarns are a favorite for spring crochet projects, offering elegance and comfort. But managing and finishing these delicate yarns can sometimes feel like walking on eggshells—too much tension or improper handling and your work could unravel.
Here’s how I ensure a secure finish when working with lightweight yarns:
- Use a Smaller Needle for Ends: Tapestry needles with a fine tip are perfect for weaving in ends without snagging the yarn.
- Weave Ends Smartly: For extra security, weave in loose ends by threading them through multiple stitches and changing directions to prevent them from slipping out.
- Avoid Overstretching: Keep the tension gentle, especially when blocking. Lightweight yarns don’t need aggressive stretching; a light misting and gentle shaping will do the trick.
If you're looking for the perfect project to try these tips, the Eggtastic Easy Spring Crochet Blanket is an excellent starting point. Its beginner-friendly design pairs beautifully with soft spring yarns, making it both charming and manageable.
![]()
Seamless Joins for Spring Crochet Accessories
Joining pieces seamlessly is the holy grail for spring-themed accessories like scarves, wraps, or table runners. Bulky seams can distract from the delicate appeal of spring crochet, so a polished look is key.
Here are my go-to joining methods for flawless finishes:
- The Invisible Join: This method mimics an unbroken stitch line, making seams nearly invisible. Perfect for airy wraps and lacy scarves!
- Slip Stitch Join: For beginners, a simple slip stitch works wonders. Its clean, subtle edge blends well with most designs without drawing attention to the join.
- Blocking for Alignment: Before joining, always block your pieces to ensure they align perfectly. It prevents uneven seams and puckering.
Whether you’re joining rows or motifs, seamless techniques elevate your projects from homemade to heirloom-worthy. For more inspiration, dive into designs like the Amazing Crochet Eggtastic Blanket for Spring, which demonstrates how thoughtful finishing transforms simple patterns into stunning projects.
By focusing on these finishing touches, you’ll ensure your spring crochet projects are as delightful to use as they are to look at.
Pro Tips for Stress-Free Finishing
When it’s time to put the final touches on your crochet project, it can often feel like the battle's not quite over. But finishing doesn’t have to be an overwhelming task if you're armed with the right strategies. With thoughtful preparation and a methodical approach, you can power through these last steps and give your project the polished look it deserves. Let’s dive into some expert tips to make finishing truly frustration-free.

Batch Processing Hard Steps
If you’ve ever felt stuck weaving in ends or joining multiple pieces, you’re not alone. These repetitive tasks can feel tedious, but there’s a way to tackle them more efficiently: batch processing. By grouping similar steps together, you can save time and reduce mental fatigue.
For example:
- Weave in ends all at once: Instead of stopping to deal with ends after each section, finish the entire project and then dedicate time to weaving in all the loose threads.
- Join pieces efficiently: Stack your blocks or motifs in the order they’ll be joined and systematically work through them in one sitting. This eliminates the back-and-forth of stopping and starting.
Batching not only streamlines the process but also lets you get into a rhythm, making these repetitive tasks more satisfying. Plus, it helps maintain consistency across your project since you’re working with the same tension and mindset throughout. If you’re looking for a decorative join that can elevate your project while you batch, try the Flat Braid Join for Granny Squares—it’s beginner-friendly and results in a stunning finish.
Creating a Finishing Checklist
One of the easiest ways to feel less overwhelmed is by creating a finishing checklist. Think of it as a map that guides you step-by-step until you reach the finish line. A checklist ensures no critical details slip through the cracks, leaving you with polished, flawless results.

Here’s an example of a simple finishing checklist you can adjust based on your project:
- Inspect and Snip: Trim all uneven edges or stray threads.
- Weave in Ends: Secure loose yarn ends by weaving them into surrounding stitches multiple times.
- Join Pieces: Use your chosen method, whether it's slip stitch joins, flat braid joins, or invisible seams.
- Block: Relax and shape your final project using blocking techniques. This is especially crucial for achieving clean, professional-looking joins.
- Final Touches: Double-check everything—tighten any loose joins and confirm that all ends are secure.
This systematic approach helps you stay organized and gives you peace of mind knowing that each step is accounted for. If you’re joining sections of a larger project and looking for additional finishing insights, the BloomScape CAL Crochet Join offers expert techniques to perfect your joins.
By implementing these pro tips, you’ll not only simplify the finishing process but also infuse your crochet work with a sense of accomplishment and pride. Keep these strategies handy, and the next time you reach that final stretch, you'll finish strong—without the stress.
Conclusion
Mastering finishing and joining techniques is the ultimate secret to creating stunning spring crochet projects that are both durable and visually appealing. These final touches elevate your handcrafted creations to heirloom quality.
Take pride in these steps—they’re what transform loose threads and separate pieces into cohesive works of art. By employing strategies like batching tasks, using the right tools, and trying out seamless joins, you’ll soon find joy instead of frustration in these often-overlooked processes.
Ready to explore more or perfect your techniques? Bookmark the Joining & Techniques page, or start your next masterpiece with the Eggtastic Easy Spring Crochet Blanket.
Every project you complete stands as a testament to your creativity and dedication. Don’t forget to share your thoughts or questions as part of our community—there’s nothing more inspiring than seeing others thrive in their crochet journeys! For even more insights, check out our helpful tutorials on YouTube.
FAQs
1. Why is finishing so important in crochet?
Finishing is what ensures your crochet project looks polished and professional. It secures loose ends, strengthens joins, and enhances durability while providing a clean, visually appealing aesthetic. Without proper finishing, your project may unravel over time or appear incomplete.
2. What’s the easiest joining method for beginners?
The Slip Stitch Join is beginner-friendly and practical for most crochet projects. It’s a simple method that creates a clean seam and doesn’t require advanced skills. For step-by-step guidance, see methods like Flat Braid Join to explore more decorative options as you improve.
3. How do I stop yarn ends from slipping out?
To prevent loose ends from slipping out:
- Weave your ends in multiple directions using a tapestry needle.
- Incorporate the loose ends into stitches as you crochet with the “weave-as-you-go” technique.
- Avoid trimming ends too close; leave a small tail for security.
4. How can I align crochet pieces perfectly when joining?
Align pieces by:
- Blocking your work to ensure all sections have uniform shape and size before joining.
- Using safety pins or locking stitch markers to temporarily secure the pieces in place.
- Working on a flat surface to keep the sections steady and aligned.
5. What tools are essential for stress-free finishing and joining?
Some must-have tools include:
- Tapestry needles for weaving in ends.
- Sharp scissors for clean snipping.
- Safety pins or stitch markers to hold pieces in place.
- Blocking mats for shaping and aligning.
6. What’s the best way to deal with uneven tension during joins?
To handle uneven tension:
- Block your pieces before joining to create uniformity.
- Work slowly and check tension regularly while keeping a relaxed grip.
- Stick to the same hook size and yarn type throughout the project.
7. What is the purpose of blocking?
Blocking helps relax and shape your crochet stitches, ensuring they lie flat and look consistent. It’s especially useful for projects with granny squares, motifs, or lacy patterns. Blocking is a key finishing step to give your work a professional appearance.
8. Can I use adhesives instead of sewing pieces together?
Yes, adhesives like fabric glue or fusible webbing can work for non-wearable projects such as decorations or placemats. Test the adhesive on a scrap piece of yarn first and avoid it for items requiring frequent washing or heavy use.
9. How do I get my crochet joins to look invisible?
Invisible joins can be achieved through techniques like the Mattress Stitch or the Zipper Seam. These methods blend seamlessly into your stitches, hiding the join line completely for a clean, polished edge.
10. Which join method is best for granny square blankets?
The Flat Braid Join is perfect for granny square blankets as it adds both style and structure. It creates a decorative braided effect while keeping the seams durable. For less visible joins, the Slip Stitch Join or the Invisible Join works well.
![]()
Christa Patel is a passionate crochet enthusiast and a dedicated advocate for the art of crafting. With over a decade of experience, Christa has mastered the delicate balance of creativity and technique, specializing in seasonal projects that bring joy and functionality to everyday life. Her love for crochet blossomed from a childhood fascination with yarn, transforming into a lifelong pursuit of sharing knowledge and inspiring others.
Through her blog, patterns, and tutorials, Christa helps crafters of all levels create projects they’re proud of—whether it’s a cozy spring blanket, intricate lacework, or stress-free finishing techniques. Known for her clear instructions and practical tips, she’s on a mission to make crafting approachable for everyone.
When she’s not crocheting, Christa enjoys exploring local yarn shops, experimenting with new stitches, and engaging with the global crochet community. Follow her journey and discover her incredible designs on her blog or through her guest contributions to crochet-focused platforms.
About the Author
With a passion for crafting easy, beginner-friendly tutorials and patterns, Christa inspires crafters of all skill levels to unleash their creativity worldwide. She encourages yarn lovers to connect, create, and crochet a world filled with beautiful handmade treasures!
Stress-Free Finishing and Joining for Spring Crochet Projects