Crochet a Tammy Sweater for Beginners – Easy Step-by-Step Guide!
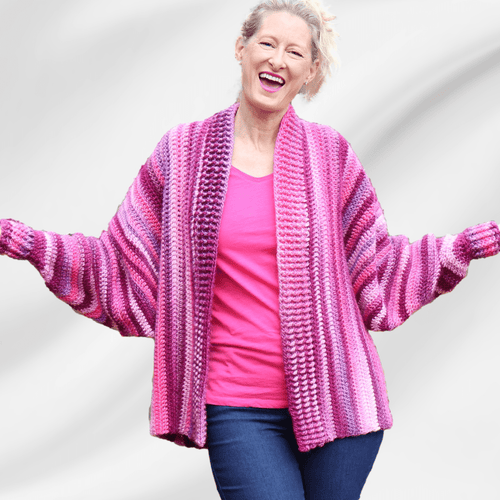
Have you ever wanted to crochet your own sweater but felt intimidated by complicated patterns? The Tammy Sweater is here to change that! Inspired by Breast Cancer Awareness, this pattern is designed with beginners in mind, using simple stitches and made to fit your unique body measurements. This guide will walk you through every step, inspired by Christa's detailed YouTube tutorial from Secret Yarnery, ensuring you can confidently create a sweater you'll love.
If you prefer to learn visually, you can follow along with the complete video tutorial:
Table of contents
For those who like to have a pattern in hand, you can grab the free pattern or a printable PDF pattern to make things even easier. Let's get started!
Why the Tammy Sweater is Perfect for Crochet Sweater Beginners
So, what makes the Tammy Sweater such a great project for beginners? Let me break it down:
-
Super Easy: The design focuses on basic stitches and techniques, so you won't be wrestling with anything too complex. There are no tricky joins!
-
Customizable Fit: Forget about generic sizing! This sweater is made to your body measurements, ensuring a comfortable and flattering fit.
-
Dolman Sleeves: These sleeves are not only stylish but also provide extra room and comfort, especially if you have larger arms.
-
Quick Project: Because of its simple construction, the Tammy Sweater works up relatively quickly. You'll have a finished sweater in no time, giving you a satisfying sense of accomplishment.

Gather Your Supplies
Before we dive into the pattern, let's gather the necessary supplies. Having everything ready will make the process smoother and more enjoyable.
Yarn
For the Tammy Sweater, I used Ice Yarn Ambient, which is a lovely blend of 50% wool and 50% acrylic. Each ball contains 100 grams and 134 meters of yarn. It feels similar to Lion Brand Landscape but includes the added warmth and texture of wool. I used 12 balls or 3 packs of yarn for this project.
- Of course, you're welcome to use any yarn you like! Just keep in mind that the gauge and overall look may vary depending on your choice. If you want something similar to what I used, look for a bulky yarn (size 5), though Ice Yarn Ambient is on the thinner side of bulky, so a size 4 yarn could also work well.
Need to stock up? You can find a wide variety of yarns at this link. And remember, Secret Yarnery has a collection of written patterns if you need some inspiration!
Here are a few yarn recommendations that would make great substitutes:
-
Lion Brand Heartland
-
WeCrochet Swish Worsted
-
Bernat Softee Chunky
Crochet Hook
I used a 6mm crochet hook for this project, which worked perfectly with the weight of my yarn. Finding the right hook size is important for achieving the desired gauge and fabric.
If you're in the market for new hooks, check out this set of crochet hooks on Amazon.
Other Essentials
Besides yarn and a hook, you'll also need a few other essential tools:
- Darning needle: For weaving in those pesky ends and creating a neat finish.
- Stitch marker: To help you keep track of your stitches and rows.
- Scissors: For cutting the yarn.
You can find reliable stitch markers on Amazon to make crocheting easier.

Understanding Chainless Foundation
Let's talk about the foundation of our sweater. I chose to use a chainless foundation, and there's a good reason for it! A chainless foundation stretches equally on both sides, which is crucial for a sweater. It prevents one edge from being tighter or looser than the other, ensuring a balanced and comfortable fit.
If you're new to this technique, don't worry! I have a detailed tutorial on how to do a chainless foundation. It is very useful for projects like this!
Here's a quick rundown of how to start the chainless foundation:
- Make a slip knot, leaving a long tail for weaving in later.
- Chain four.
- Yarn over and insert your hook into the first chain.
- Hold the stitch, pull up a loop, and chain one.
- Pinch the chain and complete the double crochet.
It might seem a bit fiddly at first, but trust me, with a little practice, you'll get the hang of it!
Chain Foundation Alternative
If the chainless foundation is proving difficult, there's no shame in using a regular chain foundation instead. Here's how to do it:
- Use a hook that's a half size or a full size larger than what you're using for the sweater itself. This will help keep your chain loose.
- When you're making the chain, try to keep it relaxed and avoid pulling too tightly.
- After you've made a bit of the chain, give it a gentle pull. If it feels too tight, try again with an even larger hook or a looser tension.
Determining the Right Length of Chain
Now, how do you figure out how long to make your chain or chainless foundation? Here's a simple method:
Measure the length from one shoulder, down your back, to where you want the sweater to end. Use this measurement as your chain length. Keep in mind that crochet tends to stretch, so the sweater will likely end up a bit longer than your initial chain. Count your stitches to know for sure! Write it down so you don't forget!
First Row: Double Crochet
Once you have your foundation chain, it's time to start the first row of double crochet. Here's how:
- Chain one and turn your work.
- Work into the first stitch. (This is your chain on the side.)
- Double crochet into each stitch across the row.
- Make sure to work into the very last chain in the beginning chain.
If you count your stitches, you should still have the same number as you did in your foundation chain.

Second Row and Beyond: Marking Your First Stitch
For the second row and all subsequent rows, I recommend using a stitch marker. This will help you create a clean, even edge along the bottom of your sweater. Here's what to do:
- Chain one to turn.
- Work into the first stitch.
- Place a stitch marker in the first stitch of the row.
- Continue with one double crochet into each stitch across the row.
- When you reach the end of the row, remove the stitch marker before working into the last stitch.
Determining the Width of Your Sweater
Now, let's figure out how wide to make your sweater. This is where the custom fit comes in!
- Measure the widest part of your body, whether it's your hips or chest.
- Divide that number by four. The result will be the width of each panel of your sweater.
- For example, if your widest measurement is 40 inches, dividing by 4 gives you 10 inches.
- Continue crocheting until your piece reaches the calculated width.
- Fold the piece in half, matching the bottom edge.
- Count your stitches to make sure it's even on both sides.
- Place a stitch marker in the halfway point to mark the center.
Creating the Neckline
Once your piece is wide enough, it's time to create the neckline. This is done by working a few rows back and forth on only half of your stitches:
- Turn and go back. This will form the back of your neck.
- Chain one, turn your work, and double crochet as normal.
- At the end of this row, chain one and come back.
- Repeat this for three rows.
Don't worry if the neckline seems small at first. It will stretch and relax into a great shape as you wear it!
Creating the Second Side
Now it's time to create the second side of your sweater, mirroring the first:
- Chain the same number of stitches as you had on the finished side.
- Use a larger hook (7mm) for the chain to keep it loose and prevent it from being too tight.
- Chain in sets of ten, using a stitch marker to keep track of your count.
- Work your way back along the chain with double crochets, switching back to your regular hook (6mm).
- Chain one, and into the very first chain, make a double crochet.
- Move your stitch marker to mark the end of the row.
- Make sure your chain isn't twisted.
- Stretch your work occasionally to ensure your chain isn't too tight.
Connecting Sides and Continuing
Now, let's connect the second side and continue working on the body of the sweater:
- Work into the first stitch of your regular double crochets.
- Go back and forth like normal, creating rows of double crochet.
- Count your rows on the first side, and make the same number of rows on the new side.

Checking the Fit
Before moving on, it's a good idea to check the fit of your sweater. Put it on yourself or a mannequin to get a sense of how it's shaping up:
- Hold the sides together to see if it fits comfortably around your body.
- If it feels too small, it's not too late to add more rows.
Joining the Sides: Preparing for Sleeves
Once you're happy with the fit, it's time to join the sides and prepare for the sleeves. Here's how:
- Fold the front flaps down along the back piece.
- Position the corner where you have the yarn attached.
- Carefully count your stitches.
- Leave 55 stitches open on each side (110 stitches in total) to create the armhole for the sleeve.
- Mark where you'll begin the seam, leaving 55 stitches open by using your stitch markers.
- Count from the bottom to make sure it's 25 stitches to where the stitch marker is.
Join-As-You-Go Technique
I like to use a join-as-you-go technique to seam the sides together. It creates a nice, clean finish and is relatively easy to do:
- Chain one and turn.
- Double crochet into the first stitch.
- Find the first double crochet on the row above.
- Tip your hook and pick up the two strands from that row.
- Grab your yarn, pull through, and slip stitch.
- Wrap your yarn and go into the next stitch to make the double crochets.
- Tip your hook down to see the stitches above.
- If you keep your hook up, it will hide the stitch.
- Double crochet into your next stitch.
- Hook down, and look for the next stitch above and make a slip stitch.
- Continue until you have the stitches lined up to the stitch marker.
Finishing the Side Join
As you approach the stitch markers, don't worry if things seem a little off:
- Continue to the very end, even if the stitches don't line up perfectly.
- Double crochet into the stitch with a stitch marker.
- Slip stitch into the stitch with a stitch marker.
Creating the Armhole
Now that the sides are joined, you have created the armholes! We'll now work in the round to shape the sleeves.
- Double crochet into each stitch going along the armhole edge.
- Use two stitch markers on each side of the join.
- These will be used for decreasing to shape the sleeve.
Decreasing: Shaping the Sleeve
Decreasing is essential for shaping the sleeve and creating a comfortable fit. Here's how I like to do it:
- Decrease in the center of the underarm.
- Decrease two stitches before and two stitches after the center decrease.
- Start your double crochet into the first stitch (2 stitches before the marker).
- Take your yarn and push your hook in.
- Wrap your yarn, but stop there and leave it on the hook.
- Go into the next stitch and start the same process.
- Wrap your yarn and take off all three loops.
- This finishes two double crochets into one stitch, creating a decrease.
- Repeat this for the next two stitches that are connected to each other.

Decreasing Around the Seam
To create a smooth decrease around the seam, try this technique:
- Start a double crochet on each side of the seam, but finish them together to create a decrease.
- Wrap your yarn, and insert your hook.
- Take off two, and leave it on the hook.
- Start another double crochet and wrap your yarn.
- Take off two.
- Wrap your yarn again, and pull through all three loops.
Continuing to Decrease
Here's how to continue decreasing to shape the sleeve:
- Decrease in the next two stitches.
- Wrap your yarn and into the next stitch.
- Wrap your yarn, take off two, and leave it on your hook.
- Repeat again in the next stitch.
- Wrap your yarn again and pull through all three.
Second Round of Decreases: Maintaining Shape
To keep the decreases aligned and prevent the seam from shifting, try this method:
- Identify the three decreases in the row below.
- Put a stitch marker in the top of each of those decreases.
- This is just to help you visualize where your stitches are.
- Start decreasing one stitch before the first decrease in the previous row.
- Every round you are going to be starting one post before.
- This will keep all of your decreases directly underneath your arm.
- Keep going until you get to the stitch marker and start the decrease.
Sleeve Length and Width
Continue decreasing until your sleeve is about 4 inches wide. This is approximately 11 or 12 centimeters.
Evening Out the Bottom of the Sleeve
To even out the bottom edge of the sleeve, try this technique:
- You're going to do one treble crochet in each decrease stitch.
- Wrap your yarn twice and into the stitch.
- Wrap your yarn and take off two.
- Repeat two more times.
- Do one treble crochet in the next stitch.
- Wrap your yarn one more time.
- Do one double crochet in the next stitch.
- Then do a half-double crochet.
- Wrap your yarn and go into the stitch.
- Wrap your yarn again and take off all three loops at once.
- Slip stitch into the last stitch.
Creating the Cuff
Now, let's move on to creating the cuff of the sleeve:
- Chain one and double crochet into the very same stitch.
- Put a stitch marker into that stitch.
- One double crochet into each stitch around.
- Slip stitch to join.
If you prefer a plain, non-ribbed cuff, just keep going like this until the sleeve is long enough. This is also a good way to save yarn if you're running low.
Starting the Ribbed Cuff: Front Post Back Post
For a classic ribbed cuff, we'll use the front post back post technique:
-
Chain one, and give yourself some space.
-
Wrap your yarn and go right in before that post and out the other side.
-
Do your double crochet.
-
This was a front post double crochet.
-
To do a back post, come from the back side and over the next post.
-
Wrap your yarn, and hold it with your finger.
-
Put your hook in and open up a space on the other side.
-
Push your hook back down, grab your yarn, and pull through.
-
Double crochet like normal.

Alternating Front Post and Back Post
Continue alternating front post double crochet and back post double crochet around the cuff. Take your time, especially with the back posts, as they can be a bit tricky. Keep going until you get to where you started.
Finishing the Ribbed Cuff
- Depending on how your stitch count works out, you may want to use the initial chain as a stitch.
- Wrap your yarn and front post into the next stitch.
- Go around the entire loopy bit that is sitting on the front.
- Slip stitch to the top of the first front post.
- Chain one and front post.
- Continue alternating front post and back post stitches around the cuff.
- Slip stitch to join.
- Chain one.
Invisible Join for Cuff
To create a seamless finish, use an invisible join for the cuff:
- Instead of a regular slip stitch, do an invisible join.
- Cut your yarn, leaving about 8 inches.
- Pull it up and through that stitch.
- Take your darning needle and thread your yarn.
- You would normally be slip stitching right into the top of that front post.
- Do the same thing with crochet hooksyour needle, going straight under two loops of that stitch.
- Make sure you are going under the stitches.
- Pull your tail through, and keep an eye on where it's coming from.
- Snug it up, but not too tight.
- Go back down into that first stitch like that.
- You will see how you've made a v.
- That is your join.
Sew in your tail, being careful not to sew into any of the pretty Vs at the top. Poke about underneath, back and forth, and up and down to secure the tail.
Checking Sleeve Length
To ensure both sleeves are the same length:
- Fold the sweater so that the pretty seams are aligned.
- Line up the very first join, or your very first sleeve row.
- Pinch it to make sure that the underarm seam and the end of the join line up.
- You can also count each row to double-check.
Collar Foundation
Now, let's move on to the collar! Here's how to create the foundation row:
- Push your hook into the very first double crochet that you made.
- It might be a bit different because there's a chain one.
- Pick that very first stitch on the edge on the corner.
- Get two loops of that V on the hook.
- Leave a tail to weave in later.
- Pull it through and slip stitch both to join.
- Hold your tail along the top of your work for a few stitches.
- Chain two (the slip stitch counts as the first chain).
- Wrap your yarn and go into the very same stitch again to make one more double crochet.
- You want to start and end with two double crochets for this round.
- Into the next stitch, do one double crochet.
- Into the next stitch, do two double crochets.
- You are alternating one double crochet and two double crochets, creating an increase every other stitch all the way along this row.
Working Along the Back of the Neck
To add stitches along the back of the neck:
- Rotate so you can work along the three rows at the back of your neck.
- Put two double crochets here, two double crochets in the chain, and two double crochets in the stitch on the other side.
- Two double crochets into the next spot.
- Two double crochets into the chain.
- Somehow get two loops on the hook.
- Two double crochets into this next space.
- You are going to put two double crochets into this stitch, even though you've already worked into it.
- This will give you extra stitches around the neck for a comfortable fit.
Finishing the Collar Foundation
- Finish the row.
- One double crochet into the next, and two into the next stitch.
- Alternate doing two double crochets and one double crochet all the way down this row.
- Chain one and turn your work.
Ribbing the Collar: Front Post, Back Post
For a ribbed collar, we'll use the front post back post technique again:
- Start with a front post, alternating all the way along.
- Wrap your yarn and go around that post you just made.
- Front post double crochet.
- Back post double crochet.
- Keep working, making front posts and back posts all the way along.
- Chain one, turn your work, and do regular front post and back post stitches.
- Keep doing this until your collar is the size you want it to be, or you run out of yarn!
Finishing the Collar
To finish the collar:
- Chain one.
- Cut your yarn.
- Pull your hook and your yarn through.
- Snug that down to secure.
- Sew in your tail.
Want to learn more? Check out the Secret Yarnery website
Left Handed?
Final Thoughts
Congratulations! You've successfully crocheted your own Tammy Sweater. Wasn't that easier than you thought? I hope you enjoyed this tutorial and are thrilled with your finished sweater. It's a wonderful feeling to create something beautiful with your own two hands. And who knows, maybe it inspires others!
I'd love to see your creations! Share your finished sweaters with me!
And don't forget to like and subscribe for more easy crochet patterns and tutorials!
I hope you are now more confident in crocheting garments like the Tammy Sweater. Check out these crochet patterns for more inspiration!
FAQs
2. What type of yarn works best for the Tammy Sweater?
Bulky (size 5) yarn is recommended. However, if you prefer a lighter drape, you can use a thicker worsted weight (size 4) yarn. Just be sure to match your measurements for the best fit.
3. How much yarn will I need?
You’ll need about 12 balls of Icy Yarns Ambient or 3 packs (each pack includes 4 balls, 100g each). The actual amount depends on your size and preferred sweater length, so have extra yarn on hand if you want longer sleeves or a longer body.
4. Can I use a different hook size?
A 6mm crochet hook is recommended for this project. If your stitches are tight or loose, adjust your hook size to get the desired drape and fit.
5. Do I need to use the chainless foundation?
The chainless foundation is suggested for more stretch and comfort, but you can use a traditional chain if you’re more comfortable with that method. Just keep your chain loose.
6. How do I make my sweater larger or smaller?
Adjust your initial chain or foundation length to match your preferred measurements. The made-to-measure method means you aren’t locked into a single size—just follow the measuring tips as you crochet.
7. Is the Tammy Sweater warm enough for winter?
Using bulky yarn makes this sweater cozy and warm, especially with the wool blend. For colder climates, layer the sweater or choose a heavier yarn.
8. Can I add extra design elements?
Absolutely! Customize your Tammy Sweater with stripes, color blocks, or decorative buttons. You can also adjust the length of sleeves, body, or neck for a personal touch.
![]()
Christa Patel is the creative mastermind behind Secret Yarnery, a crochet enthusiast who transforms simple yarn projects into stunning handmade creations. With years of crocheting experience, Christa dedicates her time to making crochet accessible to everyone, especially beginners. Her tutorials are known for their clarity, creativity, and encouragement, helping beginners gain confidence and hone their skills.
Inspired by causes close to her heart, such as Breast Cancer Awareness, Christa designs projects like the Tammy Sweater to bring comfort, style, and joy to the craft of crochet. Through her engaging YouTube channel and thoughtfully written patterns, she empowers crafters with the tools and knowledge to create unique, wearable pieces.
When Christa isn’t busy crocheting, she’s sharing tips, tricks, and inspiration with her vibrant online community. Check out more of Christa’s patterns and tutorials on her website, Secret Yarnery, to fuel your crochet journey. Stay Hooked!
About the Author
With a passion for crafting easy, beginner-friendly tutorials and patterns, Christa inspires crafters of all skill levels to unleash their creativity worldwide. She encourages yarn lovers to connect, create, and crochet a world filled with beautiful handmade treasures!
Crochet a Tammy Sweater for Beginners – Easy Step-by-Step Guide!