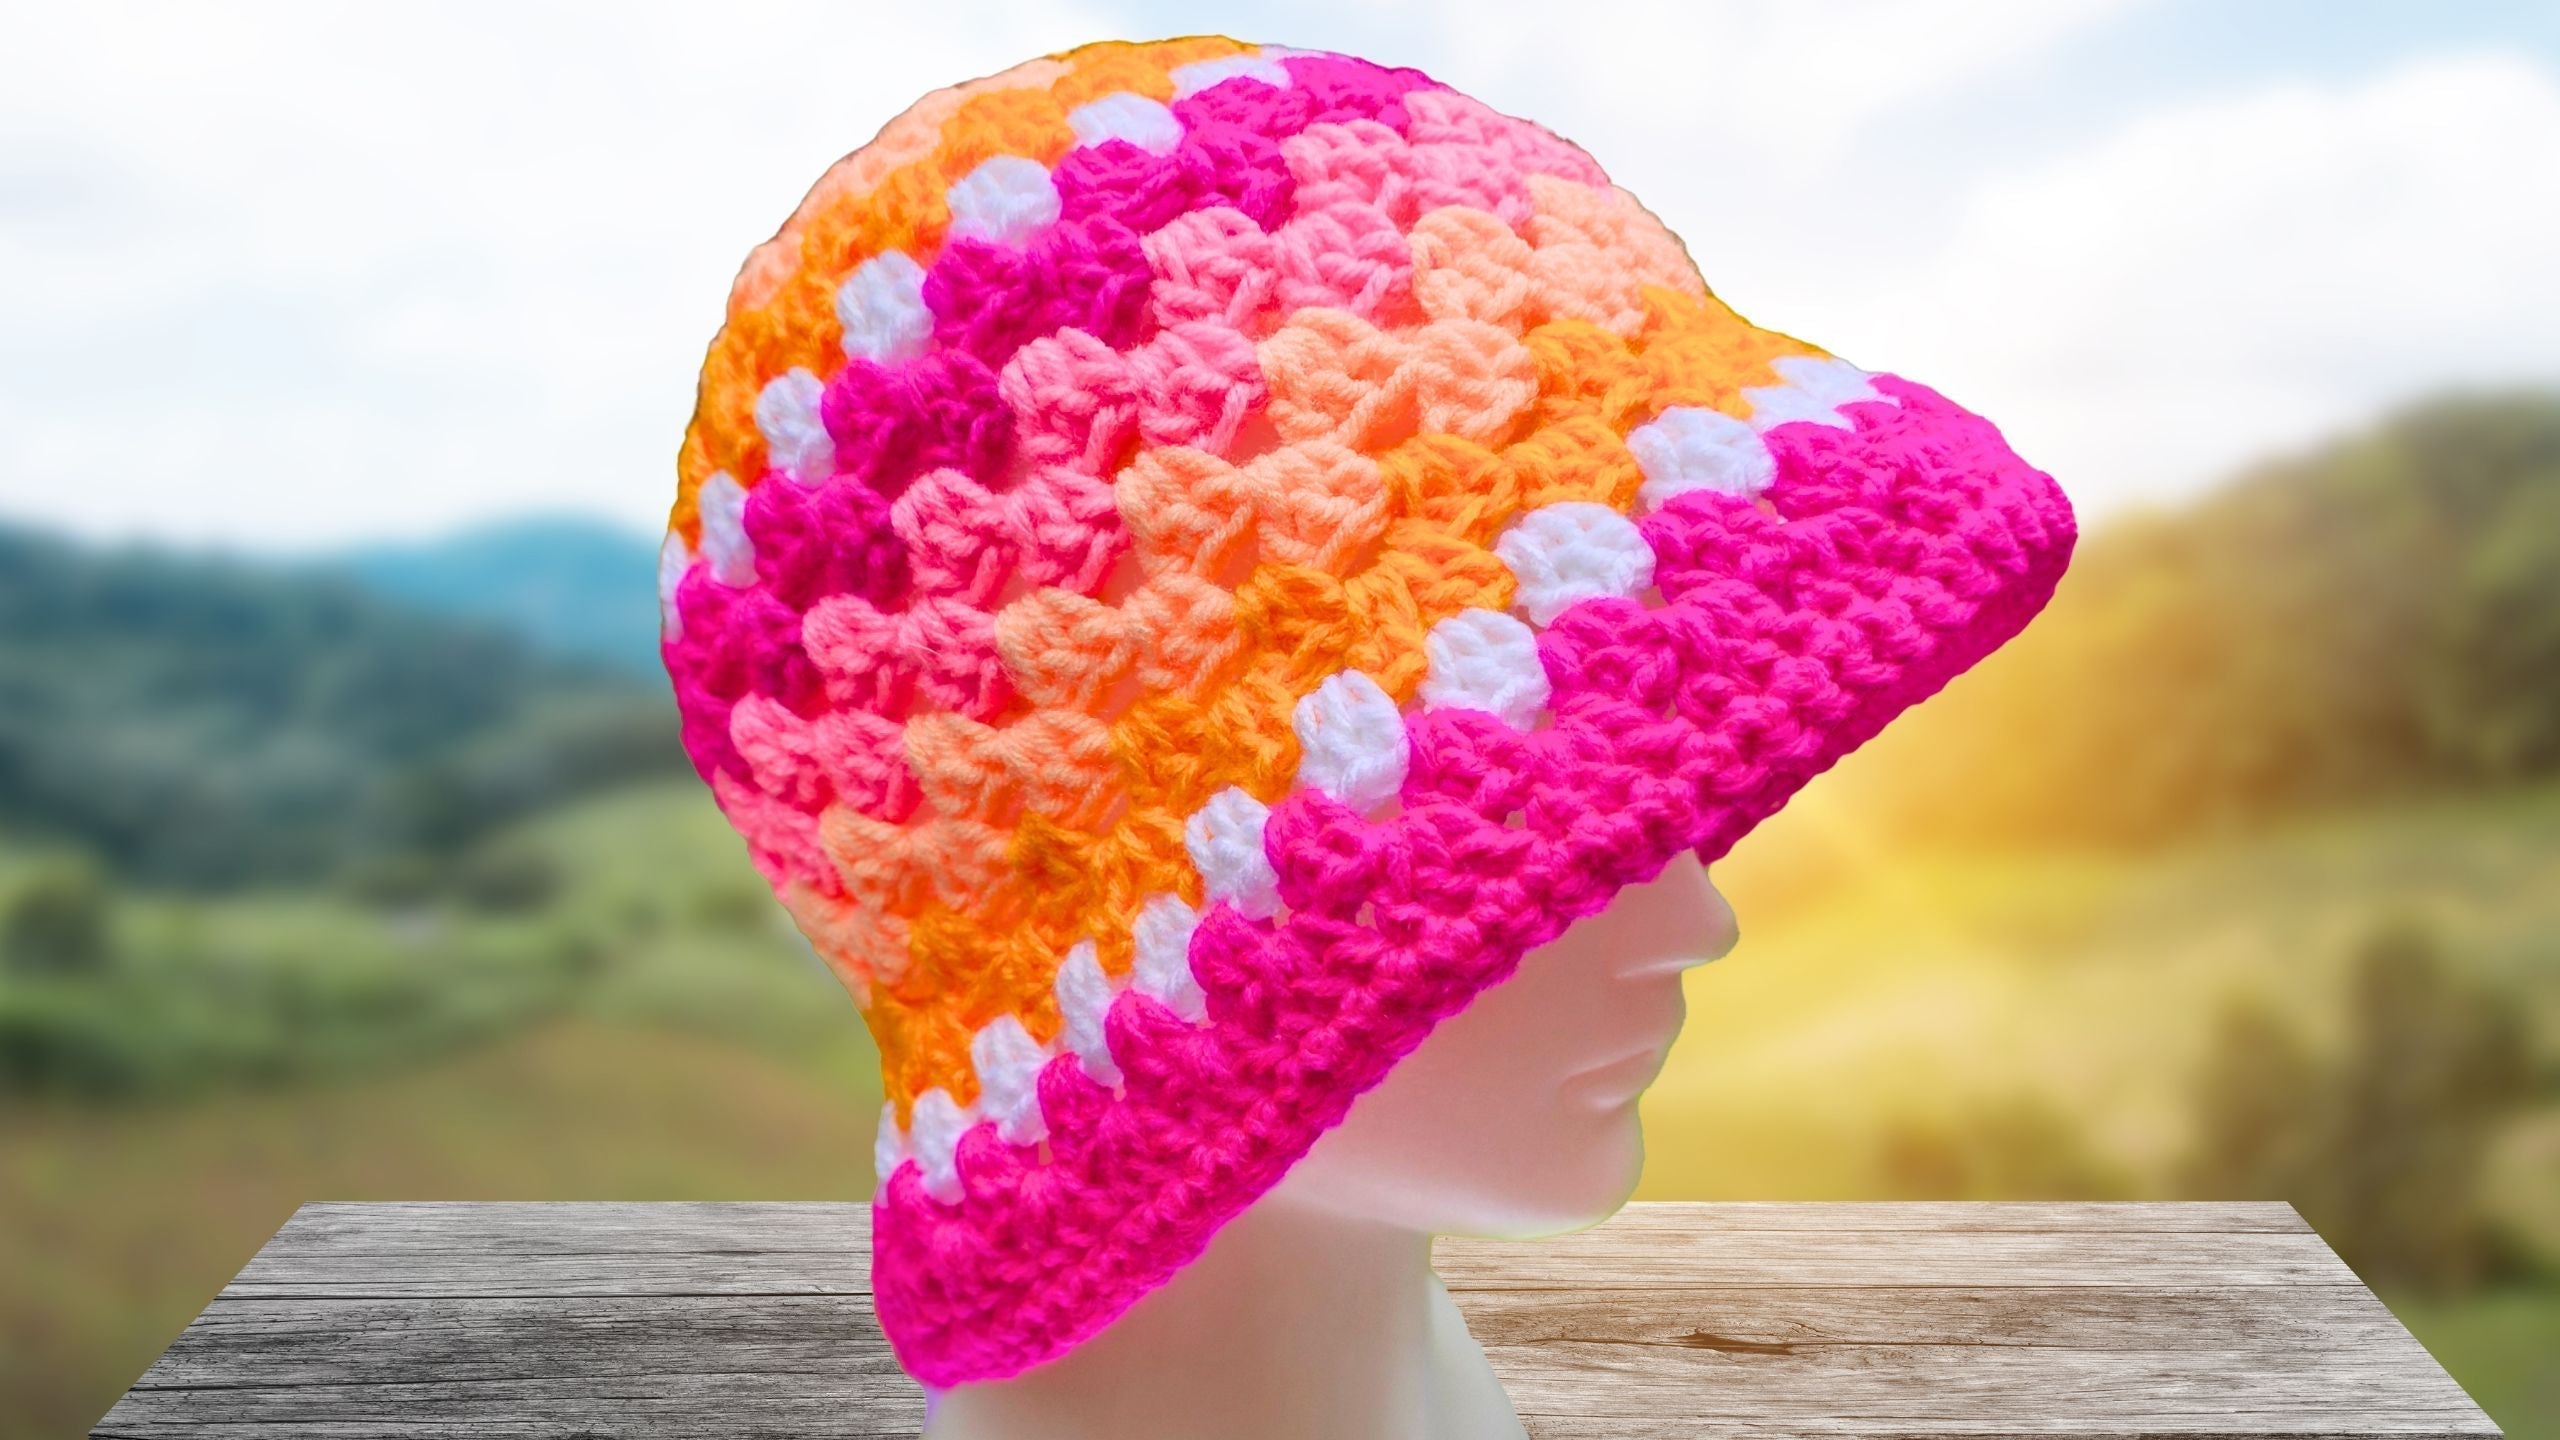
Crochet Bucket Hat Pattern for Beginners: Step-by-Step Guide
If you're dreaming of a fun, stylish project that’s quick to finish and perfect for beginners, you’ll love making your own crochet bucket hat. With just the basic double crochet stitch and some colorful yarn, I’ll walk you through each step so anyone can create a beautiful hat in an afternoon. This pattern’s open to endless color combinations, making every bucket hat as unique as you are. For those wanting extra convenience, you can grab my printable PDF pattern right here and enjoy a hands-on experience that’s as relaxing as it is rewarding.
You don’t have to be a crochet pro to follow along—this project is beginner-friendly and you’ll pick up valuable skills like color changes, working in the round, and finishing techniques that will serve you well in future creations. The finished bucket hat makes a fantastic handmade accessory or a thoughtful gift, and you can easily tailor the size and personality of each hat with just a few small tweaks. Let’s dive in and get started!
Materials Needed for Your Crochet Bucket Hat
Having the right tools and materials sets you up for success with any crochet project. For this bucket hat, you’ll need:
- Worsted weight acrylic yarn (size 4), about 165 meters per color. Feel free to mix and match your favorites for a striped look!
- 6mm crochet hook (US J-10).
- Stitch marker (optional but very helpful for beginners to mark the start of each round).
- Yarn needle for weaving in ends.
- Sharp scissors for trimming yarn tails.
I’ve rounded up all of my favorite hook sets, scissors, and helpful notions on my Amazon Crochet Supplies Store so you can shop with confidence.

Starting Your Hat: Magic Ring vs. Chain 3 Ring
The foundation of a Crochet Bucket Hat is a tight, neat center—and that’s where the magic ring comes in. This technique lets you pull the starting round completely closed so there’s no hole in the middle. If you’re a new crocheter, you might prefer the chain 3 ring as an easier starting point.
Magic Ring Step-by-Step:
- Hold your yarn’s tail over your non-dominant hand, with the end under your ring finger.
- Wrap the yarn over your pointer and middle fingers, forming an ‘X’ on top.
- Pass the yarn under your ring finger and hold both the starting tail and working yarn with your thumb.
- Turn your hand over—you'll see a short and a long yarn strand.
- Insert the hook under the short strand and over the long strand.
- Grab the long strand with your hook, bring it under the short one, and pull up a loop.
- Release your thumb and allow the long strand to slide.
- Pinch everything below the hook and chain one to secure.
Tip: If this feels tricky, you can substitute a simple chain 3 and join with a slip stitch to form a ring. This method leaves a small hole in the center but works just as well for your first go.
Want a visual? For a clear walkthrough, try this 👇
Round 1: Making 11 Double Crochets Into the Magic Ring
Once you’ve got your ring ready, let’s build the hat’s foundation:
- Chain 1—this doesn't count as a stitch, it’s just to anchor your work.
- Double crochet (dc) 11 times into the center of the ring. Make sure to crochet over that tail so you can pull the ring tight later.
- Tip: Keep your tail accessible but not too short. You want to tighten the ring after the round, but also need enough tail to weave in securely.
If you want detailed written instructions, they’re always available at the Secret Yarnery pattern library.
Pro tip: Pause the video at any point if you want to keep your pace steady and stitches even.
Joining Round 1 and Changing Yarn Colors
When you complete the 11 double crochets, you’ll need to close the circle and prepare for the next round.
- Slip stitch into the top of the first real double crochet. Insert your hook under both loops of the “V” at the top of the stitch.
- Chain 1 to secure your yarn.
- Cut the yarn, leaving a tail long enough to weave in with a needle.
If you want to change colors (one of the joys of this project!), pull the tail through your last stitch to finish and snug it down.
Now, join your next color:
- Insert your hook into the next stitch after your join (not the join itself).
- Pull a loop of the new color through.
- Hold both short and long ends of the new color and slip stitch to anchor them.
- Drop the tail at the back and chain 2 to start the next round.
Tip: For the neatest result, always join new colors in a stitch slightly away from the previous join. This prevents gaps or bulk in your seam.
Refer to the step-by-step video if you want to see this color change in action.

Round 2: Increasing to 24 Double Crochets
This round starts to shape the crown of your crochet bucket hat and gives it a bit of volume.
- Chain 2 (counts as first double crochet).
- Work two double crochets in every stitch around (including the join area)—you should have 24 stitches when you finish.
- For the very last stitch, you'll do two double crochets before and after the join spot (the knot), ending up with 12 pairs of stitches circling your magic ring.
Work over your yarn tails as much as you can, so fewer ends are left to weave in!
Want to see how this comes together? Watch this part in the video or try another free pattern like this step-by-step bucket hat tutorial for beginners.
Securing Round 2 and Preparing for Round 3
Once you've made 24 stitches, it’s time for a new color or a new round:
- Slip stitch into the top of your starting chain to finish the round.
- Chain 1 and trim your yarn with a long tail so it can be sewn in later.
- Gently tighten your magic ring, making the middle nice and snug.
To join a new color, choose a spot away from your last join for smooth transitions. Insert your hook, pull up a loop of the next color, slip stitch both strands, and chain 2 to begin round three.
Tip: Changing colors at a different spot every round keeps your seams subtle and your bucket hat looking seamless.
Round 3: Working 3 Double Crochets Between Pairs
This round adds more width, forming the classic bucket hat shape:
- Chain 2 (counts as your first double crochet) in the gap between any pair of double crochets from the round below.
- Work 2 more double crochets in the same space (3 total in the first gap).
- Continue: Work 3 double crochets between each pair of double crochets all the way around.
- Crochet over any beginning yarn tails as you go, then gently pull those tails to sit flush.
You’ll notice the piece starts to “dish up” or cup a bit. Don’t worry—this is exactly what you want as the hat begins to take shape!
Using a stitch marker here can help mark the start of your round if you’re new to working in the round.
Check out the detailed video demonstration if you want to watch this round made in real time.

Joining Round 3 and Changing Colors
To close out round three:
- Join with a slip stitch or single crochet at the top of your starting chain, depending on which style you prefer or whether you’ll change yarns.
- If you’re staying with the same color, chain 2 for the next round. If you want another color, chain 1, cut your yarn, and bring a new color in as before.
Remember: always leave a long yarn tail—this keeps your finished hat secure and neat once your ends are woven in.
Increase Round: Shaping Your Hat and Sizing
Now, we’re going to make the hat fit any head! The increase round is where you shape the bucket hat crown and set up for sizing—whether you want a snug child’s fit or roomy adult style.
- Insert your hook into any space not just joined.
- Draw up a loop of your next color and slip stitch both strands to join. Chain 2 to start.
- In that same space, work two double crochets, chain 1, then two more double crochets—all in the same space. This forms a “shell” and builds the spots you’ll use for the next round.
- Repeat this shell in every space around the hat.
- This standard layout will fit most adults. Adjust where and how often you do the “shell” (increase) rounds to resize your hat as needed.
Tip: Use stitch markers or count stitches at the end of each round to make sure your increases are spaced evenly. This helps prevent a lopsided hat!
If you like visuals, this photo guide shows how increase shells create the signature bucket shape.
Joining Increase Round and Continuing with Double Crochets
Finish your increase round by joining with a:
- Single crochet into the top of your starting chain (not a slip stitch).
- Chain 2—this acts as your first double crochet for the new round.
From here, work three double crochets into every space—including the new chain-1 spaces from your increases. This will begin to build up the height of your bucket hat.
Count as you go and use markers if needed to avoid skipping spaces.
Eight Rounds of Three Double Crochets: Building the Hat Body
Now comes the relaxing part. Keep building your hat “down” by working eight rounds of three double crochets in every space all the way around.
- Change colors as often as you want for stripes or color block effects.
- Take breaks; there’s no rush—enjoy the flow of each round.
- Use a stitch marker to note the start of each round, especially if you get interrupted.
Counting rounds can be as easy as tracking color changes or simply making a tally after each lap. This is what will create the main body and height of your crochet bucket hat.
Tip: Check your height after a few rounds to be sure it fits your style—add or skip a round for a custom fit. For more styling ideas, see these spring crochet ideas.

Round 15: Starting the Brim with Alternating Shells
When you reach row 15, it’s time to give your bucket hat its signature brim.
- Regular shell: 3 double crochets in one space.
- Increase shell: 2 double crochets, chain 1, 2 double crochets in the next space.
Alternate between a regular shell and an increase shell all the way around the round. This pattern helps the brim flare gently, giving you that instantly recognizable bucket hat curve.
Spacing is important here. Keep your increases (shells with the extra chain and set of double crochets) evenly distributed for a smooth, comfortable brim that doesn’t pucker or twist. You can use a simple diagram—one regular shell, one increase shell, repeat—to plan your round, or just count as you go.
Pro tip: If you want more or less flare, you can adjust how frequently you do the increase shells—every other space for more flare, every third for a subtler look.
Joining Round 15 and Changing Colors
After completing round 15, you’ll either:
- Join with a slip stitch if you’re changing colors,
- Or do a single crochet join if you continue with the same yarn.
As before, chain 2 to start the next round, and make sure to leave your tails long enough to weave in later. Hide yarn tails along the back as you crochet for a cleaner finish.
Tip: The neatest color changes happen when you overlap a few stitches and keep the tails on the inside (wrong side) of your hat.
Rounds 16-17: Adding Thickness With Double Crochet Rows
These final two double crochet rounds form the thickness of your hat’s brim and give it a satisfying weight.
- Three double crochets in every space around—for two complete rows.
- Pause to switch colors for stripes, accents, or a bold contrast, if you wish.
- Keep track of the start of your round with a stitch marker.
These rounds strengthen the brim so it won’t wilt or lose shape, and they offer a great opportunity for color play. Want more hat inspiration? Check out this charming crochet ruffle hat DIY.
Finishing the Brim Edge With a Single Crochet Round
To keep the bucket hat’s brim from flipping up, finish with a round of single crochet:
- Chain 1 and turn your work so you’re working along the outer brim.
- Make one single crochet into each stitch all the way around.
- This edge helps your brim hold its shape and sit nicely, not like a floppy sun hat.
Counting stitches here ensures a balanced edge. A stitch marker pinning your starting stitch will help you spot where the round ends.
Tip: This single crochet round makes all the difference in getting a clean, wearable, bucket hat look.

Invisible Join for a Clean and Professional Edge Finish
The final touch is all about presentation. The invisible join gives your edge a smooth look without the bump of a standard slip stitch.
Here’s how:
- After your last single crochet, cut your yarn and pull the tail through the last loop.
- Thread the yarn onto a needle.
- Find the first single crochet of the round and insert your needle under both top loops of that stitch.
- Draw the yarn through, then pass the needle down through the center of the last single crochet (where the yarn just exited).
- Gently tug to shape the new stitch—don’t over-tighten or it might pucker. Adjust until the edge looks continuous.
Go back and forth under a few stitches inside the brim for a firm, flat seam—this helps avoid lumps and keeps your hard work looking professional. If you want to see an invisible join up close, visit this easy tutorial.
Sewing in Yarn Ends Neatly
Loose yarn tails can make or break the look of your hat. Finish strong by:
- Threading your yarn tail onto a needle.
- Weaving it under and through several strands of yarn on the inside of your hat.
- Going back and forth at least three times for security.
- Trim off any excess without cutting stitches.
Tip: Work your tails into areas with a lot of stitches to keep your hat soft and flexible.
Choosing Yarn Colors and Combinations
The crochet bucket hat is the perfect canvas for playing with color. I love switching shades for stripes, bold color blocks, or even a soft ombré.
- Try contrasting brights for a pop-art look.
- Use two-tone neutrals for a classic street style.
- Add in variegated yarn for a wild, hand-dyed splash.
Looking for ideas? Find inspiration in other seasonal projects like this Cozy Crochet Pumpkin Hat.
Crochet Terms and Stitches Glossary (Beginner-Friendly)
Understanding a few core crochet terms helps make any pattern easy to follow:
- Magic ring: A loop that can be pulled tight to close the center hole of your work.
- Chain (ch): The base stitch in crochet, like stringing beads together.
- Double crochet (dc): Yarn over, insert hook, yarn over and pull up a loop, yarn over and pull through two, yarn over and pull through two again.
- Slip stitch (sl st): Insert hook, yarn over, pull through both stitch and loop on the hook.
- Single crochet (sc): Insert hook, yarn over, pull up loop, yarn over and pull through both loops.
- Shell: Cluster of several double crochets (usually 3 or more) worked in the same stitch or space.
- Increase: Adding extra stitches into a space or stitch to widen your project.
For detailed video demonstrations, visit the Secret Yarnery tutorials.

Using Stitch Markers Effectively
Stitch markers make crochet in the round a breeze. They:
- Help you spot the first stitch of a round, so you don’t lose count.
- Mark increase points for even spacing.
No official stitch marker? Use a safety pin, bobby pin, or even a different color of scrap yarn!
Troubleshooting Common Crochet Bucket Hat Mistakes
Even pros hit snags sometimes! Watch for these missteps:
- Missed stitches: Periodically count each round—should match the pattern.
- Uneven tension: Practice makes perfect; work relaxed for steady stitches.
- Hat curling or cupping too much: You may need extra increases, or to add a plain round.
- Gaps at joins or color changes: Always join in a different spot and snug up first stitch.
If something looks off, it’s okay to “frog” (unravel) a round and redo it. Don’t let mistakes mess with your fun!

Customizing Hat Size for Every Head
A perfect fit is easy. You can:
- Adjust the number of increase rounds at the crown for looser or tighter fits.
- Measure the hat diameter after initial rounds—aim for about 17 cm for most adults.
- Add or subtract double crochet rounds on the body for taller or shorter hats.
Kids’ hats need fewer increases; adults may want an extra increase round at the crown. Printable guides and size charts are often included with free pattern PDFs like the one here.
Adding Decorative Borders or Edging Options
Customize your Bucket Hat with flair:
- Add a **picot # The Easiest Crochet Bucket Hat: Complete Step-by-Step Guide for Beginners
A crochet bucket hat is the kind of project that’s both practical and full of color possibilities. Whether you’re new to crochet or just want a pattern you can whip up in a weekend, this easy pattern checks all the boxes. The only stitch you’ll really need is the double crochet, and you get to play with as many colors as you like. That means every hat turns out unique, full of personality, and perfect as a gift or a treat for yourself.
All you need is some yarn, a hook, and a little time. I’ll walk you through every step—right from creating a tidy center to giving your hat a professional, store-bought finish (with tips for neat edges and sewing in yarn tails). Want a pattern in hand? Get my free printable PDF pattern here. Let’s get started.
What You’ll Need: Crochet Bucket Hat Supplies
Gather these before you begin to keep things easy and stress-free:
- Worsted weight acrylic yarn (size 4) – about 165 meters per hat (mix colors for stripes or color blocks!)
- 6mm crochet hook
- Stitch marker (optional but helpful for beginners)
- Needle for weaving in yarn tails
- Scissors for snipping ends
I keep my favorite yarns, crochet hooks, and notions in one spot on my crochet supplies Amazon Store for easy, reliable shopping.

Getting Started: Magic Ring or Chain 3 Ring
The hat begins in the center. A magic ring is tidy and leaves no hole, but a chain 3 ring works if you find the magic ring fiddly.
Magic Ring Steps:
- Lay the yarn tail over your non-dominant hand, pinched with your thumb and ring finger.
- Wrap the yarn around your top two fingers forming an X on the back of your hand.
- Turn your hand over; you’ll see a short and long strand.
- Insert your hook under the short strand, hook the long strand, and pull up a loop.
- Gently remove fingers, pinch the ring, and chain one.
If you’d like more visuals, check the start of my YouTube tutorial above or jump to a clear magic ring video guide.
Tip: Feel free to try the chain-3 ring to get going if you’re new—it’s nothing to stress over!
Round 1: Make 11 Double Crochets in the Ring
Now, let’s create the hat’s foundation.
- Chain 1 (this doesn’t count as a stitch).
- Double crochet 11 times into the center of your ring, working over your yarn tail.
- If your tail is getting short, just tug a little for more length.
Working over the tail means you can pull it tight later, making the center invisible. Take your time, pause the video, and count to make sure you hit 11 stitches. If you want an extra reference, you can always read along with the full written pattern on Secret Yarnery.
Joining Round 1 and Changing Colors
It's time to close your first round and try a color change (if the mood strikes).
- Slip stitch into the top of the first real double crochet (catching both loops of the “V” on the stitch).
- Chain 1 and cut the yarn, leaving a solid tail for sewing in later.
- Pull your hook and the yarn tail through the last stitch, then tighten.
- For the next color, put your hook into the stitch after the join, draw up a loop of the new color, slip stitch with both strands, drop the tail, and chain 2 to begin the next round.
Always leave a long enough tail to sew in—tidy ends mean a hat that looks and feels great!

Round 2: Increase to 24 Double Crochets
Now we build size and structure:
- Chain 2 (counts as your first double crochet).
- Work two double crochets in every stitch all around. You’ll end up with 24 stitches.
- At the end, place two double crochets before and after the join to keep your circle continuous.
Crocheting over the new tails as you change color helps keep the inside neat and saves time later.
If you want another demonstration, look for the timestamp in the video for this specific round or peek at this quick bucket hat tutorial for beginners.
Securing & Starting Round 3
Once round 2 is done:
- Slip stitch join into the top of your starting chain.
- Chain 1, cut your yarn, and finish off as before.
- Tighten the center tail gently for a neat look.
- Join your next color in between any pair of double crochets (not the join area), slip stitch with both strands, and chain 2.
Vary where you change color for an even, almost invisible seam all the way up.

Round 3: Three Double Crochets Between Pairs
Let’s start to see the bucket shape emerge.
- Chain 2, then make two more double crochets into the same space (so, 3 in total per gap).
- In each gap between pairs of double crochets from below, work three double crochets.
- Continue around, still crocheting over any tails.
- The “dishing up” or slight cupping is normal—it’s building the curve you want in a bucket hat.
New at marking rounds? Pop in a stitch marker after your first group of three to keep track.
Check out the associated spot in the video for more visual guidance.
Finishing Round 3 and Color Change
- Join with a single crochet (if not changing color) or a slip stitch (if switching).
- Chain 2 to start the next round, or chain 1, cut your yarn if you’re switching colors.
Consistent color changes and tail length are key for a smooth finish. If you need more help with color changes, let the video show you the technique up close.
Hat Sizing: Increase Round & Adjusting Fit
Here comes the fun part—the increase round that lets you size your hat for comfort or style:
- In any open space, join your new color, then chain 2.
- In that same space, 2 double crochets, chain 1, 2 double crochets (this is your “shell” increase).
- Repeat this shell in every open space around the circle.
This number of increases works for most adults. If you want a child-size fit, add increases less frequently. Mark the start of your increase section with a stitch marker if you’re worried about losing place.
Feeling creative? For even more adjustments, try spacing these increase shells further apart or making the cluster bigger for a bolder brim!

Building Height: Even Rounds Down the Body
Once you finish the increase round, you’ll:
- Single crochet join in the top of the previous starting chain.
- Chain 2 and work three double crochets in every space all the way around—including new “chain-1” gaps from the increases.
Continue this for eight rounds. These rounds establish the height of your hat and give you room to change colors or create dramatic striping. Keep a tally, a row counter, or use color changes as a visual marker.
Working in even rounds is a good chance to settle into a rhythm and enjoy the process. Take a breather and check the fit after a few rounds.
Want more hat project ideas? Explore other Spring Crochet Patterns for inspiration.
Shaping the Brim: Increase and Shell Rounds
Time for the brim! Here’s how:
- Regular shell: Three double crochets in one space.
- Increase shell: Two double crochets, chain 1, two double crochets in next space.
Alternate shells all around the brim for a gentle, classic bucket flare. Spacing is everything—keep regularity in your increases to maintain that signature curve. If you prefer diagrams or visual cues, you can quickly sketch a repeat of “regular shell, increase shell” to keep yourself on track.
If you’re using new colors for the brim, join yarns at the edge of an increase shell for smooth, seamless stripes.
Brim Finishing and Color Join
When finishing your brim rounds:
- Join with a slip stitch (for color changes) or a single crochet (if continuing).
- Secure the tail, add new yarn as above, and keep tails tidy by holding them along the inside edge as you crochet.
It’s the details on these rounds that can take your hat from good to great—smooth joins and even shells keep things professional.

Adding Brim Thickness: Final Double Crochet Rounds
For a sturdier, thicker brim:
- Work two more rounds of three double crochets in each space (no increases).
- This is your spot to go wild with color combos or keep it subtle with a single shade.
- Use a stitch marker to keep your place as the brim widens.
These final double crochet rounds are what gives the brim that iconic, just-stiff-enough bucket hat feel.
Need a little more brim inspiration? Try a ruffled variation with this Crochet Ruffle Hat DIY tutorial.
The Brim Edge: Finishing with Single Crochet
To give the brim a structured edge while keeping it flexible:
- Chain 1, turn your work.
- Single crochet in every stitch all the way around the brim.
- This closes off the row, flattens the brim ever so slightly, and keeps it from curling.
Mark your starting stitch for accuracy and double-check your stitch count if you’re unsure.
The Invisible Join: A Clean, Seamless Edge
For a finishing touch that looks as clean as a store-bought hat:
- After your last stitch, cut yarn and pull the tail through the last single crochet.
- Thread the end onto a yarn needle.
- Insert the needle under both loops of the first single crochet of the round.
- Pull it through, then feed the needle down into the center of the last single crochet, mimicking the look of a real stitch.
- Gently pull to adjust, matching the surrounding stitches.
- Weave in remaining ends securely along the inside “fat” parts of your brim.
You can see another version of an invisible join on a quick bucket hat tutorial here.
Final Details: Sewing in Yarn Tails
Don’t let loose tails drag down your hard work. Here’s how to tidy up:
- Thread your needle and weave the tail in and out of several stitches inside the hat, changing direction a few times.
- Trim off any excess.
- Smooth your hat and enjoy the finished look!
Patience pays off—a neat inside means no itchy bits and years of wear.

Choosing Yarn Colors: Tips for Standout Hats
A crochet bucket hat is as bold or subtle as you want. Mix pastels for spring, neons for festival vibes, or add neutral trims for a classic look. Variegated yarns add pattern without the hassle of changing yarn constantly. Use up leftover skeins for stripes, or plan a palette for a more sophisticated design—there’s no wrong way.
For more seasonal color ideas, take a peek at the Cozy Crochet Pumpkin Hat for fall inspiration.
Essential Crochet Terms & Abbreviations
Here are the basic terms used in this pattern (in plain English):
- Magic ring: Adjustable loop to start crocheting in the round, closes tightly.
- Chain (ch): A simple linked stitch, foundation for other stitches.
- Double crochet (dc): Yarn over, insert into stitch, pull up loop, yarn over, pull through two loops, yarn over, pull through two.
- Slip stitch (sl st): Insert hook, yarn over, pull through stitch and loop on hook—used for joining rounds.
- Single crochet (sc): Insert hook, yarn over, pull up loop, yarn over, pull through both loops.
- Shell: A group of stitches in the same space, like 3 or 5 double crochets.
- Increase: Placing extra stitches in a space to make the piece wider.
Find easy-to-follow video demos on my Secret Yarnery YouTube channel.

Stitch Markers: When and How to Use
Stitch markers are your secret weapon to stress-free in-the-round crochet. Place one at the start of your round (just after your first stitch). Move it up every round. If you’re short on notions, a bobby pin or scrap of contrasting yarn does the trick.
Fixing Common Mistakes
- Missed a stitch? Back up a few stitches and redo.
- Brim flips up? The single crochet edge or an extra increase round helps.
- Loose or uneven tension? Adjust grip or try a smaller hook.
- Gaps at joins? Always tighten chains and try joining at a different stitch with each color change.
Mistakes happen—just repeat any tricky part or check the video to troubleshoot.
Customizing Hat Size
Fitting a child? Do fewer increase rounds. For a looser adult fit, add an extra round with more shell increases after round three. Measure hat diameter across the top; for adults you want roughly 17cm (6⅔ inches). Try it on as you go—crochet is forgiving!
Adding Decorative Edges or Finishing Touches
Personalize your bucket hat even more:
- Picot edge: (chain 3, slip stitch to base, skip stitch) for a slightly frilly finish.
- Crab stitch: Single crochet in reverse (for a thick, ropey finish).
- Simple slip stitch: For a minimalist border.
Find more finishing ideas in my library of spring crochet inspiration.
Left Handed?
In Closing
There’s nothing like wearing a handmade crochet bucket hat that you stitched together, picked the colors for, and made fit exactly right. With just a bit of yarn, a hook, and some time, you’ll have a new favorite accessory that’s cute, comfy, and uniquely you.
If you enjoyed this project, explore more of my step-by-step tutorials and patterns at Secret Yarnery or try other free bucket hat patterns like this quick and easy version.
Ready to show off your bucket hat or ask questions? Join me and a thriving crochet community on the Secret Yarnery YouTube channel for more projects, tips, and inspiration.
Happy crocheting—and don’t forget to share your finished hats
FAQs
How long does it take to complete a crochet bucket hat for beginners?
Most beginners can finish a bucket hat in 2 to 4 hours. Taking breaks and working at a comfortable pace is fine—enjoy the process!
What type of yarn works best for crochet bucket hats?
Worsted weight acrylic yarn (size 4) is ideal. It holds its shape well, is affordable, and easy to care for. Cotton yarn also works for summer hats or a lighter, breathable style.
Can I make the hat larger or smaller for different head sizes?
Yes! Add or subtract “increase” rounds at the crown to adjust width. To adjust height, add or skip even double crochet rounds before starting the brim. Measure as you go for a perfect fit.
Do I have to use a magic ring to start?
No—the magic ring creates a seamless, hole-free center, but you can start with a chain-3 ring and join into a loop if it’s easier for you.
How can I prevent my hat brim from curling up?
Finish the brim with a single crochet round for extra structure. If it still curls, block the hat gently with steam or adjust by adding an increase round.
What’s the best way to change yarn colors without a messy seam?
Always change colors at a stitch away from your last join, and crochet over yarn tails as you work. This hides joins and keeps the seam nearly invisible.
Can I use leftover yarn scraps for this project?
Yes! Bucket hats are perfect for using up scrap yarn. Combine colors for stripes, blocks, or random fun patterns—each hat becomes truly unique.
![]()
Christa Patel is the creative mind behind Secret Yarnery and a passionate crochet designer with over a decade of hands-on experience. Based in Nairobi, Kenya, Christa brings color, fun, and simple techniques to crafters all over the world through her clear tutorials, free patterns, and encouraging approach.
She specializes in making crochet feel easy and joyful—no matter your skill level. Christa’s step-by-step YouTube videos and printable patterns have helped thousands of beginners learn to crochet hats, blankets, shawls, and more. With a love for bold yarn choices and smart, beginner-friendly tips, she believes every maker deserves confidence and success in their crafting.
When she’s not filming new tutorials, Christa is busy experimenting with new yarns, connecting with the global crochet community, and sharing behind-the-scenes stories from her life and home studio. Connect with Christa at SecretYarnery.com, join her YouTube crochet family, or find her inspiring ideas on Instagram and the Secret Yarnery blog.
Christa’s mission: Crochet should always be fun, relaxing, and something you’re excited to share with others.
About the Author
With a passion for crafting easy, beginner-friendly tutorials and patterns, Christa inspires crafters of all skill levels to unleash their creativity worldwide. She encourages yarn lovers to connect, create, and crochet a world filled with beautiful handmade treasures!
Crochet Bucket Hat Pattern for Beginners: Step-by-Step Guide